Android Bitmap理解
Bitmap介绍
Bitmap是Android系统中的图像处理中最重要类之一。Bitmap可以获取图像文件信息,对图像进行剪切、旋转、缩放,压缩等操作,并可以以指定格式保存图像文件。
创建Bitmap
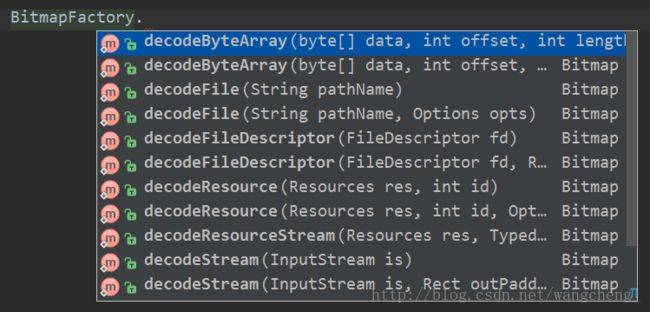
有两种方法可以创建Bitmap对象,分别是通过Bitmap.createBitmap()和BitmapFactory的decode系列静态方法创建Bitmap对象。
总的来说分为四类
1,decodeFile 从文件系统加载
a,通过Intent打开本地图片或照片
b,根据uri获取图片的路径
c,根据路径解析bitmap:Bitmap bm = BitmapFactory.decodeFile(sd_path)
2,decodeResource 以R.drawable.xxx的形式从本地资源中加载
Bitmap bm = BitmapFactory.decodeResource(getResources(),R.drawable.aaa);3, decodeStream 从输入流加载
Bitmap bm = BitmapFactory.decodeStream(stream)这是一个耗时操作,要在子线程中执行
4,decodeByteArray 从字节数组中加载
Bitmap bm = BitmapFactory.decodeByteArray(myByte,0,myByte.length);
Bitmap的颜色配置信息
在Bitmap的源码中有一个内部枚举类Config:
    public static enum Config {
        ALPHA_8,
        ARGB_4444,
        ARGB_8888,
        RGB_565;

        private Config() {
        }
    }
ALPHA_8
颜色信息只由透明度组成,占8位。ARGB_4444
颜色信息由透明度与R(Red),G(Green),B(Blue)四部分组成,每个部分都占4位,总共占16位。ARGB_8888
颜色信息由透明度与R(Red),G(Green),B(Blue)四部分组成,每个部分都占8位,总共占32位。
是Bitmap默认的颜色配置信息,也是最占空间的一种配置。
RGB_565
颜色信息由R(Red),G(Green),B(Blue)三部分组成,R占5位,G占6位,B占5位,总共占16位。
Android默认的色彩模式为ARGB_8888,这个色彩模式色彩最细腻,显示质量最高。但同样的,占用的内存也最大。
BitmapFactory.Options的inPreferredConfig参数可以 指定decode到内存中,手机中所采用的编码,可选值定义在Bitmap.Config中。缺省值是ARGB_8888。
假设一张1024*1024,模式为ARGB_8888的图片,那么它占有的内存就是:1024*1024*4 = 4MB
模式为RGB_565为图片占用的内存就是:1024*1024*2 = 2MB
在做Bitmap的优化的时候,这里有一个非常重要的设置,我们通常会使用Bitmap.Config.RGB_565这个配置,因为Bitmap.Config.ALPHA_8只有透明度,显示一般图片没有意义,Bitmap.Config.ARGB_4444显示图片不清楚,Bitmap.Config.ARGB_8888占用内存最多。
需要了解的一点是,在大的图片框架中Glide默认的Bitmap格式是RGB_565,Picasso默认的是ARGB_8888格式。
所以Glide在处理同张图片占用内存只有Picasso的一半
Bitmap的常用操作
1.Bitmap裁剪图像
Bitmap裁剪图像有两种方式:
Bitmap.createBitmap(Bitmap source, int x, int y, int width, int height)
根据源Bitmap对象source,创建出source对象裁剪后的图像的Bitmap。x,y分别代表裁剪时,x轴和y轴的第一个像素,width,height分别表示裁剪后的图像的宽度和高度。
注意:x+width要小于等于source的宽度,y+height要小于等于source的高度。
Bitmap.createBitmap(Bitmap source, int x, int y, int width, int height,Matrix m, boolean filter)
这个方法只比上面的方法多了m和filter这两个参数,m是一个Matrix(矩阵)对象,可以进行缩放,旋转,移动等动作,filter为true时表示source会被过滤,仅仅当m操作不仅包含移动操作,还包含别的操作时才适用。
2.Bitmap缩放,旋转,移动
Bitmap缩放,旋转,移动,倾斜图像其实就是通过
Bitmap.createBitmap(Bitmap source, int x, int y, int width, int height,Matrix m, boolean filter)
方法实现的,只是在实现这些功能的同时还可以实现图像的裁剪。
      // 定义矩阵对象
   Matrix matrix = new Matrix();
      // 缩放图像
   matrix.postScale(0.8f, 0.9f);
      // 向左旋转(逆时针旋转)45度,参数为正则向右旋转(顺时针旋转)
   matrix.postRotate(-45);
      //移动图像
      //matrix.postTranslate(100,80);
   Bitmap bitmap = Bitmap.createBitmap(source, 0, 0, source.getWidth(), source.getHeight(),
                matrix, true);
Matrix的postScale和postRotate方法还有多带两个参数的重载方法postScale(float sx, float sy, float px, float py)和postRotate(float degrees, float px, float py),后两个参数px和py都表示以该点为中心进行操作。
注意:虽然Matrix还可以调用postSkew方法进行倾斜操作,但是却不可以在此时创建Bitmap时使用。
3.Bitmap保存图像
Bitmap bitmap = null;
bitmap=BitmapFactory.decodeResource(getResources(),R.drawable.test);
        File file=new File(getFilesDir(),"test.jpg");
        if(file.exists()){
            file.delete();
        }
        try {
            FileOutputStream outputStream=new FileOutputStream(file);
            bitmap.compress(Bitmap.CompressFormat.JPEG,90,outputStream);
            outputStream.flush();
            outputStream.close();
        } catch (FileNotFoundException e) {
            e.printStackTrace();
        } catch (IOException e) {
            e.printStackTrace();
        }

    if (!bitmap.isRecycle()) {
        bitmap.recycle();   //回收图片所占的内存
        bitmap = null;
        system.gc();  //提醒系统及时回收
        }//释放bitmap的资源,这是一个不可逆转的操作
4.BitmapFactory通过BitmapFactory.Options对图像进行操作
BitmapFactory.Options中有很多非常有用的属性,理解的好的话可以大大的降低在使用Bitmap的时候出现OOM。BitmapFactory.Options的基本使用:
// 第一次加载时 将inJustDecodeBounds设置为true 表示不真正加载图片到内存
BitmapFactory.Options options = new BitmapFactory.Options();
        options.inJustDecodeBounds = true;
        options.inSampleSize = calculateInSampleSize(options, reqWidth, reqHeight);
        options.inPreferredConfig  = Bitmap.Config.RGB_565;
return BitmapFactory.decodeResource(res, resId, options);
inJustDecodeBounds:
这是一个Boolean类型的参数,如果将这个值置为true,那么在解码的时候将不会返回bitmap,只会返回这个bitmap的尺寸。这里可以获取到Bitmap的Width和Height,但又不把它读取到内存中。
inSampleSize:
这个值是一个int,当它小于1的时候,将会被当做1处理,如果大于1,那么就会按照比例(1 / inSampleSize)缩小bitmap的宽和高、降低分辨率,大于1时这个值将会被处置为2的倍数。例如,width=100,height=100,inSampleSize=2,那么就会将bitmap处理为,width=50,height=50,宽高降为1 / 2,像素数降为1 / 4,响应的内存占用也会只有1/4。
当然这个值也不是随便指定的,Android官方有一个计算方式来获取这个值:
public int calculateInSampleSize(BitmapFactory.Options op, int reqWidth,
            int reqheight) {
        int originalWidth = op.outWidth;
        int originalHeight = op.outHeight;
        int inSampleSize = 1;
        if (originalWidth > reqWidth || originalHeight > reqheight) {
            int halfWidth = originalWidth / 2;
            int halfHeight = originalHeight / 2;
            while ((halfWidth / inSampleSize > reqWidth)
                    &&(halfHeight / inSampleSize > reqheight)) {
                inSampleSize *= 2;

            }
        }
        return inSampleSize;
    }
inPreferredConfig:
用来设置上面提到的色彩模式,默认值是ARGB_8888,一般采用RGB_565模式。
inScaled:
设置这个Bitmap是否可以被缩放,默认值是true,表示可以被缩放。
inPurgeable和inInputShareable:
这两个在5.0已经被弃用。
outWidth和outHeight:
表示这个Bitmap的宽和高,一般和inJustDecodeBounds一起使用来获得Bitmap的宽高,但是不加载到内存。
使用Bitmap的注意事项
这些注意事项主要是为了避免在使用Bitmap的时候出现OutOfMemory,然后APP Crash掉。
1.Bitmap及时释放
if(bitmap != null && !bitmap.isRecycled()){
    bitmap.recycle();
    bitmap = null;
}
System.gc();

