FFmpeg开发笔记(四):ffmpeg解码的基本流程详解
若该文为原创文章,未经允许不得转载
原博主博客地址:https://blog.csdn.net/qq21497936
原博主博客导航:https://blog.csdn.net/qq21497936/article/details/102478062
本文章博客地址:https://blog.csdn.net/qq21497936/article/details/108573195
各位读者,知识无穷而人力有穷,要么改需求,要么找专业人士,要么自己研究
红胖子(红模仿)的博文大全:开发技术集合(包含Qt实用技术、树莓派、三维、OpenCV、OpenGL、ffmpeg、OSG、单片机、软硬结合等等)持续更新中…(点击传送门)
FFmpeg开发专栏(点击传送门)
上一篇:《FFmpeg开发笔记(三):ffmpeg介绍、windows编译以及开发环境搭建》
下一篇:敬请期待
前言
ffmpeg涉及了很多,循序渐进,本篇描述基本的解码流程。
Demo
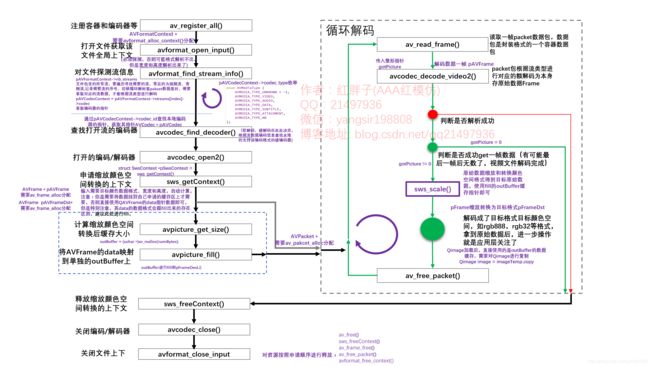
ffmpeg解码流程
ffmpeg的解码和编码都遵循其基本的执行流程。
基本流程如下:

步骤一:注册:
使用ffmpeg对应的库,都需要进行注册,可以注册子项也可以注册全部。
步骤二:打开文件:
打开文件,根据文件名信息获取对应的ffmpeg全局上下文。
步骤三:探测流信息:
一定要探测流信息,拿到流编码的编码格式,不探测流信息则其流编码器拿到的编码类型可能为空,后续进行数据转换的时候就无法知晓原始格式,导致错误。
步骤四:查找对应的解码器
依据流的格式查找解码器,软解码还是硬解码是在此处决定的,但是特别注意是否支持硬件,需要自己查找本地的硬件解码器对应的标识,并查询其是否支持。普遍操作是,枚举支持文件后缀解码的所有解码器进行查找,查找到了就是可以硬解了(此处,不做过多的讨论,对应硬解码后续会有文章进行进一步研究)。
(注意:解码时查找解码器,编码时查找编码器,两者函数不同,不要弄错了,否则后续能打开但是数据是错的)
步骤五:打开解码器
打开获取到的解码器。
步骤六:申请缩放数据格式转换结构体
此处特别注意,基本上解码的数据都是yuv系列格式,但是我们显示的数据是rgb等相关颜色空间的数据,所以此处转换结构体就是进行转换前到转换后的描述,给后续转换函数提供转码依据,是很关键并且非常常用的结构体。
步骤七:申请缓存区
申请一个缓存区outBuffer,fill到我们目标帧数据的data上,比如rgb数据,QAVFrame的data上存是有指定格式的数据,且存储有规则,而fill到outBuffer(自己申请的目标格式一帧缓存区),则是我们需要的数据格式存储顺序。
举个例子,解码转换后的数据为rgb888,实际直接用data数据是错误的,但是用outBuffer就是对的,所以此处应该是ffmpeg的fill函数做了一些转换。
进入循环解码:
步骤八:获取一帧packet
拿取封装的一个packet,判断packet数据的类型进行解码拿到存储的编码数据
步骤九:数据转换
使用转换函数结合转换结构体对编码的数据进行转换,那拿到需要的目标宽度、高度和指定存储格式的原始数据。
步骤十:自行处理
拿到了原始数据自行处理。
不断循环,直到拿取pakcet函数成功,但是无法got一帧数据,则代表文件解码已经完成。
帧率需要自己控制循环,此处只是循环拿取,可加延迟等。
步骤十一:释放QAVPacket
此处要单独列出是因为,其实很多网上和开发者的代码:
在进入循环解码前进行了av_new_packet,循环中未av_free_packet,造成内存溢出;
在进入循环解码前进行了av_new_packet,循环中进行av_free_pakcet,那么一次new对应无数次free,在编码器上是不符合前后一一对应规范的。
查看源代码,其实可以发现av_read_frame时,自动进行了av_new_packet(),那么其实对于packet,只需要进行一次av_packet_alloc()即可,解码完后av_free_packet。
执行完后,返回执行“步骤八:获取一帧packet”,一次循环结束。
步骤十二:释放转换结构体
全部解码完成后,安装申请顺序,进行对应资源的释放。
步骤十三:关闭解码/编码器
关闭之前打开的解码/编码器。
步骤十四:关闭上下文
关闭文件上下文后,要对之前申请的变量按照申请的顺序,依次释放。
另附上完成的详细解码流程图:

本文章博客地址:https://blog.csdn.net/qq21497936/article/details/108573195
ffmpeg解码相关变量
AVFormatContext
AVFormatContext描述了一个媒体文件或媒体流的构成和基本信息,位于avformat.h文件中。
AVInputFormat
AVInputFormat 是类似COM 接口的数据结构,表示输入文件容器格式,着重于功能函数,一种文件容器格式对应一个AVInputFormat 结构,在程序运行时有多个实例,位于avoformat.h文件中。
AVDictionary
AVDictionary 是一个字典集合,键值对,用于配置相关信息。
AVCodecContext
AVCodecContext是一个描述编解码器上下文的数据结构,包含了众多编解码器需要的参数信息,位于avcodec.h文件中。
AVPacket
AVPacket是FFmpeg中很重要的一个数据结构,它保存了解复用(demuxer)之后,解码(decode)之前的数据(仍然是压缩后的数据)和关于这些数据的一些附加的信息,如显示时间戳(pts),解码时间戳(dts),数据时长(duration),所在流媒体的索引(stream_index)等等。
使用前,使用av_packet_alloc()分配,
AVCodec
AVCodec是存储编解码器信息的结构体,位于avcodec.h文件中。
AVFrame
AVFrame中存储的是经过解码后的原始数据。在解码中,AVFrame是解码器的输出;在编码中,AVFrame是编码器的输入。
使用前,使用av_frame_alloc()进行分配。
struct SwsContext
使用前,使用sws_getContext()进行获取,主要用于视频图像的转换。
ffmpeg解码流程相关函数原型
av_register_all
void av_register_all(void);
初始化libavformat并注册所有muxer、demuxer和协议。如果不调用此函数,则可以选择想要指定注册支持的哪种格式,通过av_register_input_format()、av_register_output_format()。
avformat_open_input
int avformat_open_input(AVFormatContext **ps,
                        const char *url,
                        AVInputFormat *fmt,
                        AVDictionary **options);
打开输入流并读取标头。编解码器未打开。流必须使用avformat_close_input()关闭,返回0-成功,<0-失败错误码。
- 参数一:指向用户提供的AVFormatContext(由avformat_alloc_context分配)的指针。
- 参数二:要打开的流的url
- 参数三:fmt如果非空,则此参数强制使用特定的输入格式。否则将自动检测格式。
- 参数四:包含AVFormatContext和demuxer私有选项的字典。返回时,此参数将被销毁并替换为包含找不到的选项。都有效则返回为空。
avformat_find_stream_info
int avformat_find_stream_info(AVFormatContext *ic, AVDictionary **options);
读取检查媒体文件的数据包以获取具体的流信息,如媒体存入的编码格式。
- 参数一:媒体文件上下文。
- 参数二:字典,一些配置选项。
avcodec_find_decoder
AVCodec *avcodec_find_decoder(enum AVCodecID id);
查找具有匹配编解码器ID的已注册解码器,解码时,已经获取到了,注册的解码器可以通过枚举查看,枚举太多,略。
avcodec_open2
int avcodec_open2(AVCodecContext *avctx,
                  const AVCodec *codec,
                  AVDictionary **options);
初始化AVCodeContext以使用给定的AVCodec。
sws_getContext
struct SwsContext *sws_getContext(int srcW,
                                  int srcH,
                                  enum AVPixelFormat srcFormat,
                                  int dstW,
                                  int dstH,
                                  enum AVPixelFormat dstFormat,
                                  int flags, SwsFilter *srcFilter,
                                  SwsFilter *dstFilter,
                                  const double *param);
分配并返回一个SwsContext。需要它来执行sws_scale()进行缩放/转换操作。
avpicture_get_size
int avpicture_get_size(enum AVPixelFormat pix_fmt, int width, int height);
返回存储具有给定参数的图像的缓存区域大小。
- 参数一:图像的像素格式
- 参数二:图像的像素宽度
- 参数三:图像的像素高度
avpicture_fill
int avpicture_fill(AVPicture *picture,
              const uint8_t *ptr,
              enum AVPixelFormat pix_fmt,
              int width,
              int height);
根据指定的图像、提供的数组设置数据指针和线条大小参数。
- 参数一:输入AVFrame指针,强制转换为AVPciture即可。
- 参数二:映射到的缓存区,开发者自己申请的存放图像数据的缓存区。
- 参数三:图像数据的编码格式。
- 参数四:图像像素宽度。
- 参数五:图像像素高度。
av_read_frame
int av_read_frame(AVFormatContext *s, AVPacket *pkt);
返回流的下一帧。此函数返回存储在文件中的内容,不对有效的帧进行验证。获取存储在文件中的帧中,并为每个调用返回一个。不会的省略有效帧之间的无效数据,以便给解码器最大可用于解码的信息。
返回0是成功,小于0则是错误,大于0则是文件末尾,所以大于等于0是返回成功。
avcodec_decode_video2
int avcodec_decode_video2(AVCodecContext *avctx,
                          AVFrame *picture,
                          int *got_picture_ptr,
                          const AVPacket *avpkt);
将大小为avpkt->size from avpkt->data的视频帧解码为图片。一些解码器可以支持单个avpkg包中的多个帧,解码器将只解码第一帧。出错时返回负值,否则返回字节数,如果没有帧可以解压缩,则为0。
- 参数一:编解码器上下文。
- 参数二:将解码视频帧存储在AVFrame中。
- 参数三:输入缓冲区的AVPacket。
- 参数四:如果没有帧可以解压,那么得到的图片是0,否则,它是非零的。
sws_scale
int sws_scale(struct SwsContext *c,
              const uint8_t *const srcSlice[],
              const int srcStride[],
              int srcSliceY,
              int srcSliceH,
              uint8_t *const dst[],
              const int dstStride[]);
在srcSlice中缩放图像切片并将结果缩放在dst中切片图像。切片是连续的序列图像中的行。
- 参数一:以前用创建的缩放上下文*sws_getContext()。
- 参数二:包含指向源片段,就是AVFrame的data。
- 参数三:包含每个平面的跨步的数组,其实就是AVFrame的linesize。
- 参数四:切片在源图像中的位置,从开始计数0对应切片第一行的图像,所以直接填0即可。
- 参数五:源切片的像素高度。
- 参数六:目标数据地址映像,是目标AVFrame的data。
- 参数七:目标每个平面的跨步的数组,就是linesize。
av_free_packet
void av_free_packet(AVPacket *pkt);
释放一个包。
avcodec_close
int avcodec_close(AVCodecContext *avctx);
关闭给定的avcodeContext并释放与之关联的所有数据(但不是AVCodecContext本身)。
avformat_close_input
void avformat_close_input(AVFormatContext **s);
关闭打开的输入AVFormatContext。释放它和它的所有内容并将*s设置为空。
Demo源码
void FFmpegManager::testDecode()
{
//    QString fileName = "test/1.avi";
    QString fileName = "test/1.mp4";

    // ffmpeg相关变量预先定义与分配
    AVFormatContext *pAVFormatContext = 0;          // ffmpeg的全局上下文,所有ffmpeg操作都需要
    AVInputFormat *pAVInputFormat = 0;              // ffmpeg的输入格式结构体
    AVDictionary *pAVDictionary = 0;                // ffmpeg的字典option,各种参数给格式编解码配置参数的
    AVCodecContext *pAVCodecContext = 0;            // ffmpeg编码上下文
    AVCodec *pAVCodec = 0;                          // ffmpeg编码器
    AVPacket *pAVPacket = 0;                        // ffmpag单帧数据包
    AVFrame *pAVFrame = 0;                          // ffmpeg单帧缓存
    AVFrame *pAVFrameRGB32 = 0;                     // ffmpeg单帧缓存转换颜色空间后的缓存
    struct SwsContext *pSwsContext = 0;             // ffmpag编码数据格式转换

    int ret = 0;                                    // 函数执行结果
    int videoIndex = -1;                            // 音频流所在的序号
    int gotPicture = 0;                             // 解码时数据是否解码成功
    int numBytes = 0;                               // 解码后的数据长度
    uchar *outBuffer = 0;                           // 解码后的数据存放缓存区

    pAVFormatContext = avformat_alloc_context();     // 分配
    pAVPacket = av_packet_alloc();                  // 分配
    pAVFrame = av_frame_alloc();                   // 分配
    pAVFrameRGB32 = av_frame_alloc();             // 分配
    if(!pAVFormatContext || !pAVPacket || !pAVFrame || !pAVFrameRGB32)
    {
        LOG << "Failed to alloc";
        goto END;
    }
    // 步骤一:注册所有容器和编解码器(也可以只注册一类,如注册容器、注册编码器等)
    av_register_all();

    // 步骤二:打开文件(ffmpeg成功则返回0)
    LOG << "文件:" << fileName << ",是否存在:" << QFile::exists(fileName);
    ret = avformat_open_input(&pAVFormatContext, fileName.toUtf8().data(), pAVInputFormat, 0);
    if(ret)
    {
        LOG << "Failed";
        goto END;
    }

    // 步骤三:探测流媒体信息
    // Assertion desc failed at libswscale/swscale_internal.h:668
    // 入坑:因为pix_fmt为空,需要对编码器上下文进一步探测
    ret = avformat_find_stream_info(pAVFormatContext, 0);
    if(ret < 0)
    {
        LOG << "Failed to avformat_find_stream_info(pAVCodecContext, 0)";
        goto END;
    }
    // 打印文件信息
    LOG << "视频文件包含流信息的数量:" << pAVFormatContext->nb_streams;
    // 在Qt中av_dump_format不会进行命令行输出
//    av_dump_format(pAVFormatContext, 1, fileName.toUtf8().data(), 0);

    // 步骤三:提取流信息,提取视频信息
    for(int index = 0; index < pAVFormatContext->nb_streams; index++)
    {
        pAVCodecContext = pAVFormatContext->streams[index]->codec;
        switch (pAVCodecContext->codec_type)
        {
        case AVMEDIA_TYPE_UNKNOWN:
            LOG << "流序号:" << index << "类型为:" << "AVMEDIA_TYPE_UNKNOWN";
            break;
        case AVMEDIA_TYPE_VIDEO:
            LOG << "流序号:" << index << "类型为:" << "AVMEDIA_TYPE_VIDEO";
            videoIndex = index;
            LOG;
            break;
        case AVMEDIA_TYPE_AUDIO:
            LOG << "流序号:" << index << "类型为:" << "AVMEDIA_TYPE_AUDIO";
            break;
        case AVMEDIA_TYPE_DATA:
            LOG << "流序号:" << index << "类型为:" << "AVMEDIA_TYPE_DATA";
            break;
        case AVMEDIA_TYPE_SUBTITLE:
            LOG << "流序号:" << index << "类型为:" << "AVMEDIA_TYPE_SUBTITLE";
            break;
        case AVMEDIA_TYPE_ATTACHMENT:
            LOG << "流序号:" << index << "类型为:" << "AVMEDIA_TYPE_ATTACHMENT";
            break;
        case AVMEDIA_TYPE_NB:
            LOG << "流序号:" << index << "类型为:" << "AVMEDIA_TYPE_NB";
            break;
        default:
            break;
        }
        // 已经找打视频品流
        if(videoIndex != -1)
        {
            break;
        }
    }
    if(videoIndex == -1 || !pAVCodecContext)
    {
        LOG << "Failed to find video stream";
        goto END;
    }
    // 步骤四:对找到的视频流寻解码器
    pAVCodec = avcodec_find_decoder(pAVCodecContext->codec_id);
    if(!pAVCodec)
    {
        LOG << "Fialed to avcodec_find_decoder(pAVCodecContext->codec_id):"
            << pAVCodecContext->codec_id;
        goto END;
    }

    // 步骤五:打开解码器
    ret = avcodec_open2(pAVCodecContext, pAVCodec, NULL);
    if(ret)
    {
        LOG << "Failed to avcodec_open2(pAVCodecContext, pAVCodec, pAVDictionary)";
        goto END;
    }
    LOG << pAVCodecContext->width << "x" << pAVCodecContext->height;
    // 步骤六:对拿到的原始数据格式进行缩放转换为指定的格式高宽大小
    // Assertion desc failed at libswscale/swscale_internal.h:668
    // 入坑:因为pix_fmt为空,需要对编码器上下文进一步探测
    pSwsContext = sws_getContext(pAVCodecContext->width,
                                 pAVCodecContext->height,
                                 pAVCodecContext->pix_fmt,
                                 pAVCodecContext->width,
                                 pAVCodecContext->height,
                                 AV_PIX_FMT_RGBA,
                                 SWS_FAST_BILINEAR,
                                 0,
                                 0,
                                 0);
    numBytes = avpicture_get_size(AV_PIX_FMT_RGBA,
                                  pAVCodecContext->width,
                                  pAVCodecContext->height);
    outBuffer = (uchar *)av_malloc(numBytes);
    // pAVFrame32的data指针指向了outBuffer
    avpicture_fill((AVPicture *)pAVFrameRGB32,
                   outBuffer,
                   AV_PIX_FMT_RGBA,
                   pAVCodecContext->width,
                   pAVCodecContext->height);
    // 此处无需分配
    // av_read_frame时他会分配,av_new_packet多此一举,正好解释了一次new和多次free的问题
//    av_new_packet(pAVPacket, pAVCodecContext->width * pAVCodecContext->height);
    // 步骤七:读取一帧数据的数据包
    while(av_read_frame(pAVFormatContext, pAVPacket) >= 0)
    {
        if(pAVPacket->stream_index == videoIndex)
        {
            // 步骤八:对读取的数据包进行解码
            ret = avcodec_decode_video2(pAVCodecContext, pAVFrame, &gotPicture, pAVPacket);
            if(ret < 0)
            {
                LOG << "Failed to avcodec_decode_video2(pAVFormatContext, pAVFrame, &gotPicture, pAVPacket)";
                break;
            }
            // 等于0代表拿到了解码的帧数据
            if(!gotPicture)
            {
                LOG << "no data";
                break;
            }else{
                sws_scale(pSwsContext,
                          (const uint8_t * const *)pAVFrame->data,
                          pAVFrame->linesize,
                          0,
                          pAVCodecContext->height,
                          pAVFrameRGB32->data,
                          pAVFrameRGB32->linesize);
                QImage imageTemp((uchar *)outBuffer,
                                 pAVCodecContext->width,
                                 pAVCodecContext->height,
                                 QImage::Format_RGBA8888);
                QImage image = imageTemp.copy();
                LOG << image.save("1.jpg");
            }
            av_free_packet(pAVPacket);
        }
        QThread::msleep(100);
    }
END:
    LOG << "释放回收资源";
    if(outBuffer)
    {
        av_free(outBuffer);
        outBuffer = 0;
    }
    if(pSwsContext)
    {
        sws_freeContext(pSwsContext);
        pSwsContext = 0;
        LOG << "sws_freeContext(pSwsContext)";
    }
    if(pAVFrameRGB32)
    {
        av_frame_free(&pAVFrameRGB32);
        pAVFrame = 0;
        LOG << "av_frame_free(pAVFrameRGB888)";
    }
    if(pAVFrame)
    {
        av_frame_free(&pAVFrame);
        pAVFrame = 0;
        LOG << "av_frame_free(pAVFrame)";
    }
    if(pAVPacket)
    {
        av_free_packet(pAVPacket);
        pAVPacket = 0;
        LOG << "av_free_packet(pAVPacket)";
    }
    if(pAVCodecContext)
    {
        avcodec_close(pAVCodecContext);
        pAVCodecContext = 0;
        LOG << "avcodec_close(pAVCodecContext);";
    }
    if(pAVFormatContext)
    {
        avformat_free_context(pAVFormatContext);
        pAVFormatContext = 0;
        LOG << "avformat_free_context(pAVFormatContext)";
    }
}
工程模板v1.1.0
对应工程模板v1.1.0
上一篇:《FFmpeg开发笔记(三):ffmpeg介绍、windows编译以及开发环境搭建》
下一篇:敬请期待
原博主博客地址:https://blog.csdn.net/qq21497936
原博主博客导航:https://blog.csdn.net/qq21497936/article/details/102478062
本文章博客地址:https://blog.csdn.net/qq21497936/article/details/108573195