openfire的内部插件开发
openfire的插件–内部插件开发
插件开发
基本
插件必须有一个实现Plugin。以创建HelloWorldPlugin为例子(下同)。在src/plugins/下新建目录helloworld,如下
在src/plugins/helloworld/src/java下添加插件代码HelloWorldPlugin.java
public class HelloWorldPlugin implements Plugin {
    private XMPPServer server;

    public HelloWorldPlugin() {

    }

    @Override
    public void initializePlugin(PluginManager managier, File pluginDirectory) {
        server = XMPPServer.getInstance(); //当前实例
        System.out.println("HelloWorldPlugin----start");
        System.out.println(server.getServerInfo());
    }

    @Override
    public void destroyPlugin() {
        System.out.println("HelloWorldPlugin----destroy");
    }
}添加plugin.xml,用于配置插件参数
<plugin>
    <class>com.wangjiayong.HelloWorldPluginclass>
    <name>Helloworldname>
    <description>Adds clustering supportdescription>
    <author>wangjiayongauthor>
    <version>0.1.0version>
    <date>02/11/2018date>

    <minServerVersion>4.2.0minServerVersion>


    <adminconsole>

    adminconsole>
plugin>
需要在管理台添加页面,则在修改
    <adminconsole>
        <tab id="tab-server">
            <sidebar id="helloworldBar" name="helloworldBar" description="sidebar helloworld">
                <item id="helloworld" name="helloworld"
                      url="index.jsp"
                      description="index helloworld"/>
            sidebar>
        tab>
adminconsole>并在src/plugins/helloworld/src/web(和Web项目一样,可以有WEB-INF等结构和Servlet)下,添加JSP文件,即tab.sidebar.item.url
<html>
<body>
<h3>Test HelloWorldh3>
body>
html>最后将helloworld打包。修改build/build.properties,添加plugin=helloworld(插件目录名),然后执行Ant Build->plugins,openfire会自动发布,将插件添加到管理台上。(todo:二级导航没出来,启动顺序未知)
拦截器
流过插件的数据为Packet,可以是Message,IQ、Presence,使用PacketInterceptor拦截,可以和Plugin一起实现。
注意:一旦interceptPacket函数内部抛出PacketRejectedException异常,那么流入interceptPacket中的packet包将被丢弃,不再往下走。当这个异常PacketRejectedException对象中的message不为空的时候,会给发送者返回一条body为fuck is error的消息。
在src/plugins/helloworld/src/java添加ContentFilter
public class ContentFilter implements PacketInterceptor {
    // 拦截器管理器,所有的拦截器都在这里注册
    private InterceptorManager interceptorManager;

    public void initializePlugin(PluginManager pManager, File pluginDirectory) {
        interceptorManager = InterceptorManager.getInstance();
        // 将拦截器注册进来,这样有Packet来的时候,就会(链式)调用interceptPacket
        interceptorManager.addInterceptor(this);
    }

    public void destroyPlugin() {
        // 插件卸载时,记得将拦截器从系统中移出。
        interceptorManager.removeInterceptor(this);
    }

    // 实际处理数据,过滤文本信息为例
    public void interceptPacket(Packet packet, Session session, boolean read,
        boolean processed) throws PacketRejectedException {
        // read为true表示本条消息刚进入openfire。processed为false,表示本条消息没有被openfire处理过。
        if (read && processed == false) {
            // packet可能是IQ、Presence、Message,这里当packet是message的时候,进行处理。
            if (packet instanceof Message) {

                Message msg = (Message)packet;
                //Message.Type.chat单聊,Message.Type.groupchat群聊
                //取出正文
                String body = msg.getBody();
                // 如果内容中包含fuck,则拒绝处理消息
                if(body != null  && body.contains("fuck")){
                    //抛出异常,返回给用户信息RejectionMessage
                    PacketRejectedException rejectedException =  new PacketRejectedException();
                    rejectedException.setRejectionMessage("fuck is error");
                    throw rejectedException;
                }

            }
        }
    }
}
操作数据库
在自定义插件根目录下,即/添加sql脚本,openfire会根据数据库类型自动建表
在plugin.xml中添加数据库表名
    <databaseKey>helloworlddatabaseKey>
    <databaseVersion>0databaseVersion>
相关逻辑
import org.jivesoftware.database.DbConnectionManager;
import org.jivesoftware.database.JiveID;
import org.jivesoftware.database.SequenceManager;
import org.jivesoftware.openfire.XMPPServer;

import java.sql.Connection;
import java.sql.PreparedStatement;
import java.sql.SQLException;

@JiveID(55)
public class HelloWorldPlugin implements Plugin {
    private static final String INSERT_HELLOWORLD = "INSERT INTO ofHelloworld(hID, msg) VALUES (?,?)";

    private void insertIntoDb() throws SQLException {
        long hID = SequenceManager.nextID(this);
        Connection con = null;
        boolean abortTransaction = false;
        try {
            con = DbConnectionManager.getTransactionConnection();
            PreparedStatement pstmt = con.prepareStatement(INSERT_HELLOWORLD);
            pstmt.setLong(1, hID);
            pstmt.setString(2, "content"+UUID.randomUUID().toString());
            pstmt.executeUpdate();
            pstmt.close();
            System.out.println("hello success in db");
        }
        catch (SQLException sqle) {
            abortTransaction = true;
            throw sqle;
        }
        finally {
            DbConnectionManager.closeTransactionConnection(con, abortTransaction);
        }
    }
}SQL脚本如下,INSERT INTO ofVersion (name, version)用于判断是否执行后续SQL语句。
INSERT INTO ofVersion (name, version) VALUES ('helloworld', 0);

CREATE TABLE ofHelloworld world (
   hID       BIGINT          NOT NULL,
   msg     VARCHAR(50)      NOT NULL,
   CONSTRAINT ofHelloworld_pk PRIMARY KEY (hID)
);
//TODO,没成功创建表,操作openfire本身的表是成功的,待解决
java.sql.SQLSyntaxErrorException: user lacks privilege or object not found: OFHELLOWORLD in statement [insert into OFHELLOWORLD(hID, msg) values (?,?)]
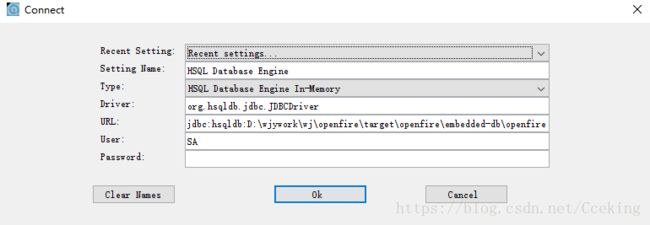
查看(内置)数据库,一般在target目录,配置如下图
#具体的项目target路径
cd /d D:\wjywork\wj\openfire\target\openfire\lib
java -cp hsqldb.jar org.hsqldb.util.DatabaseManagerSwing此时在openfire\target\openfire\embedded-db中生成了openfire.script,里面有相关数据的SQL,可以用于数据库迁移。注意打开hsqldb.jar后,数据库已经处于锁定状态,openfire就不能使用了。
用户
通过拦截器,可以获取每个Pacekt的信息,比如根据JID获取具体用户信息。
import org.jivesoftware.openfire.user.UserManager;
import org.jivesoftware.openfire.user.User;

public void interceptPacket(Packet packet, Session session, boolean read,
                            boolean processed) throws PacketRejectedException{

    JID fromJID = packet.getFrom(); //发送者
    JID toJID = packet.getTo(); //接收者
    final UserManager userManager = UserManager.getInstance();
    try {
        User user = userManager.getUser(toJID.getNode());
        user.getName();
    }
    catch (UserNotFoundException e) {

    }

}


