22.深度学习——卷积神经网络
1、 深层的神经网络
深度学习网络与更常见的单一隐藏层神经网络的区别在于深度,深度学习网络中,每一个节点层在前一层输出的基础上学习识别一组特定的特征。随着神经网络深度增加,节点所能识别的特征也就越来越复杂。
2、卷积神经网络
2.1、卷积神经网络与简单的单层神经网络的比较
2.2、卷积神经网络的发展历史
2.3、卷积神经网络的结构分析
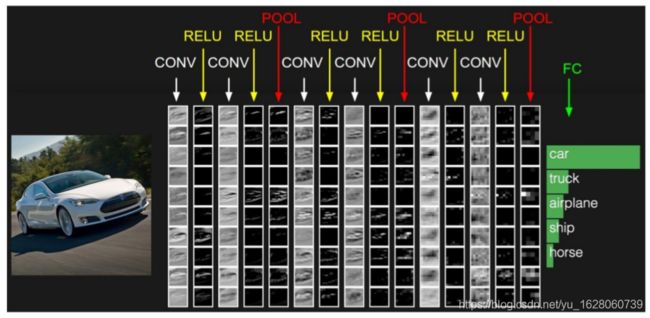
神经网络(neural networks)的基本组成包括输入层、隐藏层、输出层。而卷积神经网络的特点在于隐藏层分为卷积层和池化层(pooling layer,又叫下采样层)。
• 卷积层:通过在原始图像上平移来提取特征
• 池化层:通过特征后稀疏参数来减少学习的参数,降低网络的复杂度,(最大池化和平均池化)
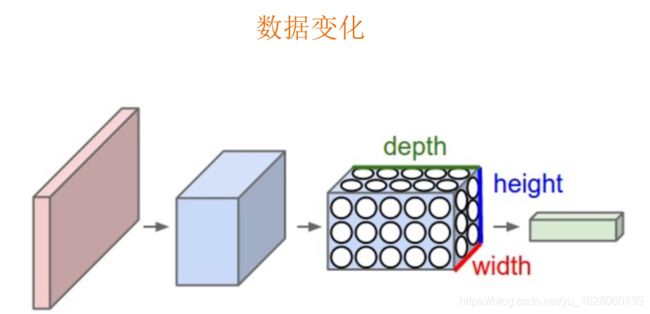
经过卷积池化后,数据的变化如上图,可以看数据的长宽在变小,通道数在增加。
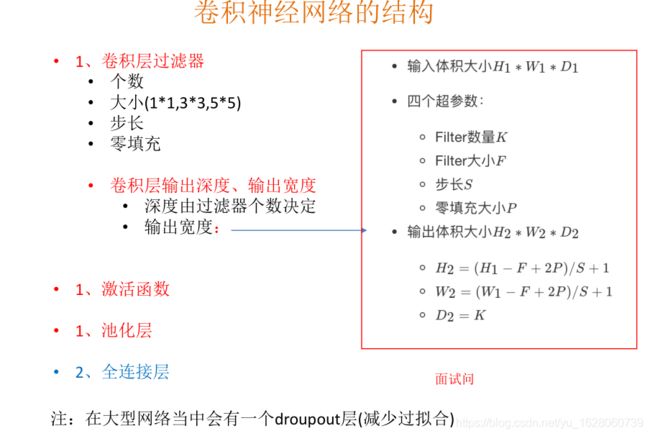
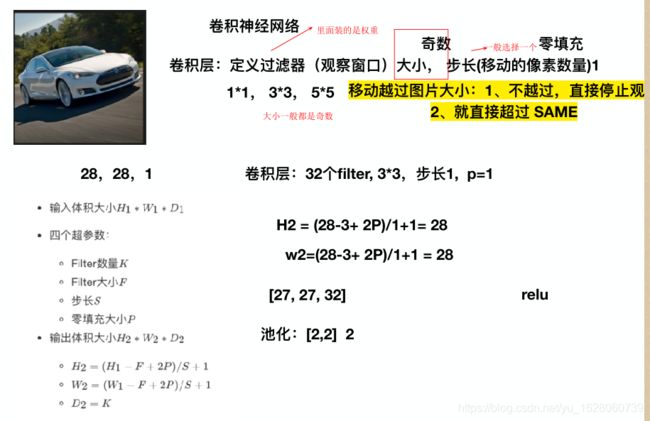
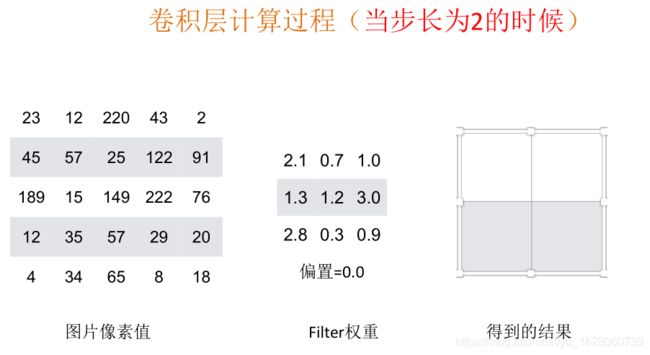
卷积层的过滤器一般大小都是奇数,常见是1x1, 3x3, 5x5 ,过滤器是一个观察窗口。而过滤器是由一个,一个的权重值组成的。
一个过滤器,以1步长去观察图片。
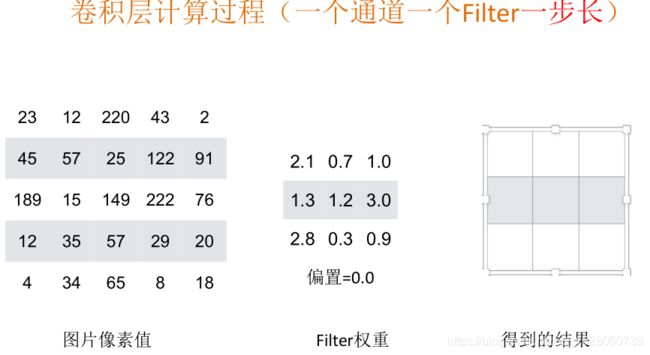
根据上面的公式可以得出一个过滤器以1步长观察图片后的结果大小。
一个过滤器,以1步长去观察图片。
多个过滤器去观察,一个过滤器观察一张图,会得到一个结果,多个就得到多个结果(这个结果数反映到数据大小上就是通道数。)

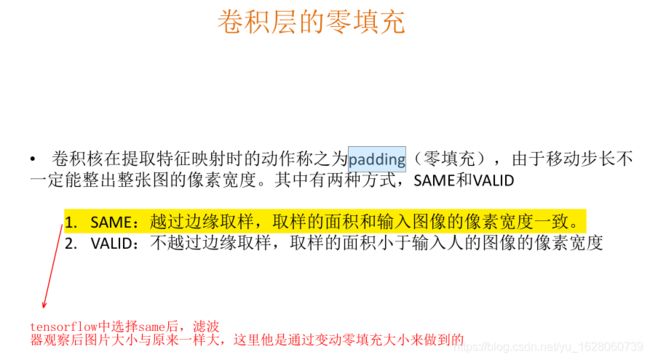
移动越过图片大小有两种方式SAME和VALID,SAME使用零填充。
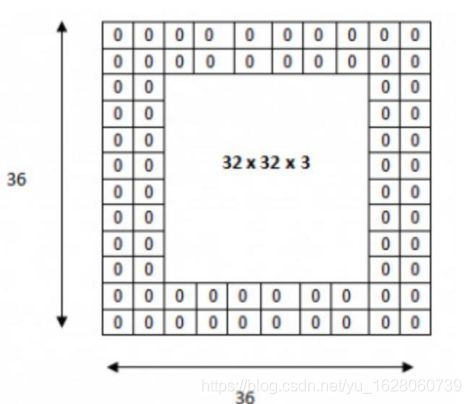
如图用两层零填充,padding = 2
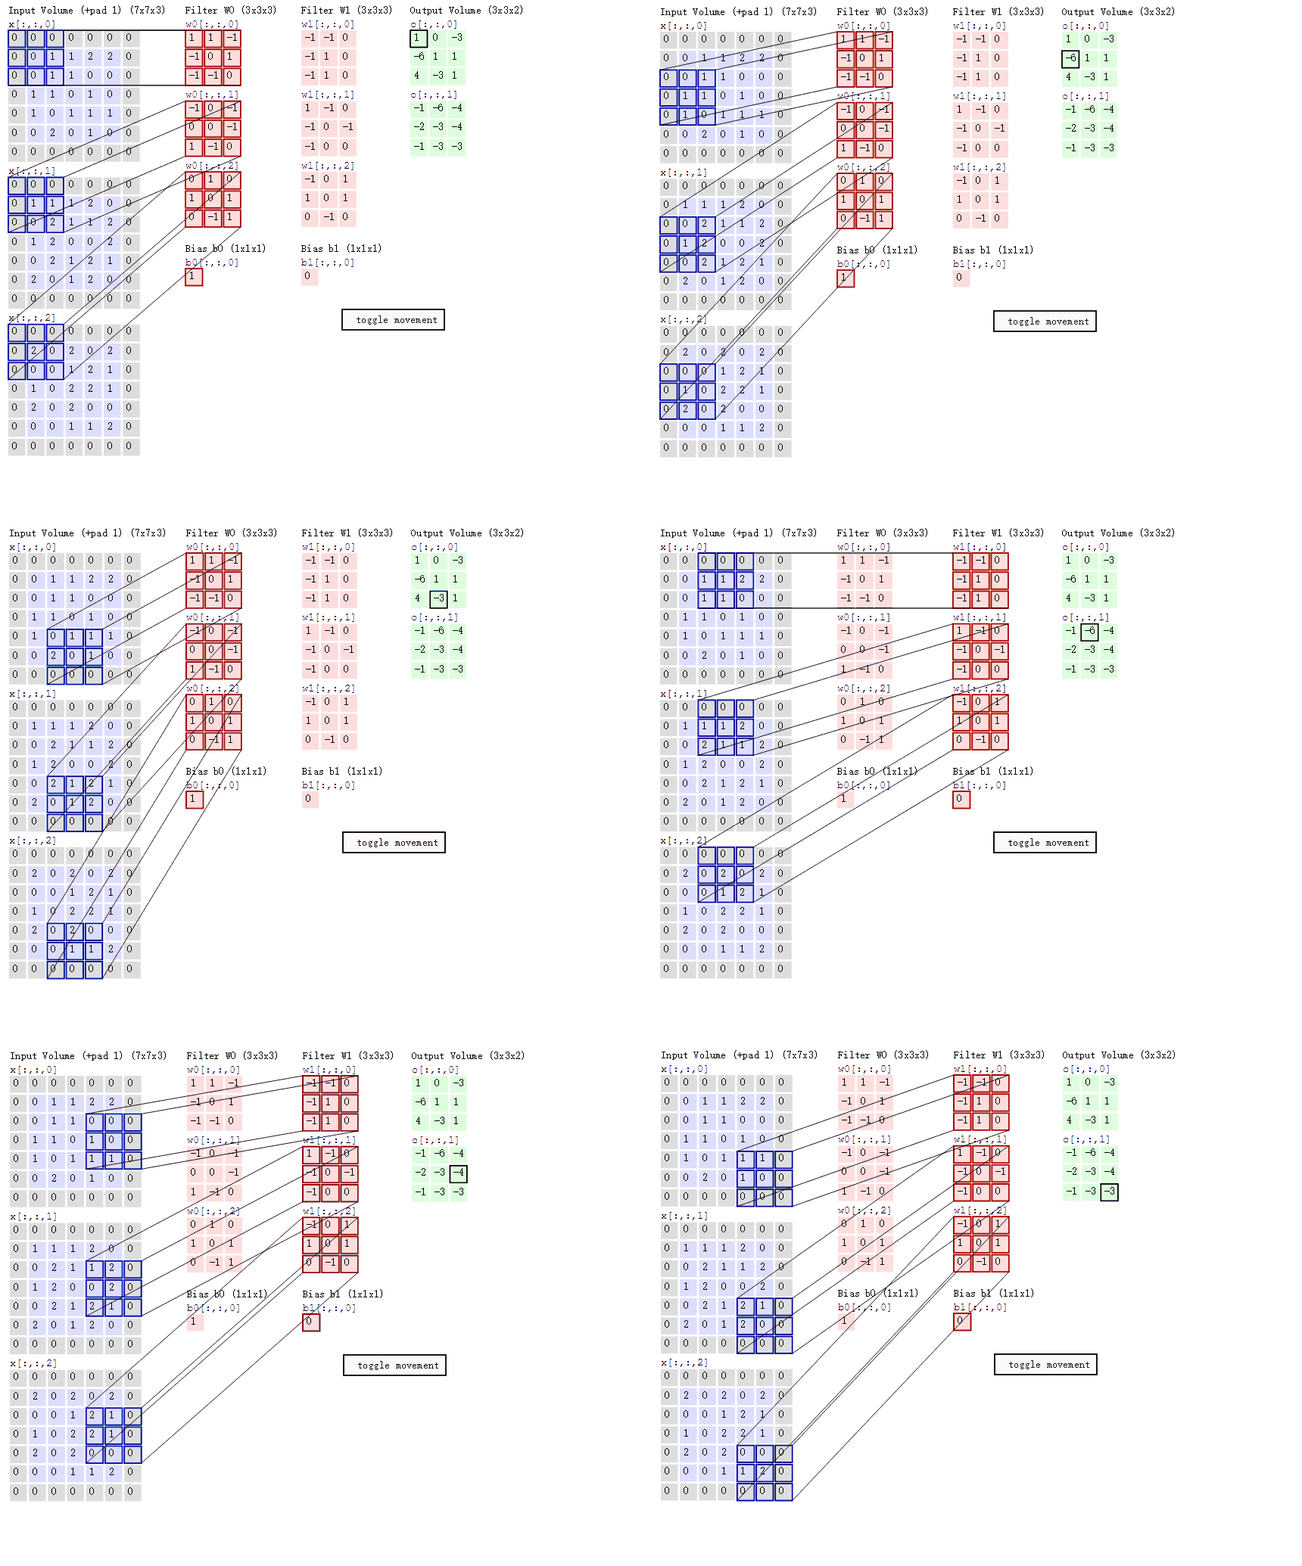
彩色图片的卷积过程演示
前面所说的都是单通道图片,也就是灰度图,如果是彩色图片卷积过程应该是如何。
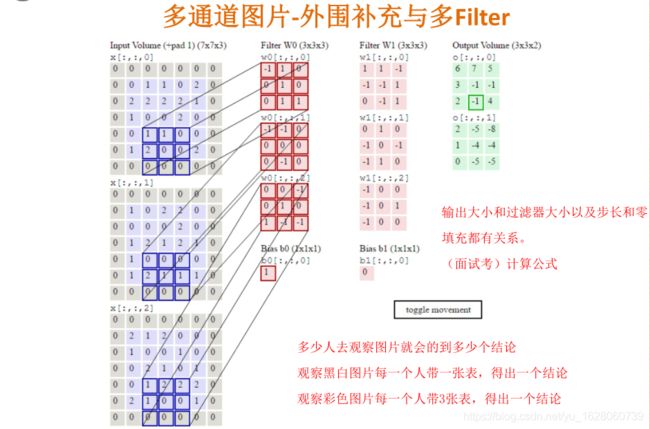
多个过滤器观察彩色图片,每一个过滤器需要带3张权重组成表,每一张表对应彩色图片的三通道表,R,G,B。
动态图演示
2.4、卷积网络API介绍
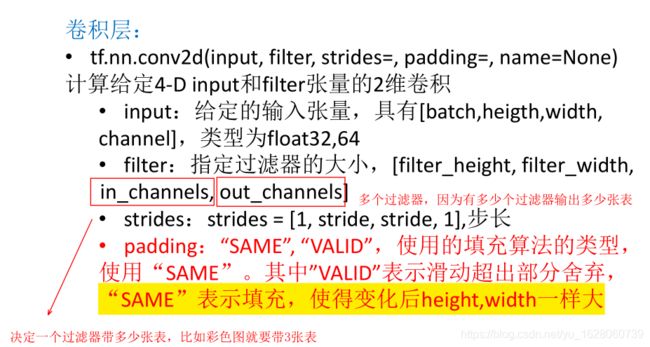
这里需要注意这个API中 padding=SAME 表示用零填充后,卷积后大小相同。
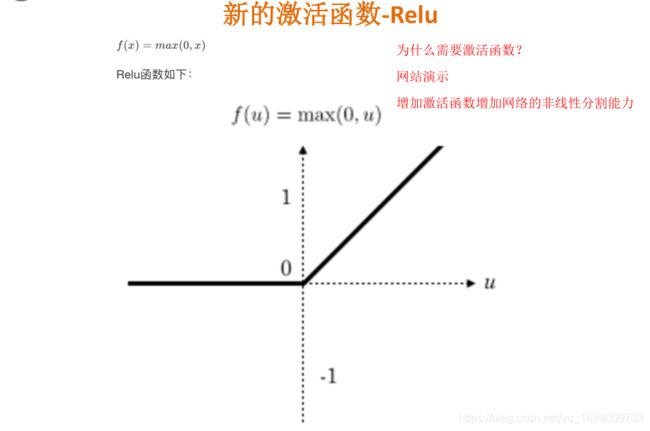
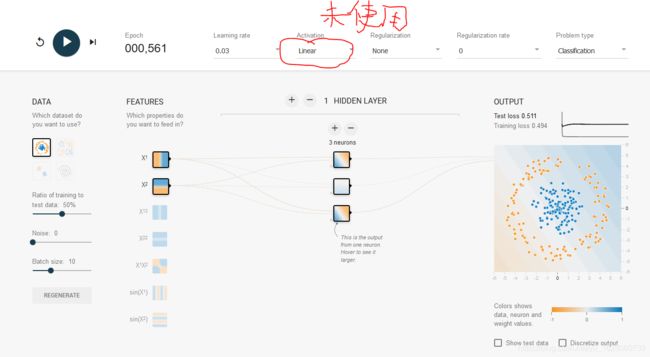
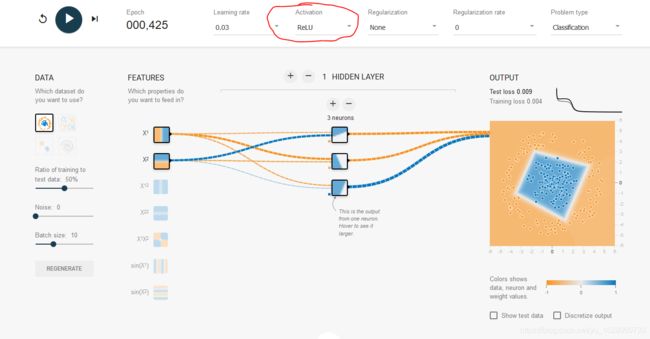
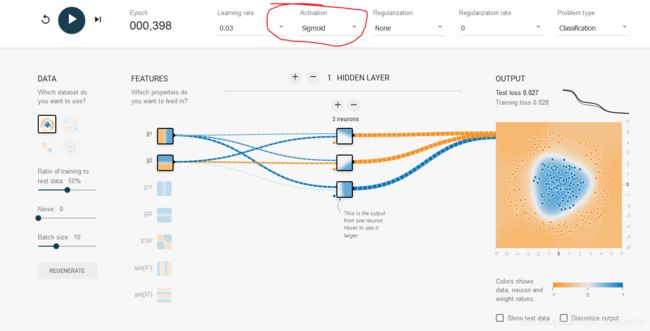
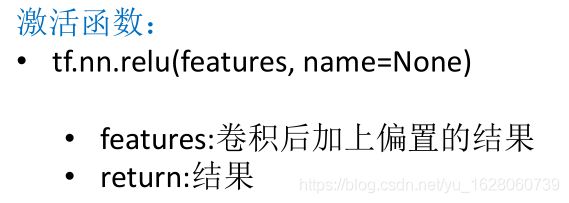
新的激活函数
以前神经网络中用的激活函数是sigmoid, 现在用的是Relu 。
不使用激活函数,神经网络根本不能正常工作。
使用Relu
 使用sigmoid函数

2.5、池化层 池化层(Pooling)计算
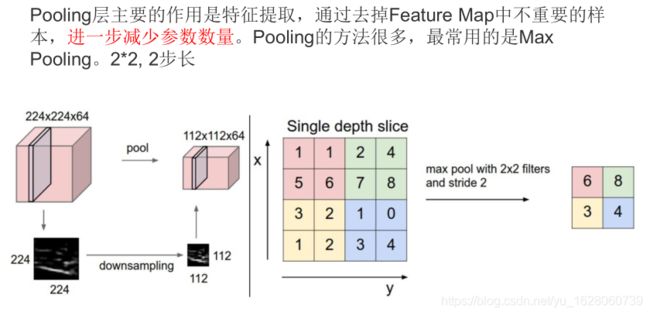
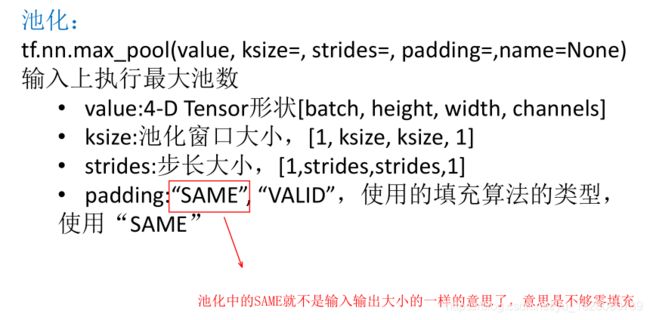
池化会改变数据大小采用 2x2 步长为2的池化,长宽会缩小一倍,通道数不变。
API
2.5、全连接层
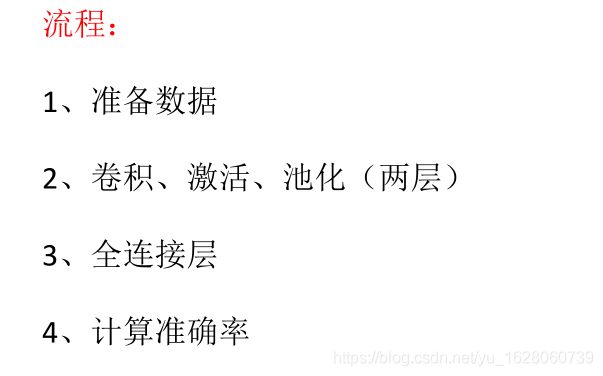
3、Mnist手写数字图片识别卷积网络案例
import tensorflow as tf
from tensorflow.examples.tutorials.mnist import input_data


# 初始化权重和偏置的函数
def weight_varibles(shape):
    w = tf.Variable(tf.random_normal(shape=shape, mean=0.0, stddev=1.0))
    return w


def bias_varibles(shape):
    b = tf.Variable(tf.constant(0.0, shape=shape))
    return b


# 定义一个模型
def model():
    """
    自定义卷积模型
    :return:
    """
    # 1、准备数据的占位符 x [None, 784]  y_true [None, 10]
    with tf.variable_scope('data'):

        x = tf.placeholder(tf.float32, [None, 784])
        y_true = tf.placeholder(tf.int32, [None, 10])

    # 2、一卷积层 卷积: 5*5*1,32个,strides=1 激活: tf.nn.relu 池化
    with tf.variable_scope("conv1"):
        # 随机初始化权重, 偏置[32]
        w_conv1 = weight_varibles([5, 5, 1, 32])
        b_conv1 = bias_varibles([32])

        # 对x进行形状的改变[None, 784]  [None, 28, 28, 1]
        x_reshape = tf.reshape(x, [-1, 28, 28, 1])

        # [None, 28, 28, 1]-----> [None, 28, 28, 32]
        x_conv1 = tf.nn.conv2d(x_reshape, w_conv1, strides=[1, 1, 1, 1], padding="SAME") + b_conv1

        # 激活函数
        x_relu1 = tf.nn.relu(x_conv1)

        # 池化 2*2 ,strides2 [None, 28, 28, 32]---->[None, 14, 14, 32]
        x_pool1 = tf.nn.max_pool(x_relu1, ksize=[1, 2, 2, 1], strides=[1, 2, 2, 1],padding="SAME")

    # 3、二卷积层卷积: 5*5*32,64个filter,strides=1 激活: tf.nn.relu 池化:
    with tf.variable_scope("conv2"):
        # 随机初始化权重,  权重:[5, 5, 32, 64]  偏置[64]
        w_conv2 = weight_varibles([5, 5, 32, 64])
        b_conv2 = bias_varibles([64])

        # 卷积,激活,池化计算
        # [None, 14, 14, 32]-----> [None, 14, 14, 64]
        x_conv2 = tf.nn.conv2d(x_pool1, w_conv2, strides=[1, 1, 1, 1], padding="SAME") + b_conv2

        x_relu2 = tf.nn.relu(x_conv2)

        # 池化 2*2, strides 2, [None, 14, 14, 64]---->[None, 7, 7, 64]
        x_pool2 = tf.nn.max_pool(x_relu2, ksize=[1, 2, 2, 1], strides=[1, 2, 2, 1], padding="SAME")

    # 4、全连接层 [None, 7, 7, 64]--->[None, 7*7*64]*[7*7*64, 10]+ [10] =[None, 10]
    with tf.variable_scope("fc"):
        # 随机初始化权重和偏置
        w_fc = weight_varibles([7*7*64, 10])
        b_fc = bias_varibles([10])

        # 修改形状 [None, 7, 7, 64] --->None, 7*7*64]
        x_fc_reshape = tf.reshape(x_pool2, [-1, 7*7*64])

        # 进行矩阵运算得出每个样本的10个结果
        y_predict = tf.matmul(x_fc_reshape, w_fc) + b_fc

    return x, y_true, y_predict

# 训练
def train_data():
    # 获取真实的数据
    mnist = input_data.read_data_sets("F:/MNIST_data/", one_hot=True)

    # 定义模型,得出输出
    x, y_true, y_predict = model()

    # 进行交叉熵损失计算
    # 3、求出所有样本的损失,然后求平均值
    with tf.variable_scope("soft_cross"):
        # 求平均交叉熵损失
        loss = tf.reduce_mean(tf.nn.softmax_cross_entropy_with_logits(labels=y_true, logits=y_predict))

    # 4、梯度下降求出损失
    with tf.variable_scope("optimizer"):
        train_op = tf.train.GradientDescentOptimizer(0.0001).minimize(loss)

    # 5、计算准确率
    with tf.variable_scope("acc"):
        equal_list = tf.equal(tf.arg_max(y_true, 1), tf.arg_max(y_predict, 1))

        # equal_list  None个样本   [1, 0, 1, 0, 1, 1,..........]
        accuracy = tf.reduce_mean(tf.cast(equal_list, tf.float32))

    # 定义一个初始化变量的op
    init_op = tf.global_variables_initializer()

    # 开启回话运行
    with tf.Session() as sess:
        sess.run(init_op)

        # 循环去训练
        for i in range(2000):
            # 取出真实存在的特征值和目标值
            mnist_x, mnist_y = mnist.train.next_batch(50)

            # 运行train_op训练
            _, acc, Loss = sess.run([train_op, accuracy, loss], feed_dict={x:mnist_x, y_true:mnist_y})

            print("训练第%d步,准确率为:%f  loss为:%f"%(i, acc, Loss))
    return  None


train_data()
以上代码是用较为底层的API实现的,下面用封装更高级的API实现tf.layers 。
import tensorflow as tf
from tensorflow.examples.tutorials.mnist import input_data


def molde2():
    # 1、准备数据的占位符 x [None, 784]  y_true [None, 10]
    with tf.variable_scope('data'):
        x = tf.placeholder(tf.float32, [None, 784])
        y_true = tf.placeholder(tf.int32, [None, 10])

    # 2、一卷积层 卷积: 5*5*1,32个,strides=1 激活: tf.nn.relu 池化
    with tf.variable_scope("conv1"):
        # 对x进行形状的改变[None, 784]  [None, 28, 28, 1]
        x_reshape = tf.reshape(x, [-1, 28, 28, 1])

        # [None, 28, 28, 1]-----> [None, 28, 28, 32]
        x_conv1 = tf.layers.conv2d(x_reshape, 32, (5, 5), padding="same", activation=tf.nn.relu)

        # 池化 2*2 ,strides2 [None, 28, 28, 32]---->[None, 14, 14, 32]
        x_pool1 = tf.layers.max_pooling2d(x_conv1, (2, 2), (2, 2), padding='same')

    # 3、二卷积层卷积: 5*5*32,64个filter,strides=1 激活: tf.nn.relu 池化:
    with tf.variable_scope("conv2"):
        # 卷积,激活,池化计算
        # [None, 14, 14, 32]-----> [None, 14, 14, 64]
        x_conv2 = tf.layers.conv2d(x_pool1, 64, (5, 5), padding='same', activation=tf.nn.relu)

        # 池化 2*2, strides 2, [None, 14, 14, 64]---->[None, 7, 7, 64]
        x_pool2 = tf.layers.max_pooling2d(x_conv2, (2, 2), (2, 2), padding='same')

    # 4、全连接层 [None, 7, 7, 64]--->[None, 7*7*64]*[7*7*64, 10]+ [10] =[None, 10]
    with tf.variable_scope("fc"):
        # 修改形状 [None, 7, 7, 64] --->None, 7*7*64]
        x_fc_reshape = tf.reshape(x_pool2, [-1, 7 * 7 * 64])

        fc1 = tf.layers.dense(x_fc_reshape, 64, activation=tf.nn.relu)

        y_predict = tf.layers.dense(fc1, 10)

    return x, y_true, y_predict


# 训练
def train_data():
    # 获取真实的数据
    mnist = input_data.read_data_sets("F:/MNIST_data/", one_hot=True)

    # 定义模型,得出输出
    x, y_true, y_predict = molde2()

    # 进行交叉熵损失计算
    # 3、求出所有样本的损失,然后求平均值
    with tf.variable_scope("soft_cross"):
        # 求平均交叉熵损失
        loss = tf.reduce_sum(tf.nn.softmax_cross_entropy_with_logits(labels=y_true, logits=y_predict))

    # 4、梯度下降求出损失
    with tf.variable_scope("optimizer"):
        train_op = tf.train.GradientDescentOptimizer(0.0001).minimize(loss)

    # 5、计算准确率
    with tf.variable_scope("acc"):

        correct_prediction = tf.equal(tf.arg_max(y_true, 1), tf.argmax(y_predict, 1))

        # 求准确率
        accuracy = tf.reduce_mean(tf.cast(correct_prediction, tf.float32))

    # 定义一个初始化变量的op
    init_op = tf.global_variables_initializer()

    # 开启回话运行
    with tf.Session() as sess:
        sess.run(init_op)

        # 循环去训练
        for i in range(2000):
            # 取出真实存在的特征值和目标值
            mnist_x, mnist_y = mnist.train.next_batch(50)


            # 运行train_op训练
            _, acc, Loss = sess.run([train_op, accuracy, loss], feed_dict={x:mnist_x, y_true:mnist_y})
            print(Loss)
            print("训练第%d步,准确率为:%f " % (i, acc))


    return  None


train_data()
结果
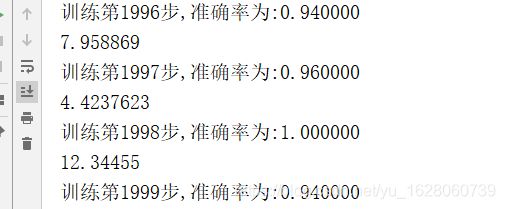
注意:这里再求loss是使用是tf.reduce_sum,若使用tf.reduce_mean,准确率提不上去。
而对于第一种方式,要使用tf.reduce_mean,否则精度提升的很慢很慢。
