Spring AOP源码解析二: 根据普通bean创建其动态代理
根据Spring AOP源码解析一 里面所讲的内容,在Spring容器启动时,会先创建所有的bean的后置处理器,然后再创建普通bean的时候,在合适的地方调用bean的后置处理器执行相应的逻辑,而对于普通bean在Spring执行的生命周期的initializeBean方法中进行完成AOP动态代理的功能工作。
说源码前首先需要有个案例:
Config 配置类,定义扫描规则和注入AOP切面处理类
package com.luban.aop;

import org.springframework.context.annotation.ComponentScan;
import org.springframework.context.annotation.Configuration;
import org.springframework.context.annotation.EnableAspectJAutoProxy;

@Configuration
@ComponentScan("com.luban.aop")
@EnableAspectJAutoProxy
public class Config {
}
UserService 类,该类为要代理的类
package com.luban.aop.service;
import org.springframework.stereotype.Service;
@Service
public class UserService {

	public String getName(){
		System.out.println("getName");
		return "wj";
	}

	public void sayHello(){
		System.out.println("hello");
	}
}
MyAspect 类,该类为切换类,定义的切点,这个切面类之所以写的这么复杂,是因为最大可能的还原真实场景,但是也是有差距的,getPointcut这个切点是作用在com.luban.aop.service包或者是子包下面所有类以get开头的所有方法,而pointcut切点会作用在com.luban.aop.service包或者是子包下面所有类的所有方法。
package com.luban.aop;

import org.aspectj.lang.annotation.*;
import org.springframework.stereotype.Component;

@Aspect
@Component
public class MyAspect {
    @Pointcut("execution(* com.luban.aop.service..*.get*(..))")
    public void getPointcut() {
    }

    @Before("getPointcut()")
    public void before() {
        System.out.println("before advice");
    }

    @After("getPointcut()")
    public void after() {
        System.out.println("after advice");
    }

    @Pointcut("execution(* com.luban.aop.service..*.*(..))")
    public void pointcut() {
    }

    @AfterReturning("pointcut()")
    public void AfterReturning() {
        System.out.println("AfterReturning advice");
    }

    @Pointcut("execution(* com.luban.aop.service1..*.*(..))")
    public void pointcut1() {
    }

    @AfterReturning("pointcut1()")
    public void AfterReturning1() {
        System.out.println("AfterReturning advice");
    }

    @After("pointcut1()")
    public void after1() {
        System.out.println("after advice");
    }
}
测试类,主要是启动类,用来测试
package com.luban.aop;

import com.luban.aop.service.UserService;
import org.springframework.context.annotation.AnnotationConfigApplicationContext;

public class Test01 {
	public static void main(String[] args) {
		AnnotationConfigApplicationContext context = new AnnotationConfigApplicationContext(Config.class);
		UserService bean = context.getBean(UserService.class);
		bean.getName();
	}
}
定义之后,在后面的讲解中会使用到上面案例作为说明,这样能够讲的更清晰。
关于Spring bean创建的流程这里就不再细说了,感兴趣的先参考:Spring中bean的生命周期(最详细),这里仅对Spring AOP进行分析,那么我们的切入点就从initializeBean方法讲起,具体看代码块1。
代码块1:AbstractAutowireCapableBeanFactory#initializeBean方法
protected Object initializeBean(final String beanName, final Object bean, @Nullable RootBeanDefinition mbd) {
//1.以安全的方式执行Aware接口的回调方法,进行设置bean工厂、bean的类加载器、bean的名称
//具体看invokeAwareMethods方法
if (System.getSecurityManager() != null) {
AccessController.doPrivileged((PrivilegedAction关于第1、2、3不是本次讲解的重要,如果真要细说的话,就这三个步骤就可以讲解一篇博客,主要是第4步,这一步会调用所有的bean的后置处理的postProcessorsAfterInitialization方法,也就是在此步完成AOP动态代理的操作,关于第4步的请看代码块2.
代码块2:AbstractAutowireCapableBeanFactory#applyBeanPostProcessorsAfterInitialization方法
@Override
public Object applyBeanPostProcessorsAfterInitialization(Object existingBean, String beanName)
		throws BeansException {
	//1.已存在bean,这个bean是没有代理之前的bean
	Object result = existingBean;
	//2.拿到所有的bena的后置处理器,依次进行遍历
	for (BeanPostProcessor processor : getBeanPostProcessors()) {
		//3.执行其postProcessAfterInitialization方法
		Object current = processor.postProcessAfterInitialization(result, beanName);
		//4.如果有其中一个返回空,则就直接返回了,不再进行遍历
		if (current == null) {
			return result;
		}
		result = current;
	}
	return result;
}
第3步执行后置处理器的postProcessAfterInitialization方法,并将返回的current 对象赋值给result,也就是会替换原来的bean对象。而对于bean后置处理器的postProcessAfterInitialization方法,如果不做处理的话,都是直接将传递过来的bean给直接返回,而不进行任何处理。
对于上篇文章提到的AnnotationAwareAspectJAutoProxyCreator也是一个bean后置处理器,而AnnotationAwareAspectJAutoProxyCreator间接的继承AbstractAutoProxyCreator类,在AbstractAutoProxyCreator类中实现了postProcessAfterInitialization方法,具体看代码块3.
代码块3:AbstractAutoProxyCreator#postProcessAfterInitialization方法
/**
 * Create a proxy with the configured interceptors if the bean is
 * identified as one to proxy by the subclass.
 * 如果子类将bean标识为一个要代理的bean,则使用配置的拦截器创建一个代理
 * @see #getAdvicesAndAdvisorsForBean
 */
@Override
public Object postProcessAfterInitialization(@Nullable Object bean, String beanName) {
	if (bean != null) {
		//1.获取缓存键,如果bean的名称不存在,则直接返回bean的class,如果不为空,
		//会判断当前bean是否为FactoryBean的子类,如果是,则在其bean名称前面添加&, 如果不是则直接返回bean的名称,
		//具体看getCacheKey方法的逻辑
		Object cacheKey = getCacheKey(bean.getClass(), beanName);
		//2.从earlyProxyReferences中根据cacheKey移除后获取值,如果获取的值和当前bean的calss不同,则
		//会进入if判断中
		if (this.earlyProxyReferences.remove(cacheKey) != bean) {
			//3.进行动态代理如果需要的话
			return wrapIfNecessary(bean, beanName, cacheKey);
		}
	}
	return bean;
}


/**
 * Build a cache key for the given bean class and bean name.
 * Note: As of 4.2.3, this implementation does not return a concatenated
 * class/name String anymore but rather the most efficient cache key possible:
 * a plain bean name, prepended with {@link BeanFactory#FACTORY_BEAN_PREFIX}
 * in case of a {@code FactoryBean}; or if no bean name specified, then the
 * given bean {@code Class} as-is.
 */
protected Object getCacheKey(Class beanClass, @Nullable String beanName) {
	if (StringUtils.hasLength(beanName)) {
		return (FactoryBean.class.isAssignableFrom(beanClass) ?
				BeanFactory.FACTORY_BEAN_PREFIX + beanName : beanName);
	}
	else {
		return beanClass;
	}
}
第1步就会先获取根据bean的class和名称获取一个缓存键,第2步从earlyProxyReferences的Map中根据缓存键移除并获取一个缓存的bean,并查看这个缓存的bean和当前方法传递过来的bean是否相同,如果不相同,则会进行if判断里面,其实这一步是很重要的一步判断,这里详细的进行介绍。
首先需要明白earlyProxyReferences里面存放的元素代表的是什么,看一下AbstractAutoProxyCreator里面使用到earlyProxyReferences的所有地方,请看代码块4.
代码块4:AbstractAutoProxyCreator#earlyProxyReferences属性的分析
private final Map earlyProxyReferences = new ConcurrentHashMap<>(16);


/**
 * Obtain a reference for early access to the specified bean,
 * typically for the purpose of resolving a circular reference.
 * This callback gives post-processors a chance to expose a wrapper
 * early - that is, before the target bean instance is fully initialized.
 * The exposed object should be equivalent to the what
 * {@link #postProcessBeforeInitialization} / {@link #postProcessAfterInitialization}
 * would expose otherwise. Note that the object returned by this method will
 * be used as bean reference unless the post-processor returns a different
 * wrapper from said post-process callbacks. In other words: Those post-process
 * callbacks may either eventually expose the same reference or alternatively
 * return the raw bean instance from those subsequent callbacks (if the wrapper
 * for the affected bean has been built for a call to this method already,
 * it will be exposes as final bean reference by default).
 */
@Override
public Object getEarlyBeanReference(Object bean, String beanName) {
	Object cacheKey = getCacheKey(bean.getClass(), beanName);
	this.earlyProxyReferences.put(cacheKey, bean);
	return wrapIfNecessary(bean, beanName, cacheKey);
}

/**
 * Apply this BeanPostProcessor to the given new bean instance after any bean
 * initialization callbacks (like InitializingBean's {@code afterPropertiesSet}
 * or a custom init-method). The bean will already be populated with property values.
 * The returned bean instance may be a wrapper around the original.
 * In case of a FactoryBean, this callback will be invoked for both the FactoryBean
 * instance and the objects created by the FactoryBean (as of Spring 2.0). The
 * post-processor can decide whether to apply to either the FactoryBean or created
 * objects or both through corresponding {@code bean instanceof FactoryBean} checks.
 * This callback will also be invoked after a short-circuiting triggered by a
 * {@link InstantiationAwareBeanPostProcessor#postProcessBeforeInstantiation} method,
 * in contrast to all other BeanPostProcessor callbacks.
 * The default implementation returns the given {@code bean} as-is.
 * @param bean the new bean instance
 * @param beanName the name of the bean
 * @return the bean instance to use, either the original or a wrapped one;
 * if {@code null}, no subsequent BeanPostProcessors will be invoked
 */
@Override
public Object postProcessAfterInitialization(@Nullable Object bean, String beanName) {
	if (bean != null) {
		Object cacheKey = getCacheKey(bean.getClass(), beanName);
		if (this.earlyProxyReferences.remove(cacheKey) != bean) {
			return wrapIfNecessary(bean, beanName, cacheKey);
		}
	}
	return bean;
}
可以看到earlyProxyReferences属性只是在两个地方进行了使用,一个是getEarlyBeanReference方法和postProcessAfterInitialization,而这两个方法的核心流程都是执行wrapIfNecessary方法。
如果执行了getEarlyBeanReference方法,那么就会以当前缓存建为key,bean为value保存到earlyProxyReferences中,然后直接执行wrapIfNecessary方法,如果在执行过getEarlyBeanReference方法之后,Spring在创建bean的时候又执行了postProcessAfterInitialization方法,这个时候拿到缓存键,从earlyProxyReferences中获取以缓存键为key的value,判断获取的值是否和bean相同,如果不相同才执行wrapIfNecessary方法。
如果在执行postProcessAfterInitialization方法之前,根本就没有执行过getEarlyBeanReference,那么从earlyProxyReferences获取的cacheKey的value,就会是null,那么也就肯定会执行wrapIfNecessary方法(因为在postProcessAfterInitialization方法中,先判断了bean是否为空的情况)
这么说可能有点晕,这两个方法到底有什么作用,其实在一个bean创建的时候,getEarlyBeanReference方法可能不会执行,凡是postProcessAfterInitialization一定会执行,getEarlyBeanReference方法是Spring为了解决循环依赖引入的方法,而earlyProxyReferences的这个Map也是为了解决循环依赖,关于Spring bean的声明周期可以查看:Spring中bean的生命周期(最详细),在这里面你会看到getEarlyBeanReference和postProcessAfterInitialization方法的执行时机。
关于Spring中的循环依赖网上说的太浅了,根本没有涉及到其精髓,我在这里说一下,Spring的循环依赖的解决方法使用了三级缓存 + getEarlyBeanReference方法 + earlyProxyReferences的Map进行解决,循环依赖中的getEarlyBeanReference方法 + earlyProxyReferences的Map会解决AOP代理的问题,如果Spring中的bean存在循环依赖,就会在二级缓存中调用一个方法,就是getEarlyBeanReference,判断这个bean是否进行了AOP代理,其判断的逻辑在wrapIfNecessary,关于缓存依赖先说到这个,以后有时间的话,会出个循环依赖的文章。
说到底还是需要查看wrapIfNecessary方法,具体看代码块4.
代码块4:AbstractAutoProxyCreator#wrapIfNecessary方法
protected Object wrapIfNecessary(Object bean, String beanName, Object cacheKey) {
	if (StringUtils.hasLength(beanName) && this.targetSourcedBeans.contains(beanName)) {
		return bean;
	}
	if (Boolean.FALSE.equals(this.advisedBeans.get(cacheKey))) {
		return bean;
	}
	if (isInfrastructureClass(bean.getClass()) || shouldSkip(bean.getClass(), beanName)) {
		this.advisedBeans.put(cacheKey, Boolean.FALSE);
		return bean;
	}

	//1. Create proxy if we have advice. 判断给定的bean是否被代理,会返回相应的拦截器
	Object[] specificInterceptors = getAdvicesAndAdvisorsForBean(bean.getClass(), beanName, null);
	if (specificInterceptors != DO_NOT_PROXY) {
		//2.要代理的就添加true
		this.advisedBeans.put(cacheKey, Boolean.TRUE);
		//3.创建代理
		Object proxy = createProxy(
				bean.getClass(), beanName, specificInterceptors, new SingletonTargetSource(bean));
		this.proxyTypes.put(cacheKey, proxy.getClass());
		return proxy;
	}

	this.advisedBeans.put(cacheKey, Boolean.FALSE);
	return bean;
}
先进行判断是否是已经处理过,是否需要跳过,跳过的话直接就放进advisedBeans里,表示不进行代理,但是这个bean处理过了,否则获取通知拦截器,然后才开始进行代理,
第2步为获取当前bean可用的通知拦截器,具体看代码块5, 第3步为创建动态代理对象的过程,具体看代码块6.
代码块5:AbstractAdvisorAutoProxyCreator#getAdvicesAndAdvisorsForBean方法
@Override
@Nullable
protected Object[] getAdvicesAndAdvisorsForBean(
Class beanClass, String beanName, @Nullable TargetSource targetSource) {
//1.1 查找该bean所有符合条件的顾问自动代理此类
List advisors = findEligibleAdvisors(beanClass, beanName);
if (advisors.isEmpty()) {
//1.2.advisors为空时,说明该bean不需要进行AOP代理
return DO_NOT_PROXY;
}
//1.3 转化成数组并返回
return advisors.toArray();
}
protected List findEligibleAdvisors(Class beanClass, String beanName) {
//2.1 查找该项目中所有的候选通知集合
List candidateAdvisors = findCandidateAdvisors();
//2.2 找到该bean能够使用到的通知
List eligibleAdvisors = findAdvisorsThatCanApply(candidateAdvisors, beanClass, beanName);
extendAdvisors(eligibleAdvisors);
if (!eligibleAdvisors.isEmpty()) {
//2.3 对这些通知进行排序
eligibleAdvisors = sortAdvisors(eligibleAdvisors);
}
return eligibleAdvisors;
}
@Override
protected List findCandidateAdvisors() {
// Add all the Spring advisors found according to superclass rules.
//3.1 找到系统中实现了Advisor接口的bean
List advisors = super.findCandidateAdvisors();
// Build Advisors for all AspectJ aspects in the bean factory.
if (this.aspectJAdvisorsBuilder != null) {
//3.2 找到系统中使用@Aspect标注的bean,并且找到该bean中使用@Before,@After等AspectJ相关通知的方法,
// 将这些方法封装为一个个Advisor
advisors.addAll(this.aspectJAdvisorsBuilder.buildAspectJAdvisors());
}
return advisors;
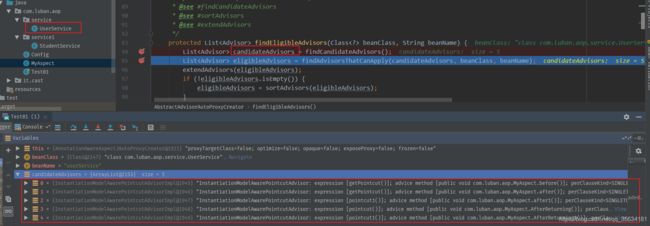
} 第2.1步会查找该项目所有的通知,具体实现看findCandidateAdvisors方法,会分别查看实现了Advisor接口的bean和AspectJ相关通知注解标注的通知方法,其findCandidateAdvisors返回的advisors看下图,在这里就跟到这个地方,再深入的方法就不跟了。
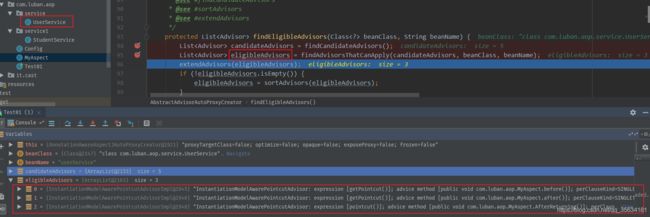
第2.2步会查看到当前类可以的通知,对于eligibleAdvisors看下图,会发现只有两个是可以用
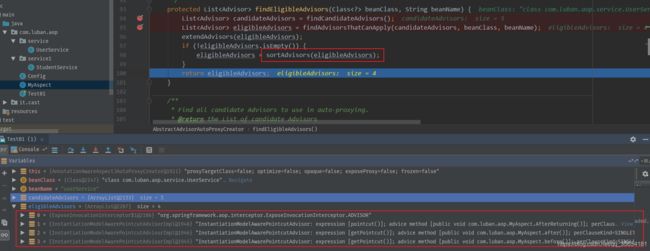
第2.3步会对eligibleAdvisors进行排序,排序会按照
- 环绕增强前(around advice before)
- 前置增强(before advice)
- -- 方法执行
- 环绕增强后(around advice after)
- 后置finally增强(after advice)
- 后置增强/抛出增强
至于为什么这么排序,后面再说
代码块6: AbstractAutoProxyCreator#createProxy方法
protected Object createProxy(Class beanClass, @Nullable String beanName,
		@Nullable Object[] specificInterceptors, TargetSource targetSource) {

	if (this.beanFactory instanceof ConfigurableListableBeanFactory) {
		AutoProxyUtils.exposeTargetClass((ConfigurableListableBeanFactory) this.beanFactory, beanName, beanClass);
	}
	// 1.创建代理工厂
	ProxyFactory proxyFactory = new ProxyFactory();
	// 2.获取当前类中相关属性
	proxyFactory.copyFrom(this);
    // 3.决定对于给定的bean是否应该使用targetClass而不是它的接口进行代理
	if (!proxyFactory.isProxyTargetClass()) {
		if (shouldProxyTargetClass(beanClass, beanName)) {
			proxyFactory.setProxyTargetClass(true);
		}
		else {
			// 4.添加代理接口
			evaluateProxyInterfaces(beanClass, proxyFactory);
		}
	}
	// 5.将拦截器适配成通知类,也就是增强器
	Advisor[] advisors = buildAdvisors(beanName, specificInterceptors);
	proxyFactory.addAdvisors(advisors);
	// 6.设置需要代理的类
	proxyFactory.setTargetSource(targetSource);
	customizeProxyFactory(proxyFactory);
	// 用来控制代理工厂被配置之后,是否还允许修改通知
    // 默认值为false(即在代理被配置之后,不允许修改代理的配置)
	proxyFactory.setFrozen(this.freezeProxy);
	if (advisorsPreFiltered()) {
		proxyFactory.setPreFiltered(true);
	}
    //7.创建代理对象
	return proxyFactory.getProxy(getProxyClassLoader());
}
在第5步,会拦截器适配成通知类,其具体方法看代码块7,在第7步,会根据代理工厂创建出代理类,具体看代码块8.
代码块7: AbstractAutoProxyCreator#buildAdvisors
protected Advisor[] buildAdvisors(@Nullable String beanName, @Nullable Object[] specificInterceptors) {
// 1.1.解析注册的所有interceptorName
Advisor[] commonInterceptors = resolveInterceptorNames();
ListbuildAdvisors方法所做的是将Spring中涉及的拦截器,增强器,增强方法等方式来对逻辑进行增强,所以非常有必要统一封装成Advisor来进行代理的创建,完成了增强的封装过程,那么解析最终的一步就是代理的创建获取。
代码块8: ProxyFactory#getProxy方法
public Object getProxy(@Nullable ClassLoader classLoader) {
	// 1.1.createAopProxy方法会根据规则创建AOP代理类 , getProxy用于获取获取代理对象
	return createAopProxy().getProxy(classLoader);
}

protected final synchronized AopProxy createAopProxy() {
	if (!this.active) {
		activate();
	}
	//2.1 createAopProxy会根据当前ProcyFactory对象创建AOP代理类
	return getAopProxyFactory().createAopProxy(this);
}

/**
 * Return the AopProxyFactory that this ProxyConfig uses.
 */
public AopProxyFactory getAopProxyFactory() {
	return this.aopProxyFactory;
}

//org.springframework.aop.framework.DefaultAopProxyFactory#createAopProxy
@Override
public AopProxy createAopProxy(AdvisedSupport config) throws AopConfigException {
	//3.1 根据规则选择使用JDK动态代理还是CGLIB动态代理
	if (config.isOptimize() || config.isProxyTargetClass() || hasNoUserSuppliedProxyInterfaces(config)) {
		Class targetClass = config.getTargetClass();
		if (targetClass == null) {
			throw new AopConfigException("TargetSource cannot determine target class: " +
					"Either an interface or a target is required for proxy creation.");
		}
		if (targetClass.isInterface() || Proxy.isProxyClass(targetClass)) {
			return new JdkDynamicAopProxy(config);
		}
		return new ObjenesisCglibAopProxy(config);
	}
	else {
		return new JdkDynamicAopProxy(config);
	}
}
在第1.1步中createAopProxy()方法会返回一个AopProxy,AopProxy是一个接口,它有两个实现了,分别代表了JDK和CGLIB的AOP代理类,其AopProxy的接口实现如下:
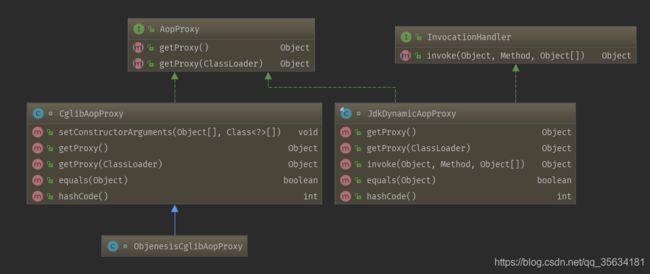
在createAopProxy方法中,会根据规则选择使用ObjenesisCglibAopProxy或者是JdkDynamicAopProxy进行返回,然后在第1.1步中调用相应的getProxy方法,因为ObjenesisCglibAopProxy和JdkDynamicAopProxy都是AopProxy接口的子类,都需要实现AopProxy接口的所有方法。
所以,如果在createAopProxy方法中返回的是JdkDynamicAopProxy,那么具体的就会调用JdkDynamicAopProxy的getProxy方法。
第3.1步的规则如下:
optimize:用来控制通过CGLIB创建的代理是否使用激进的优化策略。除非完全了解AOP代理是如何优化,否则不推荐用户使用这个设置,目前这个属性仅用于CGLIB代理,对于JDK动态代理(缺省代理)无效。
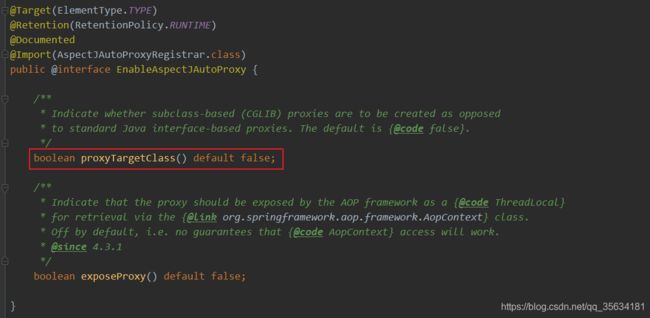
proxyTargetClass:这个属性为true时,目标类本身被代理而不是目标类的接口。如果这个属性值被设为true,CGLIB代理将被创建,还记得我们在Spring AOP源码解析一中代码块2:AspectJAutoProxyRegistrar源码中的设置proxyTargetClass的代码吗,其proxyTargetClass是在@EnableAspectJAutoProxy注解里面进行设置的,如下图:
hasNOUser Supplied Proxy Interfaces:是否存在代理接口。
至此就是创建代理的过程,后面就是两种动态代理的生成proxy的方式和底层的实现。见Spring AOP 详解的jdk源码分析和cglib分析
下面是对JDK与Cglib方式的总结:
如果目标对象实现了接口,默认情况下会采用JDK的动态代理实现AOP。
如果目标对象实现了接口,可以强制使用CGLIB实现AOP。
如果目标对象没有实现了接口,必须采用CGLIB库。
要点列表形式
proxyTargetClasstrue- 目标对象实现了接口 – 使用
CGLIB代理机制 - 目标对象没有接口(只有实现类) – 使用
CGLIB代理机制
- 目标对象实现了接口 – 使用
false- 目标对象实现了接口 – 使用
JDK动态代理机制(代理所有实现了的接口) - 目标对象没有接口(只有实现类) – 使用
CGLIB代理机制
- 目标对象实现了接口 – 使用
关于AopProxy接口的getProxy方法,有两个实现:JDK、CGLIB,所以getProxy需要分析两个方法,那么咱们先分析CGLIB的getProxy方法,具体看代码块9,关于JDK的动态代理,其具体看代码块11.
代码块9:CglibAopProxy#getProxy方法
@Override
public Object getProxy(@Nullable ClassLoader classLoader) {

	try {
		Class rootClass = this.advised.getTargetClass();
		Assert.state(rootClass != null, "Target class must be available for creating a CGLIB proxy");

		Class proxySuperClass = rootClass;
		if (ClassUtils.isCglibProxyClass(rootClass)) {
			proxySuperClass = rootClass.getSuperclass();
			Class[] additionalInterfaces = rootClass.getInterfaces();
			for (Class additionalInterface : additionalInterfaces) {
				this.advised.addInterface(additionalInterface);
			}
		}

		// Validate the class, writing log messages as necessary.
		// 1. 验证Class
		validateClassIfNecessary(proxySuperClass, classLoader);

		// Configure CGLIB Enhancer...
		// 2.创建和配置Enhancer
		Enhancer enhancer = createEnhancer();
		if (classLoader != null) {
			enhancer.setClassLoader(classLoader);
			if (classLoader instanceof SmartClassLoader &&
					((SmartClassLoader) classLoader).isClassReloadable(proxySuperClass)) {
				enhancer.setUseCache(false);
			}
		}
		enhancer.setSuperclass(proxySuperClass);
		enhancer.setInterfaces(AopProxyUtils.completeProxiedInterfaces(this.advised));
		enhancer.setNamingPolicy(SpringNamingPolicy.INSTANCE);
		enhancer.setStrategy(new ClassLoaderAwareUndeclaredThrowableStrategy(classLoader));

		//3.设置拦截器
		Callback[] callbacks = getCallbacks(rootClass);
		Class[] types = new Class[callbacks.length];
		for (int x = 0; x < types.length; x++) {
			types[x] = callbacks[x].getClass();
		}
		// fixedInterceptorMap only populated at this point, after getCallbacks call above
		enhancer.setCallbackFilter(new ProxyCallbackFilter(
				this.advised.getConfigurationOnlyCopy(), this.fixedInterceptorMap, this.fixedInterceptorOffset));
		enhancer.setCallbackTypes(types);

		// Generate the proxy class and create a proxy instance.
		//4.生成代理类和创建代理
		return createProxyClassAndInstance(enhancer, callbacks);
	}
	catch (CodeGenerationException | IllegalArgumentException ex) {
		throw new AopConfigException("Could not generate CGLIB subclass of " + this.advised.getTargetClass() +
				": Common causes of this problem include using a final class or a non-visible class",
				ex);
	}
	catch (Throwable ex) {
		// TargetSource.getTarget() failed
		throw new AopConfigException("Unexpected AOP exception", ex);
	}
}
第3步为创建获取拦截器链,其具体看代码块10,
代码块10: CglibAopProxy#getCallbacks方法
private Callback[] getCallbacks(Class rootClass) throws Exception {
// Parameters used for optimization choices...
//1.对expose-proxy属性的处理
boolean exposeProxy = this.advised.isExposeProxy();
boolean isFrozen = this.advised.isFrozen();
boolean isStatic = this.advised.getTargetSource().isStatic();
// Choose an "aop" interceptor (used for AOP calls).
//2. 将拦截器封装在DynamicAdvisedInterceptor中
Callback aopInterceptor = new DynamicAdvisedInterceptor(this.advised);
// Choose a "straight to target" interceptor. (used for calls that are
// unadvised but can return this). May be required to expose the proxy.
Callback targetInterceptor;
if (exposeProxy) {
targetInterceptor = (isStatic ?
new StaticUnadvisedExposedInterceptor(this.advised.getTargetSource().getTarget()) :
new DynamicUnadvisedExposedInterceptor(this.advised.getTargetSource()));
}
else {
targetInterceptor = (isStatic ?
new StaticUnadvisedInterceptor(this.advised.getTargetSource().getTarget()) :
new DynamicUnadvisedInterceptor(this.advised.getTargetSource()));
}
// Choose a "direct to target" dispatcher (used for
// unadvised calls to static targets that cannot return this).
Callback targetDispatcher = (isStatic ?
new StaticDispatcher(this.advised.getTargetSource().getTarget()) : new SerializableNoOp());
// 3.将拦截器链加入到Callback中
Callback[] mainCallbacks = new Callback[] {
aopInterceptor, // for normal advice
targetInterceptor, // invoke target without considering advice, if optimized
new SerializableNoOp(), // no override for methods mapped to this
targetDispatcher, this.advisedDispatcher,
new EqualsInterceptor(this.advised),
new HashCodeInterceptor(this.advised)
};
Callback[] callbacks;
// If the target is a static one and the advice chain is frozen,
// then we can make some optimizations by sending the AOP calls
// direct to the target using the fixed chain for that method.
if (isStatic && isFrozen) {
Method[] methods = rootClass.getMethods();
Callback[] fixedCallbacks = new Callback[methods.length];
this.fixedInterceptorMap = new HashMap<>(methods.length);
// TODO: small memory optimization here (can skip creation for methods with no advice)
for (int x = 0; x < methods.length; x++) {
List在getCallbacks中spring考虑了很多情况,但是对于我们来说,只需要理解最常用的就可以了,比如将advised属性封装在DynamicAdvisedInterceptor并加入在callbacks中,这么做的目的是什么,为什么会这么做?在前面的示例中,我们了解到CGLIB中对于方法的拦截是通过将自定义的拦截器(实现MethodInterceptor接口)加入Callback中并在调用代理的时候直接激活拦截器中的intercept方法来实现的,那么在getCallback中正是实现了这样的一个目的,DynamicAdvisedInterceptor继承自MethodInterceptor加入CallBack中后,再次调用代理时会直接调用DynamicAdvisedInterceptor中的intercept方法,所以,由此推断,对于CGLIB方式实现的代理,其核心逻辑在DynamicAdvisedInterceptor中的intercept方法,DynamicAdvisedInterceptor作为CglibAopProxy内部封装私有类,其在org.springframework.aop.framework.CglibAopProxy类中:
@Override
@Nullable
public Object intercept(Object proxy, Method method, Object[] args, MethodProxy methodProxy) throws Throwable {
Object oldProxy = null;
boolean setProxyContext = false;
Object target = null;
TargetSource targetSource = this.advised.getTargetSource();
try {
if (this.advised.exposeProxy) {
// Make invocation available if necessary.
oldProxy = AopContext.setCurrentProxy(proxy);
setProxyContext = true;
}
// Get as late as possible to minimize the time we "own" the target, in case it comes from a pool...
target = targetSource.getTarget();
Class targetClass = (target != null ? target.getClass() : null);
// 获取拦截链
List上述的实现与JDK方式实现代理中的invoke方法基本相同,都是首先构造链,然后封装此链进行串联调用,区别就是在JDK代理中直接构造ReflectiveMethodInvocation类,而在CGLIB代理中使用CglibMethodInvocation,CglibMethodInvocation继承自ReflectiveMethodInvocation,但是process方法没有重写。
代码块11:JdkDynamicAopProxy#getProxy方法
@Override
public Object getProxy(@Nullable ClassLoader classLoader) {
	if (logger.isDebugEnabled()) {
		logger.debug("Creating JDK dynamic proxy: target source is " + this.advised.getTargetSource());
	}
	//1.为给定的AOP配置确定要代理的完整接口集
	Class[] proxiedInterfaces = AopProxyUtils.completeProxiedInterfaces(this.advised, true);
	findDefinedEqualsAndHashCodeMethods(proxiedInterfaces);
	//2.创建一个动态代理对象
	return Proxy.newProxyInstance(classLoader, proxiedInterfaces, this);
}
JDKProxy的使用关键是创建自定义的InvocationHandler,而InvocationHandler中包含了需要覆盖的函数getProxy,并且JdkDynamicAopProxy还实现了InvocationHandler接口,所以,AOP的代理会调用它的invoke方法。当调用AOP 动态代理对象的方法时,就会调用它的invoke方法,关于这个逻辑后面再将。
关于AOP动态代理创建对象的流程就先讲到这,下面进行总结一下。
总结:
在Spring创建bean时,在没有循环依赖是,会在生命周期的BeanPostProcessor# postProcessAfterInitialization中进行判断该bean是否需要进行AOP动态代理,先找到容器中找到所有的通知方法,然后根据切点表达式判断当前bean是否有可用的通知方法,如果没有的话,则直接返回,如果有,拿到当前bean可用的通知方法,然后进行统一的适配和排序,再根据@EnableAspectJAutoProxy注解中配置的proxyTargetClass和当前bean是否实现了接口,进行选择使用JDK、CGLIB进行动态代理的增强。