Openwrt编写GPIO驱动控制LED
一、驱动的编写
1.创建gpio_control_driver文件夹
2.在gpio_control_driver文件夹下再创建src文件夹以及Makefile文件
Makefile文件如下:
include $(TOPDIR)/rules.mk
include $(INCLUDE_DIR)/kernel.mk

PKG_NAME:=gpio_control_driver
PKG_RELEASE:=1

include $(INCLUDE_DIR)/package.mk

define KernelPackage/gpio_control_driver
  SUBMENU:=Other modules
  DEPENDS:=@GPIO_SUPPORT
  TITLE:=Driver for JS9331/JS7628 gpios control
  FILES:=$(PKG_BUILD_DIR)/gpio_control_driver.ko
  KCONFIG:=
  AUTOLOAD:=$(call AutoLoad,30,gpio_control_driver)
endef

define KernelPackage/gpio_control_driver/description
 Kernel module to control gpios for JS9331 and JS7628
endef

EXTRA_KCONFIG:= \
        CONFIG_GPIO_CONTROL_DRIVER=m

define Build/Prepare
	mkdir -p $(PKG_BUILD_DIR)
	$(CP) ./src/* $(PKG_BUILD_DIR)/
endef

define Build/Compile
	$(MAKE) -C "$(LINUX_DIR)" \
		CROSS_COMPILE="$(TARGET_CROSS)" \
		ARCH="$(LINUX_KARCH)" \
		SUBDIRS="$(PKG_BUILD_DIR)" \
		EXTRA_CFLAGS="$(BUILDFLAGS)" \
		$(EXTRA_KCONFIG)
endef

$(eval $(call KernelPackage,gpio_control_driver))
3.在src文件夹下再创建Makefile,Kconfig文件以及gpio对应的.c,.h驱动文件
Makefile文件:
obj-${CONFIG_GPIO_CONTROL_DRIVER} += gpio_control_driver.oKconfig文件:
config GPIO_CONTROL_DRIVER
        tristate "Gpio control driver for AR9344"
        depends on GENERIC_GPIO
驱动文件gpio_control_driver.c:
#include
#include
#include
#include
#include
#include
#include
#include
#include
#include
#include
#include
#include
#include
#include


#include "gpio_control_driver.h"

static int gpio_control_open(struct inode *pinode, struct file *pfile)
{
	printk("***%s***\n",__func__);
	//initialize

	return 0;
}

static int gpio_control_release(struct inode *pinode, struct file *pfile)
{
	printk("***%s***\n",__func__);

	return 0;
}


static long gpio_control_ioctl(struct file *pfile, unsigned int cmd, unsigned long arg)
{
	int ret;
	unsigned char gpio_number;
	unsigned char gpio_value;

	//printk("***%s***\n",__func__);
	//printk("cmd:0x%02X\n", cmd);

	gpio_number = GET_GPIO_NUM(arg);
	gpio_value  = GET_GPIO_VALUE(arg);
	//printk("gpio number:%d\n", gpio_number);
	//printk("gpio value:0x%02X\n", gpio_value);

	switch (cmd){
	case GPIO_CONTROL_SET_OUT:
		//printk("command: GPIO_CONTROL_SET_OUT\n");
		ret = gpio_direction_output(gpio_number, gpio_value);
		if (ret < 0){
			//printk("###gpio_direction_output ERROR: can't set gpio %d output###\n", gpio_number);
			return -1;
		}
		//printk("command: GPIO_CONTROL_SET_OUT done\n");
		break;

	case GPIO_CONTROL_SET_IN:
		ret = gpio_direction_input(gpio_number);
		if (ret < 0){
			//printk("###gpio_direction_input ERROR: can't set gpio %d input###\n", gpio_number);
			return -1;
		}
		//printk("command: GPIO_CONTROL_SET_IN\n");
		break;
#if 0
	case GPIO_CONTROL_GET_DIRECTION:

		printk("command: GPIO_CONTROL_GET_DIRECTION\n");
		break;
#endif
	case GPIO_CONTROL_SET_VALUE:
		gpio_set_value(gpio_number, gpio_value);
		//printk("command: GPIO_CONTROL_SET_VALUE\n");
		break;

	case GPIO_CONTROL_GET_VALUE:
		ret = gpio_get_value(gpio_number);
		if (ret < 0){
			//printk("###gpio_get_value ERROR: can't get gpio %d value###\n", gpio_number);
			return -1;
		}
		//printk("command: GPIO_CONTROL_GET_VALUE\n");
		break;

	case GPIO_CONTROL_REQUEST_GPIO:
		//printk("command: GPIO_CONTROL_REQUEST_ONE\n");
		if (0 > gpio_request(gpio_number, "gpio_ctrl")){
			//printk("###gpio_request ERROR: can't request %d pin for output###\n", gpio_number);
			return -1;
		}
		//printk("command: GPIO_CONTROL_REQUEST_GPIO done\n");
		break;

	case GPIO_CONTROL_FREE_GPIO:
		gpio_free(gpio_number);
		//printk("command: GPIO_CONTROL_FREE_GPIO done\n");
		break;

	default:
		printk("***Unknown command:0x%02X\n***\n", cmd);
		break;

	}

	return 0;
}

static const struct file_operations gpio_control_ops = {
		.owner 			= THIS_MODULE,
		.open			= gpio_control_open,
		.release		= gpio_control_release,
		.unlocked_ioctl	= gpio_control_ioctl,
};

static struct miscdevice s_gpio_control_dev = {
		.minor = MISC_DYNAMIC_MINOR,
		.fops = &gpio_control_ops,
		.name = GPIO_CONTROL_DEV_NAME
};

//module initialize function
static int gpio_control_init(void)
{
	int result;
	//initialize and register device
	result = misc_register(&s_gpio_control_dev);
	if (result != 0) {
		//printk("###misc_register error###\n");
		return -1;
	}

	printk("**gpio_control module initiation OK**\n");
	return result;
}

//module exit fuc
void gpio_control_exit(void)
{
	//unregister what we registered
	misc_deregister(&s_gpio_control_dev);

	printk("**gpio_control module exit**\n");
}

module_init(gpio_control_init);
module_exit(gpio_control_exit);

MODULE_VERSION("V1.0");
MODULE_AUTHOR("wq ");
MODULE_LICENSE("Dual BSD/GPL");
驱动文件gpio_control_driver.h:
#ifndef GPIO_CONTROL_DRIVER_H_
#define GPIO_CONTROL_DRIVER_H_

#include
#include
#include

#define GET_GPIO_NUM(arg1) (unsigned char)((arg1 >> 24) & 0xff)
#define GET_GPIO_VALUE(arg1) (unsigned char)((arg1 >> 16) & 0xff)

#define GPIO_CONTROL_MAJOR 					99//device major number


#define GPIO_CONTROL_DEV_NAME		"gpio_control"

//IOCTRL CMDs
#define GPIO_CONTROL_SET_OUT			0x01
#define GPIO_CONTROL_SET_IN			0x02
//#define GPIO_CONTROL_GET_DIRECTION		0x03
#define GPIO_CONTROL_SET_VALUE			0x04
#define GPIO_CONTROL_GET_VALUE			0x05
#define GPIO_CONTROL_REQUEST_GPIO		0x06
#define GPIO_CONTROL_FREE_GPIO			0x07


#endif /* GPIO_CONTROL_DRIVER_H_ */
二、驱动的编译安装
1.将gpio_control_driver文件夹拷贝到openwrt源码目录下的/package/kernel/下
2.进入openwrt的/目录,输入
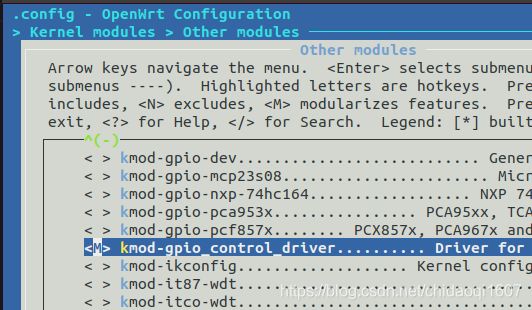
make menuconfig3.配置如下
4.编译
make V=s5.在源码/bin/targets/ath79/generic/packages下找到kmod-gpio_control_driver_4.19.57-1_mips_24kc.ipk,通过scp上传到板子上。
6.安装驱动
在板子上执行
opkg install kmod-gpio_control_driver_4.19.57-1_mips_24kc.ipk在/lib/modules/4.19.57/下可以找到gpio_control_driver.ko,执行
insmod gpio_control_driver.ko这样驱动已经成功安装,如果想卸载,可以执行
rmmod gpio_control_driver.ko此时,可以看见在板子的/dev/下存在gpio_control驱动
7.将驱动加载到内核
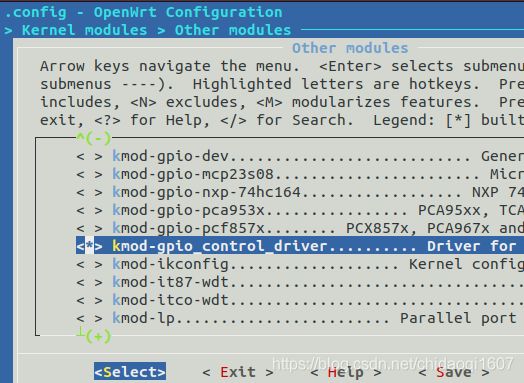
我们也可以直接将驱动加载到内核,这样就不需要手动安装了,只要将内核配置改为
然后还是去openwrt的/目录下执行
make V=s将/bin/targets/ath79/generic/下生成的新固件(.bin文件)更新下系统,等系统重启完可以看见在板子的/dev/下存在gpio_control驱动
三、驱动的测试
1.编写测试程序
驱动测试文件gpio_control_test.c:
#include
#include
#include
#include
#include
#include
#include
#include
#include "gpio_control_test.h"

static unsigned char gpio_pin;//define GPIOs to be use
static int gpio_dev_fd;

void demo1_release(int signal_no)
{
	ioctl(gpio_dev_fd, GPIO_CONTROL_SET_IN, GPIO_IOCTL_PRAM(gpio_pin, 0));
	ioctl(gpio_dev_fd, GPIO_CONTROL_FREE_GPIO, GPIO_IOCTL_PRAM(gpio_pin, 0));
	exit(0);
}


//指定管脚拉高, 拉低
int set_gpio(unsigned char pin, int state)
{

    if(state == 1)
    {
        ioctl(gpio_dev_fd, GPIO_CONTROL_SET_VALUE, GPIO_IOCTL_PRAM(pin, 1));
    }
    else if(state == 0)
    {
        ioctl(gpio_dev_fd, GPIO_CONTROL_SET_VALUE, GPIO_IOCTL_PRAM(pin, 0));
    }
    else
    {
        printf("No such set\n");
        goto ERROR;
    }

    return 0;

    ERROR:
        return -1;
}

int gpio_init(int pin)
{
    int ret;

    gpio_pin = pin;

    gpio_dev_fd = open(GPIO_CONTROL_DEVICE_PATH, O_RDWR);//open gpio device
    if (gpio_dev_fd < 0){
        printf("###open %s ERROR###\n", GPIO_CONTROL_DEVICE_PATH);
        goto ERROR;
    }else{
        printf("***open %s success***\n", GPIO_CONTROL_DEVICE_PATH);
    }

    ret = ioctl(gpio_dev_fd, GPIO_CONTROL_REQUEST_GPIO, GPIO_IOCTL_PRAM(pin, 0));
	if (ret < 0){
		printf("###request GPIO %d error###", pin);
		goto ERROR;
	}
	ret = ioctl(gpio_dev_fd, GPIO_CONTROL_SET_OUT, GPIO_IOCTL_PRAM(pin, 0));
	if (ret < 0){
		printf("###set GPIO %d output error###", pin);
		goto ERROR;
	}

	signal(SIGINT, demo1_release);//register terminal signal

    return 0;

    ERROR:
        return -1;
}


int main()
{
    gpio_init(42);
    gpio_init(40);
    gpio_init(39);

    while(1)
    {
        set_gpio(42, 1);
        usleep(200000);
        set_gpio(42, 0);
        usleep(200000);
        set_gpio(40, 1);
        usleep(200000);
        set_gpio(40, 0);
        usleep(200000);
        set_gpio(39, 1);
        usleep(200000);
        set_gpio(39, 0);
        usleep(200000);
    }
}
驱动测试文件gpio_control_test.h:
#ifndef GPIO_CONTROL_TEST_H_
#define GPIO_CONTROL_TEST_H_

#define GPIO_CONTROL_DEVICE_PATH		"/dev/gpio_control"

#define GPIO_IOCTL_PRAM(gpio_num, arg1) (((unsigned long)gpio_num << 24) + ((unsigned long)arg1 << 16))
#define GET_GPIO_NUM(arg1) (unsigned char)((arg1 >> 24) & 0xff)
#define GET_GPIO_VALUE(arg1) (unsigned char)((arg1 >> 16) & 0xff)

//IOCTRL CMDs
#define GPIO_CONTROL_SET_OUT			0x01
#define GPIO_CONTROL_SET_IN			0x02
//#define GPIO_CONTROL_GET_DIRECTION		0x03
#define GPIO_CONTROL_SET_VALUE			0x04
#define GPIO_CONTROL_GET_VALUE			0x05
#define GPIO_CONTROL_REQUEST_GPIO		0x06
#define GPIO_CONTROL_FREE_GPIO			0x07

int set_gpio(unsigned char pin, int state);
int gpio_init(int pin);
void delay_ms(int ms);


#endif
2.编译
mips-openwrt-linux-gcc -o gpio_control_test gpio_control_test.c
3.将gpio_control_test通过scp上传到板子上并执行,可以看到3个灯的闪烁

