Dubbo源码分析-服务导出
本文紧接上一篇 dubbo的自适应机制
参考自官网-服务导出
本篇文章,我们来研究一下 Dubbo 导出服务的过程。Dubbo 服务导出过程始于 Spring 容器发布刷新事件,Dubbo 在接收到事件后,会立即执行服务导出逻辑。
整个过程可简单总结为:先创建注册中心实例,之后再通过注册中心实例注册服务。
整个逻辑大致可分为三个部分
第一部分是 前置工作,主要用于检查参数,组装 URL。
第二部分是 导出服务,包含导出服务到本地 (JVM),和导出服务到远程两个过程。
第三部分是 向注册中心注册服务,用于服务发现。
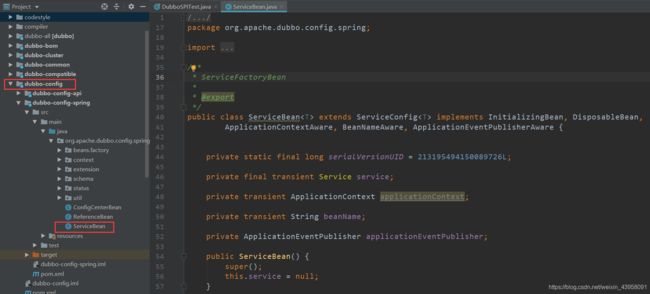
服务导出的入口方法是 ServiceBean(具体所在包如图) 的 onApplicationEvent(2.6.x版本是这样)。onApplicationEvent 是一个事件响应方法,该方法会在收到 Spring 上下文刷新事件后执行服务导出操作。

public void onApplicationEvent(ContextRefreshedEvent event) {

    // 是否有延迟导出 && 是否已导出 && 是不是已被取消导出
    if (isDelay() && !isExported() && !isUnexported()) {

        // 导出服务
        export();
    }
}

isDelay()当方法返回 true 时,表示无需延迟导出。返回 false 时,表示需要延迟导出。

// -☆- ServiceBean
private boolean isDelay() {

    // 获取 delay
    Integer delay = getDelay();
    ProviderConfig provider = getProvider();
    if (delay == null && provider != null) {

        // 如果前面获取的 delay 为空,这里继续获取
        delay = provider.getDelay();
    }
    // 判断 delay 是否为空,或者等于 -1
    return supportedApplicationListener && (delay == null || delay == -1);
}
解释一下 supportedApplicationListener 变量含义,该变量用于表示当前的 Spring 容器是否支持 ApplicationListener,这个值初始为 false。
在 Spring 容器将自己设置到 ServiceBean 中时,ServiceBean 的 setApplicationContext 方法会检测 Spring 容器是否支持 ApplicationListener。若支持,则将 supportedApplicationListener 置为 true。ServiceBean 是 Dubbo 与 Spring 框架进行整合的关键,可以看做是两个框架之间的桥梁。具有同样作用的类还有 ReferenceBean。
前置工作
前置工作主要包含两个部分,分别是配置检查,以及 URL 装配。在导出服务之前,Dubbo 需要检查用户的配置是否合理,或者为用户补充缺省配置。配置检查完成后,接下来需要根据这些配置组装 URL。Dubbo 使用 URL 作为配置载体,所有的拓展点都是通过 URL 获取配置。
采用 URL 作为配置信息的统一格式,所有扩展点都通过传递 URL 携带配置信息。
- 检查配置
@Override
public void export() {

    进入到父类ServiceConfig中执行。
    super.export();
    // Publish ServiceBeanExportedEvent
    publishExportEvent();
}


### ServiceConfig中

private static final ScheduledExecutorService delayExportExecutor = Executors.newSingleThreadScheduledExecutor(new NamedThreadFactory("DubboServiceDelayExporter", true));

public synchronized void export() {

    if (provider != null) {

        // 获取 export 和 delay 配置
        if (export == null) {

            export = provider.getExport();
        }
        if (delay == null) {

            delay = provider.getDelay();
        }
    }
    // 如果 export 为 false,则不导出服务
    if (export != null && !export) {

        return;
    }

    // delay > 0,延时导出服务
    if (delay != null && delay > 0) {

        delayExportExecutor.schedule(new Runnable() {

            @Override
            public void run() {

                doExport();
            }
        }, delay, TimeUnit.MILLISECONDS);

    // 立即导出服务
    } else {

        doExport();
    }
}
export 方法对两项配置进行了检查,并根据配置执行相应的动作。首先是 export 配置,这个配置决定了是否导出服务。有时候我们只是想本地启动服务进行一些调试工作,我们并不希望把本地启动的服务暴露出去给别人调用。此时,我们可通过配置 export 禁止服务导出,比如:
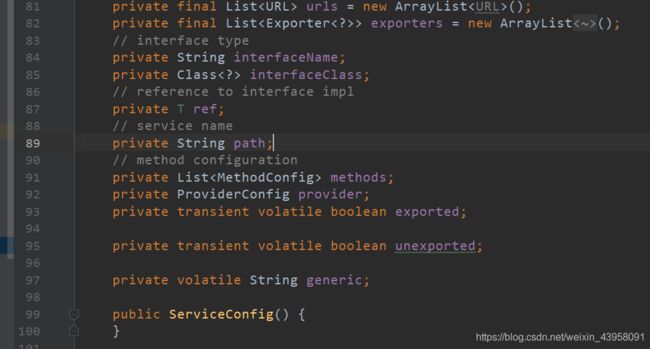
一些重要的变量,可以看到对于每个ProviderConfig对应。

protected synchronized void doExport() {

    if (unexported) {

        throw new IllegalStateException("Already unexported!");
    }
    if (exported) {

        return;
    }
    exported = true;
    // 检测 interfaceName 是否合法
    if (interfaceName == null || interfaceName.length() == 0) {

        throw new IllegalStateException("interface not allow null!");
    }
    // 检测 provider 是否为空,为空则新建一个,并通过系统变量为其初始化
    checkDefault();

    // 下面几个 if 语句用于检测 provider、application 等核心配置类对象是否为空,
    // 若为空,则尝试从其他配置类对象中获取相应的实例。
    if (provider != null) {

        if (application == null) {

            application = provider.getApplication();
        }
        if (module == null) {

            module = provider.getModule();
        }
        if (registries == null) {
     ...}
        if (monitor == null) {
     ...}
        if (protocols == null) {
     ...}
    }
    if (module != null) {

        if (registries == null) {

            registries = module.getRegistries();
        }
        if (monitor == null) {
     ...}
    }
    if (application != null) {

        if (registries == null) {

            registries = application.getRegistries();
        }
        if (monitor == null) {
     ...}
    }

    // 检测 ref 是否为泛化服务类型
    if (ref instanceof GenericService) {

        // 设置 interfaceClass 为 GenericService.class
        interfaceClass = GenericService.class;
        if (StringUtils.isEmpty(generic)) {

            // 设置 generic = "true"
            generic = Boolean.TRUE.toString();
        }

    // ref 非 GenericService 类型
    } else {

        try {

            interfaceClass = Class.forName(interfaceName, true, Thread.currentThread()
                    .getContextClassLoader());
        } catch (ClassNotFoundException e) {

            throw new IllegalStateException(e.getMessage(), e);
        }
        // 对 interfaceClass,以及  标签中的必要字段进行检查
        checkInterfaceAndMethods(interfaceClass, methods);
        // 对 ref 合法性进行检测
        checkRef();
        // 设置 generic = "false"
        generic = Boolean.FALSE.toString();
    }

    // local 和 stub 在功能应该是一致的,用于配置本地存根,都是字符串类型
    if (local != null) {

        if ("true".equals(local)) {

            local = interfaceName + "Local";
        }
        Class<?> localClass;
        try {

            // 获取本地存根类
            localClass = ClassHelper.forNameWithThreadContextClassLoader(local);
        } catch (ClassNotFoundException e) {

            throw new IllegalStateException(e.getMessage(), e);
        }
        // 检测本地存根类是否可赋值给接口类,若不可赋值则会抛出异常,提醒使用者本地存根类类型不合法
        if (!interfaceClass.isAssignableFrom(localClass)) {

            throw new IllegalStateException("The local implementation class " + localClass.getName() + " not implement interface " + interfaceName);
        }
    }

    if (stub != null) {

        // 此处的代码和上一个 if 分支的代码基本一致,这里省略
    }

    // 检测各种对象是否为空,为空则新建,或者抛出异常
    checkApplication();
    checkRegistry();
    checkProtocol();
    appendProperties(this);
    checkStubAndMock(interfaceClass);
    if (path == null || path.length() == 0) {

        path = interfaceName;
    }

    // 导出服务
    doExportUrls();

    // ProviderModel 表示服务提供者模型,此对象中存储了与服务提供者相关的信息。
    // 比如服务的配置信息,服务实例等。每个被导出的服务对应一个 ProviderModel。
    // ApplicationModel 持有所有的 ProviderModel。
    ProviderModel providerModel = new ProviderModel(getUniqueServiceName(), this, ref);
    ApplicationModel.initProviderModel(getUniqueServiceName(), providerModel);
}
- 检测 dubbo:service 标签的 interface 属性合法性,不合法则抛出异常
- 检测 ProviderConfig、ApplicationConfig 等核心配置类对象是否为空,若为空,则尝试从其他配置类对象中获取相应的实例。
- 检测并处理泛化服务和普通服务类
- 检测本地存根配置,并进行相应的处理
- 对 ApplicationConfig、RegistryConfig 等配置类进行检测,为空则尝试创建,若无法创建则抛出异常
多协议多注册中心导出服务
Dubbo 允许我们使用不同的协议导出服务,也允许我们向多个注册中心注册服务。Dubbo 在 doExportUrls 方法中对多协议,多注册中心进行了支持。相关代码如下:
private void doExportUrls() {

    // 加载注册中心链接
    List<URL> registryURLs = loadRegistries(true);
    // 遍历 protocols,并在每个协议下导出服务
    for (ProtocolConfig protocolConfig : protocols) {

        doExportUrlsFor1Protocol(protocolConfig, registryURLs);
    }
}
上面代码首先是通过 loadRegistries 加载注册中心链接,然后再遍历 ProtocolConfig 集合导出每个服务。并在导出服务的过程中,将服务注册到注册中心。下面,我们先来看一下 loadRegistries 方法的逻辑。(内部实现—先拿到注册中心列表,然后遍历,然后得到URL列表,也即是协议)
protected List<URL> loadRegistries(boolean provider) {

    // 检测是否存在注册中心配置类,不存在则抛出异常
    checkRegistry();
    List<URL> registryList = new ArrayList<URL>();
    if (registries != null && !registries.isEmpty()) {

        for (RegistryConfig config : registries) {

            String address = config.getAddress();
            if (address == null || address.length() == 0) {

                // 若 address 为空,则将其设为 0.0.0.0
                address = Constants.ANYHOST_VALUE;
            }

            // 从系统属性中加载注册中心地址
            String sysaddress = System.getProperty("dubbo.registry.address");
            if (sysaddress != null && sysaddress.length() > 0) {

                address = sysaddress;
            }
            // 检测 address 是否合法
            if (address.length() > 0 && !RegistryConfig.NO_AVAILABLE.equalsIgnoreCase(address)) {

                Map<String, String> map = new HashMap<String, String>();
                // 添加 ApplicationConfig 中的字段信息到 map 中
                appendParameters(map, application);
                // 添加 RegistryConfig 字段信息到 map 中
                appendParameters(map, config);

                // 添加 path、pid,protocol 等信息到 map 中
                map.put("path", RegistryService.class.getName());
                map.put("dubbo", Version.getProtocolVersion());
                map.put(Constants.TIMESTAMP_KEY, String.valueOf(System.currentTimeMillis()));
                if (ConfigUtils.getPid() > 0) {

                    map.put(Constants.PID_KEY, String.valueOf(ConfigUtils.getPid()));
                }
                if (!map.containsKey("protocol")) {

                    if (ExtensionLoader.getExtensionLoader(RegistryFactory.class).hasExtension("remote")) {

                        map.put("protocol", "remote");
                    } else {

                        map.put("protocol", "dubbo");
                    }
                }
				先拿到注册中心列表,然后遍历,然后得到URL列表,也即是协议
                // 解析得到 URL 列表,address 可能包含多个注册中心 ip,
                // 因此解析得到的是一个 URL 列表
                List<URL> urls = UrlUtils.parseURLs(address, map);
                for (URL url : urls) {

                    url = url.addParameter(Constants.REGISTRY_KEY, url.getProtocol());
                    // 将 URL 协议头设置为 registry
                    url = url.setProtocol(Constants.REGISTRY_PROTOCOL);
                    // 通过判断条件,决定是否添加 url 到 registryList 中,条件如下:
                    // (服务提供者 && register = true 或 null)
                    //    || (非服务提供者 && subscribe = true 或 null)
                    if ((provider && url.getParameter(Constants.REGISTER_KEY, true))
                            || (!provider && url.getParameter(Constants.SUBSCRIBE_KEY, true))) {

                        registryList.add(url);
                    }
                }
            }
        }
    }
    return registryList;
}
loadRegistries 方法主要包含如下的逻辑:
- 检测是否存在注册中心配置类,不存在则抛出异常
- 构建参数映射集合,也就是 map
- 构建注册中心链接列表
- 遍历链接列表,并根据条件决定是否将其添加到 registryList 中
组装 URL
配置检查完毕后,紧接着要做的事情是根据配置,以及其他一些信息组装 URL。前面说过,URL 是 Dubbo 配置的载体,通过 URL 可让 Dubbo 的各种配置在各个模块之间传递。
private void doExportUrlsFor1Protocol(ProtocolConfig protocolConfig, List<URL> registryURLs) {

    String name = protocolConfig.getName();
    // 如果协议名为空,或空串,则将协议名变量设置为 dubbo
    if (name == null || name.length() == 0) {

        name = "dubbo";
    }

    Map<String, String> map = new HashMap<String, String>();
    // 添加 side、版本、时间戳以及进程号等信息到 map 中
    map.put(Constants.SIDE_KEY, Constants.PROVIDER_SIDE);
    map.put(Constants.DUBBO_VERSION_KEY, Version.getProtocolVersion());
    map.put(Constants.TIMESTAMP_KEY, String.valueOf(System.currentTimeMillis()));
    if (ConfigUtils.getPid() > 0) {

        map.put(Constants.PID_KEY, String.valueOf(ConfigUtils.getPid()));
    }

    // 通过反射将对象的字段信息添加到 map 中
    appendParameters(map, application);
    appendParameters(map, module);
    appendParameters(map, provider, Constants.DEFAULT_KEY);
    appendParameters(map, protocolConfig);
    appendParameters(map, this);

    // methods 为 MethodConfig 集合,MethodConfig 中存储了  标签的配置信息
    if (methods != null && !methods.isEmpty()) {

        // 这段代码用于添加 Callback 配置到 map 中,代码太长,待会单独分析
    }

    // 检测 generic 是否为 "true",并根据检测结果向 map 中添加不同的信息
    if (ProtocolUtils.isGeneric(generic)) {

        map.put(Constants.GENERIC_KEY, generic);
        map.put(Constants.METHODS_KEY, Constants.ANY_VALUE);
    } else {

        String revision = Version.getVersion(interfaceClass, version);
        if (revision != null && revision.length() > 0) {

            map.put("revision", revision);
        }

        // 为接口生成包裹类 Wrapper,Wrapper 中包含了接口的详细信息,比如接口方法名数组,字段信息等
        String[] methods = Wrapper.getWrapper(interfaceClass).getMethodNames();
        // 添加方法名到 map 中,如果包含多个方法名,则用逗号隔开,比如 method = init,destroy
        if (methods.length == 0) {

            logger.warn("NO method found in service interface ...");
            map.put(Constants.METHODS_KEY, Constants.ANY_VALUE);
        } else {

            // 将逗号作为分隔符连接方法名,并将连接后的字符串放入 map 中
            map.put(Constants.METHODS_KEY, StringUtils.join(new HashSet<String>(Arrays.asList(methods)), ","));
        }
    }

    // 添加 token 到 map 中
    if (!ConfigUtils.isEmpty(token)) {

        if (ConfigUtils.isDefault(token)) {

            // 随机生成 token
            map.put(Constants.TOKEN_KEY, UUID.randomUUID().toString());
        } else {

            map.put(Constants.TOKEN_KEY, token);
        }
    }
    // 判断协议名是否为 injvm
    if (Constants.LOCAL_PROTOCOL.equals(protocolConfig.getName())) {

        protocolConfig.setRegister(false);
        map.put("notify", "false");
    }

    // 获取上下文路径
    String contextPath = protocolConfig.getContextpath();
    if ((contextPath == null || contextPath.length() == 0) && provider != null) {

        contextPath = provider.getContextpath();
    }

    // 获取 host 和 port
    String host = this.findConfigedHosts(protocolConfig, registryURLs, map);
    Integer port = this.findConfigedPorts(protocolConfig, name, map);
    // 组装 URL
    URL url = new URL(name, host, port, (contextPath == null || contextPath.length() == 0 ? "" : contextPath + "/") + path, map);

    // 省略无关代码
}
上面的代码首先是将一些信息,比如版本、时间戳、方法名以及各种配置对象的字段信息放入到 map 中,map 中的内容将作为 URL 的查询字符串。构建好 map 后,紧接着是获取上下文路径、主机名以及端口号等信息。最后将 map 和主机名等数据传给 URL 构造方法创建 URL 对象。需要注意的是,这里出现的 URL 并非 java.net.URL,而是 com.alibaba.dubbo.common.URL。
上面省略了一段代码,这里简单分析一下。这段代码用于检测 dubbo:method 标签中的配置信息,并将相关配置添加到 map 中。代码如下:
private void doExportUrlsFor1Protocol(ProtocolConfig protocolConfig, List<URL> registryURLs) {

    // ...

    // methods 为 MethodConfig 集合,MethodConfig 中存储了  标签的配置信息
    if (methods != null && !methods.isEmpty()) {

        for (MethodConfig method : methods) {

            // 添加 MethodConfig 对象的字段信息到 map 中,键 = 方法名.属性名。
            // 比如存储  对应的 MethodConfig,
            // 键 = sayHello.retries,map = {"sayHello.retries": 2, "xxx": "yyy"}
            appendParameters(map, method, method.getName());

            String retryKey = method.getName() + ".retry";
            if (map.containsKey(retryKey)) {

                String retryValue = map.remove(retryKey);
                // 检测 MethodConfig retry 是否为 false,若是,则设置重试次数为0
                if ("false".equals(retryValue)) {

                    map.put(method.getName() + ".retries", "0");
                }
            }
			// 获取 ArgumentConfig 列表
			List<ArgumentConfig> arguments = method.getArguments();
			for (遍历 ArgumentConfig 列表) {

			    if (type 不为 null,也不为空串) {
         // 分支1
			        1. 通过反射获取 interfaceClass 的方法列表
			        for (遍历方法列表) {

			            1. 比对方法名,查找目标方法
			        	2. 通过反射获取目标方法的参数类型数组 argtypes
			            if (index != -1) {
         // 分支2
			                1. 从 argtypes 数组中获取下标 index 处的元素 argType
			                2. 检测 argType 的名称与 ArgumentConfig 中的 type 属性是否一致
			                3. 添加 ArgumentConfig 字段信息到 map 中,或抛出异常
			            } else {
         // 分支3
			                1. 遍历参数类型数组 argtypes,查找 argument.type 类型的参数
			                2. 添加 ArgumentConfig 字段信息到 map 中
			            }
			        }
			    } else if (index != -1) {
         // 分支4
					1. 添加 ArgumentConfig 字段信息到 map 中
			    }
			}
appendParameters 这个方法出现的次数比较多,该方法用于将对象字段信息添加到 map 中。实现上则是通过反射获取目标对象的 getter 方法,并调用该方法获取属性值。然后再通过 getter 方法名解析出属性名,比如从方法名 getName 中可解析出属性 name。
如果用户传入了属性名前缀,此时需要将属性名加入前缀内容。最后将 <属性名,属性值> 键值对存入到 map 中就行了。
导出 Dubbo 服务
前置工作做完,接下来就可以进行服务导出了。服务导出分为导出到本地 (JVM),和导出到远程。在深入分析服务导出的源码前,我们先来从宏观层面上看一下服务导出逻辑。如下: