Android Development
Android
Beginner’s entry level
文章目录
- Android
-
- Beginner's entry level
- Introduce
- Project
- Activity
- LinearLayout
- RelativeLayout
- TextView
- Button
- EditText
- RadioButton
- CheckBox
- ImageView
- ListView
- GridView
- ScrollView&HorizontalScrollView
- WebView
- Toast
- AlertDialog
- ProgressBar&ProgressDialogue
- PopuppWindow
- Activity
- Fragment
- Handler
- Android Storage
- SharedPreferences
- InternalStorage
- ExternalStorage
- BroadCast
- ValueAnimator
Introduce
Android是Google开发的操作系统,是移动应用开发的表现之一
项目流程:Android <–> 接口 <–> 数据库
开发工具Android Studio,利用JAVA语言,因此需要JDK
Project
新建一个项目,依次展开文件夹
JAVA文件AndroidLearn\app\src\main\java\com.example.androidlearn
资源和样式文件AndroidLearn\app\src\main\res\drawable
布局文件AndroidLearn\app\src\main\res\layout
Manifest文件AndroidLearn\app\src\main\AndroidManifest.xml
gradle配置文件AndroidLearn\app\build.gradle
Activity
每一个界面可以看成一个Activity,新建一个Empty Activity作为MainActivity
每一个Activity需要对应的布局文件
public class MainActivity extends AppCompatActivity {

    @Override
    protected void onCreate(Bundle savedInstanceState) {

        super.onCreate(savedInstanceState);
        setContentView(R.layout.activity_main);
    }
}
<LinearLayout xmlns:android="http://schemas.android.com/apk/res/android"
    xmlns:app="http://schemas.android.com/apk/res-auto"
    xmlns:tools="http://schemas.android.com/tools"
    android:layout_width="match_parent"
    android:layout_height="match_parent"
    android:orientation="vertical"
    tools:context=".MainActivity">
LinearLayout>
此时可运行该程序,为空白界面
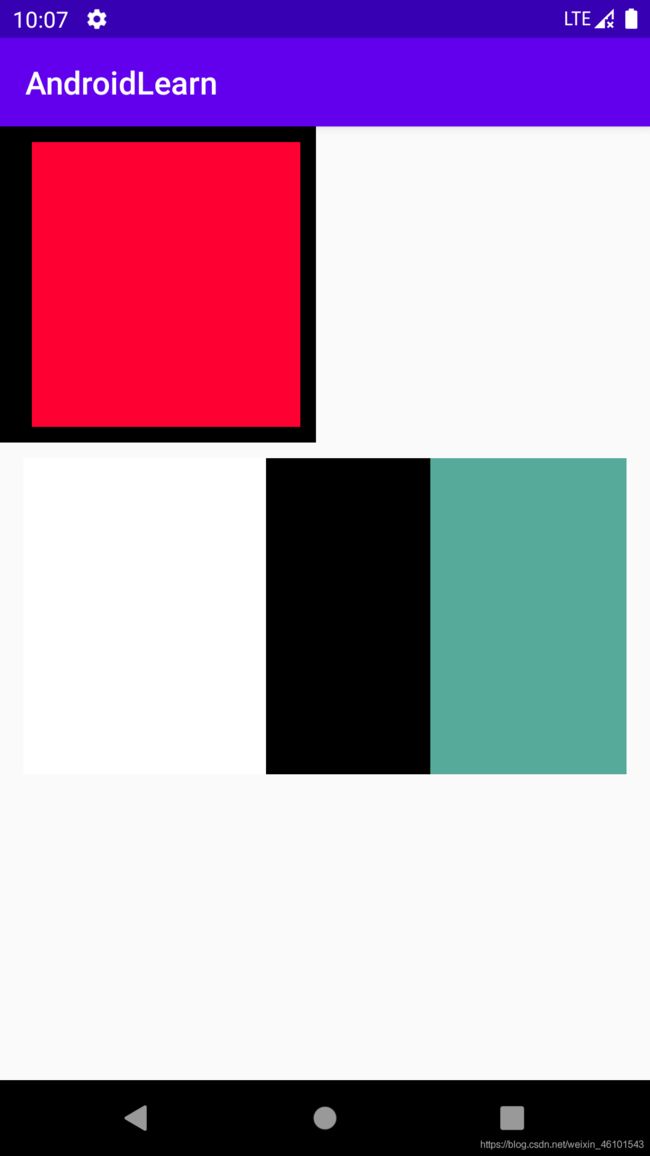
LinearLayout
利用线性布局,可绘制一些图案
对于线性布局,设置方向是必须的
<LinearLayout xmlns:android="http://schemas.android.com/apk/res/android"
    xmlns:app="http://schemas.android.com/apk/res-auto"
    xmlns:tools="http://schemas.android.com/tools"
    android:layout_width="match_parent"
    android:layout_height="match_parent"
    android:orientation="vertical"
    tools:context=".LinearLayout">

    <LinearLayout
        android:id="@+id/ll_ll_1"
        android:layout_width="200dp"
        android:layout_height="200dp"
        android:orientation="vertical"
        android:background="#000000"
        android:paddingLeft="20dp"
        android:paddingRight="10dp"
        android:paddingTop="10dp"
        android:paddingBottom="10dp">

        <View
            android:layout_width="match_parent"
            android:layout_height="match_parent"
            android:background="#FF0033"/>

    LinearLayout>

    <LinearLayout
        android:layout_width="match_parent"
        android:layout_height="200dp"
        android:orientation="horizontal"
        android:background="#0066FF"
        android:layout_marginTop="10dp"
        android:layout_marginLeft="15dp"
        android:layout_marginRight="15dp">


        <View
            android:layout_width="50dp"
            android:layout_height="match_parent"
            android:background="#FFFFFF"
            android:layout_weight="1"/>

        <View
            android:layout_width="0dp"
            android:layout_height="match_parent"
            android:background="#000000"
            android:layout_weight="1"/>

        <View
            android:layout_width="20dp"
            android:layout_height="match_parent"
            android:background="#55AA99"
            android:layout_weight="1"/>

    LinearLayout>

LinearLayout>
RelativeLayout
<RelativeLayout xmlns:android="http://schemas.android.com/apk/res/android"
    xmlns:app="http://schemas.android.com/apk/res-auto"
    xmlns:tools="http://schemas.android.com/tools"
    android:layout_width="match_parent"
    android:layout_height="match_parent"
    tools:context=".RelativeLayout">

    <View
        android:layout_width="100dp"
        android:layout_height="100dp"
        android:background="#000000"
        android:layout_alignParentBottom="true"
        android:layout_alignParentRight="true"/>

    <View
        android:id="@+id/rl_view_1"
        android:layout_width="100dp"
        android:layout_height="100dp"
        android:background="#000000"/>

    <View
        android:id="@+id/rl_view_2"
        android:layout_width="100dp"
        android:layout_height="100dp"
        android:background="#FF0033"
        android:layout_toRightOf="@id/rl_view_1"
        android:layout_below="@id/rl_view_1"/>

    <LinearLayout
        android:layout_width="match_parent"
        android:layout_height="200dp"
        android:layout_below="@id/rl_view_2"
        android:orientation="horizontal"
        android:background="#0066FF"
        android:padding="15dp">

        <View
            android:layout_width="100dp"
            android:layout_height="match_parent"
            android:background="#FF0033"/>

        <RelativeLayout
            android:layout_width="match_parent"
            android:layout_height="match_parent"
            android:background="#000000"
            android:padding="15dp">

            <View
                android:id="@+id/rl_view_3"
                android:layout_width="100dp"
                android:layout_height="match_parent"
                android:background="#FF9900"/>

            <View
                android:layout_width="100dp"
                android:layout_height="match_parent"
                android:background="#FFFFFF"
                android:layout_toRightOf="@id/rl_view_3"
                android:layout_marginLeft="10dp"/>

        RelativeLayout>

    LinearLayout>

RelativeLayout>

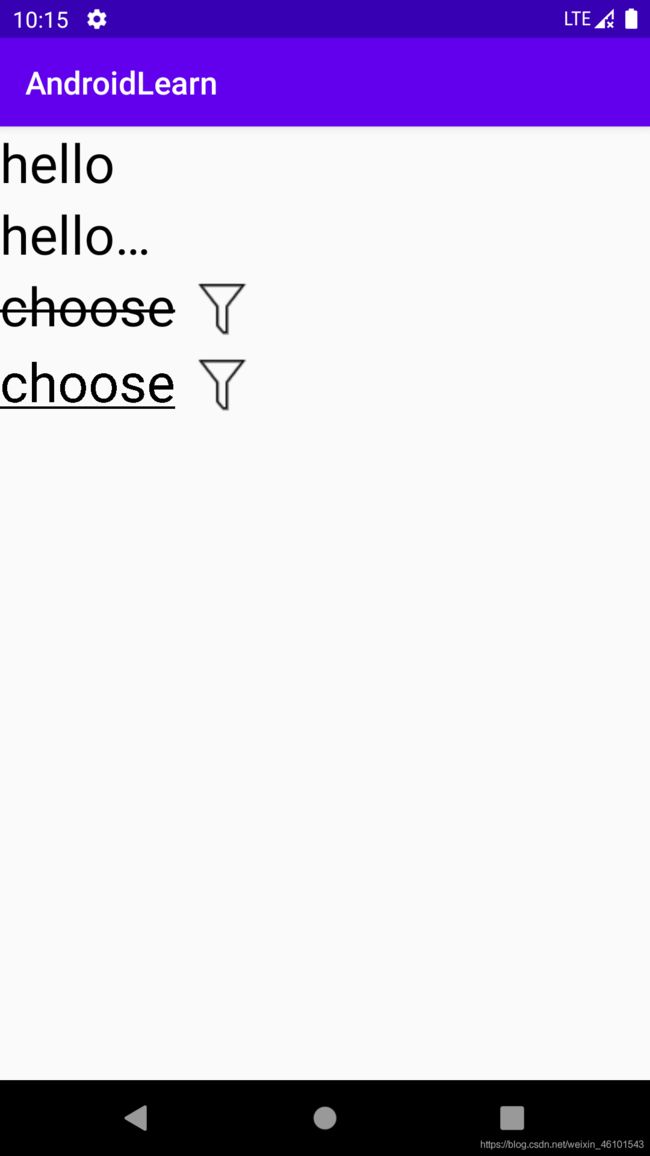
TextView
<LinearLayout xmlns:android="http://schemas.android.com/apk/res/android"
    xmlns:app="http://schemas.android.com/apk/res-auto"
    xmlns:tools="http://schemas.android.com/tools"
    android:layout_width="match_parent"
    android:layout_height="match_parent"
    android:orientation="vertical"
    tools:context=".TextView">

    <TextView
        android:id="@+id/tv_tv_1"
        android:layout_width="wrap_content"
        android:layout_height="wrap_content"
        android:text="hello"
        android:textColor="#000000"
        android:textSize="34sp"/>

    <TextView
        android:id="@+id/tv_tv_2"
        android:layout_width="100dp"
        android:layout_height="wrap_content"
        android:maxLines="1"
        android:ellipsize="end"
        android:text="hello world"
        android:textColor="#000000"
        android:textSize="34sp" />

    <TextView
        android:id="@+id/tv_tv_3"
        android:layout_width="wrap_content"
        android:layout_height="wrap_content"
        android:text="choose"
        android:textColor="#000000"
        android:textSize="34sp"
        android:drawableRight="@drawable/choose"
        android:drawablePadding="5dp" />

    <TextView
        android:id="@+id/tv_tv_4"
        android:layout_width="wrap_content"
        android:layout_height="wrap_content"
        android:text="choose"
        android:textColor="#000000"
        android:textSize="34sp"
        android:drawableRight="@drawable/choose"
        android:drawablePadding="5dp" />

LinearLayout>
public class TextViewActivity extends AppCompatActivity {

    private TextView textView1;
    private TextView textView2;

    @Override
    protected void onCreate(Bundle savedInstanceState) {

        super.onCreate(savedInstanceState);
        setContentView(R.layout.activity_text_view);
        textView1 = (TextView)findViewById(R.id.tv_tv_3);//找到对应的控件,并复制
        textView1.getPaint().setFlags(Paint.STRIKE_THRU_TEXT_FLAG);//中划线
        textView1.getPaint().setAntiAlias(true);

        textView2 = (TextView)findViewById(R.id.tv_tv_4);
        textView2.getPaint().setFlags(Paint.UNDERLINE_TEXT_FLAG);//下划线
    }
}
Button
<LinearLayout xmlns:android="http://schemas.android.com/apk/res/android"
    xmlns:app="http://schemas.android.com/apk/res-auto"
    xmlns:tools="http://schemas.android.com/tools"
    android:layout_width="match_parent"
    android:layout_height="match_parent"
    android:orientation="vertical"
    android:padding="15dp"
    tools:context=".ButtonActivity">

    <Button
        android:id="@+id/btn_btn_1"
        android:layout_width="match_parent"
        android:layout_height="wrap_content"
        android:text="Button"
        android:textSize="20sp"
        android:textColor="#FF0000"
        android:background="@drawable/ripple_button"/>


    <Button
        android:id="@+id/btn_btn_2"
        android:layout_width="match_parent"
        android:layout_height="wrap_content"
        android:text="Button"
        android:textSize="20sp"
        android:layout_marginTop="10dp"
        android:textColor="#000000"
        android:background="@drawable/button"/>

LinearLayout>
<ripple xmlns:android="http://schemas.android.com/apk/res/android"
    android:color="#979292">
    <item android:drawable="@drawable/shape_button"/>
ripple>


<shape xmlns:android="http://schemas.android.com/apk/res/android"
    android:shape="rectangle">
    <solid
        android:color="#FFC107"/>
    <corners
        android:radius="25dp"/>
shape>
设置按钮监听器
public class ButtonActivity extends AppCompatActivity {

    private Button button;
    @Override
    protected void onCreate(Bundle savedInstanceState) {

        super.onCreate(savedInstanceState);
        setContentView(R.layout.activity_button);
        button = (Button)findViewById(R.id.btn_btn_2);
        button.setOnClickListener(new View.OnClickListener() {

            @Override
            public void onClick(View v) {

                Toast.makeText(ButtonActivity.this, "button is clicked", Toast.LENGTH_SHORT).show();
            	//弹出一个Toast
            }
        });
    }
}

EditText
绘制一个登录界面
<RelativeLayout xmlns:android="http://schemas.android.com/apk/res/android"
    xmlns:app="http://schemas.android.com/apk/res-auto"
    xmlns:tools="http://schemas.android.com/tools"
    android:layout_width="match_parent"
    android:layout_height="match_parent"
    android:gravity="center"
    tools:context=".EditViewActivity">

    <EditText
        android:id="@+id/et_et_user"
        android:layout_width="match_parent"
        android:layout_height="50dp"
        android:layout_margin="15dp"
        android:paddingLeft="10dp"
        android:paddingRight="10dp"
        android:textSize="15sp"
        android:textColor="#000000"
        android:inputType="number"
        android:maxLines="1"
        android:background="@drawable/edit_text"
        android:hint="User"
        android:maxLength="8"
        android:drawableLeft="@drawable/account"
        android:drawablePadding="5dp"/>

    <EditText
        android:id="@+id/et_et_password"
        android:layout_width="match_parent"
        android:layout_height="50dp"
        android:layout_margin="15dp"
        android:paddingLeft="10dp"
        android:paddingRight="10dp"
        android:textSize="15sp"
        android:textColor="#000000"
        android:hint="Password"
        android:maxLength="16"
        android:inputType="textPassword"
        android:maxLines="1"
        android:background="@drawable/edit_text"
        android:drawableLeft="@drawable/password"
        android:layout_below="@id/et_et_user"
        android:drawablePadding="5dp"/>

    <Button
        android:id="@+id/et_btn_login"
        android:layout_width="match_parent"
        android:layout_height="wrap_content"
        android:layout_below="@id/et_et_password"
        android:layout_marginTop="30dp"
        android:text="Login"
        android:textColor="#000000"
        android:textSize="20sp"
        android:background="@drawable/button"
        android:layout_marginLeft="30dp"
        android:layout_marginRight="30dp"/>

RelativeLayout>
为文本框设置圆角样式
<shape xmlns:android="http://schemas.android.com/apk/res/android">
    <stroke
        android:width="2dp"
        android:color="#7E7575"/>
    <corners
        android:radius="10dp"/>
shape>
Java部分设置好监听器
public class EditTextActivity extends AppCompatActivity {

    private Button login;
    private EditText editText_user;
    private EditText editText_password;

    @Override
    protected void onCreate(Bundle savedInstanceState) {

        super.onCreate(savedInstanceState);
        setContentView(R.layout.activity_edit_view);
        login = (Button)findViewById(R.id.et_btn_login);
        //设置按钮监听
        login.setOnClickListener(new View.OnClickListener() {

            @Override
            public void onClick(View v) {

                //利用editText_user.getText()获取输入内容
                Toast.makeText(EditTextActivity.this, "success", Toast.LENGTH_SHORT).show();
            }
        });
        editText_user = (EditText)findViewById(R.id.et_et_user);
        //文本框监听器
        editText_user.addTextChangedListener(new TextWatcher() {

            @Override
            public void beforeTextChanged(CharSequence s, int start, int count, int after) {
     }
            @Override
            public void onTextChanged(CharSequence s, int start, int before, int count) {
     }
            @Override
            public void afterTextChanged(Editable s) {

                Toast.makeText(EditTextActivity.this, s, Toast.LENGTH_SHORT).show();
            }
        });
        editText_password = (EditText)findViewById(R.id.et_et_password);
		//文本框监听器
        editText_password.addTextChangedListener(new TextWatcher() {

            @Override
            public void beforeTextChanged(CharSequence s, int start, int count, int after) {
     }
            @Override
            public void onTextChanged(CharSequence s, int start, int before, int count) {
     }
            @Override
            public void afterTextChanged(Editable s) {

                Toast.makeText(EditTextActivity.this, s, Toast.LENGTH_SHORT).show();
            }
        });
    }
}

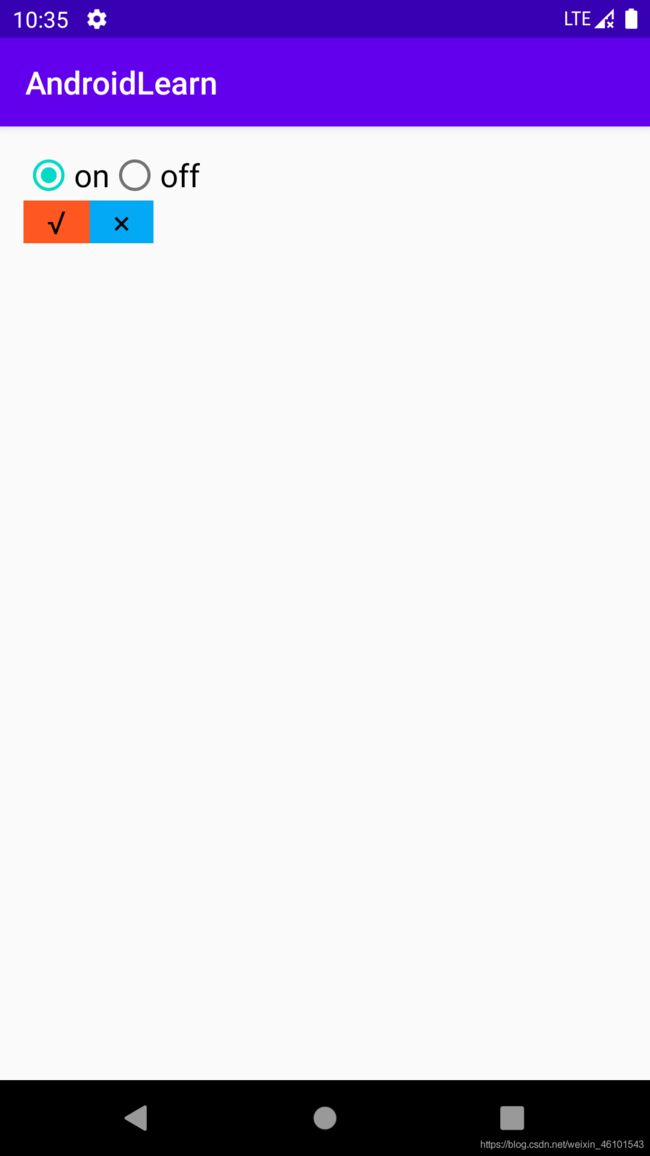
RadioButton
将单个单选按钮包装实现RadioGrop
<LinearLayout xmlns:android="http://schemas.android.com/apk/res/android"
    xmlns:app="http://schemas.android.com/apk/res-auto"
    xmlns:tools="http://schemas.android.com/tools"
    android:layout_width="match_parent"
    android:layout_height="match_parent"
    android:orientation="vertical"
    android:padding="15dp"
    tools:context=".RadioButtonActivity">

    <RadioGroup
        android:id="@+id/rb_rg_switch"
        android:layout_width="wrap_content"
        android:layout_height="wrap_content"
        android:orientation="horizontal">
        <RadioButton
            android:id="@+id/rb_rb_on"
            android:layout_width="wrap_content"
            android:layout_height="wrap_content"
            android:text="on"
            android:textSize="20sp"
            android:textColor="#000000"/>

        <RadioButton
            android:id="@+id/rb_rb_off"
            android:layout_width="wrap_content"
            android:layout_height="wrap_content"
            android:text="off"
            android:textSize="20sp"
            android:textColor="#000000"
            android:checked="true"/>


    RadioGroup>

    <RadioGroup
        android:id="@+id/rb_rg_choose"
        android:layout_width="wrap_content"
        android:layout_height="wrap_content"
        android:orientation="horizontal">
        <RadioButton
            android:id="@+id/rb_rb_yes"
            android:layout_width="wrap_content"
            android:layout_height="wrap_content"
            android:paddingLeft="15dp"
            android:paddingRight="15dp"
            android:text="√"
            android:textSize="20sp"
            android:button="@null"
            android:background="@drawable/radio_button"
            android:textColor="#000000"/>

        <RadioButton
            android:id="@+id/rb_rb_no"
            android:layout_width="wrap_content"
            android:layout_height="wrap_content"
            android:paddingLeft="15dp"
            android:paddingRight="15dp"
            android:text="×"
            android:textSize="20sp"
            android:button="@null"
            android:background="@drawable/radio_button"
            android:textColor="#000000"
            android:checked="true"/>

    RadioGroup>

LinearLayout>
自定义效果
<selector xmlns:android="http://schemas.android.com/apk/res/android">
    <item android:state_checked="false">
        <shape>
            <solid
                android:width="3dp"
                android:color="#03A9F4"/>
        shape>
    item>

    <item android:state_checked="true">
        <shape>
            <solid
                android:color="#FF5722"/>
        shape>
    item>

selector>
public class RadioButtonActivity extends AppCompatActivity {

    private RadioGroup radioGroup;
    @Override
    protected void onCreate(Bundle savedInstanceState) {

        super.onCreate(savedInstanceState);
        setContentView(R.layout.activity_radio_button);
        radioGroup = (RadioGroup)findViewById(R.id.rb_rg_choose);
        //设置当选择结果改变时的监听
        radioGroup.setOnCheckedChangeListener(new RadioGroup.OnCheckedChangeListener() {

            @Override
            public void onCheckedChanged(RadioGroup group, int checkedId) {

                //在所监听的Group中,找到当前所选的Id的Text
                RadioButton radioButton = (RadioButton)group.findViewById(checkedId);
                Toast.makeText(RadioButtonActivity.this, radioButton.getText(), Toast.LENGTH_SHORT).show();
            }
        });
    }
}
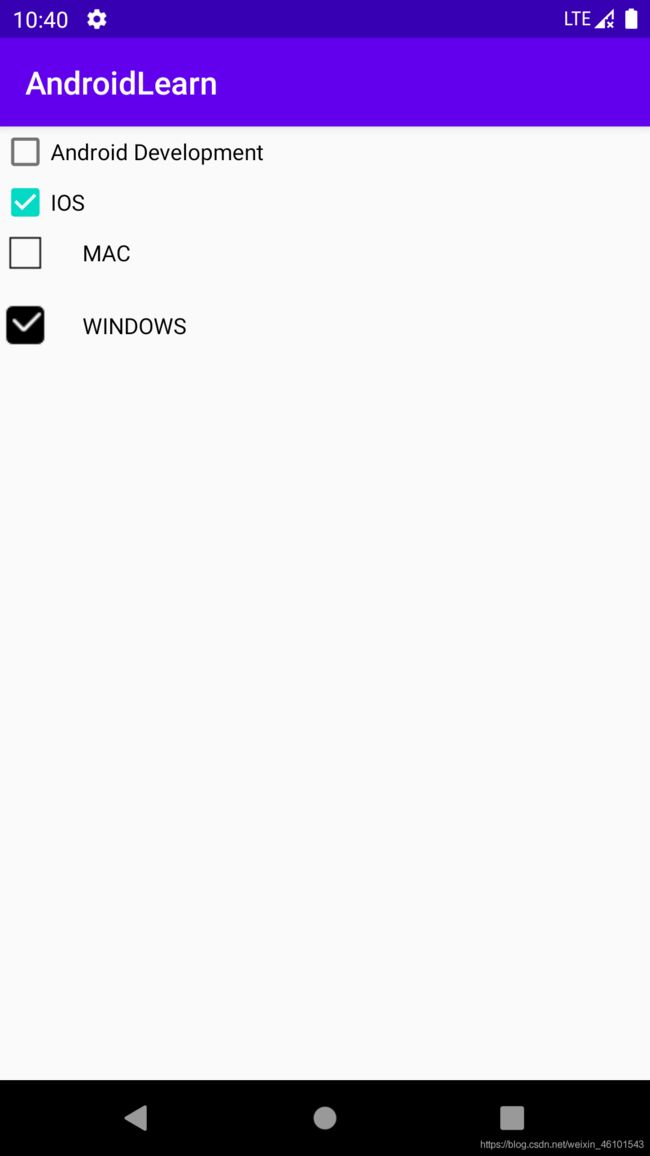
CheckBox
<LinearLayout xmlns:android="http://schemas.android.com/apk/res/android"
    xmlns:app="http://schemas.android.com/apk/res-auto"
    xmlns:tools="http://schemas.android.com/tools"
    android:layout_width="match_parent"
    android:layout_height="match_parent"
    android:orientation="vertical"
    tools:context=".CheckBoxActivity">

    <CheckBox
        android:id="@+id/cb_cb_android"
        android:layout_width="wrap_content"
        android:layout_height="wrap_content"
        android:text="Android Development"/>

    <CheckBox
        android:id="@+id/cb_cb_IOS"
        android:layout_width="wrap_content"
        android:layout_height="wrap_content"
        android:text="IOS"/>

    <CheckBox
        android:id="@+id/cb_cb_mac"
        android:layout_width="wrap_content"
        android:layout_height="wrap_content"
        android:text="MAC"
        android:paddingLeft="20dp"
        android:button="@drawable/check_box"/>

    <CheckBox
        android:id="@+id/cb_cb_windows"
        android:layout_width="wrap_content"
        android:layout_height="wrap_content"
        android:text="WINDOWS"
        android:padding="20dp"
        android:button="@drawable/check_box"/>/>

LinearLayout>
当然也可以自定义button的样式
<selector xmlns:android="http://schemas.android.com/apk/res/android">
    <item
        android:state_checked="true"
        android:drawable="@drawable/checkedbox"/>

    <item
        android:state_checked="false"
        android:drawable="@drawable/uncheckedbox"/>

selector>
public class CheckBoxActivity extends AppCompatActivity {

    private CheckBox ios;
    private CheckBox android;

    @Override
    protected void onCreate(Bundle savedInstanceState) {

        super.onCreate(savedInstanceState);
        setContentView(R.layout.activity_check_box);
        ios = (CheckBox)findViewById(R.id.cb_cb_android);
        android = (CheckBox)findViewById(R.id.cb_cb_IOS);
        //设置监听器,当选择项改变时获取选中状态
        ios.setOnCheckedChangeListener(new CompoundButton.OnCheckedChangeListener() {

            @Override
            public void onCheckedChanged(CompoundButton buttonView, boolean isChecked) {

                Toast.makeText(CheckBoxActivity.this, isChecked?"yes":"no", Toast.LENGTH_SHORT).show();
            }
        });
        android.setOnCheckedChangeListener(new CompoundButton.OnCheckedChangeListener() {

            @Override
            public void onCheckedChanged(CompoundButton buttonView, boolean isChecked) {

                Toast.makeText(CheckBoxActivity.this, isChecked?"yes":"no", Toast.LENGTH_SHORT).show();
            }
        });
    }
}
ImageView
<LinearLayout xmlns:android="http://schemas.android.com/apk/res/android"
    xmlns:app="http://schemas.android.com/apk/res-auto"
    xmlns:tools="http://schemas.android.com/tools"
    android:layout_width="match_parent"
    android:layout_height="match_parent"
    android:orientation="vertical"
    tools:context=".ImageViewActivity">
    <ImageView
        android:layout_width="300dp"
        android:layout_height="200dp"
        android:background="#972F2F"
        android:src="@drawable/image"
        android:scaleType="center"/>


    <ImageView
        android:id="@+id/iv_iv_internet"
        android:layout_width="300dp"
        android:layout_height="200dp"
        android:background="#A39696"
        android:layout_marginTop="10dp"
        android:scaleType="fitXY"/>

LinearLayout>
public class ImageViewActivity extends AppCompatActivity {

    private ImageView inetPic;
    @Override
    protected void onCreate(Bundle savedInstanceState) {

        super.onCreate(savedInstanceState);
        setContentView(R.layout.activity_image_view);
        inetPic = (ImageView)findViewById(R.id.iv_iv_internet);
        loadImage();
    }
    //通过开源库实现加载网络图片
    public void loadImage() {

        Glide.with(this).load("").into(inetPic);
    }
}
此时需要在Manifest中声明网络请求权限
<uses-permission android:name="android.permission.INTERNET" />
并借助gradle下载依赖包
repositories {
    google()
    jcenter()
}

dependencies {
    implementation 'com.github.bumptech.glide:glide:4.11.0'
    implementation 'org.jetbrains:annotations-java5:15.0'
    annotationProcessor 'com.github.bumptech.glide:compiler:4.11.0'
}

ListView
<LinearLayout xmlns:android="http://schemas.android.com/apk/res/android"
    xmlns:app="http://schemas.android.com/apk/res-auto"
    xmlns:tools="http://schemas.android.com/tools"
    android:layout_width="match_parent"
    android:layout_height="match_parent"
    tools:context=".ListViewActivity">
    <ListView
        android:id="@+id/lv_lv_testLv"
        android:layout_width="wrap_content"
        android:layout_height="wrap_content"
        android:listSelector="@drawable/list_view_item"/>

LinearLayout>
设置对每一项不同触摸操作时的不同效果
<selector xmlns:android="http://schemas.android.com/apk/res/android">
    <item
        android:state_selected="true"
        android:drawable="@color/colorGrey"/>
    <item
        android:state_pressed="true"
        android:drawable="@color/colorGrey"/>
    <item
        android:state_focused="true"
        android:drawable="@color/colorGrey"/>
    <item
        android:drawable="@color/colorWhite"/>
selector>
public class ListViewActivity extends AppCompatActivity {

    private ListView listView;
    @Override
    protected void onCreate(Bundle savedInstanceState) {

        super.onCreate(savedInstanceState);
        setContentView(R.layout.activity_list_view);
        listView = (ListView)findViewById(R.id.lv_lv_testLv);
        //给ListView设置适配器
        listView.setAdapter(new ListAdapter(ListViewActivity.this));
        //设置每一个item的监听
        listView.setOnItemClickListener(new AdapterView.OnItemClickListener(){

            @Override
            public void onItemClick(AdapterView<?> parent, View view, int position, long id) {

                Toast.makeText(ListViewActivity.this, "click"+position, Toast.LENGTH_SHORT).show();
            }
        });
        listView.setOnItemLongClickListener(new AdapterView.OnItemLongClickListener(){

            @Override
            public boolean onItemLongClick(AdapterView<?> parent, View view, int position, long id) {

                Toast.makeText(ListViewActivity.this, "longClick"+position, Toast.LENGTH_SHORT).show();
                return true;
            }
        });
    }
}
class ListAdapter extends BaseAdapter{

    private Context context;
    private LayoutInflater layoutInflater;
    ListAdapter(Context context){

        this.context = context;
        layoutInflater = LayoutInflater.from(context);
    }
    @Override
    public int getCount() {
     return 10;}
    @Override
    public Object getItem(int position) {
     return null;}
    @Override
    public long getItemId(int position) {
     return 0;}
    //设置每一个item的样式
    static class ViewHolder{

        public ImageView imageView1;
        public ImageView imageView2;
        public TextView textView;
    }
    @Override
    public View getView(int position, View convertView, ViewGroup parent) {

        //此时可以为每一个item设置样式,可以把它们放在集合框架中
        ViewHolder viewHolder = null;
        if(convertView == null){

            convertView = layoutInflater.inflate(R.layout.listview_item,null);
            viewHolder = new ViewHolder();
            viewHolder.imageView1 = convertView.findViewById(R.id.lvitm_iv_iv1);
            viewHolder.imageView2 = convertView.findViewById(R.id.lvitm_iv_iv2);
            viewHolder.textView = convertView.findViewById(R.id.lvitm_tv_test);
            convertView.setTag(viewHolder);
        }else{

            viewHolder = (ViewHolder)convertView.getTag();
        }
        Glide.with(context).load("").into(viewHolder.imageView2);
        viewHolder.textView.setText("this is test"+position);
        return convertView;
    }
}
每一个item的样式
<LinearLayout
    xmlns:android="http://schemas.android.com/apk/res/android"
    android:layout_width="match_parent"
    android:layout_height="match_parent"
    android:orientation="horizontal"
    android:padding="15dp">

    <ImageView
        android:id="@+id/lvitm_iv_iv1"
        android:layout_width="100dp"
        android:layout_height="100dp"
        android:background="#000000"/>

    <ImageView
        android:id="@+id/lvitm_iv_iv2"
        android:layout_marginLeft="20dp"
        android:layout_marginRight="20dp"
        android:layout_width="100dp"
        android:layout_height="100dp"
        android:background="#9A5050" />

    <TextView
        android:id="@+id/lvitm_tv_test"
        android:layout_width="wrap_content"
        android:layout_height="wrap_content"
        android:text="test"
        android:textSize="50sp"
        android:textColor="@color/colorRed"/>

LinearLayout>

GridView
<LinearLayout xmlns:android="http://schemas.android.com/apk/res/android"
    xmlns:app="http://schemas.android.com/apk/res-auto"
    xmlns:tools="http://schemas.android.com/tools"
    android:layout_width="match_parent"
    android:layout_height="match_parent"
    tools:context=".GridViewActivity">

    <GridView
        android:id="@+id/gv_gv_gvTest"
        android:layout_width="wrap_content"
        android:layout_height="wrap_content"
        android:numColumns="3"
        android:horizontalSpacing="10dp"/>

LinearLayout>
和listView一样,每一个item也通过适配器来实现
public class GridViewActivity extends AppCompatActivity {

    private GridView gridView;
    @Override
    protected void onCreate(Bundle savedInstanceState) {

        super.onCreate(savedInstanceState);
        setContentView(R.layout.activity_grid_view);
        gridView = (GridView)findViewById(R.id.gv_gv_gvTest);
        //setAdapter
        gridView.setAdapter(new GridViewAdapter(GridViewActivity.this));
        //设置监听
        gridView.setOnItemClickListener(new AdapterView.OnItemClickListener(){

            @Override
            public void onItemClick(AdapterView<?> parent, View view, int position, long id) {

                Toast.makeText(GridViewActivity.this, "click"+position, Toast.LENGTH_SHORT).show();
            }
        });
        gridView.setOnItemLongClickListener(new AdapterView.OnItemLongClickListener(){

            @Override
            public boolean onItemLongClick(AdapterView<?> parent, View view, int position, long id) {

                Toast.makeText(GridViewActivity.this, "longClick"+position, Toast.LENGTH_SHORT).show();
                return true;
            }
        });
    }
}
class GridViewAdapter extends BaseAdapter{

    private Context context;
    private LayoutInflater layoutInflater;
    GridViewAdapter(Context context){

        this.context = context;
        layoutInflater = LayoutInflater.from(context);
    }
    @Override
    public int getCount() {
     return 10;}
    @Override
    public Object getItem(int position) {
     return null;}
    @Override
    public long getItemId(int position) {
     return 0;}
    static class ViewHolder{

        public ImageView imageView;
        public TextView textView;
    }
    @Override
    public View getView(int position, View convertView, ViewGroup parent) {

        ViewHolder viewHolder;
        if(convertView == null){

            convertView = layoutInflater.inflate(R.layout.gridview_item,null);
            viewHolder = new ViewHolder();
            viewHolder.imageView = (ImageView) convertView.findViewById(R.id.gvitm_iv_test);
            viewHolder.textView = (TextView) convertView.findViewById(R.id.gvitm_tv_test);
            convertView.setTag(viewHolder);
        }else{

            viewHolder = (ViewHolder) convertView.getTag();
        }
        viewHolder.textView.setText("hello");
        Glide.with(context).load("").into(viewHolder.imageView);
        return convertView;
    }
}
同样的,为每一个item绘制布局
<LinearLayout
    xmlns:android="http://schemas.android.com/apk/res/android"
    android:layout_width="match_parent"
    android:layout_height="match_parent"
    android:orientation="vertical"
    android:padding="15dp">

    <ImageView
        android:id="@+id/gvitm_iv_test"
        android:layout_width="100dp"
        android:layout_height="100dp"
        android:background="@color/colorGrey"/>

    <TextView
        android:id="@+id/gvitm_tv_test"
        android:layout_width="match_parent"
        android:layout_height="wrap_content"
        android:gravity="center"
        android:text="test"
        android:textSize="50sp"
        android:textColor="@color/colorRed"/>

LinearLayout>
ScrollView&HorizontalScrollView
其直接的子控件只能有一个
<ScrollView xmlns:android="http://schemas.android.com/apk/res/android"
    xmlns:app="http://schemas.android.com/apk/res-auto"
    xmlns:tools="http://schemas.android.com/tools"
    android:layout_width="match_parent"
    android:layout_height="match_parent"
    tools:context=".MainActivity">

    <LinearLayout
        android:layout_width="match_parent"
        android:layout_height="match_parent"
        android:orientation="vertical">

        <Button
            android:id="@+id/ma_btn_es"
            android:layout_width="match_parent"
            android:layout_height="wrap_content"
            android:text="ExternalStorage"
            android:textAllCaps="false"/>

        <Button
            android:id="@+id/ma_btn_bc"
            android:layout_width="match_parent"
            android:layout_height="wrap_content"
            android:text="BroadCast"
            android:textAllCaps="false"/>

        <Button
            android:id="@+id/ma_btn_va"
            android:layout_width="match_parent"
            android:layout_height="wrap_content"
            android:text="ValueAnimator"
            android:textAllCaps="false"/>

    LinearLayout>

ScrollView>
<LinearLayout xmlns:android="http://schemas.android.com/apk/res/android"
    xmlns:app="http://schemas.android.com/apk/res-auto"
    xmlns:tools="http://schemas.android.com/tools"
    android:layout_width="match_parent"
    android:layout_height="match_parent"
    tools:context=".ScrollViewActivity">

    <HorizontalScrollView
        android:layout_width="match_parent"
        android:layout_height="wrap_content">

        <LinearLayout
            android:layout_width="match_parent"
            android:layout_height="match_parent"
            android:orientation="horizontal">
            <ImageView
                android:layout_width="300dp"
                android:layout_height="100dp"
                android:background="@color/colorGrey"/>

            <ImageView
                android:layout_width="300dp"
                android:layout_height="100dp"
                android:background="@color/colorRed"/>

        LinearLayout>

    HorizontalScrollView>

LinearLayout>

WebView
<LinearLayout xmlns:android="http://schemas.android.com/apk/res/android"
    xmlns:app="http://schemas.android.com/apk/res-auto"
    xmlns:tools="http://schemas.android.com/tools"
    android:layout_width="match_parent"
    android:layout_height="match_parent"
    tools:context=".WebViewActivity">

    <WebView
        android:id="@+id/wv_wv_wv"
        android:layout_width="match_parent"
        android:layout_height="match_parent"/>

LinearLayout>
public class WebViewActivity extends AppCompatActivity {

    private WebView webView;
    @Override
    protected void onCreate(Bundle savedInstanceState) {

        super.onCreate(savedInstanceState);
        setContentView(R.layout.activity_web_view);
        webView = (WebView)findViewById(R.id.wv_wv_wv);
        //加载本地html文件
        //webView.loadUrl("file:///android_asset/test.html");
        //加载网页
        //启用javaScript
        webView.getSettings().setJavaScriptEnabled(true);
        //禁用跳转本地浏览器
        webView.setWebViewClient(new WebViewClient(){

            @Override
            public boolean shouldOverrideUrlLoading(WebView view, WebResourceRequest request) {

                view.loadUrl(request.getUrl().toString());
                return true;
            }
            @Override
            public void onPageStarted(WebView view, String url, Bitmap favicon) {

                super.onPageStarted(view, url, favicon);
            }
            @Override
            public void onPageFinished(WebView view, String url) {

                super.onPageFinished(view, url);
            }
        });
        //实现进度条和获得网页title(继承WebChromeClient)
        webView.setWebChromeClient(new WebChromeClient(){

            @Override
            public void onProgressChanged(WebView view, int newProgress) {

                //newProgress是0-100之间,可以实现加载百分比
                super.onProgressChanged(view, newProgress);
            }
            @Override
            public void onReceivedTitle(WebView view, String title) {

                //将网页标题设置为activity的标题
                setTitle(title);
                super.onReceivedTitle(view, title);
            }
        });
        webView.loadUrl("https://m.baidu.com");
    }
    @Override
    //实现返回键用于返回上一个网页界面,而非返回上一个应用界面
    //重写返回方法
    public boolean onKeyDown(int keyCode, KeyEvent event) {

        if (keyCode == KeyEvent.KEYCODE_BACK && webView.canGoBack()) {

            webView.goBack();
            return true;
        }
        return super.onKeyDown(keyCode, event);
    }
}

Toast
private Button btn1;
    private Button btn2;
    @Override
    protected void onCreate(Bundle savedInstanceState) {

        super.onCreate(savedInstanceState);
        setContentView(R.layout.activity_toast);
        btn1 = (Button) findViewById(R.id.tst_btn_test1);
        btn2 = (Button) findViewById(R.id.tst_btn_test2);
        clickListener clickListener = new clickListener();
        btn1.setOnClickListener(clickListener);
        btn2.setOnClickListener(clickListener);
    }
    class clickListener implements View.OnClickListener{

        @Override
        public void onClick(View v) {

            switch(v.getId()){

                case R.id.tst_btn_test1:
                    //在默认位置弹出Toast
                    Toast.makeText(ToastActivity.this, "toast", Toast.LENGTH_SHORT).show();
                    break;
                case R.id.tst_btn_test2:
                    //在自定义位置弹出Toast
                    Toast toast = Toast.makeText(getApplicationContext(),"toastTest",Toast.LENGTH_LONG);
                    toast.setGravity(Gravity.CENTER,0,0);
                    toast.show();
                    break;
            }
        }
    }
AlertDialog

AlertDialog.Builder builder = new AlertDialog.Builder(AlertDialogActivity.this);
builder.setTitle("title");
builder.setMessage("test");
builder.setPositiveButton("pos", new DialogInterface.OnClickListener() {

    @Override
    public void onClick(DialogInterface dialog, int which) {

        Toast.makeText(AlertDialogActivity.this, "ok", Toast.LENGTH_SHORT).show();
    }
});
builder.setNeutralButton("neu", new DialogInterface.OnClickListener() {

    @Override
    public void onClick(DialogInterface dialog, int which) {

        Toast.makeText(AlertDialogActivity.this, "emmm...", Toast.LENGTH_SHORT).show();
    }
});
builder.setNegativeButton("nea", new DialogInterface.OnClickListener() {

    @Override
    public void onClick(DialogInterface dialog, int which) {

        Toast.makeText(AlertDialogActivity.this, "no", Toast.LENGTH_SHORT).show();
    }
});
builder.show();

String[] strings = new String[]{
     "1","2","3"};
AlertDialog.Builder builder = new AlertDialog.Builder(AlertDialogActivity.this);
builder.setTitle("title");
//内容以字符串数组形式给出
builder.setItems(strings, new DialogInterface.OnClickListener() {

    @Override
    public void onClick(DialogInterface dialog, int which) {

        Toast.makeText(AlertDialogActivity.this, ""+which, Toast.LENGTH_SHORT).show();
    }
});
builder.show();

AlertDialog.Builder builder = new AlertDialog.Builder(AlertDialogActivity.this);
builder.setTitle("login");
//AlertDialog布局由R.layout.alert_dialog_item给出
View view = LayoutInflater.from(AlertDialogActivity.this).inflate(R.layout.alert_dialog_item, null);
EditText user = (EditText) findViewById(R.id.et_et_user);
EditText pw = (EditText)findViewById(R.id.et_et_password);
//Todo About EditText ActionListener
builder.setView(view);
//设置点击监听器
builder.setPositiveButton("login", new DialogInterface.OnClickListener() {

    @Override
    public void onClick(DialogInterface dialog, int which) {

        Toast.makeText(AlertDialogActivity.this, "success", Toast.LENGTH_SHORT).show();
        dialog.dismiss();
    }
});
//设置不可点击其他区域取消
builder.setCancelable(false);
builder.show();
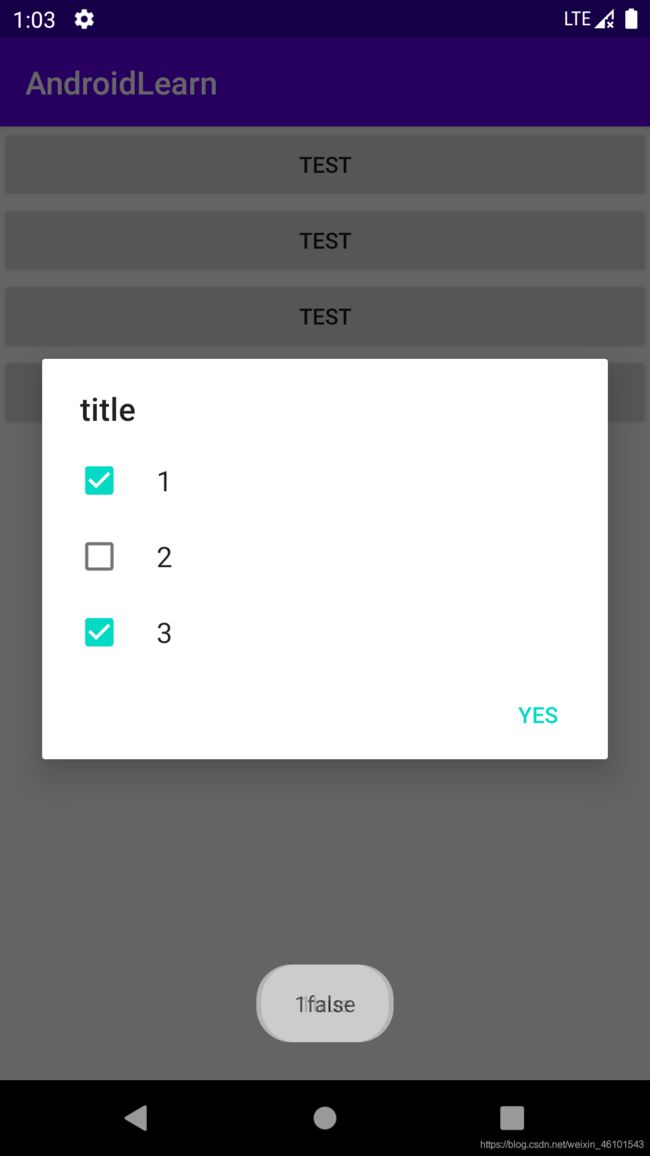
String[] strings = new String[]{
     "1", "2", "3"};
boolean[] booleans = new boolean[]{
     true, false, true};
AlertDialog.Builder builder = new AlertDialog.Builder(AlertDialogActivity.this);
builder.setTitle("title");
//设置监听事件
builder.setMultiChoiceItems(strings, booleans, new DialogInterface.OnMultiChoiceClickListener() {

    @Override
    public void onClick(DialogInterface dialog, int which, boolean isChecked) {

        Toast.makeText(AlertDialogActivity.this, ""+which+isChecked, Toast.LENGTH_SHORT).show();
    }
});
builder.setPositiveButton("yes", new DialogInterface.OnClickListener() {

    @Override
    public void onClick(DialogInterface dialog, int which) {

        Toast.makeText(AlertDialogActivity.this, ""+which, Toast.LENGTH_SHORT).show();
    }
});
builder.show();
ProgressBar&ProgressDialogue
<LinearLayout xmlns:android="http://schemas.android.com/apk/res/android"
    xmlns:app="http://schemas.android.com/apk/res-auto"
    xmlns:tools="http://schemas.android.com/tools"
    android:layout_width="match_parent"
    android:layout_height="match_parent"
    android:orientation="vertical"
    tools:context=".ProgressBarActivity">

    <ProgressBar
        android:id="@+id/pb_pb_pb1"
        android:layout_width="match_parent"
        android:layout_height="wrap_content"/>

    <ProgressBar
        android:id="@+id/pb_pb_pb2"
        android:layout_width="match_parent"
        android:layout_height="wrap_content"
        android:layout_margin="10dp"
        style="@style/Widget.AppCompat.ProgressBar.Horizontal"
        android:max="100"/>


LinearLayout>
在java中设置进度信息
private ProgressBar progressBar;
//-------------------------------------------
progressBar = (ProgressBar)findViewById(R.id.pb_pb_pb2);
handler.sendEmptyMessage(0);
//-------------------------------------------
Handler handler = new Handler(){

    @Override
    public void handleMessage(@NonNull Message msg) {

        super.handleMessage(msg);
        if(progressBar.getProgress()<100){

            handler.postDelayed(runnable,50);
        }else{

            progressBar.setVisibility(View.GONE);
            Toast.makeText(ProgressBarActivity.this, "finish", Toast.LENGTH_SHORT).show();
        }
    }
};
Runnable runnable = new Runnable() {

    @Override
    public void run() {

        progressBar.setProgress(progressBar.getProgress()+1);
        handler.sendEmptyMessage(0);
    }
};
private ProgressDialog progressDialog;
//-------------------------------------------
progressDialog = new ProgressDialog(ProgressBarActivity.this);
progressDialog.setTitle("waiting");
progressDialog.setMessage("connecting");
progressDialog.setOnDismissListener(new DialogInterface.OnDismissListener(){

    @Override
    public void onDismiss(DialogInterface dialog) {

        Toast.makeText(ProgressBarActivity.this, "cancel", Toast.LENGTH_SHORT).show();
    }
});
progressDialog.setCancelable(false);
progressDialog.show();
//progressDialog.dismiss()用于结束progressDialogue

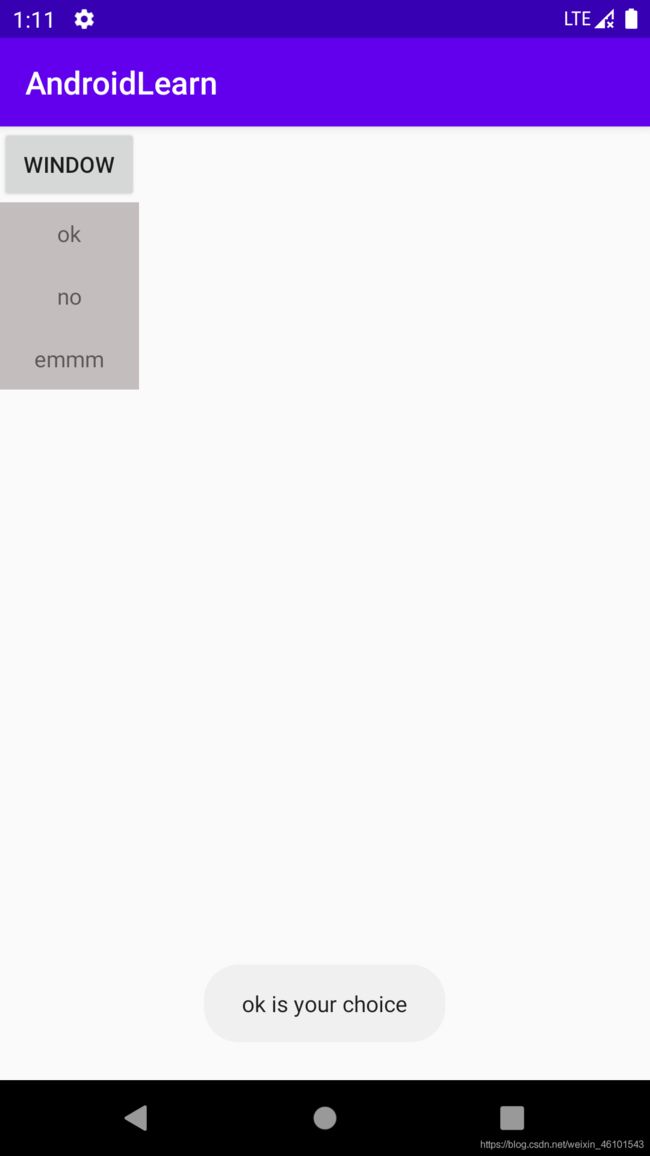
PopuppWindow
<LinearLayout
    xmlns:android="http://schemas.android.com/apk/res/android"
    android:layout_width="match_parent"
    android:layout_height="match_parent"
    android:background="@color/colorGrey"
    android:orientation="vertical">

    <TextView
        android:id="@+id/pw_tv_ok"
        android:layout_width="match_parent"
        android:layout_height="wrap_content"
        android:text="ok"
        android:layout_margin="10dp"
        android:gravity="center"/>
    <View
        android:layout_width="match_parent"
        android:layout_height="0.5dp"/>

    <TextView
        android:id="@+id/pw_tv_no"
        android:layout_width="match_parent"
        android:layout_height="wrap_content"
        android:text="no"
        android:layout_margin="10dp"
        android:gravity="center"/>

    <View
        android:layout_width="match_parent"
        android:layout_height="0.5dp"/>

    <TextView
        android:id="@+id/pw_tv_emmm"
        android:layout_width="match_parent"
        android:layout_height="wrap_content"
        android:text="emmm"
        android:layout_margin="10dp"
        android:gravity="center"/>

LinearLayout>
public class PopupWindowActivity extends AppCompatActivity {

    private Button button;
    private PopupWindow popupWindow;
    @Override
    protected void onCreate(Bundle savedInstanceState) {

        super.onCreate(savedInstanceState);
        setContentView(R.layout.activity_popup_window);
        button = (Button)findViewById(R.id.pw_btn_pw);
        button.setOnClickListener(new View.OnClickListener(){

            @Override
            public void onClick(View v) {

                //为PopuppWindow中的每一条文本和界面布局做出声明
                View view = getLayoutInflater().inflate(R.layout.popupwindow_item,null);
                TextView textView1 = (TextView)view.findViewById(R.id.pw_tv_ok);
                TextView textView2 = (TextView)view.findViewById(R.id.pw_tv_emmm);
                TextView textView3 = (TextView)view.findViewById(R.id.pw_tv_no);
                //可以依次为每一个文本设置监听
                textView1.setOnClickListener(new View.OnClickListener() {

                    @Override
                    public void onClick(View v) {

                        popupWindow.dismiss();
                        Toast.makeText(PopupWindowActivity.this, "ok is your choice", Toast.LENGTH_SHORT).show();
                    }
                });
                //创建一个PopuppWindow,传入view
                popupWindow = new PopupWindow(view,button.getWidth(), ViewGroup.LayoutParams.WRAP_CONTENT);
                //设置PopuppWindow可以通过触摸空白区域和点击按钮关闭
                popupWindow.setOutsideTouchable(true);
                popupWindow.setFocusable(true);
                popupWindow.showAsDropDown(button);
            }
        });
    }
}
Activity
每一个Activity都有自己的生命周期,在不同生命周期调用不同的方法
每一个Activity都因该在Manifest中做出声明
<application
    android:allowBackup="true"
    android:icon="@mipmap/ic_launcher"
    android:label="@string/app_name"
    android:roundIcon="@mipmap/ic_launcher_round"
    android:supportsRtl="true"
    android:theme="@style/AppTheme">
    <activity android:name=".ValueAnimatorActivity">activity>
    <activity android:name=".BroadCastBActivity" />
    <activity android:name=".BroadCastActivity" />
    <activity
        android:name=".ExternalStorageActivity"
        android:requestLegacyExternalStorage="true" />
    <activity android:name=".InternalStorageActivity" />
    <activity android:name=".SharedPreferencesActivity" />
    <activity android:name=".HandlerActivity" />
    <activity android:name=".ContainerActivity" />
    <activity
        android:name=".ActivityJumpActivity"
        android:label="JumpActivity" />
    <activity
        android:name=".ActivityActivity"
        android:label="activity"
        android:launchMode="standard"
        android:screenOrientation="portrait"
        android:theme="@style/Theme.AppCompat.Light.NoActionBar" />

    <activity
            android:name=".MainActivity"
            android:label="Activity"/>
        <activity android:name=".StartActivity"
            android:theme="@style/Theme.AppCompat.Light.NoActionBar">

            <intent-filter>
                <action android:name="android.intent.action.MAIN" />

                <category android:name="android.intent.category.LAUNCHER" />
            intent-filter>
        activity>
    application>
可以设置一个启动页
protected void onCreate(Bundle savedInstanceState) {

    super.onCreate(savedInstanceState);
    getWindow().addFlags(WindowManager.LayoutParams.FLAG_FULLSCREEN);
    setContentView(R.layout.activity_start);
    new Thread(){
     //创建子线程,在2秒后实现跳转
        @Override
        public void run() {

            try{

                sleep(2000);
                Intent it=new Intent(StartActivity.this,MainActivity.class);
                startActivity(it);
                finish();
            }catch (Exception e){

                e.printStackTrace();
            }
        }
    }.start();
}
Activity之间的信息传递
//显示跳转
Intent intent = new Intent(ActivityActivity.this,ActivityJumpActivity.class);
//发送bundle
Bundle data = new Bundle();
data.putString("Username","Username");
intent.putExtras(data);
startActivity(intent);
//在onCreate中获取bundle
Bundle data = getIntent().getExtras();
String s = data.getString("Username");
除了重写最常用的onCreate方法,根据需要重写该界面进入不同状态时所调用的方法
@Override
protected void onStart() {

    super.onStart();
    //打印日志信息
    Log.d("Activity","onStart");
}

@Override
//用于每次进入的刷新
protected void onResume() {

    super.onResume();
    Log.d("Activity","onResume");
}

@Override
//退出会暂停,此时调用
protected void onPause() {

    super.onPause();
    Log.d("Activity","onPause");
}

@Override
protected void onStop() {

    super.onStop();
    Log.d("Activity","onStop");
}

@Override
protected void onRestart() {

    super.onRestart();
    Log.d("Activity","onRestart");
}

@Override
//摧毁时调用
protected void onDestroy() {

    super.onDestroy();
    Log.d("Activity","onDestroy");
}
Fragment
Fragment有自己的生命周期,Fragment依赖于Activity,Fragment通过getActivity()可以获取所在的Activity;Activity通过FragmentManger的findFragmentById()获取Fragment,Fragment依赖于Activity,它们是多对多的关系
点击按钮触发事件,更换一个Fragment
<LinearLayout xmlns:android="http://schemas.android.com/apk/res/android"
    xmlns:app="http://schemas.android.com/apk/res-auto"
    xmlns:tools="http://schemas.android.com/tools"
    android:layout_width="match_parent"
    android:layout_height="match_parent"
    android:orientation="vertical"
    tools:context=".ContainerActivity">

    <Button
        android:id="@+id/ctn_btn_change"
        android:layout_width="match_parent"
        android:layout_height="wrap_content"
        android:text="change"/>

    <FrameLayout
        android:id="@+id/ctn_flt_flt"
        android:layout_width="match_parent"
        android:layout_height="match_parent"/>

LinearLayout>
public class ContainerActivity extends AppCompatActivity {

    private Fragment fragment;
    private Fragment bFragment;
    private Button button;
    @Override
    protected void onCreate(Bundle savedInstanceState) {

        super.onCreate(savedInstanceState);
        setContentView(R.layout.activity_container);
        //实例化
        fragment = new AFragment();
        button = (Button)findViewById(R.id.ctn_btn_change);
        //点击事件
        button.setOnClickListener(new View.OnClickListener() {

            @Override
            public void onClick(View v) {

                if(bFragment == null){

                    bFragment = new BFragment();
                }
                getSupportFragmentManager().beginTransaction().replace(R.id.ctn_flt_flt,bFragment).commitAllowingStateLoss();
            }
        });
        //添加到指定的fragment,并调用commit方法
        getSupportFragmentManager().beginTransaction().add(R.id.ctn_flt_flt,fragment).commitAllowingStateLoss();
    }

    @Override
    protected void onDestroy() {

        super.onDestroy();
        //取消异步,处理fragment中的还在运行的线程等
    }
}
fragment也需要一个布局文件
public class AFragment extends Fragment {


    private TextView textView;

    //给它一个布局文件
    @Nullable
    @Override
    public View onCreateView(@NonNull LayoutInflater inflater, @Nullable ViewGroup container, @Nullable Bundle savedInstanceState) {

        View view = inflater.inflate(R.layout.a_fragment_item,container,false);
        return view;
    }

    @Override
    public void onViewCreated(@NonNull View view, @Nullable Bundle savedInstanceState) {

        super.onViewCreated(view, savedInstanceState);
        textView = (TextView)view.findViewById(R.id.aft_tv_test);
        //操作所在的Activity
        if(getActivity() != null){

            //Todo something about activity
        }
    }
    //当fragment与Activity建立联系的时候,此方法被调用
    @Override
    public void onAttach(@NonNull Context context) {

        super.onAttach(context);
    }
    //当fragment被destroy或与Activity失去联系的时候,此方法被调用
    @Override
    public void onDetach() {

        super.onDetach();
    }
}
Fragment回退栈
//在替换之前放到回退栈中,这样以便按返回键返回上一个fragment,而不是上一个Activity
getSupportFragmentManager().beginTransaction().replace(R.id.ctn_flt_flt,bFragment).addToBackStack(null).commitAllowingStateLoss();
当然,返回时onCreateView会被调用,即使是同一个实例,那么就会造成对fragment中文字内容的更改后,再返回则回到默认的样式
//这是因为replace可以看成remove和add两个动作的叠加
getSupportFragmentManager().beginTransaction().replace(R.id.ctn_flt_flt,bFragment).addToBackStack(null).commitAllowingStateLoss();
如果在add一个fragment时候加一个tag
getSupportFragmentManager().beginTransaction().add(R.id.ctn_flt_flt,fragment).commitAllowingStateLoss();
然后在更换为BFragment的时候隐藏fragment,再创建新的fragment,并加入回退栈
if(bFragment == null){

	bFragment = new BFragment();
}
//寻找是否有tag的fragment
Fragment fragment = getFragmentManager().findFragmentByTag("a");
if(fragment != null){

//如果有tag标记的fragment,就隐藏当前fragment,添加bfragment
  getFragmentManager().beginTransaction().hide(fragment).add(R.id.fl_container,bFragment).addToBackStack(null).commitAllowingStateLoss();
} else {

//否则就直接replace
  getFragmentManager().beginTransaction().replace(R.id.fl_container,bFragment).addToBackStack(null).commitAllowingStateLoss();
}
可以在fragment中getActivity来获取所在的Activity,来实现消息传递
而推荐的fragment与Activity之间的消息传递
//在fragment中声明一个接口
public interface Message{

    void onClick(String text);
}
该接口在Activity中被实现
public class ContainerActivity extends AppCompatActivity implements AFragment.Message{

	//......
    @Override
    public void onClick(String text) {

        mTvTitle.setText(text);
    }
    //......
}
在fragment的onAttach方法中赋值,以获取所在的Activity
private Message listener;
//.....
@Override
public void onAttach(Context context) {

    super.onAttach(context);
    try {

        listener = (Message) context;
    }catch (ClassCastException e){

        //没有实现抛出异常
        throw new ClassCastException("Activity must implements Message interface");
    }
}
那么现在在fragment中可以调用在Activity中实现接口的方法实现信息传递了
listener.onClick("msg");
Handler
private Handler handler;
@Override
protected void onCreate(Bundle savedInstanceState) {

    super.onCreate(savedInstanceState);
    setContentView(R.layout.activity_handler);
    {

        //应用1:延时一段时间来处理某事
        Handler handler = new Handler();
        //延时Millis执行某个线程
        handler.postDelayed(new Runnable() {

            @Override
            public void run() {

                //finish();
            }
        }, 1000);
    }
    //应用2:线程通信,等待收到消息后,处理某事
    handler = new Handler(){

        @Override
        public void handleMessage(Message msg) {

            super.handleMessage(msg);
            //等待接收msg,接收后进行处理
            if(msg.what == 1){

                Toast.makeText(HandlerActivity.this, "got msg", Toast.LENGTH_SHORT).show();
            }
        }
    };
    //创建了一个线程,给主线程发送一个msg
    new Thread(){

        @Override
        public void run() {

            super.run();
            Message message = new Message();
            message.what = 1;
            handler.sendMessage(message);
        }
    }.start();
}
Android Storage
内部存储(Internal Storage) 外部存储(External Storage)
内部存储会随着应用卸载被删除
/data/data//shared_prefs
/data/data//databases
/data/data//file
上述都是通过类方法来操作
外部存储有公有目录(Download等)和私有目录(Android文件下的文件)
共有目录可以通过类方法来获取
私有目录
/mnt/sdcard/data/data//cache
/mnt/sdcard/data/data//files
会随着应用程序的卸载而删除,当然你可以自行在sdcard下创建目录,该目录不会随着应用的卸载而删除
SharedPreferences
private SharedPreferences sharedPreferences;
private SharedPreferences.Editor editor;

//MODE_PRIVATE表示该数据为该程序私有
sharedPreferences = this.getSharedPreferences("data",MODE_PRIVATE);
editor = sharedPreferences.edit();

//写使用editor的方法
editor.putString("user","Jack");
editor.apply();//Apply是异步存储
//读取时,数据在磁盘上不一定已经生效,但立即读取不受影响,因为它会从内存中读取
sharedPreferences.getString("user","")
InternalStorage
final private String file = "test.txt";
//以读写字符串为例
//save file
    private void save(String content) {

        FileOutputStream fileOutputStream = null;
        try {

            fileOutputStream = openFileOutput(file,MODE_PRIVATE);
            fileOutputStream.write(content.getBytes());
        } catch (IOException e) {
     } finally {

            try {

                if(fileOutputStream != null){

                    fileOutputStream.close();
                }
            } catch (IOException e) {
     }
        }
    }
    //read file
    private String read(){

        FileInputStream fileInputStream = null;
        try {

            fileInputStream = openFileInput(file);
            //每次最多读1024个字节
            byte[] buf = new byte[1024];
            StringBuilder stringBuilder = new StringBuilder("");
            int len = 0;
            while((len = fileInputStream.read(buf))>0){

                stringBuilder.append(new String(buf,0,len));
            }
            return stringBuilder.toString();
        } catch (IOException e) {
     } finally {

            try {

                if(fileInputStream != null){

                    fileInputStream.close();
                }
            } catch (IOException e) {
     }
        }
        return null;
    }
ExternalStorage
外部存储的读写需要访问权限
<uses-permission android:name="android.permission.READ_EXTERNAL_STORAGE" />
<uses-permission android:name="android.permission.WRITE_EXTERNAL_STORAGE" />
<uses-permission
                 android:name="android.permission.MOUNT_UNMOUNT_FILESYSTEMS"
                 tools:ignore="ProtectedPermissions" />
需要在使用的界面动态申请,如
ActivityCompat.requestPermissions(this,new String[]{
     Manifest.permission.WRITE_EXTERNAL_STORAGE,Manifest.permission.READ_EXTERNAL_STORAGE},2);
依然以读写文本文件为例
final private String fileName = "test.txt";

//save file
    private void save(String content) {

        FileOutputStream fileOutputStream = null;
        String sdStatus = Environment.getExternalStorageState();
        if (!sdStatus.equals(Environment.MEDIA_MOUNTED)) {
      // 检测sd是否可用
            Toast.makeText(this, "sdcard error!", Toast.LENGTH_SHORT).show();
            return;
        }
        try {

            //文件夹
            File dir = new File(getExternalFilesDir(null),"sky");
            if(!dir.exists()){

                boolean jg = dir.mkdirs();
                Log.d("dir",""+jg);
            }
            //文件
            File file = new File(dir,fileName);
            if(!file.exists()){

                boolean jg = file.createNewFile();
                Log.d("mkFile",""+jg);
            }
            //写入
            fileOutputStream = new FileOutputStream(file);
            fileOutputStream.write(content.getBytes());
        } catch (IOException e) {

            e.printStackTrace();
        } finally {

            try {

                if(fileOutputStream != null){

                    fileOutputStream.close();
                }
            } catch (IOException e) {

                e.printStackTrace();
            }
        }
    }
    //read file
    private String read(){

        FileInputStream fileInputStream = null;
        try {

            //寻找文件
            File file = new File(getExternalFilesDir(null).getAbsolutePath()+File.separator+"sky",fileName);
            fileInputStream = new FileInputStream(file);
            //读取文件,每次最多读1024个字节
            byte[] buf = new byte[1024];
            StringBuilder stringBuilder = new StringBuilder("");
            int len = 0;
            while((len = fileInputStream.read(buf))>0){

                stringBuilder.append(new String(buf,0,len));
            }
            return stringBuilder.toString();
        } catch (IOException e) {

            e.printStackTrace();
        } finally {

            try {

                if(fileInputStream != null){

                    fileInputStream.close();
                }
            } catch (IOException e) {

                e.printStackTrace();
            }
        }
        return null;
    }
BroadCast
添加依赖包
dependencies {
    implementation 'androidx.localbroadcastmanager:localbroadcastmanager:1.0.0'
}
当一个界面需要发送广播时
private  BroadCast broadCast;
//说明要发送的intent
IntentFilter intentFilter = new IntentFilter();
intentFilter.addAction("com.bc.modifyText");
//注册广播
LocalBroadcastManager.getInstance(this).registerReceiver(broadCast,intentFiler);
相应的,因该重写onDestroy方法,来取消注册广播
@Override
protected void onDestroy() {

    super.onDestroy();
    //destroy该页面后取消注册的广播
    LocalBroadcastManager.getInstance(this).unregisterReceiver(broadCast);
}
在其他类中可以接受该广播,并处理
@Override
//重写接收方法
public void onReceive(Context context, Intent intent) {

    switch (intent.getAction()){

        case "com.bc.modifyText":
            //textView.setText("Text is changed");
            break;
    }
}
ValueAnimator
private TextView textView;
//将textView沿y轴移动500,在2000ms内
textView.animate().translationYBy(100).setDuration(2000).start();
//渐变到消失
textView.animate().alpha(0).setDuration(2000);
//ValueAnimator
ValueAnimator valueAnimator = ValueAnimator.ofInt(0,100);
valueAnimator.setDuration(2000);
valueAnimator.addUpdateListener(new ValueAnimator.AnimatorUpdateListener() {

    @Override
    public void onAnimationUpdate(ValueAnimator animation) {

        //实际值,0~100
        int s = (int) animation.getAnimatedValue();
        textView.setTextSize(s);
        //动画进度,0~1.0
        animation.getAnimatedFraction();
    }
});
valueAnimator.start();
//依次沿y轴移动100,0,100,0
ObjectAnimator objectAnimator = ObjectAnimator.ofFloat(textView,"translationY",100,0,100,0);
objectAnimator.setDuration(2000);
objectAnimator.start();