laravel5.8整合JWT
记录一次laravel5.8开发的API接口,引入JWT的流程。
laravel+JWT的整合教程在网上有很多,根据网上的教程整合期间,还是踩了很多坑。
虽然这些坑都能在网上搜索到解决办法,但网上的其他教程都没有注明需要注意的点在哪里。
开始之前,先放两个链接。
jwt-auth for laravel的安装与使用.
JWT 完整使用详解【这篇很详细,讲得也很到位,基本看这篇就够了】.
我也是根据这几篇文章进行的整合。
laravel中使用的是jwt-auth库,那么先安装:
step1:
# 建议使用1.0以上版本
composer require tymon/jwt-auth
step2:发布配置文件
# 这条命令会在 config 下增加一个 jwt.php 的配置文件
php artisan vendor:publish --provider="Tymon\JWTAuth\Providers\LaravelServiceProvider"
step3: 生成加密密钥
# 这条命令会在 .env 文件下生成一个加密密钥,如:JWT_SECRET=foobar
php artisan jwt:secret
step4:更新校验用户登录的模型
以User为例:
<?php

namespace App;

use Illuminate\Database\Eloquent\Model;
use Illuminate\Notifications\Notifiable;
use Tymon\JWTAuth\Contracts\JWTSubject;
use Illuminate\Foundation\Auth\User as Authenticatable;

class User extends Authenticatable implements JWTSubject
{

    use Notifiable;

    /**
     * 可以被批量赋值的属性.
     * @var array
     */
    protected $fillable = [];
    protected $hidden   = [];

    /**
     * 关联到模型的数据表
     *
     * @var string
     */
    protected $table = '';

    /**
     * 表明模型是否应该被打上时间戳
     *
     * @var bool
     */
    public $timestamps = false;

    /**
     * Get the identifier that will be stored in the subject claim of the JWT.
     *
     * @return mixed
     */
    public function getJWTIdentifier()
    {

        return $this->getKey();
    }

    /**
     * Return a key value array, containing any custom claims to be added to the JWT.
     *
     * @return array
     */
    public function getJWTCustomClaims()
    {

        return [];
    }


    /**
     * 覆盖Laravel中默认的getAuthPassword方法, 可返回自己需要的字段.
     * @return array

    public function getAuthPassword(){
        return ['password'=>$this->attributes['password'], 'phone'=>$this->attributes['phone']];
    }*/

}
当然,这里也可以不用user,你可以创建你自己的用于登录校验的模型。
后面jwt-auth进行登录校验时,会使用到这个模型。
step5: 修改auth.php
    // 这里定义可以用的 guard(看守器)
    // driver 指的就是上面的对 Guard 契约的具体实现那个类了
    // users 是下面 providers 数组 key 为 users 的那个
    'guards' => [
        'web' => [
            'driver' => 'session',
            'provider' => 'users',
        ],

        'api' => [
            'driver' => 'jwt', // 这里原是token,改为jwt
            'provider' => 'users', // 这里的user指的是下面providers中配置的users
            //'hash' => false,
        ],
    ],
        'providers' => [
        'users' => [
            'driver' => 'eloquent', // 这里使用的用户提供器,默认是EloquentUserProvider.
            'model' => App\User::class, // 这个的作用是指定认证所需的 user 来源的数据表,可根据需要修改为你自己需要认证用户的模型.
        ],

        // 'users' => [
        //     'driver' => 'database',
        //     'table' => 'users',
        // ],
    ],
划重点:
1. 因为是用的API接口,使用guards(看守器)中的api中的driver要改为jwt.
2. providers中users中配置的model,需指向关联用户的模型。关联用户的模型需extends Illuminate\Foundation\Auth\User 并 implements JWTSubject,并重写getJWTIdentifier()和getJWTCustomClaims(),如上面的User模型。
以上就是配置过程。
好,接下来,我们就来看看laravel中怎么使用jwt。
先来个controller,同样来自这个JWT 完整使用详解【这篇很详细,讲得也很到位,基本看这篇就够了】:
<?php

namespace App\Http\Controllers;

use App\User;
use Illuminate\Http\Request;
use Illuminate\Support\Facades\Auth;
use Tymon\JWTAuth\Facades\JWTAuth;
use Log;
class AuthController extends Controller
{


    /**
     * Create a new AuthController instance.
     * 要求附带email和password(数据来源users表)
     *
     * @return void
     */
    public function __construct()
    {

        // 这里额外注意了:官方文档样例中只除外了『login』
        // 这样的结果是,token 只能在有效期以内进行刷新,过期无法刷新
        // 如果把 refresh 也放进去,token 即使过期但仍在刷新期以内也可刷新
        // 不过刷新一次作废
        //$this->middleware('auth:api', ['except' => ['login']]);
        // 另外关于上面的中间件,官方文档写的是『auth:api』
        // 但是我推荐用 『jwt.auth』,效果是一样的,但是有更加丰富的报错信息返回
        // auth:api   auth指的是中间件 App\Http\Kernel中$routeMiddleware定义的。而后面 :api 是路由参数,指定了要使用哪个看守器,可以看到下面 api 对应的看守器就是 jwt 的看守器。
        // 并且你可以直接使用 auth ,这样就相当于使用 defaults 中指定的看守器,即 session。
        // Lumen 默认用的就是 api 那个,所以你直接用 auth 作为 api 路由的中间件完全没问题
        // Laravel 中指定了两个看守器,而且默认的并不是 api,所以你必须得用 auth:api 作为路由的中间件

    }

    /**
     * Get a JWT via given credentials.
     *
     * @return \Illuminate\Http\JsonResponse
     */
    public function login()
    {


        $credentials = request(['phone', 'password']);
        /*
         * 这里创建token有三种方式
         * 1. 基于账密参数
         **/
         $token = auth('api')->attempt($credentials);

        /* 2. 基于 users 模型返回的实例
            $user = User::where([
                ['phone', $credentials['phone'], ['password', $credentials['password']]]
            ])->first();
          $token = auth('api')->login($user);
         */

        /* 3. 基于 users 模型中的主键 id
          $token = auth('api')->tokenById($user->id);
         */

        if (!$token) {

            return response()->json(['error' => 'Unauthorized'], 401);
        }
        return response()->json([
            'access_token' => $token,
            'token_type'   => 'bearer',
            'expires_in'   => auth('api')->factory()->getTTL() * 60,
        ]);
       // return $this->respondWithToken($token);
    }

    /**
     * Get the authenticated User.
     *
     * @return \Illuminate\Http\JsonResponse
     */
    public function me()
    {

        $user = auth('api')->user();
        $r['user'] = $user;
        return response()->json($r);
    }

    /**
     * Log the user out (Invalidate the token).
     *
     * @return \Illuminate\Http\JsonResponse
     */
    public function logout(Request $request)
    {

        $token = $request->header("Authorization");
        try {

            JWTAuth::invalidate(JWTAuth::getToken());
            return response()->json([
                "status" => "success",
                "message"=> "User successfully logged out."
            ]);
        } catch (JWTException $e) {

            // something went wrong whilst attempting to encode the token
            return response()->json([
                "status" => "error",
                "message" => "Failed to logout, please try again."
            ], 500);
        }

        //auth('api')->logout();  使用该方法,注销无效。

        return response()->json(['message' => 'Successfully logged out']);
    }

    /**
     * Refresh a token.
     * 刷新token,如果开启黑名单,以前的token便会失效。
     * 值得注意的是用上面的getToken再获取一次Token并不算做刷新,两次获得的Token是并行的,即两个都可用。
     * @return \Illuminate\Http\JsonResponse
     */
    public function refresh()
    {

        return $this->respondWithToken(auth('api')->refresh());
    }

    /**
     * Get the token array structure.
     *
     * @param  string $token
     *
     * @return \Illuminate\Http\JsonResponse
     */
    protected function respondWithToken($token)
    {

        return response()->json([
            'access_token' => $token,
            'token_type'   => 'bearer',
            'expires_in'   => auth('api')->factory()->getTTL() * 60
        ]);
    }

}
然后添加路由:
/* jwt 测试*/
Route::match(['post', 'get'], '/auth/login', '\App\Http\Controllers\AuthController@login');

// 需要登录后访问的接口放这里
Route::middleware(['jwt.auth:api'])->prefix('auth')->group(function () {

    Route::match(['post', 'get'], '/logout', '\App\Http\Controllers\AuthController@logout');
    Route::match(['post', 'get'], '/refresh', '\App\Http\Controllers\AuthController@refresh');
    Route::match(['post', 'get'], '/findUser', '\App\Http\Controllers\AuthController@me');
});
laravel中api接口的地址默认会加上前缀/api,所以我的测试路由地址如下:
/api/auth/login   #登录
/api/auth/logout  #注销
/api/auth/refresh #刷新token
/api/auth/findUser #刷新查询登录用户信息
直接使用postman进行测试,关于postman大家可自行搜索,网上都有教程。
先测试登录接口。
希望一切顺利。
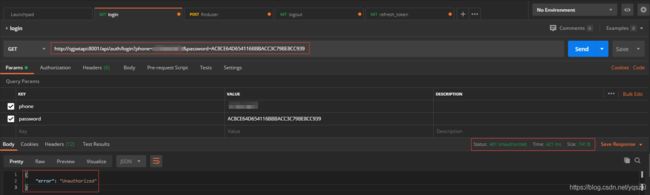
接口直接返回401 unauthorized,出现问题。
先怀疑账号密码错误,经再三确认,账号密码没错。排除嫌疑。
那就是jwt认证用户的问题了。
开始分析AuthController中的login方法。login方法很简单,如下:
    public function login()
    {

        // 这里只接收参数
        $credentials = request(['phone', 'password']);

        if (! $token = auth('api')->attempt($credentials)) {

            return response()->json(['error' => 'Unauthorized'], 401);
        }

        return $this->respondWithToken($token);
    }
那就是,auth(‘api’)->attempt()返回的问题了。
进一步定位,发现auth(‘api’)->attempt($credentials)返回的是false。
auth(‘api’)就是使用我们在auth.php中配置的key为api的看守器,可以理解为返回了一个jwt的guard。
attempt()返回false,有哪些情况呢?
一路跟踪源码,发现最终是,Illuminate\Hashing\AbstractHasher中的check()方法返回的false。
返回false的语句是:password_verify($value, $hashedValue)。
好吧,就是密码校验返回的false。
为什么输入密码正确,但auth(‘api’)->attempt()却校验密码返回false呢?
网上搜索。
然后一片文章出现在眼前,还是先放链接:laravel jwttoken jwt attempt laravel auth->attempt() 返回false.
问题定位成功:密码校验方式问题。
auth(‘api’)->attempt()默认的加密方式为Bcrypt,bcrypt又名HASH::make(),laravel框架中默认的加密方式就是HASH:::make。
这时终于明了,网上很多laravel+jwt整合的例子,他们都有一个前提:
用户默认的加密方式是laravel框架自带的加密方式。
所以他们按照教程,很顺利的就测试通过。
画重点:
laravel中使用jwt时,需注意用户认证的加密方式。
auth(‘api’)->attempt()默认使用的是laravel框架中默认的bcrypt。
如果你的加密方式不是laravel框架的默认加密方式,auth(‘api’)->attempt()会返回false。
你需要自己扩展认证方式。
那怎么auth(‘api’)->attempt()怎么更改为MD5的认证方式呢?
继续百度之。
同样,网上有很多种解决方法,但个人认为下面这篇,操作起来最简单。
还是先上链接:Laravel核心解读 – 扩展用户认证系统.
先自定义的用户提供器CustomEloquentUserProvider,继承自EloquentUserProvider,通过它的validateCredentials来实现我们自己系统的密码验证规则,由于用户提供器的其它方法不用改变沿用EloquentUserProvider里的实现就可以。
<?php
/**
 * Created by PhpStorm.
 * User: 86157
 * Date: 2020/6/5
 * Time: 14:50
 */

namespace App\Providers;


use Illuminate\Auth\EloquentUserProvider;
use Illuminate\Contracts\Auth\Authenticatable;

class CustomEloquentUserProvider extends EloquentUserProvider
{

    /**
     * Validate a user against the given credentials.
     *
     * @param \Illuminate\Contracts\Auth\Authenticatable $user
     * @param array $credentials
     */
    public function validateCredentials(Authenticatable $user, array $credentials)
    {

        $plain = $credentials['password'];// 这里需要传入加密后的密码
        $authPassword = $user->getAuthPassword(); // 这里是从数据库中user表中查询出的密码  可在user中重写getAuthPassword()
        return strtoupper($plain) == strtoupper($authPassword);
    }
}
然后在AppServiceProvider中的boot()方法中注册:
    /**
     * Bootstrap any application services.
     *
     * @return void
     */
    public function boot()
    {

        // 注册服务提供者  重新注册校验用户的服务提供者
        Auth::provider("custom-eloquent", function ($app, $config) {

            return new CustomEloquentUserProvider($app['hash'], $config['model']);
        });
    }
最后在config/auth.php里配置让看守器使用新注册的custom-eloquent作为用户提供器了。
修改后的config/auth.php配置如下:
<?php

return [

    // 这里是指定默认的看守器
    // web 的意思取下面 guards 数组 key 为 web 的那个
    'defaults' => [
        'guard' => 'web',
        'passwords' => 'users',
    ],

    // 这里定义可以用的 guard(看守器)
    // driver 指的就是上面的对 Guard 契约的具体实现那个类了
    // users 是下面 providers 数组 key 为 users 的那个
    'guards' => [
        'web' => [
            'driver' => 'session',
            'provider' => 'users',
        ],

        'api' => [
            'driver' => 'jwt', // 这里原是token,改为jwt
            'provider' => 'users', // 这里的user指的是下面providers中配置的users
            //'hash' => false,
        ],
    ],

    'providers' => [
        'users' => [
            //'driver' => 'eloquent', // 这里使用的用户提供器,默认是EloquentUserProvider.
            'driver' => 'custom-eloquent', // 这里已改为自定义的用户提供器
            'model' => App\User::class, // 这个的作用是指定认证所需的 user 来源的数据表,可根据需要修改为你自己需要认证用户的模型.
        ],

        // 'users' => [
        //     'driver' => 'database',
        //     'table' => 'users',
        // ],
    ],

    'passwords' => [
        'users' => [
            'provider' => 'users',
            'table' => 'password_resets',
            'expire' => 60,
        ],
    ],

];
config/auth.php中的providers,其users中的driver已改为我们在AppServiceProvider中新注册的custom-eloquent了。
以上,问题已经定位,并找到解决方案。
再次进行测试登录接口。
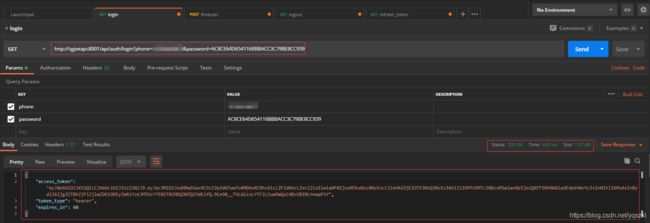
登录接口测试成功,已获取到jwt生成的token。
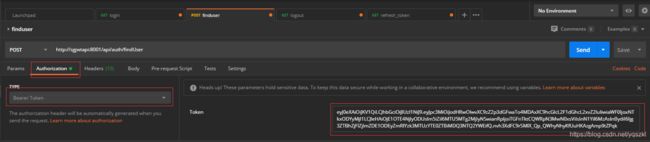
获取用户信息:

这里需要注意的是,获取用户请求需要携带token.
怎么携带token? 如下设置:
用户注销:

又出幺蛾子!!!
Route [login] not defined,还是关键词网上搜索。
顺利找到原因,还是先上链接: Laravel Passport API token 验证,出现 Route [login] not defined 报错.
好吧,不用谢,我是勤劳的搬运工。
原因:
中间件UrlGenerator的 redirectTo() 方法,因为没定义 ‘login’ 路由,导致抛出了这个异常。
但,这是API接口啊,你给我从定向到另一个路由去,要闹哪样?
你直接给我返回个json啊!
最终解决方法:
api 请求 header 添加:
Accept: application/json
然后就会抛出 AuthenticationException 异常,我们可以在
app/Exceptions/Handler.php
捕获异常,重新定义渲染。
好吧,postman中,发送请求时设置Accept: application/json.

设置后返回401Unauthorized。
返回正常,因为token过期了。
为了测试,token只设置了1分钟的实效。
好吧,过期后,正好试试可否刷新token。

咦!
过期后不能刷新token吗?
那不是token签发后,过期了就只能重新登录了?重新输入用户名密码登录,那多麻烦。
而且体验也不好。
查看jwt.php的配置
<?php

/*
 * This file is part of jwt-auth.
 *
 * (c) Sean Tymon
 *
 * For the full copyright and license information, please view the LICENSE
 * file that was distributed with this source code.
 */

return [

    /*
    |--------------------------------------------------------------------------
    | JWT Authentication Secret
    |--------------------------------------------------------------------------
    |
    | Don't forget to set this in your .env file, as it will be used to sign
    | your tokens. A helper command is provided for this:
    | `php artisan jwt:secret`
    |
    | Note: This will be used for Symmetric algorithms only (HMAC),
    | since RSA and ECDSA use a private/public key combo (See below).
    |
    */
    // 用于加密生成 token 的 secret
    'secret' => env('JWT_SECRET'),

    /*
    |--------------------------------------------------------------------------
    | JWT Authentication Keys
    |--------------------------------------------------------------------------
    |
    | The algorithm you are using, will determine whether your tokens are
    | signed with a random string (defined in `JWT_SECRET`) or using the
    | following public & private keys.
    |
    | Symmetric Algorithms:
    | HS256, HS384 & HS512 will use `JWT_SECRET`.
    |
    | Asymmetric Algorithms:
    | RS256, RS384 & RS512 / ES256, ES384 & ES512 will use the keys below.
    |
    */

    'keys' => [

        /*
        |--------------------------------------------------------------------------
        | Public Key
        |--------------------------------------------------------------------------
        |
        | A path or resource to your public key.
        |
        | E.g. 'file://path/to/public/key'
        |
        */

        'public' => env('JWT_PUBLIC_KEY'),

        /*
        |--------------------------------------------------------------------------
        | Private Key
        |--------------------------------------------------------------------------
        |
        | A path or resource to your private key.
        |
        | E.g. 'file://path/to/private/key'
        |
        */

        'private' => env('JWT_PRIVATE_KEY'),

        /*
        |--------------------------------------------------------------------------
        | Passphrase
        |--------------------------------------------------------------------------
        |
        | The passphrase for your private key. Can be null if none set.
        |
        */

        'passphrase' => env('JWT_PASSPHRASE'),

    ],

    /*
    |--------------------------------------------------------------------------
    | JWT time to live
    |--------------------------------------------------------------------------
    |
    | Specify the length of time (in minutes) that the token will be valid for.
    | Defaults to 1 hour.
    |
    | You can also set this to null, to yield a never expiring token.
    | Some people may want this behaviour for e.g. a mobile app.
    | This is not particularly recommended, so make sure you have appropriate
    | systems in place to revoke the token if necessary.
    | Notice: If you set this to null you should remove 'exp' element from 'required_claims' list.
    |
    */
    // 指定 access_token 有效的时间长度(以分钟为单位),默认为1小时,您也可以将其设置为空,以产生永不过期的标记
    'ttl' => env('JWT_TTL', 1), // 这里为了测试,设置为1分钟。

    /*
    |--------------------------------------------------------------------------
    | Refresh time to live
    |--------------------------------------------------------------------------
    |
    | Specify the length of time (in minutes) that the token can be refreshed
    | within. I.E. The user can refresh their token within a 2 week window of
    | the original token being created until they must re-authenticate.
    | Defaults to 2 weeks.
    |
    | You can also set this to null, to yield an infinite refresh time.
    | Some may want this instead of never expiring tokens for e.g. a mobile app.
    | This is not particularly recommended, so make sure you have appropriate
    | systems in place to revoke the token if necessary.

    | 刷新时间指的是在这个时间内可以凭旧 token 换取一个新 token。
    | 例如 token 有效时间为 60 分钟,刷新时间为 20160 分钟。
    | 在 60 分钟内可以通过这个 token 获取新 token。
    | 但是超过 60 分钟是不可以的,然后你可以一直循环获取,直到总时间超过 20160 分钟,不能再获取。
    |
    */

    'refresh_ttl' => env('JWT_REFRESH_TTL', 5), // 一周:20160 这里为了测试,设置为5分钟。

    /*
    |--------------------------------------------------------------------------
    | JWT hashing algorithm
    |--------------------------------------------------------------------------
    |
    | Specify the hashing algorithm that will be used to sign the token.
    |
    | See here: https://github.com/namshi/jose/tree/master/src/Namshi/JOSE/Signer/OpenSSL
    | for possible values.
    |
    | 指定将用于对令牌进行签名的散列算法。
    |
    */

    'algo' => env('JWT_ALGO', 'HS256'),

    /*
    |--------------------------------------------------------------------------
    | Required Claims
    |--------------------------------------------------------------------------
    |
    | Specify the required claims that must exist in any token.
    | A TokenInvalidException will be thrown if any of these claims are not
    | present in the payload.
    |
    | 指定必须存在于任何令牌中的声明。
    */

    'required_claims' => [
        'iss',
        'iat',
        'exp',
        'nbf',
        'sub',
        'jti',
    ],

    /*
    |--------------------------------------------------------------------------
    | Persistent Claims
    |--------------------------------------------------------------------------
    |
    | Specify the claim keys to be persisted when refreshing a token.
    | `sub` and `iat` will automatically be persisted, in
    | addition to the these claims.
    |
    | Note: If a claim does not exist then it will be ignored.
    | 指定在刷新令牌时要保留的声明密钥。
    */

    'persistent_claims' => [
        // 'foo',
        // 'bar',
    ],

    /*
    |--------------------------------------------------------------------------
    | Lock Subject
    |--------------------------------------------------------------------------
    |
    | This will determine whether a `prv` claim is automatically added to
    | the token. The purpose of this is to ensure that if you have multiple
    | authentication models e.g. `App\User` & `App\OtherPerson`, then we
    | should prevent one authentication request from impersonating another,
    | if 2 tokens happen to have the same id across the 2 different models.
    |
    | Under specific circumstances, you may want to disable this behaviour
    | e.g. if you only have one authentication model, then you would save
    | a little on token size.
    |
    */

    'lock_subject' => true,

    /*
    |--------------------------------------------------------------------------
    | Leeway
    |--------------------------------------------------------------------------
    |
    | This property gives the jwt timestamp claims some "leeway".
    | Meaning that if you have any unavoidable slight clock skew on
    | any of your servers then this will afford you some level of cushioning.
    |
    | This applies to the claims `iat`, `nbf` and `exp`.
    |
    | Specify in seconds - only if you know you need it.
    |
    */

    'leeway' => env('JWT_LEEWAY', 0),

    /*
    |--------------------------------------------------------------------------
    | Blacklist Enabled
    |--------------------------------------------------------------------------
    |
    | In order to invalidate tokens, you must have the blacklist enabled.
    | If you do not want or need this functionality, then set this to false.
    |
    | 为了使令牌无效,您必须启用黑名单。
    | 如果您不想或不需要此功能,请将其设置为 false。
    */

    'blacklist_enabled' => env('JWT_BLACKLIST_ENABLED', true),

    /*
    | -------------------------------------------------------------------------
    | Blacklist Grace Period
    | -------------------------------------------------------------------------
    |
    | When multiple concurrent requests are made with the same JWT,
    | it is possible that some of them fail, due to token regeneration
    | on every request.
    |
    | Set grace period in seconds to prevent parallel request failure.
    |
    | 当多个并发请求使用相同的JWT进行时,
    | 由于 access_token 的刷新 ,其中一些可能会失败
    | 以秒为单位设置请求时间以防止并发的请求失败。
    |
    */

    'blacklist_grace_period' => env('JWT_BLACKLIST_GRACE_PERIOD', 0),

    /*
    |--------------------------------------------------------------------------
    | Cookies encryption
    |--------------------------------------------------------------------------
    |
    | By default Laravel encrypt cookies for security reason.
    | If you decide to not decrypt cookies, you will have to configure Laravel
    | to not encrypt your cookie token by adding its name into the $except
    | array available in the middleware "EncryptCookies" provided by Laravel.
    | see https://laravel.com/docs/master/responses#cookies-and-encryption
    | for details.
    |
    | Set it to true if you want to decrypt cookies.
    |
    */

    'decrypt_cookies' => false,

    /*
    |--------------------------------------------------------------------------
    | Providers
    |--------------------------------------------------------------------------
    |
    | Specify the various providers used throughout the package.
    |
    | 指定整个包中使用的各种提供程序。
    */

    'providers' => [

        /*
        |--------------------------------------------------------------------------
        | JWT Provider
        |--------------------------------------------------------------------------
        |
        | Specify the provider that is used to create and decode the tokens.
        | 指定用于创建和解码令牌的提供程序。
        */

        'jwt' => Tymon\JWTAuth\Providers\JWT\Lcobucci::class,

        /*
        |--------------------------------------------------------------------------
        | Authentication Provider
        |--------------------------------------------------------------------------
        |
        | Specify the provider that is used to authenticate users.
        | 指定用于对用户进行身份验证的提供程序。
        |
        */

        'auth' => Tymon\JWTAuth\Providers\Auth\Illuminate::class,

        /*
        |--------------------------------------------------------------------------
        | Storage Provider
        |--------------------------------------------------------------------------
        |
        | Specify the provider that is used to store tokens in the blacklist.
        | 指定用于在黑名单中存储标记的提供程序。
        */

        'storage' => Tymon\JWTAuth\Providers\Storage\Illuminate::class,

    ],

];
其中
'ttl' => env('JWT_TTL', 2), // 这里为了测试,设置为1分钟。
'refresh_ttl' => env('JWT_REFRESH_TTL', 5), // 一周:20160 这里为了测试,设置为5分钟。
这就表示,jwt生成的token有效期为2分钟,在token的有效期内,可以携带token过来刷新token。
若超过5分钟,则不能刷新token,只能重新登录。
那token过期后,不想重新登录,想刷新怎么办呢?
同样,先上链接:使用 Jwt-Auth 实现 API 用户认证以及无痛刷新访问令牌
.
可以采用中间件来处理
<?php

namespace App\Http\Middleware;

use Closure;
use Illuminate\Support\Facades\Auth;
use Symfony\Component\HttpKernel\Exception\UnauthorizedHttpException;
use Tymon\JWTAuth\Exceptions\JWTException;
use Tymon\JWTAuth\Exceptions\TokenExpiredException;
use Tymon\JWTAuth\Http\Middleware\BaseMiddleware;
use Log;

// 注意,这里要继承的是 jwt 的 BaseMiddleware
class JwtRefreshToken extends BaseMiddleware
{

    /**
     * Handle an incoming request.
     * @param  \Illuminate\Http\Request $request
     * @param  \Closure $next
     * @throws \Symfony\Component\HttpKernel\Exception\UnauthorizedHttpException
     *
     * @return mixed
     */
    public function handle($request, Closure $next)
    {

        // 检查此次请求中是否带有 token,如果没有则抛出异常。
        $this->checkForToken($request);

        // 使用 try 包裹,以捕捉 token 过期所抛出的 TokenExpiredException  异常
        try {

            // 检测用户的登录状态,如果正常则通过
            if ($this->auth->parseToken()->authenticate()) {

                return $next($request);
            }
            throw new UnauthorizedHttpException('jwt-auth', '未登录');
        } catch (TokenExpiredException $exception) {

            // 此处捕获到了 token 过期所抛出的 TokenExpiredException 异常,我们在这里需要做的是刷新该用户的 token 并将它添加到响应头中
            try {

                // 刷新用户的 token
                $token = $this->auth->refresh();
                // 使用一次性登录以保证此次请求的成功
                Auth::guard('api')->onceUsingId($this->auth->manager()->getPayloadFactory()->buildClaimsCollection()->toPlainArray()['sub']);
            } catch (JWTException $exception) {

                Log::error($exception);
                // 如果捕获到此异常,即代表 refresh 也过期了,用户无法刷新令牌,需要重新登录。
                throw new UnauthorizedHttpException('jwt-auth', $exception->getMessage());
            }
        }

        // 在响应头中返回新的 token
        return $this->setAuthenticationHeader($next($request), $token);
    }

}
然后,App\Http\Kernel中$routeMiddleware增加:
'jwt_refresh_token' => \App\Http\Middleware\JwtRefreshToken::class,
最后修改api.php中的路由,修改的路由如下:
/* jwt 测试*/
Route::match(['post', 'get'], '/auth/login', '\App\Http\Controllers\AuthController@login');

// 需要登录后访问的接口放这里
Route::middleware(['jwt_refresh_token', 'jwt.auth:api'])->prefix('auth')->group(function () {

    Route::match(['post', 'get'], '/logout', '\App\Http\Controllers\AuthController@logout');
    Route::match(['post', 'get'], '/refresh', '\App\Http\Controllers\AuthController@refresh');
    Route::match(['post', 'get'], '/findUser', '\App\Http\Controllers\AuthController@me');
});
画重点: 路由中间件jwt_refresh_token需放在第一位
token过期后,可以暂时通过此次请求,并在此次请求中刷新该用户的 token,最后在响应头中将新的 token 返回给前端,前端拿到新的token后,更新token。
这里需要注意的是,当jwt.php中设置的refresh_ttl到期后,refresh()将会失效。之后只能重新登录。
以上,是token过期后刷新的情况。
那么,若是token未过期,刷新了token后,原token可以继续使用吗?
jwt.php中这么两个配置:
    /*
    |--------------------------------------------------------------------------
    | Blacklist Enabled
    |--------------------------------------------------------------------------
    | 为了使令牌无效,您必须启用黑名单。
    | 如果您不想或不需要此功能,请将其设置为 false。
    */

    'blacklist_enabled' => env('JWT_BLACKLIST_ENABLED', true),

    /*
    | -------------------------------------------------------------------------
    | Blacklist Grace Period
    | -------------------------------------------------------------------------
    | 当多个并发请求使用相同的JWT进行时,
    | 由于 access_token 的刷新 ,其中一些可能会失败
    | 以秒为单位设置请求时间以防止并发的请求失败。
    |
    */

    'blacklist_grace_period' => env('JWT_BLACKLIST_GRACE_PERIOD', 60),
blacklist_grace_period:可以设置在多少秒内,旧token还可以继续使用。
若想刷新后,旧token立即失效,可以设置为0秒。
jwt token 注销:
注销时,需注意:auth(‘api’)->logout(); 使用该方法,注销无效。
未深究原因,待后面有空深入研究下。知道原因的,也可以告知我下。
jwt-auth中,token注销,实则是把token加入黑名单。
最终调用 Laravel 当前的 Cache,将 Token 加入缓存。
也就是说,jwt-auth中token注销会使用laravel框架的Cache。
如果API接口要集群的话,laravel的Cache就需要使用redis之类的第三方缓存,而不是使用默认的file.
Cache使用file的话,会导致,token在某台API接口服务器中失效,但在其他接口服务器中却可以正常使用。
以上,记录了本次引入jwt的过程,和其中碰到的问题。可能有疏漏的地方。但把自己认为应该注意的地方都标注了。
写得有些凌乱,但也不想改了。
后面有时间再重新修整吧。