Android中Service的使用方法
今天抽时间复习了Service的基础,在这里做一次总结,刚开始写,基本和老罗第二季中的视频是一样的,只是自己不看内容做总结。
一、Service的简介
Service是Android应用的四大组件之一,它的特点就是:优先级高!不会轻易被系统给回收,而且可以做到及时启动它的组件被销毁,它也依旧运行。
二、Service的作用
Service主要是在后台进行长时间的耗时操作(下载视频、图片、听音乐等),它是没有界面的一个组件,只会运行在后台。Service的优先级比较高,当启动它的Activity被销毁后,Service也会继续运行,即时应用程序退出,Service也可以运行的,所以Service可以在众多场景使用。
三、Service的使用
Setvice有两种启动方式
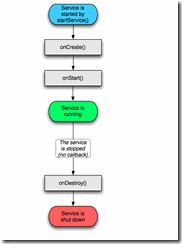
第一种是startService(Intent i);的方式启动,这种启动方式的生命周期:
这种启动方式,由Activity调用startService(Intent i);方法启动,第一次启动时Service依次调用onCreate();---onStart();---onDestory();在Service的生命周期中,onCreate()和onDestory()只能够执行一次,但是onStart()可以多次调用。这种启动方式特点是不会随着应用进程的结束而结束。
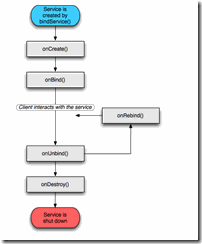
第二种启动方式是绑定式启动:
这种启动方式启动服务时,依次为onCreate() -> onBind() -> Service running -> onUnbind() -> onDestroy();特点是它会随着启动它的上下文一起被销毁。
关闭一个服务,只需要调用Service.stopSelf()或者stopService()即可。
1、第一种方式启动Service
这种启动方式很简单,就是利用Intent启动服务,过程中还可以利用Intent向服务传递数据。
MainActivity.class
package com.example.servicetest;

import android.app.Activity;
import android.content.Intent;
import android.os.Bundle;
import android.view.View;
import android.view.View.OnClickListener;
import android.widget.Button;

public class MainActivity extends Activity {

    private Button btn_start;
    private Button btn_stop;

    @Override
    protected void onCreate(Bundle savedInstanceState) {
        super.onCreate(savedInstanceState);
        setContentView(R.layout.activity_main);
        btn_start = (Button) findViewById(R.id.btn_start);
        btn_stop = (Button) findViewById(R.id.btn_stop);
        final Intent intent = new Intent(this, ServiceStart.class);
        //启动服务
        btn_start.setOnClickListener(new OnClickListener() {

            @Override
            public void onClick(View arg0) {

                startService(intent); // TODO Auto-generated method stub

            }
        });
        //停止服务
        btn_stop.setOnClickListener(new OnClickListener() {

            @Override
            public void onClick(View arg0) {
                // TODO Auto-generated method stub
                stopService(intent);
            }
        });

    }

}
Manifest.xml(需要在配置文件里注册服务)
<application
        android:allowBackup="true"
        android:icon="@drawable/ic_launcher"
        android:label="@string/app_name"
        android:theme="@style/AppTheme" >
        <activity
            android:name=".MainActivity"
            android:label="@string/app_name" >
ServiceStart.class
package com.example.servicetest;

import android.app.Service;
import android.content.Intent;
import android.os.IBinder;
import android.util.Log;

public class ServiceStart extends Service {

    @Override
    public void onCreate() {
        super.onCreate();
        Log.i("tag", "服务-------create");
    }

    @Override
    public void onDestroy() {
        super.onDestroy();
        Log.i("tag", "服务-------destory");
    }

    @Override
    public void onStart(Intent intent, int startId) {
        super.onStart(intent, startId);
        Log.i("tag", "服务-------start");
    }

    @Override
    public IBinder onBind(Intent arg0) {
        return null;
    }

}
在onStart()方法里开新线程进行一些耗时的操作。
2、 第二种启动方式
绑定式启动的服务,会在启动它的Activity被销毁后也结束,启动方式是:
在你创建的服务类里,写一个内部类LocalBinder,这个内部类需要继承Binder,它相当于一个绑定器,然后这个绑定器里写一个方法,返回你的服务类的实例。在onBinder方法中需要返回这个内部类。
在MainActivity中,需要去创建一个ServiceConnection对象,它相当于Activity和Service之间的桥梁,ServiceConnection中有两个需要重写的方法分别是绑定成功和失败,绑定成功之后,onServiceConnected方法会回调出IBinder,这里的IBinder就是你在Service类中定义的内部类绑定器,最后从绑定器中获取服务类的实例。
// 服务端和客户端的桥梁
    private ServiceConnection mServiceConnection = new ServiceConnection() {

        @Override
        public void onServiceDisconnected(ComponentName name) {
            // 绑定失败
            is_binder = false;
        }

        @Override
        public void onServiceConnected(ComponentName name, IBinder service) {
            //绑定成功,获取到Service的实例对象
            LocalBinder localBinder = (LocalBinder) service;
            myService = localBinder.getService();
            is_binder = true;
        }
    };
MainActivity.class
package com.example.servicetest;

import com.example.servicetest.ServiceBind.LocalBinder;

import android.app.Activity;
import android.app.Service;
import android.content.ComponentName;
import android.content.Intent;
import android.content.ServiceConnection;
import android.os.Bundle;
import android.os.IBinder;
import android.view.View;
import android.view.View.OnClickListener;
import android.widget.Button;

public class MainActivity extends Activity {

    private Button btn_bind;
    private Button btn_unbind;
    private boolean is_binder = false;
    private ServiceBind myService;

    @Override
    protected void onCreate(Bundle savedInstanceState) {
        super.onCreate(savedInstanceState);
        setContentView(R.layout.activity_main);
        btn_bind = (Button) findViewById(R.id.btn_bind);
        btn_unbind = (Button) findViewById(R.id.btn_unbind);
        final Intent intent = new Intent(this, ServiceBind.class);
        // 绑定服务
        btn_bind.setOnClickListener(new OnClickListener() {

            @Override
            public void onClick(View arg0) {
                bindService(intent, mServiceConnection,
                        Service.BIND_AUTO_CREATE);
            }
        });
        // 解绑服务
        btn_unbind.setOnClickListener(new OnClickListener() {

            @Override
            public void onClick(View arg0) {
                unbindService(mServiceConnection);
            }
        });
    }


    // 服务端和客户端的桥梁
    private ServiceConnection mServiceConnection = new ServiceConnection() {

        @Override
        public void onServiceDisconnected(ComponentName name) {
            // TODO Auto-generated method stub
            is_binder = false;
        }

        @Override
        public void onServiceConnected(ComponentName name, IBinder service) {
            //绑定成功,获取到Service的实例对象
            LocalBinder localBinder = (LocalBinder) service;
            myService = localBinder.getService();
            is_binder = true;
        }
    };

    @Override
    protected void onDestroy() {
        // TODO Auto-generated method stub
        super.onDestroy();
        if (is_binder) {
            unbindService(mServiceConnection);
        }
    }

}
ServiceBind.class
package com.example.servicetest;

import android.app.Service;
import android.content.Intent;
import android.os.Binder;
import android.os.IBinder;
import android.util.Log;

public class ServiceBind extends Service {

    private Binder binder = new LocalBinder();
    @Override
    public void onCreate() {
        super.onCreate();
        Log.i("tag", "服务-------create");
    }

    @Override
    public void onDestroy() {
        super.onDestroy();
        Log.i("tag", "服务-------destory");
    }

    @Override
    public IBinder onBind(Intent arg0) {
        Log.i("tag", "服务-------onBind");
        return binder;
    }

    @Override
    public boolean onUnbind(Intent intent) {
        Log.i("tag", "服务-------onUnbind");
        return super.onUnbind(intent);
    }

    public class LocalBinder extends Binder {
        public ServiceBind getService() {
            return ServiceBind.this;
        }
    }
}
如下图:
点击绑定服务:
然后点击解绑服务:
![]()
注意:在没有绑定服务之前,点击解绑服务会报错,所以需要进行判断。
在第一次绑定服务之后,再次绑定服务的话,是不会再次执行onBinder的。
3、Service和Activity的数据传输
两者之间的数据传输需要用到一个回调的方法。
就是Binder类下的onTransact,它就像一个电话一样,可以来回传输数据。
第一步:在Srivice类中,你自己写的LocalBinder下,重写Binder下的onTransact方法
public class LocalBinder extends Binder {
        public ServiceBind getService() {
            return ServiceBind.this;
        }
        @Override
        protected boolean onTransact(int code, Parcel data, Parcel reply,
                int flags) throws RemoteException {
            //  参数 data是Activity中传输过来的数据。
            //  参数reply是Service反馈回去的数据。
            //  参数code和flags 在这里不用改动
            return super.onTransact(code, data, reply, flags);
        }

    }
第二步:在Activity中,当服务绑定成功后,会返回你在服务类中定义的LocalBinder类
// 服务端和客户端的桥梁
    private ServiceConnection mServiceConnection = new ServiceConnection() {

        @Override
        public void onServiceDisconnected(ComponentName name) {
            // 绑定失败
            is_binder = false;
        }

        @Override
        public void onServiceConnected(ComponentName name, IBinder service) {
            //绑定成功,获取到Service的实例对象
            localBinder = (LocalBinder) service;
            myService = localBinder.getService();
            is_binder = true;
        }
    };
调用这个localBinder的方法
Parcel data = Parcel.obtain();
                data.writeInt(1);
                Parcel reply = Parcel.obtain();
                try {
                    //参数2和3分别是传送过去的数据和反馈的数据
                    localBinder.transact(IBinder.LAST_CALL_TRANSACTION, data, reply, 0);
                } catch (RemoteException e) {
                    // TODO Auto-generated catch block
                    e.printStackTrace();
                }
通过这种方式,可以很简便的进行数据传输。
Service的使用方法大概就是这样,随着我技术的提升,会对它们有不同的理解。现在只能是自己做总结。


