【论文阅读笔记】关于GhostNet的结构
目录
1.关于理论:
2.Ghost模块
2.1关于计算量
2.2.复杂度分析【内存和计算量的收益】
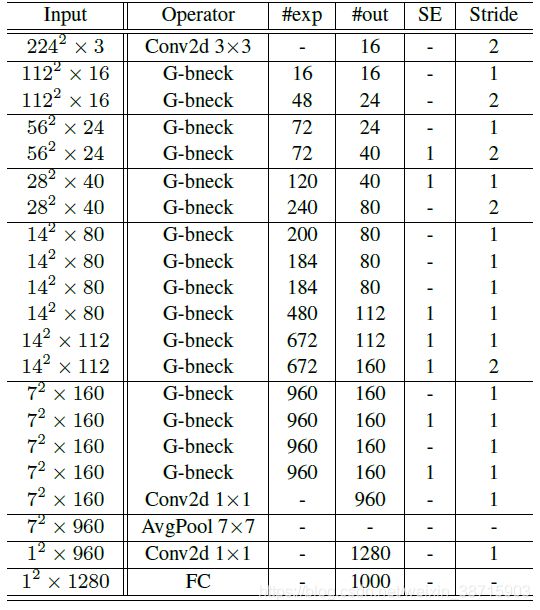
2.3 关于GhostNet结构【配合代码使用】:
2.3.1 pytorch中:
2.3.2 darknet的cfg文件具体分析:
3.GhostNet-yolo
论文链接:https://arxiv.org/abs/1911.11907
作者解读:https://zhuanlan.zhihu.com/p/109325275
开源代码tensorflow:https://github.com/huawei-noah/ghostnet
开源代码:pytorch : https://github.com/iamhankai/ghostnet.pytorch/blob/master/ghost_net.py
开源代码:darknet:https://github.com/AlexeyAB/darknet/files/3997987/ghostnet.cfg.txt【cfg文件】
https://github.com/AlexeyAB/darknet/issues/4418【darknet版本】
1.关于理论:
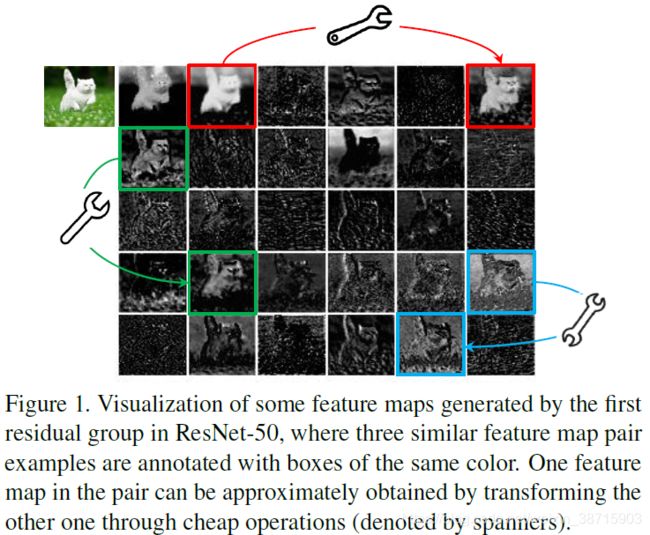
在作者专栏里讲得很清楚了,一般情况下,深度神经网络提取的特征通常会包含大量的冗余特征图,这样能够保证对输入的数据有详细的特征理解。论文里给出了一个示例,在ResNet-50网络中的特征可视化图,并标出了三对相似的特征图(6个特征)。作者认为可以不直接通过卷积生成这些特征(6个),而是可以通过一定的变换来生成所需要的特征(先生成3个特征,再通过一定的变换生成剩下三个特征,concat后就是之前需要的3对特征图)。因此可以说其中一个特征图是另一个的“幻影”(Ghost)。
所以可以知道,本文最重要的部分是,提出了并非所有特征图都要用卷积操作来得到,“幻影”特征图可以用更廉价的操作来生成。【就是文章中最关键的Ghost 模块】
2.Ghost模块
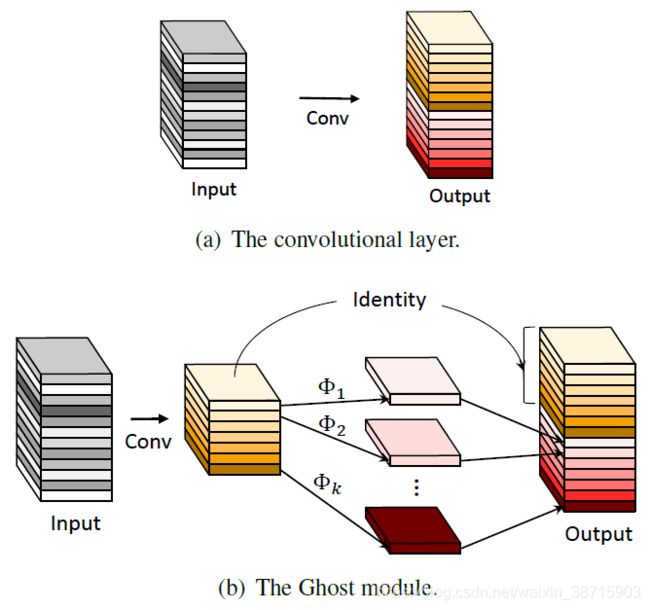
由图可以得到我们在前面说的内容,原有的深度神经网络如a)结构,直接通过卷积生成一组特征图(含有一些相似的特征图);Ghost结构如b)结构,先通过卷积生成其中一部分特征图A,再将A做一些简单的线性运算生成A’,将A concat A’后生成最终需要的一组特征图。
作者说,这样的操作能够在保持相似识别性能的同时降低通用卷积层的计算成本,并且GhostNet可以超越MobileNetV3等先进的高效深度模型,在移动设备上进行快速推断。
2.1关于计算量
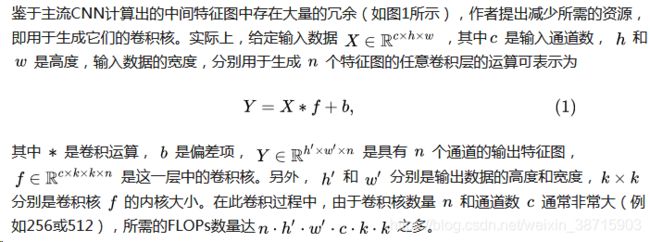
(不愿意手打公式,直接截图作者的解析了,QAQ)
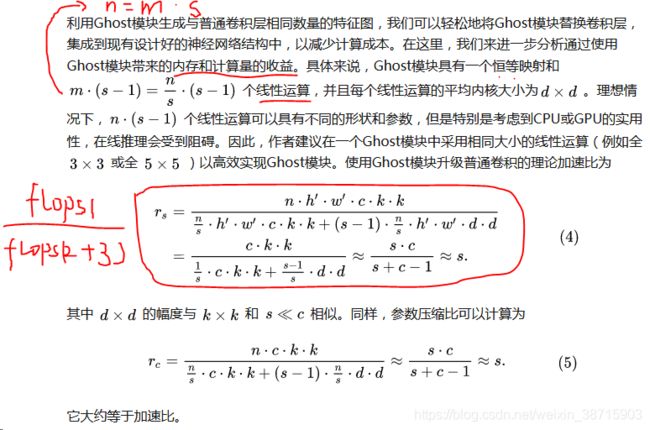
- 首先有原有的flops数量为:flops1=n*h'*w'*c*k*k
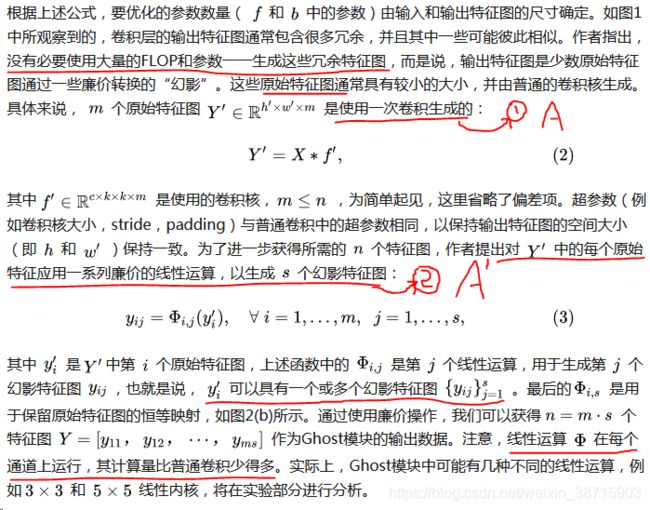
- 由上特征图的channel是m,变换的数量是s,最终得到的新的特征图的数量是n:n=m*s,
- 生成原始特征Y'的flops数量为:flops2=m*h'*w'*c*k*k(读网络结构的时候可以发现一般m<=0.5*n)
- 线性变换的flops远小于普通卷积计算,假设每个线性运算的平均内核大小为d*d:flops3=(s-1)*m*h'*w'*d*d。
作者利用综上的操作能够减少生成特征时的相应计算量。
2.2.复杂度分析【内存和计算量的收益】
(不愿意手打公式,直接截图作者的解析了,QAQ)
- 特征图的channel是m,变换的数量是s,最终得到的新的特征图的数量是n:n=m*s;假设每个线性运算的平均内核大小为d*d
- 由2.1 的计算量分析可以得出:m=n/s,以及如下图
2.3 关于GhostNet结构【配合代码使用】:
在代码实现中,第二个变换是用depthwise conv实现的,然后将两个过程生成的feature map concat后得到完整的feature map。
2.3.1 pytorch中:
class GhostModule(nn.Module):
    def __init__(self, inp, oup, kernel_size=1, ratio=2, dw_size=3, stride=1, relu=True):
        super(GhostModule, self).__init__()
        self.oup = oup
        init_channels = math.ceil(oup / ratio)
        new_channels = init_channels*(ratio-1)

        self.primary_conv = nn.Sequential(
            nn.Conv2d(inp, init_channels, kernel_size, stride, kernel_size//2, bias=False),
            nn.BatchNorm2d(init_channels),
            nn.ReLU(inplace=True) if relu else nn.Sequential(),
        )

        self.cheap_operation = nn.Sequential(
            nn.Conv2d(init_channels, new_channels, dw_size, 1, dw_size//2, groups=init_channels, bias=False),
            nn.BatchNorm2d(new_channels),
            nn.ReLU(inplace=True) if relu else nn.Sequential(),
        )

    def forward(self, x):
        x1 = self.primary_conv(x)
        x2 = self.cheap_operation(x1)
        out = torch.cat([x1,x2], dim=1)
        return out[:,:self.oup,:,:]
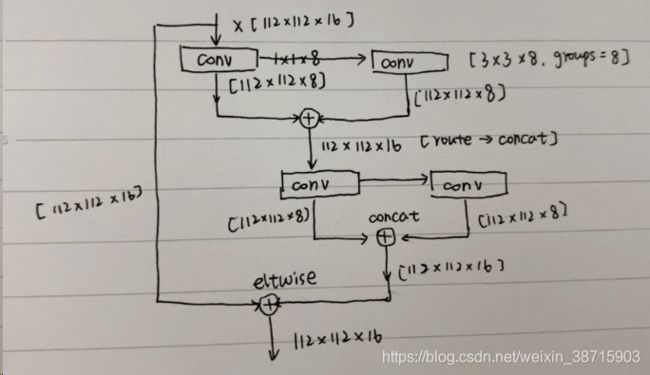
上面代码应该很好理解,根据上述代码可以画出简单地GhostNet的结构:
2.3.2 darknet的cfg文件具体分析:
【一小部分分析,就是举个例子,怕自己忘记】
- 224*224*3-->112*112*16:【conv 3*3】
[convolutional]
batch_normalize=1
filters=16
size=3
stride=2
pad=1
activation=relu- 112*112*16-->112*112*16:【G-bneck,se=0】
[convolutional]
batch_normalize=1
filters=8
size=1
stride=1
pad=1
activation=relu

[convolutional]
batch_normalize=1
filters=8
groups=8
size=3
stride=1
pad=1
activation=relu

[route]
layers = -1, -2


[convolutional]
batch_normalize=1
filters=8
size=1
stride=1
pad=1
activation=relu

[convolutional]
batch_normalize=1
filters=8
groups=8
size=3
stride=1
pad=1
activation=linear

[route]
layers = -1, -2

[shortcut]
from = -7
activation = linear
配图理解:
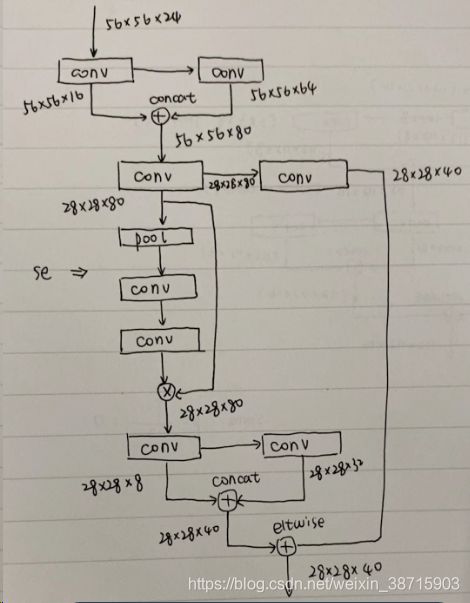
- 56*56*24-->28*28*40:【G-bneck,se=1】
[convolutional]
batch_normalize=1
filters=16
size=1
stride=1
pad=1
activation=relu

[convolutional]
batch_normalize=1
filters=64
groups=16
size=5
stride=1
pad=1
activation=relu

[route]
layers = -1, -2

# stride = 2
[convolutional]
batch_normalize=1
filters=80
groups=80
size=5
stride=2
pad=1
activation=linear

# shortcut
[convolutional]
batch_normalize=1
filters=40
size=1
stride=1
pad=1
activation=linear

[route]
layers = -2

#squeeze-n-excitation
[avgpool]

# squeeze ratio r=4
[convolutional]
filters=16
size=1
stride=1
activation=relu

# excitation
[convolutional]
filters=80
size=1
stride=1
activation=logistic

# multiply channels
[scale_channels]
from=-4


[convolutional]
batch_normalize=1
filters=8
size=1
stride=1
pad=1
activation=relu

[convolutional]
batch_normalize=1
filters=32
groups=8
size=5
stride=1
pad=1
activation=linear

[route]
layers = -1, -2

[shortcut]
from = -9
activation = linear
配图理解:
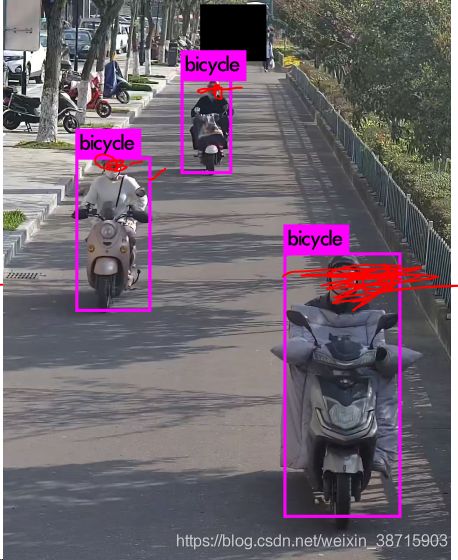
3.GhostNet-yolo
训练到一半,测试了单张图片的效果,还行,能跑。
cfg文件:https://github.com/hualuluu/ghost-yolo
单张效果:
