【实战项目】 ---- 从0开始迭代一步步设计实现高性能缓存
目录
- 1. 缓存策略
- 2. 简单版缓存 ---- HashMap
-
- 2.1 存在的问题
- 2.2 为什么给HashMap加关键字final?
- 2.3 解决问题方法
-
- 2.3.1 方法一
- 2.3.2 方法二
- 3. 用并发集合 ---- 引出ConcurrentHashMap
- 4. 避免重复计算 ---- 引出Future和Callable的妙用
- 5. 计算错误和缓存"污染"问题解决
- 6. 缓存过期功能和随机性
- 7. 用CountDownLatch实现测压及ThreadLocal确认时间的统一性
- 8. 参考
1. 缓存策略
正确使用缓存,可以避免让我们重复的去计算大量数据或者反复的去读取硬件设备。
缓存节约了时间,提高了吞吐量,但是消耗了内存
if value in cache
  return value from cache
else
  compute value
  set value to cache
  return value
2. 简单版缓存 ---- HashMap
/**
 * 描述: 最简单的缓存形式: HashMap
 */
public class ImoocCache1 {


	private final HashMap<String, Integer> cache = new HashMap<>();

	public Integer compute(String userId) throws InterruptedException {

		Integer result = cache.get(userId);
		// 先检查HashMap里面有没有保存过之前的计算结果
		if(result == null) {

			// 如果缓存中找不到,那么需要现在计算一下结果,并且保存到HashMap中
			result = doCompute(userId);
			cache.put(userId, result);
		}
		return result;
	}

	private Integer doCompute(String userId) throws InterruptedException {

		// 这里假设计算时间为5秒,所以以休眠时间代替计算
		TimeUnit.SECONDS.sleep(5);
		return new Integer(userId);
	}

	public static void main(String[] args) throws InterruptedException {

		ImoocCache1 imoocCache1 = new ImoocCache1();
		System.out.println("开始计算了");
		Integer result = imoocCache1.compute("13");
		System.out.println("第一次计算结果:" + result);
		result = imoocCache1.compute("13");
		System.out.println("第二次计算结果:" + result);
	}
}
2.1 存在的问题
HashMap不是线程安全的,线程不安全的缓存可能在多线程的情况下导致某一个数据被计算两次,违背了缓存的初衷- 设计不良好,缓存类和计算过程耦合性太高,缓存类既要负责缓存,又要负责计算新的数值,不利于扩展
2.2 为什么给HashMap加关键字final?
- 属性被声明为final后,该变量则只能被赋值一次,且一旦被赋值,final的变量就不能再改变
- 类中Map不需要改变,加上
final关键字,增强了安全性
2.3 解决问题方法
2.3.1 方法一
synchronized
- 对
compute方法加入synchronized关键字
仍然存在以下问题
- 性能问题: 多个线程同时到
compute的时候,由于HashMap是线程不安全的,所以如果多个线程同时put、get,会带来线程安全问题,所以这里用synchronized来保证每个时刻最多只有一个线程能访问,但是显而易见这带来了性能问题。当多个线程同时想计算的时候,需要慢慢等待,严重时,性能甚至比不用缓存更差 - 代码复用能力差: 代码的复用能力很差,如果第二个类需要用缓存,难道要重新加一个HashMap,然后再加上compute方法吗?这样对代码的侵入性太高了,而且一旦我们的
compute逻辑有变动,就要在之前使用了缓存的所有类中都一个个做出修改,违反了开闭原则,不可取
2.3.2 方法二
装饰者模式 + synchronized (刚好还没学装饰者模式,借此机会学了一下,先看原理,代码后面附上)
-
原有类和装饰器类必须继承同一个父类

再来看看一个煎饼果子类的UML图(辅助理解,后续写一下装饰者模式文章)
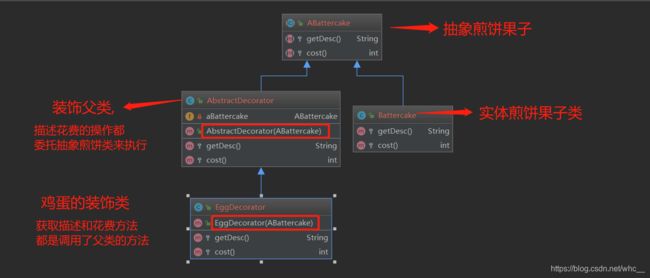
回到本篇文章,引入装饰者模式改进代码 -
Computable接口类(计算函数)
/** * 描述: 有一个计算函数compute,用来代表耗时计算,每个计算器都要实现这个接口,这样 * 就可以无侵入实现缓存功能 */ public interface Computable<A, V> { V compute(A arg) throws Exception; } -
ExpensiveFunction(耗时实现类,实现Computable接口)
/** * 描述: 耗时计算的实现类,实现了Computable接口,但是本身不具备缓存能力, * 不需要考虑缓存的事情 */ public class ExpensiveFunction implements Computable<String, Integer> { @Override public Integer compute(String arg) throws Exception { Thread.sleep(5000); return Integer.valueOf(arg); } } -
缓存类
/**
 * 描述: 用装饰者模式,给计算器自动添加缓存功能
 */
public class ImoocCache3<A,V> implements Computable<A, V> {


	private final Map<A, V> cache = new HashMap();

	// 计算函数接口
	private final Computable<A, V> c;

	// 构造函数,传入接口的实现类
	public ImoocCache3(Computable<A, V> c) {

		this.c = c;
	}

	// 对计算方法进行加锁,保证安全性
	@Override
	public synchronized V compute(A arg) throws Exception {

		System.out.println("进入缓存机制");
		V result = cache.get(arg);
		if(result == null) {

			result = c.compute(arg);
			cache.put(arg, result);
		}
		return result;
	}

	public static void main(String[] args) throws Exception {

		ImoocCache3<String, Integer> expensiveComputer = new ImoocCache3<>(new ExpensiveFunction());

		new Thread(() -> {


			try {

				Integer result = expensiveComputer.compute("666");
				System.out.println("第一次计算结果:" + result);
			} catch (Exception e) {

				e.printStackTrace();
			}
		}).start();

		new Thread(() -> {


			try {

				Integer result = expensiveComputer.compute("667");
				System.out.println("第二次计算结果:" + result);
			} catch (Exception e) {

				e.printStackTrace();
			}
		}).start();

		new Thread(() -> {


			try {

				Integer result = expensiveComputer.compute("666");
				System.out.println("第三次计算结果:" + result);
			} catch (Exception e) {

				e.printStackTrace();
			}
		}).start();
	}
}
此方法问题
- 性能差
- 当多个线程同时想计算的时候,需要慢慢等待,严重时,性能甚至比不用缓存更差
3. 用并发集合 ---- 引出ConcurrentHashMap
-
代码修改
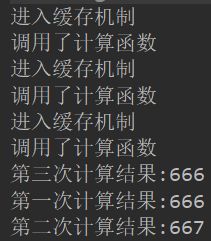
private final Map<A, V> cache = new ConcurrentHashMap<>(); @Override public V compute(A arg) throws Exception { System.out.println("进入缓存机制"); V result = cache.get(arg); if (result == null) { System.out.println("调用了计算函数"); result = c.compute(arg); // 此时若线程同时到达,会发生阻塞 cache.put(arg, result); } return result; } -
打印结果
-
缺点,可能会出现重复计算问题
在计算完成前,另一个要求计算相同值的请求到来,会导致计算两遍,这和缓存想避免多次计算的初衷恰恰相反,是不可接收的
4. 避免重复计算 ---- 引出Future和Callable的妙用
-
ConcurrentMap的
putIfAbsent方法可以以线程安全的方式添加一个value到Map中,可以在多线程环境下使用。 -
Future的
get方法可以以线程安全的方式得到一个值。当在线程A中调用该方法时,如果线程B正在产生这个值,那么线程A将会挂起,通过使用Future可以避免一个值被重复计算两次的问题。 -
缓存代码被封装在一个Callable中,我们可以在该Callable中缓存任何东西。当我们想要使用另一种算法进行缓存的时候,只需要重写一个Callable就可以。
代码
/**
 * 描述:  利用Future,避免重复计算
 */
public class ImoocCache7<A, V> implements Computable<A, V> {


	// value为Future类型,作用是保存着计算结果值
	private final Map<A, Future<V>> cache = new ConcurrentHashMap<>();

	private final Computable<A, V> c;

	public ImoocCache7(Computable<A, V> c) {

		this.c = c;
	}

	@Override
	public V compute(A arg) throws Exception {

		Future<V> f = cache.get(arg);
		if(f == null) {

			// 缓存代码被封装在一个Callable中,我们可以在该Callable中缓存任何东西
			Callable<V> callable = new Callable<V>() {

				@Override
				public V call() throws Exception {

					return c.compute(arg);
				}
			};
			// FutureTask即是Future,也是Runnable,它既可以执行任务,也可以获取计算结果
			FutureTask<V> ft = new FutureTask<>(callable);
			// putIfAbsent方法返回该key对应的上一个value(future实现类)
			f = cache.putIfAbsent(arg, ft);
			// 如果返回的上一个value值为空,说明是第一次添加,需要运行TutureTask
			// 避免多次计算,进行非空判断
			if(f == null) {

				f = ft;
				System.out.println("从FutureTask调用了计算函数");
				// 执行任务
				ft.run();
			}
		}
		// 返回缓存的结果值
		return f.get();
	}

	public static void main(String[] args) throws Exception {


		ImoocCache7<String, Integer> expensiveComputer = new ImoocCache7<>(new ExpensiveFunction());

		new Thread(() -> {

			try {

				Integer result = expensiveComputer.compute("666");
				System.out.println("第一次计算结果:" + result);
			} catch (Exception e) {

				e.printStackTrace();
			}
		}).start();

		new Thread(() -> {

			try {

				Integer result = expensiveComputer.compute("667");
				System.out.println("第二次计算结果:" + result);
			} catch (Exception e) {

				e.printStackTrace();
			}
		}).start();

		new Thread(() -> {

			try {

				Integer result = expensiveComputer.compute("666");
				System.out.println("第三次计算结果:" + result);
			} catch (Exception e) {

				e.printStackTrace();
			}
		}).start();
	}
}

5. 计算错误和缓存"污染"问题解决
- 计算中抛出异常 ---- 引出ExecutionException对异常的处理
- 计算期间任务被取消 ---- 处理CancellationException
- 计算期间被中断 ---- 引出InterruptedExcetion对异常的处理
这三种异常之所以用不同的catch块捕获,是因为它们的处理逻辑是不同的
- CancellationException和InterruptedException是人为取消的,那么我们应该立刻终止任务
- 但是如果是计算错误,且我们明确知道多试几次就可以得到答案,那么我们的逻辑应该是重试,尝试多次直到正确的结果出现
- 加上while(true)来保证计算出错不会影响逻辑,如果是计算错误,就进入下一个循环,重新计算,直到计算成功;如果是人为取消,那么就抛出异常然后运行结束
计算实现类代码(这里设置50%概率出现抛出错误)
MayFail接口类
/**
 * 描述: 耗时计算的实现类,有概率计算失败
 */
public class MayFail implements Computable<String, Integer> {

	@Override
	public Integer compute(String arg) throws Exception {

		double random = Math.random();
		// 一半概率出现错误
		if(random > 0.5) {

			throw new IOException("读取文件出错");
		}
		Thread.sleep(3000);
		return Integer.valueOf(arg);
	}
}
缓存类ImoocCache
/**
 * 描述:  利用Future,避免重复计算
 */
public class ImoocCache9<A, V> implements Computable<A, V> {


	private final Map<A, Future<V>> cache = new ConcurrentHashMap<>();

	private final Computable<A, V> c;

	public ImoocCache9(Computable<A, V> c) {

		this.c = c;
	}

	@Override
	public V compute(A arg) throws InterruptedException, ExecutionException {

		while(true) {

			Future<V> f = cache.get(arg);
			if (f == null) {

				Callable<V> callable = new Callable<V>() {

					@Override
					public V call() throws Exception {

						return c.compute(arg);
					}
				};
				// FutureTask即是Future,也是Runnable,它既可以执行任务,也可以获取计算结果
				FutureTask<V> ft = new FutureTask<>(callable);
				// putIfAbsent方法返回该key对应的上一个value
				f = cache.putIfAbsent(arg, ft);
				// 如果返回的上一个value值为空,说明是第一次添加,需要运行TutureTask
				// 避免多次计算,进行非空判断
				if (f == null) {

					f = ft;
					System.out.println("从FutureTask调用了计算函数");
					ft.run();
				}
			}
			try {

				return f.get();
			} catch (CancellationException e) {

				System.out.println("被取消了");
				// 避免缓存被污染,所以这里移除那些被取消的key缓存
				cache.remove(arg);
				throw e;
			} catch (InterruptedException e) {

				// 避免缓存被污染,所以这里移除那些被中断的key缓存
				cache.remove(arg);
				throw e;
			} catch (ExecutionException e) {

				// 避免缓存被污染,所以这里移除那些计算错误的key缓存
				cache.remove(arg);
				System.out.println("计算错误,需要重试");
				// 这里不抛出异常,是为了进入下一次循环去尝试重新计算
			}
		}
	}

	public static void main(String[] args) throws Exception {


		ImoocCache9<String, Integer> expensiveComputer = new ImoocCache9<>(new MayFail());

		new Thread(() -> {

			try {

				Integer result = expensiveComputer.compute("666");
				System.out.println("第一次计算结果:" + result);
			} catch (Exception e) {

				e.printStackTrace();
			}
		}).start();

		new Thread(() -> {

			try {

				Integer result = expensiveComputer.compute("667");
				System.out.println("第二次计算结果:" + result);
			} catch (Exception e) {

				e.printStackTrace();
			}
		}).start();

		new Thread(() -> {

			try {

				Integer result = expensiveComputer.compute("666");
				System.out.println("第三次计算结果:" + result);
			} catch (Exception e) {

				e.printStackTrace();
			}
		}).start();

		/*// 直接取消,还没等第一二线程运行结束,就取消了,所以抛出取消异常
		Future future = expensiveComputer.cache.get("666");
		future.cancel(true);*/
	}
}
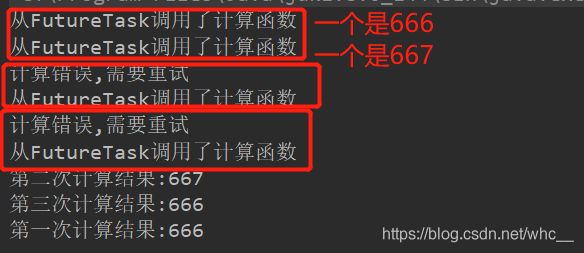
上述演示缓存污染带来的问题的解决,无论是计算错误还是被取消,都应该用cache.remove把缓存清理掉,这样后续的计算才可能成功
6. 缓存过期功能和随机性
- 为每个结果指定过期时间,并定期扫描过期的元素
/**
 * 描述:  出于安全性考虑,缓存需要设置有效期,到期自动失效,否则如果
 * 缓存一直不生效,那么带来缓存不一致等问题
 */
public class ImoocCache10<A, V> implements Computable<A, V> {


	private final Map<A, Future<V>> cache = new ConcurrentHashMap<>();

	private final Computable<A, V> c;

	public ImoocCache10(Computable<A, V> c) {

		this.c = c;
	}
	// 解决高并发访问时
	public V computeRandomExpire(A arg) throws ExecutionException, InterruptedException {

		long randomExpire = (long) (Math.random() * 10000);
		return compute(arg, randomExpire);
	}

	@Override
	public V compute(A arg) throws InterruptedException, ExecutionException {


		while(true) {

			Future<V> f = cache.get(arg);
			if (f == null) {

				Callable<V> callable = new Callable<V>() {

					@Override
					public V call() throws Exception {

						return c.compute(arg);
					}
				};
				// FutureTask即是Future,也是Runnable,它既可以执行任务,也可以获取计算结果
				FutureTask<V> ft = new FutureTask<>(callable);
				// putIfAbsent方法返回该key对应的上一个value
				f = cache.putIfAbsent(arg, ft);
				// 如果返回的上一个value值为空,说明是第一次添加,需要运行TutureTask
				// 避免多次计算,进行非空判断
				if (f == null) {

					f = ft;
					System.out.println("从FutureTask调用了计算函数");
					ft.run();
				}
			}
			try {

				return f.get();
			} catch (CancellationException e) {

				System.out.println("被取消了");
				cache.remove(arg);
				throw e;
			} catch (InterruptedException e) {

				cache.remove(arg);
				throw e;
			} catch (ExecutionException e) {

				cache.remove(arg);
				System.out.println("计算错误,需要重试");
			}
		}
	}

	// 创建一个线程池
	public final static ScheduledExecutorService executor = Executors.newScheduledThreadPool(5);

	// 实现延迟功能,传入一个延迟时间
	public V compute(A arg, long expire) throws ExecutionException, InterruptedException {

		// 在给定的expire延迟后执行
		if(expire > 0) {

			executor.schedule(new Runnable() {

				@Override
				public void run() {

					// 时间一到,执行任务,执行清除缓存任务
					expire(arg);
				}
			}, expire, TimeUnit.MILLISECONDS);
		}
		return compute(arg);
	}

	public synchronized void expire(A key) {

		// 检查缓存中是否存在着对应的key
		Future<V> future = cache.get(key);
		if(future != null) {

			// 假如如果还存在任务还在执行,那么我们要取消掉该任务
			if(!future.isDone()) {

				System.out.println("Future任务被取消");
				future.cancel(true);
			}

			System.out.println("过期时间到,缓存被清除");
			cache.remove(key);
		}
	}

	public static void main(String[] args) throws Exception {


		ImoocCache10<String, Integer> expensiveComputer = new ImoocCache10<>(new MayFail());

		new Thread(() -> {


			try {

				// 设置5秒钟过期
				Integer result = expensiveComputer.compute("666", 5000L);
				System.out.println("第一次计算结果:" + result);
			} catch (Exception e) {

				e.printStackTrace();
			}
		}).start();

		new Thread(() -> {


			try {

				Integer result = expensiveComputer.compute("666");
				System.out.println("第三次计算结果:" + result);
			} catch (Exception e) {

				e.printStackTrace();
			}
		}).start();

		new Thread(() -> {


			try {

				Integer result = expensiveComputer.compute("667");
				System.out.println("第二次计算结果:" + result);
			} catch (Exception e) {

				e.printStackTrace();
			}
		}).start();

		Thread.sleep(6000L);
		Integer result = expensiveComputer.compute("666");
		System.out.println("主线程计算结果:" + result);
	}
}
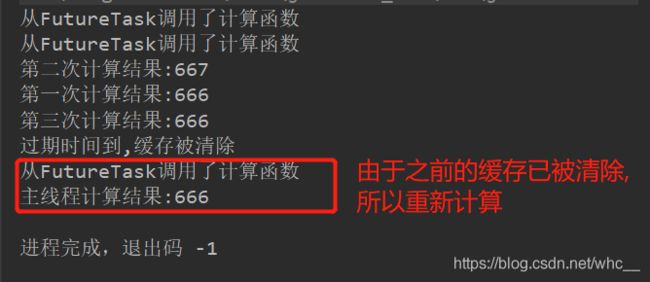
问题: 如果高并发访问时,缓存同时过期,那么都拿不到缓存,导致打爆cpu和MySQL,造成缓存雪崩、缓存击穿等高并发下的缓存问题
解决方案: 缓存时间设置为随机,如下代码
// 解决高并发访问时
	public V computeRandomExpire(A arg) throws ExecutionException, InterruptedException {

		long randomExpire = (long) (Math.random() * 10000);
		return compute(arg, randomExpire);
	}
7. 用CountDownLatch实现测压及ThreadLocal确认时间的统一性
先CountDownLatch测压
public class ImoocCache12 {


	static ImoocCache10<String, Integer> expensiveComputer = new ImoocCache10<>(new ExpensiveFunction());

	// 设置一个CountDownLatch实现测压,倒数为1,1次等待即可
	public static CountDownLatch countDownLatch = new CountDownLatch(1);

	public static void main(String[] args) throws InterruptedException {

		ExecutorService service = Executors.newFixedThreadPool(100);
		long start = System.currentTimeMillis();
		for (int i = 0; i < 100; i++) {

			service.submit(() -> {

				Integer result = null;
				try {

					System.out.println(Thread.currentThread().getName() + "开始等待");
					// 每个线程都进行await
					countDownLatch.await();
					System.out.println(Thread.currentThread().getName() +"被放行");
					result = expensiveComputer.compute("666");
				} catch (InterruptedException e) {

					e.printStackTrace();
				} catch (ExecutionException e) {

					e.printStackTrace();
				}
				System.out.println(result);
			});
		}
		 // 休眠5秒钟后统一放行
		Thread.sleep(5000);
		countDownLatch.countDown();
		service.shutdown();
	}
}
加入ThreadLocal确认时间统一性
每个线程都想要打印出当前时间
public class ThreadLocalFormatter {

	// 生成线程安全的SimpleDateFormat
	public static ThreadLocal<SimpleDateFormat> dateFormatter = new ThreadLocal<SimpleDateFormat>(){


		// 每个线程会调用本地方法一次,用于初始化
		@Override
		protected SimpleDateFormat initialValue() {

			return new SimpleDateFormat("mm:ss");
		}

		// 首次调用本地方法时,会调用initialValue();后面的调用会返回第一次创建的值

		@Override
		public SimpleDateFormat get() {

			return super.get();
		}
	};

	public static void main(String[] args) {

		ThreadLocalFormatter.dateFormatter.get();
	}
}
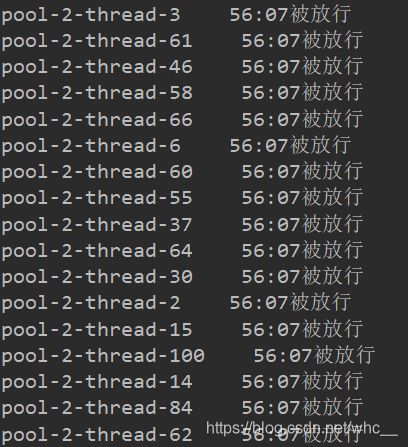
for (int i = 0; i < 100; i++) {

	service.submit(() -> {

			Integer result = null;
			try {

				System.out.println(Thread.currentThread().getName() + "开始等待");
				// 每个线程都进行await
				countDownLatch.await();
				SimpleDateFormat dateFormat = ThreadLocalFormatter.dateFormatter.get();
				String time = dateFormat.format(new Date());
				System.out.println(Thread.currentThread().getName() + "    " + time + "被放行");
				result = expensiveComputer.compute("666");
			} catch (InterruptedException e) {

				e.printStackTrace();
			} catch (ExecutionException e) {

				e.printStackTrace();
			}
			System.out.println(result);
		});
	}
8. 参考
- 慕课网悟空老师课程
- 装饰者模式文章 : https://www.jianshu.com/p/4a530a3c70af
- 正确使用缓存文章: https://www.jianshu.com/p/b67256506de4