Spring之IoC源码分析一
一、前言
IoC(Inversion of Control )控制反转,也叫依赖注入(Dependency Injection),目的是为了降低系统之间的耦合度。
整个 IoC 源码分析可分成两个过程,一个是 资源文件转化为Spring容器中的数据结构 BeanDefinition 的过程(例如new ClassPathXmlApplicationContext("aop.xml");),另一个则是根据 BeanDefinition 实例化对象并注入的过程(例如ctx.getBean("userService"))。第一个过程相对简单,我们下面进行分析。
二、将资源文件 aop.xml 封装为 Resource
在 Spring 中,对其内部资源使用了内部数据结构 Resource 来封装

在顶级接口 InputStreamSource 中只有一个方法 getInputStream(),那么其子类都可以通过该方法获得输入流。
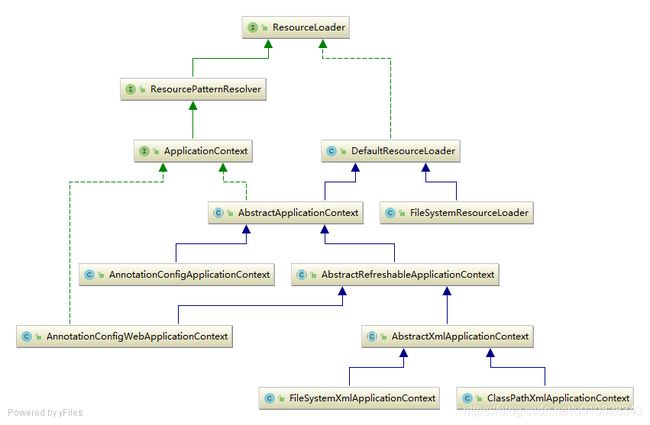
同样,Spring 对资源的加载也进行了封装,顶级接口为 ResourceLoader。


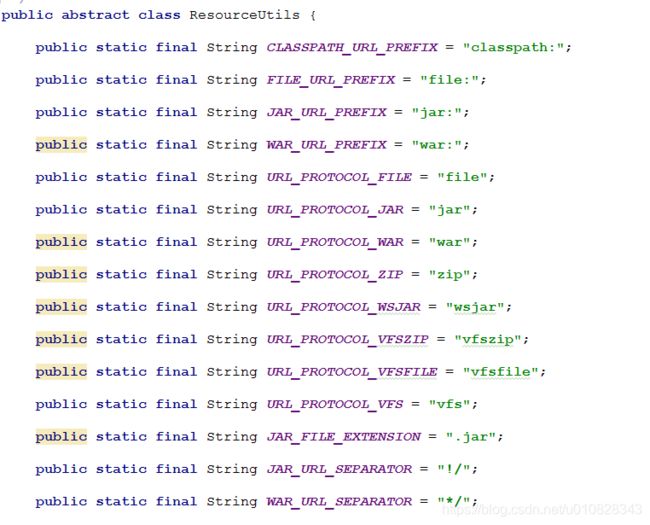
从上图可以看出,Resource 和 Resource 的种类非常多,这是根据资源的种类定义的,从 ResourceUtils 可以看到这些类型,

针对不同类型的 location,使用不同的 Resouce 封装,例如在 DefaultResourceLoader 的 getResource 方法中可以看到这个过程。
public Resource getResource(String location) {
	Assert.notNull(location, "Location must not be null");

	for (ProtocolResolver protocolResolver : this.protocolResolvers) {
		Resource resource = protocolResolver.resolve(location, this);
		if (resource != null) {
			return resource;
		}
	}

	if (location.startsWith("/")) {
		return getResourceByPath(location);
	}
	else if (location.startsWith(CLASSPATH_URL_PREFIX)) {
		return new ClassPathResource(location.substring(CLASSPATH_URL_PREFIX.length()), getClassLoader());
	}
	else {
		try {
			// Try to parse the location as a URL...
			URL url = new URL(location);
			return (ResourceUtils.isFileURL(url) ? new FileUrlResource(url) : new UrlResource(url));
		}
		catch (MalformedURLException ex) {
			// No URL -> resolve as resource path.
			return getResourceByPath(location);
		}
	}
}
三、将Resource解析为BeanDefinition
经过 ResourceLoader 将资源文件封装为 Resource 后,就是将 Resource 解析为 BeanDefinition(Spring 中所需要的数据结构)的过程了,这个过程主要由 BeanDefinitionReader 负责

而 AbstractBeanDefinitionReader 实现了 loadBeanDefinitions 方法,代码如下
public int loadBeanDefinitions(String location, @Nullable Set actualResources) throws BeanDefinitionStoreException {
	ResourceLoader resourceLoader = getResourceLoader();
	if (resourceLoader == null) {
		throw new BeanDefinitionStoreException(
				"Cannot load bean definitions from location [" + location + "]: no ResourceLoader available");
	}

	if (resourceLoader instanceof ResourcePatternResolver) {
		// Resource pattern matching available.
		try {
			// 根据指定的ResourceLoader将资源文件封装为Resource
			Resource[] resources = ((ResourcePatternResolver) resourceLoader).getResources(location);
			// 将resources转换为BeanDefinitions
			int count = loadBeanDefinitions(resources);
			if (actualResources != null) {
				Collections.addAll(actualResources, resources);
			}
			if (logger.isTraceEnabled()) {
				logger.trace("Loaded " + count + " bean definitions from location pattern [" + location + "]");
			}
			return count;
		}
		catch (IOException ex) {
			throw new BeanDefinitionStoreException(
					"Could not resolve bean definition resource pattern [" + location + "]", ex);
		}
	}
	else {
		// Can only load single resources by absolute URL.
		Resource resource = resourceLoader.getResource(location);
		int count = loadBeanDefinitions(resource);
		if (actualResources != null) {
			actualResources.add(resource);
		}
		if (logger.isTraceEnabled()) {
			logger.trace("Loaded " + count + " bean definitions from location [" + location + "]");
		}
		return count;
	}
}
从代码可以看到,BeanDefinitionReader 中将资源文件委托给 ResourceLoader 封装为 Resource 后,再将 Resource 解析为Spring 中需要的数据结构 BeanDefinition,而 BeanDefinitionReader 中的 loadBeanDefinitions(resource); 方法,只有三个子类实现了该方法,我们关注的是最后一个 XmlBeanDefinitionReader。

public int loadBeanDefinitions(EncodedResource encodedResource) throws BeanDefinitionStoreException {
	...
	InputStream inputStream = encodedResource.getResource().getInputStream();
	try {
		InputSource inputSource = new InputSource(inputStream);
		if (encodedResource.getEncoding() != null) {
			inputSource.setEncoding(encodedResource.getEncoding());
		}
		return doLoadBeanDefinitions(inputSource, encodedResource.getResource());
	}
	finally {
		inputStream.close();
	}
	...
}
进入doLoadBeanDefinitions方法
protected int doLoadBeanDefinitions(InputSource inputSource, Resource resource)
			throws BeanDefinitionStoreException {
		// 将Resource委托给DocumentLoader解析为Document
		Document doc = doLoadDocument(inputSource, resource);
		int count = registerBeanDefinitions(doc, resource);
		if (logger.isDebugEnabled()) {
			logger.debug("Loaded " + count + " bean definitions from " + resource);
		}
		return count;
}
BeanDefinitionReader 将 Resource 委托给 DocumentLoader 加载 Document ,代码如下
protected Document doLoadDocument(InputSource inputSource, Resource resource) throws Exception {
	return this.documentLoader.loadDocument(inputSource, getEntityResolver(), this.errorHandler,
			getValidationModeForResource(resource), isNamespaceAware());
}

protected int getValidationModeForResource(Resource resource) {
	int validationModeToUse = getValidationMode();
	if (validationModeToUse != VALIDATION_AUTO) {
		return validationModeToUse;
	}
	int detectedMode = detectValidationMode(resource);
	if (detectedMode != VALIDATION_AUTO) {
		return detectedMode;
	}
	// Hmm, we didn't get a clear indication... Let's assume XSD,
	// since apparently no DTD declaration has been found up until
	// detection stopped (before finding the document's root tag).
	return VALIDATION_XSD;
}
解析为 Document 之前,需要对 Document 进行校验,这里涉及到 DTD 和 XSD 的知识点,不展开描述了。
BeanDefinitionReader 使用的是 DefaultDocumentLoader 解析 Resource 。
public Document loadDocument(InputSource inputSource, EntityResolver entityResolver,
			ErrorHandler errorHandler, int validationMode, boolean namespaceAware) throws Exception {
	DocumentBuilderFactory factory = createDocumentBuilderFactory(validationMode, namespaceAware);
	if (logger.isTraceEnabled()) {
		logger.trace("Using JAXP provider [" + factory.getClass().getName() + "]");
	}
	DocumentBuilder builder = createDocumentBuilder(factory, entityResolver, errorHandler);
	return builder.parse(inputSource);
}
到这里就比较明确了,解析后返回Document,然后再回到doLoadBeanDefinitions方法,进入registerBeanDefinitions方法
public int registerBeanDefinitions(Document doc, Resource resource) throws BeanDefinitionStoreException {
		BeanDefinitionDocumentReader documentReader = createBeanDefinitionDocumentReader();
		int countBefore = getRegistry().getBeanDefinitionCount();
		documentReader.registerBeanDefinitions(doc, createReaderContext(resource));
		return getRegistry().getBeanDefinitionCount() - countBefore;
	}
可以看到,之前是将 Resource 交给 BeanDefinitionReader 解析后得到 Document ,而后面对 Document 的解析又委托给 BeanDefinitionDocumentReader 解析,其实我们进入 createBeanDefinitionDocumentReader() 方法可以看到,其实是交给了 DefaultBeanDefinitionDocumentReader 解析。
public interface BeanDefinitionDocumentReader {

	/**
	 * Read bean definitions from the given DOM document and
	 * register them with the registry in the given reader context.
	 * @param doc the DOM document
	 * @param readerContext the current context of the reader
	 * (includes the target registry and the resource being parsed)
	 * @throws BeanDefinitionStoreException in case of parsing errors
	 */
	void registerBeanDefinitions(Document doc, XmlReaderContext readerContext)
			throws BeanDefinitionStoreException;

}
其实 BeanDefinitionDocumentReader 只有一个接口,可以看出该接口目的就是从 DOM 文件读取 BeanDefinition 然后注册到注册表中,并且它只有一个实现类 DefaultBeanDefinitionDocumentReader 。
public void registerBeanDefinitions(Document doc, XmlReaderContext readerContext) {
this.readerContext = readerContext;
logger.debug("Loading bean definitions");
Element root = doc.getDocumentElement();
doRegisterBeanDefinitions(root);
}
protected void doRegisterBeanDefinitions(Element root) {
BeanDefinitionParserDelegate parent = this.delegate;
this.delegate = createDelegate(getReaderContext(), root, parent);
// 默认命名空间
if (this.delegate.isDefaultNamespace(root)) {
String profileSpec = root.getAttribute(PROFILE_ATTRIBUTE);
// 元素中的profile与ReaderContext不一致,则略过
if (StringUtils.hasText(profileSpec)) {
String[] specifiedProfiles = StringUtils.tokenizeToStringArray(
profileSpec, BeanDefinitionParserDelegate.MULTI_VALUE_ATTRIBUTE_DELIMITERS);
if (!getReaderContext().getEnvironment().acceptsProfiles(specifiedProfiles)) {
if (logger.isInfoEnabled()) {
logger.info("Skipped XML bean definition file due to specified profiles [" + profileSpec +
"] not matching: " + getReaderContext().getResource());
}
return;
}
}
}
// 提供扩展,由子类实现
preProcessXml(root);
// 解析
parseBeanDefinitions(root, this.delegate);
// 提供扩展,由子类实现
postProcessXml(root);
this.delegate = parent;
}
protected void parseBeanDefinitions(Element root, BeanDefinitionParserDelegate delegate) {
// 默认命名空间
if (delegate.isDefaultNamespace(root)) {
NodeList nl = root.getChildNodes();
for (int i = 0; i < nl.getLength(); i++) {
Node node = nl.item(i);
if (node instanceof Element) {
Element ele = (Element) node;
// 如果命名空间是 http://www.springframework.org/schema/beans 则是默认命名空间
if (delegate.isDefaultNamespace(ele)) {
// 默认的element,例如在资源文件中,根据命名空间可分为默认命名空间和非默认命名空间

其中第一行xmlns="http://www.springframework.org/schema/beans" 就是默认命名空间,后面三行都是非默认命名空间,在解析自定义标签中,就是根据标签(例如xmlns:aop="http://www.springframework.org/schema/aop"获取在spring.handler文件中的处理器进行自定义标签解析,关于自定义标签解析和 AOP 源码分析在后面文章中展开。
下面我们展开 parseDefaultElement 方法,也就是默认标签的解析
private void parseDefaultElement(Element ele, BeanDefinitionParserDelegate delegate) {
	// 对import标签处理
	if (delegate.nodeNameEquals(ele, IMPORT_ELEMENT)) {
		importBeanDefinitionResource(ele);
	}
	// 对alias标签处理
	else if (delegate.nodeNameEquals(ele, ALIAS_ELEMENT)) {
		processAliasRegistration(ele);
	}
	// 对bean标签处理(最复杂)
	else if (delegate.nodeNameEquals(ele, BEAN_ELEMENT)) {
		processBeanDefinition(ele, delegate);
	}
	// 对beans标签处理
	else if (delegate.nodeNameEquals(ele, NESTED_BEANS_ELEMENT)) {
		// recurse 递归
		doRegisterBeanDefinitions(ele);
	}
}
默认标签就四种 import、alias、bean、beans,而 import 和 beans 类似,alias 相对简单,我们重点分析 bean 标签的解析。
protected void processBeanDefinition(Element ele, BeanDefinitionParserDelegate delegate) {
	// 将 Element 委托给 BeanDefinitionParserDelegate 解析为 BeanDefinitionHolder
	BeanDefinitionHolder bdHolder = delegate.parseBeanDefinitionElement(ele);
	if (bdHolder != null) {
		// 自定义属性解析
		bdHolder = delegate.decorateBeanDefinitionIfRequired(ele, bdHolder);
		try {
			// Register the final decorated instance.
			// 将 BeanDefinition 注册到注册表
			BeanDefinitionReaderUtils.registerBeanDefinition(bdHolder, getReaderContext().getRegistry());
		}
		catch (BeanDefinitionStoreException ex) {
			getReaderContext().error("Failed to register bean definition with name '" +
					bdHolder.getBeanName() + "'", ele, ex);
		}
		// Send registration event.
		// 发送注册事件
		getReaderContext().fireComponentRegistered(new BeanComponentDefinition(bdHolder));
	}
}
整个解析 bean 标签分为四个步骤
- 将 Element 委托给 BeanDefinitionParserDelegate 解析为 BeanDefinitionHolder
- 对自定义属性解析
- 将 BeanDefinition 注册到注册表
- 发送注册事件
我们重点分析步骤1和3,步骤1 :
public BeanDefinitionHolder parseBeanDefinitionElement(Element ele) {
	return parseBeanDefinitionElement(ele, null);
}

public BeanDefinitionHolder parseBeanDefinitionElement(Element ele, @Nullable BeanDefinition containingBean) {
	// 解析id属性
	String id = ele.getAttribute(ID_ATTRIBUTE);
	// 解析name属性
	String nameAttr = ele.getAttribute(NAME_ATTRIBUTE);

	// 解析aliases属性
	List aliases = new ArrayList<>();
	if (StringUtils.hasLength(nameAttr)) {
		String[] nameArr = StringUtils.tokenizeToStringArray(nameAttr, MULTI_VALUE_ATTRIBUTE_DELIMITERS);
		aliases.addAll(Arrays.asList(nameArr));
	}

	// 解析beanName 一般与id一致,如果beanName为空,但是aliases(name)不为空,则使用aliases[0]代替beanName
	String beanName = id;
	if (!StringUtils.hasText(beanName) && !aliases.isEmpty()) {
		beanName = aliases.remove(0);
		...
	}

	if (containingBean == null) {
		// 检查beanName是否被注册
		checkNameUniqueness(beanName, aliases, ele);
	}

	// 解析后封装成AbstractBeanDefinition
	AbstractBeanDefinition beanDefinition = parseBeanDefinitionElement(ele, beanName, containingBean);
	if (beanDefinition != null) {
		...
		String[] aliasesArray = StringUtils.toStringArray(aliases);
		return new BeanDefinitionHolder(beanDefinition, beanName, aliasesArray);
	}
	return null;
}
- 解析 id,name 属性
- 处理和校验 beanName
- 将 Element 解析后封装为 AbstractBeanDefinition
- 将 beanDefinition, beanName, aliasesArray 封装为 BeanDefinitionHolder 返回

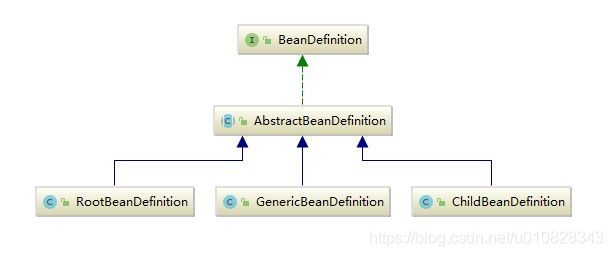
从2.5版本开始,Spring都是使用 GenericBeanDefinition 保存 Bean 的相关信息,在确认 Bean 的父子关系后,再转换为 RootBeanDefinition 或者 ChildBeanDefinition 类型,如果没有子 Bean 则使用 RootBeanDefinition 类型。
public AbstractBeanDefinition parseBeanDefinitionElement(
		Element ele, String beanName, @Nullable BeanDefinition containingBean) {

	this.parseState.push(new BeanEntry(beanName));
	String className = null;
	// 获取class属性
	if (ele.hasAttribute(CLASS_ATTRIBUTE)) {
		className = ele.getAttribute(CLASS_ATTRIBUTE).trim();
	}
	// 获取parent属性
	String parent = null;
	if (ele.hasAttribute(PARENT_ATTRIBUTE)) {
		parent = ele.getAttribute(PARENT_ATTRIBUTE);
	}

	try {
		// 把信息封装到 GenericBeanDefinition
		AbstractBeanDefinition bd = createBeanDefinition(className, parent);
		// 解析 bean 标签的各种属性
		parseBeanDefinitionAttributes(ele, beanName, containingBean, bd);
		// 设置 description
		bd.setDescription(DomUtils.getChildElementValueByTagName(ele, DESCRIPTION_ELEMENT));

		// 解析元数据
		parseMetaElements(ele, bd);
		// 解析子元素 lookup-method
		parseLookupOverrideSubElements(ele, bd.getMethodOverrides());
		// 解析子元素 replace-method
		parseReplacedMethodSubElements(ele, bd.getMethodOverrides());
		// 解析子元素 constructor-arg
		parseConstructorArgElements(ele, bd);
		// 解析子元素 property
		parsePropertyElements(ele, bd);
		// 解析子元素 qualifier
		parseQualifierElements(ele, bd);

		bd.setResource(this.readerContext.getResource());
		bd.setSource(extractSource(ele));

		return bd;
	}
	catch (ClassNotFoundException ex) {
		error("Bean class [" + className + "] not found", ele, ex);
	}
	catch (NoClassDefFoundError err) {
		error("Class that bean class [" + className + "] depends on not found", ele, err);
	}
	catch (Throwable ex) {
		error("Unexpected failure during bean definition parsing", ele, ex);
	}
	finally {
		this.parseState.pop();
	}

	return null;
}
解析元素过程我们就不展开分析了,对于解析的元素可以从 BeanDefinitionParserDelegate 或者 AbstractBeanDefinition 中看到

步骤3: 将 BeanDefinition 注册到注册表
public static void registerBeanDefinition(
		BeanDefinitionHolder definitionHolder, BeanDefinitionRegistry registry)
		throws BeanDefinitionStoreException {

	// Register bean definition under primary name.
	String beanName = definitionHolder.getBeanName();
	registry.registerBeanDefinition(beanName, definitionHolder.getBeanDefinition());

	// Register aliases for bean name, if any.
	String[] aliases = definitionHolder.getAliases();
	if (aliases != null) {
		for (String alias : aliases) {
			registry.registerAlias(beanName, alias);
		}
	}
}

public void registerBeanDefinition(String beanName, BeanDefinition beanDefinition)
		throws BeanDefinitionStoreException {

	if (beanDefinition instanceof AbstractBeanDefinition) {
		try {
			((AbstractBeanDefinition) beanDefinition).validate();
		}
		catch (BeanDefinitionValidationException ex) {
			throw new BeanDefinitionStoreException(beanDefinition.getResourceDescription(), beanName,
					"Validation of bean definition failed", ex);
		}
	}

	BeanDefinition oldBeanDefinition;

	oldBeanDefinition = this.beanDefinitionMap.get(beanName);
	if (oldBeanDefinition != null) {
	    // 不允许覆盖
		if (!isAllowBeanDefinitionOverriding()) {
			throw new BeanDefinitionStoreException(beanDefinition.getResourceDescription(), beanName,
					"Cannot register bean definition [" + beanDefinition + "] for bean '" + beanName +
					"': There is already [" + oldBeanDefinition + "] bound.");
		}
		...
		this.beanDefinitionMap.put(beanName, beanDefinition);
	}
	else {
		if (hasBeanCreationStarted()) {
			// Cannot modify startup-time collection elements anymore (for stable iteration)
               // 因为 beanDefinitionMap 是全局变量,需要考虑并发情况
			synchronized (this.beanDefinitionMap) {
			    // 保存到 beanDefinitionMap ,也就是前面所说的注册表
				this.beanDefinitionMap.put(beanName, beanDefinition);
				List updatedDefinitions = new ArrayList<>(this.beanDefinitionNames.size() + 1);
				updatedDefinitions.addAll(this.beanDefinitionNames);
				updatedDefinitions.add(beanName);
				this.beanDefinitionNames = updatedDefinitions;
				if (this.manualSingletonNames.contains(beanName)) {
					Set updatedSingletons = new LinkedHashSet<>(this.manualSingletonNames);
					updatedSingletons.remove(beanName);
					this.manualSingletonNames = updatedSingletons;
				}
			}
		}
		else {
			// Still in startup registration phase
			this.beanDefinitionMap.put(beanName, beanDefinition);
			this.beanDefinitionNames.add(beanName);
			this.manualSingletonNames.remove(beanName);
		}
		this.frozenBeanDefinitionNames = null;
	}

	if (oldBeanDefinition != null || containsSingleton(beanName)) {
	    // 重置所有 beanName 对应的缓存
		resetBeanDefinition(beanName);
	}
}
上面的代码主要做了几件事情
- 对 beanDefinition 进行校验,主要对 methodOverride 属性的校验
- beanName 已经被注册时,是否允许覆盖
- 注册到 beanDefinitionMap 注册表
- 重置 beanName 对应的缓存
四、总结
- BeanDefinitionReader(AbstractBeanDefinitionReader 的
loadBeanDefinitions(String location, @Nullable Set方法) 将 location 委托给 ResourceLoader 封装资源文件为 ResourceactualResources) - BeanDefinitionReader 将 Resource 委托给 XmlBeanDefinitionReader (
doLoadBeanDefinitions(InputSource inputSource, Resource resource)方法)加载 Document - 加载 Document 后,又委托给 BeanDefinitionDocumentReader(
doRegisterBeanDefinitions(Element root)方法) 解析 - 最终由 BeanDefinitionParserDelegate(
processBeanDefinition(Element ele, BeanDefinitionParserDelegate delegate)方法)对 Document 中的 Element 进行解析(默认标签) - 将解析后的 BeanDefinition 注册到注册表 beanDefinitionMap 中
或者:
BeanDefinitionReader 负责:
- 将 location 委托给 ResourceLoader 封装,得到 resource
- 将 resource 委托给 DocumentLoader 解析,得到 document
- 将 document 委托给 BeanDefinitionDocumentReader 处理后续过程
BeanDefinitionDocumentReader 负责
- 遍历 document 中的 Element,委托给 BeanDefinitionParserDelegate 解析 Element,得到 BeanDefinitionHolder
- 将 BeanDefinitionHolder 中的 BeanDefinition 注册到注册表