Spring框架(九):spring aop入门开发
一、基于xml的spring aop开发
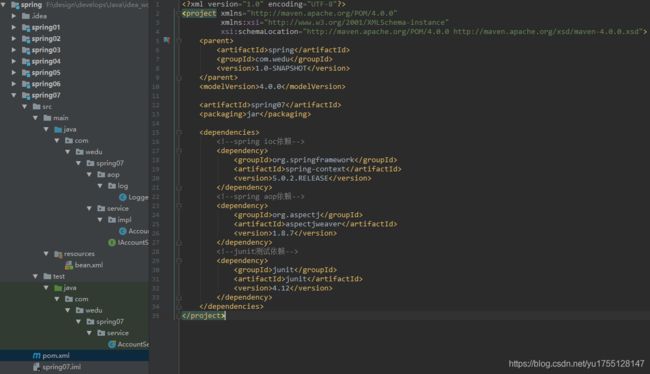
1、创建maven项目并导入jar包的坐标
2、在service包中创建业务层接口IAccountService
package com.wedu.spring07.service;

/**
 * 账户的业务层接口
 */
public interface IAccountService {

    /**
     * 模拟保存账户
     */
   void saveAccount();

    /**
     * 模拟更新账户
     * @param i
     */
   void updateAccount(int i);

    /**
     * 删除账户
     * @return
     */
   int  deleteAccount();
}
3、在service包中创建impl包并在其中创建AccountServiceImpl
package com.wedu.spring07.service.impl;

import com.wedu.spring07.service.IAccountService;

/**
 * 账户的业务层实现类
 */
public class AccountServiceImpl implements IAccountService {

    @Override
    public void saveAccount() {
        System.out.println("执行了保存");
        //int i=1/0;
    }

    @Override
    public void updateAccount(int i) {
        System.out.println("执行了更新"+i);

    }

    @Override
    public int deleteAccount() {
        System.out.println("执行了删除");
        return 0;
    }
}
4、在log包中创建Logger日志类
package com.wedu.spring07.aop.log;

import org.aspectj.lang.ProceedingJoinPoint;

/**
 * 用于记录日志的工具类
 */
public class Logger {

    /**
     * 前置通知
     */
    public  void beforePrintLog(){
        System.out.println("前置通知开始记录日志了。。。");
    }

    /**
     * 后置通知
     */
    public  void afterReturningPrintLog(){
        System.out.println("后置通知开始记录日志了。。。");
    }
    /**
     * 异常通知
     */
    public  void afterThrowingPrintLog(){
        System.out.println("异常通知开始记录日志了。。。");
    }

    /**
     * 最终通知
     */
    public  void afterPrintLog(){
        System.out.println("最终通知开始记录日志了。。。");
    }
}
5、创建配置文件bean.xml并将AccountServiceImpl和Logger交给spring管理
6、spring aop的xml配置
7、在测试模块的创建AccountServiceTest测试类
package com.wedu.spring07.service;

import org.junit.Test;
import org.springframework.context.ApplicationContext;
import org.springframework.context.support.ClassPathXmlApplicationContext;

/**
 * 基于xml的spring aop的测试
 */
public class AccountServiceTest {

    @Test
    public void saveAccount() {
        ApplicationContext ac = new ClassPathXmlApplicationContext("bean.xml");
        IAccountService accountService = ac.getBean("accountService", IAccountService.class);
        accountService.saveAccount();
    }
}
8、切入点表达式的说明
8.1、切入点表达式的写法:execution(表达式);
8.2、表达式的写法:访问修饰符 返回值 包名.包名.包名...类名.方法名(参数列表);
标准的表达式写法:public void com.wedu.service.impl.AccountServiceImpl.saveAccount()
访问修饰符可以省略:void com.wedu.service.impl.AccountServiceImpl.saveAccount()
返回值可以使用通配符,表示任意返回值:* com.wedu.service.impl.AccountServiceImpl.saveAccount()
包名可以使用通配符,表示任意包(有几级包,就需要写几个*):* *.*.*.*.AccountServiceImpl.saveAccount()
包名可以使用..表示当前包及其子包:* *..AccountServiceImpl.saveAccount()
类名和方法名都可以使用*来实现通配:* *..*.*()
全通配写法:* *..*.*(..)
8.3、参数列表的表示:
可以直接写数据类型:基本类型直接写名称,引用类型写包名.类名的方式;
可以使用通配符表示任意类型,但是必须有参数;
可以使用..表示有无参数均可,有参数可以是任意类型。
8.4、实际开发中切入点表达式的通常写法:切到业务层实现类下的所有方法,如:* com.wedu.service.impl.*.*(..)
9、环绕通知的配置
9.1、在Logger类中添加环绕通知方法
package com.wedu.spring07.aop.log;

import org.aspectj.lang.ProceedingJoinPoint;

/**
 * 用于记录日志的工具类
 */
public class Logger {

    /**
     * 环绕通知
     *
     * spring中的环绕通知:
     *      它是spring框架为我们提供的一种可以在代码中手动控制增强方法何时执行的方式。
     */
    public Object aroundPringLog(ProceedingJoinPoint pjp){
        Object rtValue = null;
        try{
            Object[] args = pjp.getArgs();//得到方法执行所需的参数

            System.out.println("Logger类中的aroundPringLog方法开始记录日志了。。。前置");

            rtValue = pjp.proceed(args);//明确调用业务层方法(切入点方法)

            System.out.println("Logger类中的aroundPringLog方法开始记录日志了。。。后置");

            return rtValue;
        }catch (Throwable t){
            System.out.println("Logger类中的aroundPringLog方法开始记录日志了。。。异常");
            throw new RuntimeException(t);
        }finally {
            System.out.println("Logger类中的aroundPringLog方法开始记录日志了。。。最终");
        }
    }
}
9.2、在bean.xml配置如下信息
二、基于注解的spring aop开发
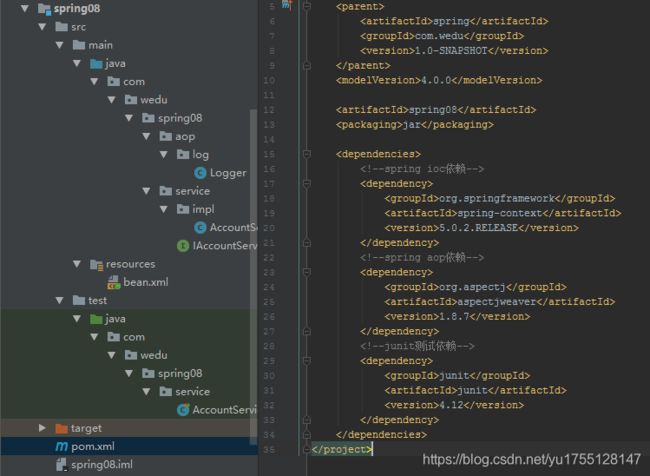
1、创建maven项目并导入jar包的坐标
2、在service包中创建业务层接口IAccountService
package com.wedu.spring08.service;

/**
 * 账户的业务层接口
 */
public interface IAccountService {

    /**
     * 模拟保存账户
     */
   void saveAccount();

    /**
     * 模拟更新账户
     * @param i
     */
   void updateAccount(int i);

    /**
     * 删除账户
     * @return
     */
   int  deleteAccount();
}
3、在service包下创建impl包,在其中创建AccountServiceImpl 并添加service注解
package com.wedu.spring08.service.impl;

import com.wedu.spring08.service.IAccountService;
import org.springframework.stereotype.Service;

/**
 * 账户的业务层实现类
 */
@Service("accountService")
public class AccountServiceImpl implements IAccountService {

    @Override
    public void saveAccount() {
        System.out.println("执行了保存");
        //int i=1/0;
    }

    @Override
    public void updateAccount(int i) {
        System.out.println("执行了更新"+i);

    }

    @Override
    public int deleteAccount() {
        System.out.println("执行了删除");
        return 0;
    }
}
4、在log包中创建Logger日志类并添加spring ioc注解@Component和切面注解@Aspect
package com.wedu.spring08.aop.log;

import org.aspectj.lang.ProceedingJoinPoint;
import org.aspectj.lang.annotation.*;
import org.springframework.stereotype.Component;

/**
 * 用于记录日志的工具类
 */
@Component("logger")
@Aspect
public class Logger {

    //定义切入点表达式
    @Pointcut("execution(* com.wedu.spring08.service.impl.*.*(..))")
    private void pt1(){}

    /**
     * 前置通知
     */
    //@Before("pt1()")
    public  void beforePrintLog(){
        System.out.println("前置通知开始记录日志了。。。");
    }

    /**
     * 后置通知
     */
    //@AfterReturning("pt1()")
    public  void afterReturningPrintLog(){
        System.out.println("后置通知开始记录日志了。。。");
    }
    /**
     * 异常通知
     */
   //@AfterThrowing("pt1()")
    public  void afterThrowingPrintLog(){
        System.out.println("异常通知开始记录日志了。。。");
    }

    /**
     * 最终通知
     */
    //@After("pt1()")
    public  void afterPrintLog(){
        System.out.println("最终通知开始记录日志了。。。");
    }
}
5、创建配置文件bean.xml并配置spring扫描和开启spring aop注解
6、在测试模块test包中创建AccountServiceTest测试类并进行测试
package com.wedu.spring08.service;

import org.junit.Test;
import org.springframework.context.ApplicationContext;
import org.springframework.context.support.ClassPathXmlApplicationContext;

/**
 * 基于注解的spring aop的测试
 */
public class AccountServiceTest {

    @Test
    public void saveAccount() {
        ApplicationContext ac = new ClassPathXmlApplicationContext("bean.xml");
        IAccountService accountService = ac.getBean("accountService", IAccountService.class);
        accountService.saveAccount();
    }
}
7、环绕通知注解配置,在Logger类中添加环绕通知方法
package com.wedu.spring08.aop.log;

import org.aspectj.lang.ProceedingJoinPoint;
import org.aspectj.lang.annotation.*;
import org.springframework.stereotype.Component;

/**
 * 用于记录日志的工具类
 */
@Component("logger")
@Aspect
public class Logger {

    //定义切入点表达式
    @Pointcut("execution(* com.wedu.spring08.service.impl.*.*(..))")
    private void pt1(){}

    /**
     * 环绕通知
     */
    //@Around("pt1()")
    public Object aroundPringLog(ProceedingJoinPoint pjp){
        Object obj = null;
        try{
            Object[] args = pjp.getArgs();//得到方法执行所需的参数

            System.out.println("开始记录日志了...前置");

            obj = pjp.proceed(args);//明确调用业务层方法(切入点方法)

            System.out.println("开始记录日志了...后置");

            return obj;
        }catch (Throwable t){
            System.out.println("开始记录日志了...异常");
            throw new RuntimeException(t);
        }finally {
            System.out.println("开始记录日志了...最终");
        }
    }
}注意:如果使用注解通知,请使用注解的环绕通知的方式,否则最终通知和后置通知的执行顺序不对。
注:如果使用纯注解的方式,可以在配置类上添加@EnableAspectJAutoProxy注解来代替

