Ubuntu 中 gconf, dconf, gsettings 和 dconf-editor 的功能与使用
GConf 是在基于 GNOME2 的 Linux 操作系统中实现对应用程序的配置及管理功能的工具。我们可以把 GConf 理解为 Linux 操作系统中的注册表。然而,它克服了 Windows 注册表的一些缺点,比如 Windows 注册表遭到破坏,可能会导致操作系统崩溃,而且 GConf 的配置信息存储于纯文本的文件中,可读性很好。在 GNOME3 中,GConf 已经被 DConf/Gsettings 替代,但还是用些应用在使用 GConf。
1. gsettings 的使用
查看所有的 schemas :
gsettings list-schemas
查看所有的 key :
gsettings list-recursively
可以很简单的找到自己想要的设置项,比如代理相关的
gsettings list-schemas | grep proxy -i
可以得到以下输出:
org.gnome.system.proxy.https
org.gnome.system.proxy.socks
org.gnome.system.proxy
org.gnome.system.proxy.ftp
org.gnome.system.proxy.http
org.gnome.settings-daemon.plugins.screensaver-proxy
接下来可以找到感兴趣的 schemas 的 keys:
gsettings list-keys org.gnome.system.proxy
返回结果如下:
use-same-proxy
mode
autoconfig-url
ignore-hosts
选择一个你想查看的值:
gsettings get org.gnome.system.proxy mode
得到返回结果如下(当前正在使用 s):
'auto'
通过 range 命令可以查看 key 的取值:
gsettings range org.gnome.system.proxy mode
返回结果如下:
enum
'none'
'manual'
'auto'
通过 set 可以改变 key 的值:
gsettings set org.gnome.system.proxy mode none
以上为 gsettings 的基本用法,详情请查看 man gsettings
2.dconf-editor 的使用
除了使用 gsettings 编辑设置以外,还可以用 dconf 进行操作,明细请通过 man dconf查看,而 dconf-editor是 dconf 的一个图形化操作程序。
先安装:
sudo apt install dconf-editor
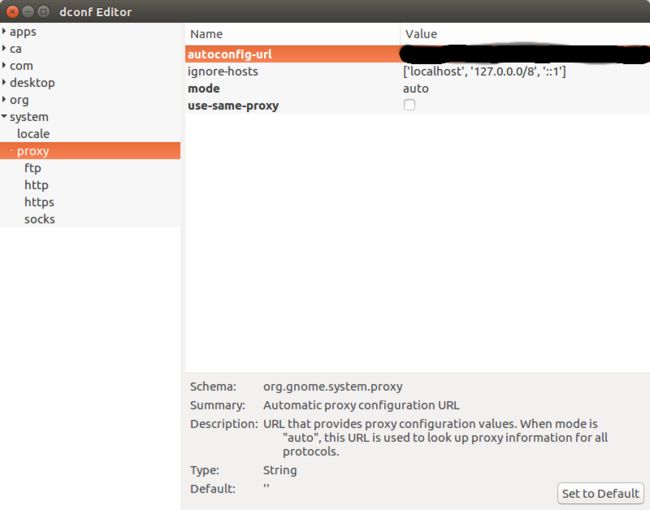
安装之后再来通过 dconf-editor 看看代理相关设置:

在路径 /system/proxy下存在名为 mode 的 key,值为 auto。通过点击右边对应的值,就可以进行编辑。
3.gsettings 和 dconf-editor 的区别与联系
同样的代理设置查看与修改,用以上两种方式,感觉一样,有好像有点不一样,区别在哪?
通过 gsettings 修改:
gsettings set org.gnome.system.proxy mode auto
通过 dconf-editor 修改:
选中左边的 system -> proxy 找到右边的 mode,进行编辑。
两个比较一下,gsetting 中的 org.gnome 是哪来的?还是说这两种方式改的是不同的数据,之后又进行的同步?
仔细看 dconf-editor 中的右下部分,可以看到有一个 schema 的项,内容是 org.gnome.system.proxy,正好是 gsettings 中的设置,那么这应该是修改的同一个内容,不过是使用了不同的方式找到值。
dconf-editor 中使用 schema path 来显示数据,而 gsettings 通过 schema id 来操作数据,而这两个值都是由程序的开发者来设置的,因为 path 和 id 是两个不同的值,不同的程序,有些 path 和 id 一致,有些是大小写上的差异,还有就是完全不一样的。
存储在文件中就是这样的:
相关文件存放路径:/usr/share/glib-2.0/schemas/
参考链接:
What is dconf, what is its function, and how do I use it?
Are dconf schema names case-sensitive?
Shouldn’t dconf-editor and gsettings access the same database?
Gconf, Dconf, Gsettings and the relationship between them