System UI 学习之一:system ui启动流程
转载请注明出处:http://blog.csdn.net/yihongyuelan
1.初始SystemUI
什么是SystemUI?你或许会觉得这个问题很幼稚,界面上的布局UI显示?系统的UI?如果你是这么想的,那么就大错特错了。我们知道Android 4.0 ICS同时适用于Phone和Tablet(TV),因此,对于Phone来说SystemUI指的是:StatusBar(状态栏)、NavigationBar(导航栏)。而对于Tablet或者是TV来说SystemUI指的是:CombinedBar(包括了StatusBar和NavigationBar)。注:关于Android 4.0的UI介绍请参考这篇文章。
根据上面的介绍,我想大家应该知道SystemUI的具体作用了吧!也就是说我们的Phone的信号,蓝牙标志,Wifi标志等等这些状态显示标志都会在StatusBar上显示。当我们的设备开机后,首先需要给用户呈现的就是各种界面同时也包括了我们的SystemUI,因此对于整个Android系统来说,SystemUI都有举足轻重的作用,那接下来就来看看它的启动流程吧!
2.启动流程
这里只是单单的分析启动流程,实际上SystemUI启动过程中涉及到很多东西的调用,这里暂时不分支去介绍,后续会有相关文章的详细分析。那么对于这种分析我还是将自己的分析思路写出来,而不是直接展现已经分析好的结果,当然结果会在最后展示出来。这样做一方面有利于锻炼自己的分析能力,另一方面各位看官也可以找出分析中的利与弊从而更好的取舍。
首先来看看SystemUI的代码位置,路径:SourceCode/frameworks/base/packages/SystemUI;其次看看它的代码梗概:
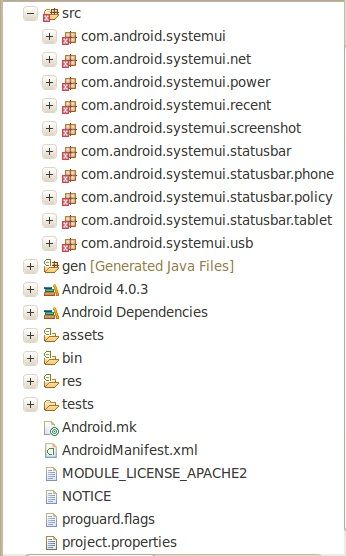
图 2.1
在Android 4.0中,Google整合了Phone和Tablet(TV)的SystemUI,也就说可以根据设备的类型自动匹配相应的SystemUI。这一点是在Android 2.3中是没有的。那么接下来怎么分析呢?打开AndroidManifest.xml可以看到:
- <manifestxmlns:android="http://schemas.android.com/apk/res/android"
- package="com.android.systemui"
- coreApp="true"
- android:sharedUserId="android.uid.system"
- android:process="system"
- >
- <uses-permissionandroid:name="android.permission.STATUS_BAR_SERVICE"/>
- <uses-permissionandroid:name="android.permission.BLUETOOTH"/>
- <uses-permissionandroid:name="android.permission.BLUETOOTH_ADMIN"/>
- <uses-permissionandroid:name="android.permission.GET_TASKS"/>
- <uses-permissionandroid:name="android.permission.MANAGE_USB"/>
- <application
- android:persistent="true"
- android:allowClearUserData="false"
- android:allowBackup="false"
- android:hardwareAccelerated="true"
- android:label="@string/app_label"
- android:icon="@drawable/ic_launcher_settings">
-
根据以上代码我们可以发现这其中注册了很多Service,同时也包括了广播。但这里我们只关注SystemUIService,这才是本文的主旨啊。那么首先要找到SystemUIService是如何启动的。对于Service的启动,在我以前的博文中已有提到,这里就不多说了,不外乎startService(intent)和bindService(intent),它们都是以intent为对象,那intent的声明也需要SystemUIService啊,因此我们可以据此搜索关键词"SystemUIService"。
经过漫长的搜索和比对之后发现,原来,SystemUIService是在SystemServer.java中被启动的,如下所示:
- static finalvoid startSystemUi(Context context) {
- Intent intent = new Intent();
- intent.setComponent(new ComponentName("com.android.systemui",
- "com.android.systemui.SystemUIService"));
- Slog.d(TAG, "Starting service: " + intent);
- context.startService(intent);
- }
    static final void startSystemUi(Context context) {
        Intent intent = new Intent();
        intent.setComponent(new ComponentName("com.android.systemui",
                    "com.android.systemui.SystemUIService"));
        Slog.d(TAG, "Starting service: " + intent);
        context.startService(intent);
    }
这里的startSystemUi()方法则在ServerThread的run()方法中被调用。这里提到SystemServer就不得不提及Android的启动流程,这里不会展开详细讨论具体的流程,只是简单的介绍一下大概流程,用以表明SystemServer所处的位置。Android的启动分为内核启动、Android启动、launcher启动,我们的SystemServer就处于Android启动中,以下是大致流程图:
init->ServiceManager->Zygote->SystemServer->... ...
在SystemServer中,初始化了Android系统中的Java层服务,如PowerManagerService、WindowManagerService等等,当然也包括了SystemUIService,它们通过ServiceManager的addService()方法,添加到ServiceManager的管理中。实际上,根据后面的分析这里add了一个很重要的StatusBarManagerService。这个Service在后面会用到的。
既然到这里SystemUIService已经启动,那么我们就继续跟踪该Service吧。
1).首先查看其onCreate()方法,如下:
- public void onCreate() {
- // Pick status bar or system bar.
- IWindowManager wm = IWindowManager.Stub.asInterface(
- ServiceManager.getService(Context.WINDOW_SERVICE));
- try {
- SERVICES[0] = wm.canStatusBarHide()//根据wm.canStatusBarHide()判断设备类型
- ? R.string.config_statusBarComponent
- : R.string.config_systemBarComponent;
- } catch (RemoteException e) {
- Slog.w(TAG, "Failing checking whether status bar can hide", e);
- }
- final int N = SERVICES.length;
- mServices = new SystemUI[N];
- for (int i=0; i
- Class cl = chooseClass(SERVICES[i]);
- Slog.d(TAG, "loading: " + cl);
- try {
- mServices[i] = (SystemUI)cl.newInstance();
- } catch (IllegalAccessException ex) {
- throw new RuntimeException(ex);
- } catch (InstantiationException ex) {
- throw new RuntimeException(ex);
- }
- mServices[i].mContext = this;
- Slog.d(TAG, "running: " + mServices[i]);
- mServices[i].start();
- }
- }
    public void onCreate() {
        // Pick status bar or system bar.
        IWindowManager wm = IWindowManager.Stub.asInterface(
                ServiceManager.getService(Context.WINDOW_SERVICE));
        try {
            SERVICES[0] = wm.canStatusBarHide()//根据wm.canStatusBarHide()判断设备类型
                    ? R.string.config_statusBarComponent
                    : R.string.config_systemBarComponent;
        } catch (RemoteException e) {
            Slog.w(TAG, "Failing checking whether status bar can hide", e);
        }

        final int N = SERVICES.length;
        mServices = new SystemUI[N];
        for (int i=0; i
在这段代码中,通过AIDL的方式获取了WindowManager的对象wm,并调用其方法canStatusBarHide()来判断当前设备的类型,也就是说如果我们使用的Phone那么后续就会加载StatusBar和NivagationBar;而如果我们设备类型是Tablet(TV)之类的(可以在配置文档里面配置), 就会加载CombiedBar。这里的canStatusBarHide()方法的具体实现是在:frameworks/base/policy/src/com/android/internal/policy/impl/PhoneWindowManager.java。为什么会是这里呢?我们在Eclipse中导入源码之后,找到SystemUIService.java中的wm.canStatusBarHide()方法,通过open Implementation直接跳转到WindowsManagerService中:
- public boolean canStatusBarHide() {
- return mPolicy.canStatusBarHide();
- }
    public boolean canStatusBarHide() {
        return mPolicy.canStatusBarHide();
    }
但这里我们发现canStatusBarHide()实际上是WindowManagerPolicy的对象调用的方法,而WindowManagerPolicy只是一个接口类,根据以往分析的经验可以知道,这里的WindowManagerPolicy对象所调用的canStatusBartHide()方法一定是其实现类中的 方法。因此,继续通过open Implementation跳转,来到了PhoneWindownManager中:- public boolean canStatusBarHide() {
- return mStatusBarCanHide;
- }
    public boolean canStatusBarHide() {
        return mStatusBarCanHide;
    }
继续查看mSatuBarCanHide的实现,如下所示:- // Determine whether the status bar can hide based on the size
- // of the screen. We assume sizes > 600dp are tablets where we
- // will use the system bar.
- int shortSizeDp = shortSize
- * DisplayMetrics.DENSITY_DEFAULT
- / DisplayMetrics.DENSITY_DEVICE;
- mStatusBarCanHide = shortSizeDp < 600;
- mStatusBarHeight = mContext.getResources().getDimensionPixelSize(
- mStatusBarCanHide
- ? com.android.internal.R.dimen.status_bar_height
- : com.android.internal.R.dimen.system_bar_height);
- mHasNavigationBar = mContext.getResources().getBoolean(
- com.android.internal.R.bool.config_showNavigationBar);
        // Determine whether the status bar can hide based on the size
        // of the screen.  We assume sizes > 600dp are tablets where we
        // will use the system bar.
        int shortSizeDp = shortSize
                * DisplayMetrics.DENSITY_DEFAULT
                / DisplayMetrics.DENSITY_DEVICE;
        mStatusBarCanHide = shortSizeDp < 600;
        mStatusBarHeight = mContext.getResources().getDimensionPixelSize(
                mStatusBarCanHide
                ? com.android.internal.R.dimen.status_bar_height
                : com.android.internal.R.dimen.system_bar_height);

        mHasNavigationBar = mContext.getResources().getBoolean(
                com.android.internal.R.bool.config_showNavigationBar);
这里通过shortSizeDp来判断当前设备的类型,如果当前屏幕的shortSize Dp<600dp,则系统会认为该设备是Phone反之则认为是Tablet。根据mStatusBarCanHide的值,设定StatusBar或者SystemBar(CombinedBar)的高度,以及是否显示NavigationBar。继续回到我们的SystemUIService.java的onCreate()方法中,根据前面对canStatusBarHide()的判断,SERVICE[0]中将存放R.string.config_statusBarComponent或者R.string.config_systemBarComponent。它们的值具体是:
- <stringname="config_statusBarComponent"translatable="false">com.android.systemui.statusbar.phone.PhoneStatusBarstring>
- <stringname="config_systemBarComponent"translatable="false">com.android.systemui.statusbar.tablet.TabletStatusBarstring>
com.android.systemui.statusbar.phone.PhoneStatusBar
com.android.systemui.statusbar.tablet.TabletStatusBar
因为我的测试设备是Phone,那么现在SERVICE[0]中存放的就是com.android.systemui.statusbart.phone.PhoneStatusBar。查看以下代码:- final int N = SERVICES.length;
- mServices = new SystemUI[N];
- for (int i=0; i
- Class cl = chooseClass(SERVICES[i]);
- Slog.d(TAG, "loading: " + cl);
- try {
- mServices[i] = (SystemUI)cl.newInstance();
- } catch (IllegalAccessException ex) {
- throw new RuntimeException(ex);
- } catch (InstantiationException ex) {
- throw new RuntimeException(ex);
- }
- mServices[i].mContext = this;
- Slog.d(TAG, "running: " + mServices[i]);
- mServices[i].start();
- }
        final int N = SERVICES.length;
        mServices = new SystemUI[N];
        for (int i=0; i
这些方法会分别启动两个方法,这两个方法可以从log中知道,分别是PhoneStatusBar.start()和PowerUI.start()。而我们的目的是要弄清SystemUI的启动,因此现关注PhoneStatusBar.start()方法。log信息:
06-04 13:23:15.379: DEBUG/SystemUIService(396): loading: class com.android.systemui.statusbar.phone.PhoneStatusBar
06-04 13:23:16.739: DEBUG/SystemUIService(396): loading: class com.android.systemui.power.PowerUI
来到PhoneStatusBar.start()方法中,位于:SourceCode/frameworks/base/packages/SystemUI/src/com/android/systemui/statusbar/phone/PhoneStatusBar.java,代码如下:
- @Override
- public void start() {
- mDisplay = ((WindowManager)mContext.getSystemService(Context.WINDOW_SERVICE))
- .getDefaultDisplay();
- mWindowManager = IWindowManager.Stub.asInterface(
- ServiceManager.getService(Context.WINDOW_SERVICE));
- super.start(); // calls makeStatusBarView()
- addNavigationBar();
- //addIntruderView();
- // Lastly, call to the icon policy to install/update all the icons.
- mIconPolicy = new PhoneStatusBarPolicy(mContext);
- }
    @Override
    public void start() {
        mDisplay = ((WindowManager)mContext.getSystemService(Context.WINDOW_SERVICE))
                .getDefaultDisplay();

        mWindowManager = IWindowManager.Stub.asInterface(
                ServiceManager.getService(Context.WINDOW_SERVICE));

        super.start(); // calls makeStatusBarView()

        addNavigationBar();

        //addIntruderView();

        // Lastly, call to the icon policy to install/update all the icons.
        mIconPolicy = new PhoneStatusBarPolicy(mContext);
    }
这里的重心主要是在super.start()和addNavigationBar() 上。目前市面上很多手机已经刷入了ICS,但是大多数是没有NavigationBar的,也就是说自己修改了源码,屏蔽了NavigationBar。继续跟踪super.start()方法,来到/SourceCode/frameworks/base/packages/SystemUI/src/com/android/systemui/statusbar/StatusBar.java的start()方法中,代码如下:- public void start() {
- // First set up our views and stuff.
- View sb = makeStatusBarView();
- // Connect in to the status bar manager service
- StatusBarIconList iconList = new StatusBarIconList();
- ArrayList
notificationKeys = new ArrayList(); - ArrayList
notifications = new ArrayList(); - mCommandQueue = new CommandQueue(this, iconList);
- mBarService = IStatusBarService.Stub.asInterface(
- ServiceManager.getService(Context.STATUS_BAR_SERVICE));
- int[] switches = newint[7];
- ArrayList
binders = new ArrayList(); - try {
- mBarService.registerStatusBar(mCommandQueue, iconList, notificationKeys, notifications,
- switches, binders);
- } catch (RemoteException ex) {
- // If the system process isn't there we're doomed anyway.
- }
- disable(switches[0]);
- setSystemUiVisibility(switches[1]);
- topAppWindowChanged(switches[2] !=0);
- // StatusBarManagerService has a back up of IME token and it's restored here.
- setImeWindowStatus(binders.get(0), switches[3], switches[4]);
- setHardKeyboardStatus(switches[5] !=0, switches[6] !=0);
- // Set up the initial icon state
- int N = iconList.size();
- int viewIndex = 0;
- for (int i=0; i
- StatusBarIcon icon = iconList.getIcon(i);
- if (icon != null) {
- addIcon(iconList.getSlot(i), i, viewIndex, icon);
- viewIndex++;
- }
- }
- // Set up the initial notification state
- N = notificationKeys.size();
- if (N == notifications.size()) {
- for (int i=0; i
- addNotification(notificationKeys.get(i), notifications.get(i));
- }
- } else {
- Log.wtf(TAG, "Notification list length mismatch: keys=" + N
- + " notifications=" + notifications.size());
- }
- // Put up the view
- final int height = getStatusBarHeight();
- final WindowManager.LayoutParams lp =new WindowManager.LayoutParams(
- ViewGroup.LayoutParams.MATCH_PARENT,
- height,
- WindowManager.LayoutParams.TYPE_STATUS_BAR,
- WindowManager.LayoutParams.FLAG_NOT_FOCUSABLE
- | WindowManager.LayoutParams.FLAG_TOUCHABLE_WHEN_WAKING
- | WindowManager.LayoutParams.FLAG_SPLIT_TOUCH,
- // We use a pixel format of RGB565 for the status bar to save memory bandwidth and
- // to ensure that the layer can be handled by HWComposer. On some devices the
- // HWComposer is unable to handle SW-rendered RGBX_8888 layers.
- PixelFormat.RGB_565);
- // the status bar should be in an overlay if possible
- final Display defaultDisplay
- = ((WindowManager)mContext.getSystemService(Context.WINDOW_SERVICE))
- .getDefaultDisplay();
- // We explicitly leave FLAG_HARDWARE_ACCELERATED out of the flags. The status bar occupies
- // very little screen real-estate and is updated fairly frequently. By using CPU rendering
- // for the status bar, we prevent the GPU from having to wake up just to do these small
- // updates, which should help keep power consumption down.
- lp.gravity = getStatusBarGravity();
- lp.setTitle("StatusBar");
- lp.packageName = mContext.getPackageName();
- lp.windowAnimations = R.style.Animation_StatusBar;
- WindowManagerImpl.getDefault().addView(sb, lp);
- if (SPEW) {
- Slog.d(TAG, "Added status bar view: gravity=0x" + Integer.toHexString(lp.gravity)
- + " icons=" + iconList.size()
- + " disabled=0x" + Integer.toHexString(switches[0])
- + " lights=" + switches[1]
- + " menu=" + switches[2]
- + " imeButton=" + switches[3]
- );
- }
- mDoNotDisturb = new DoNotDisturb(mContext);
- }
如果细心阅读了的朋友肯定会发现这句代码:public void start() { // First set up our views and stuff. View sb = makeStatusBarView(); // Connect in to the status bar manager service StatusBarIconList iconList = new StatusBarIconList(); ArrayListnotificationKeys = new ArrayList (); ArrayList notifications = new ArrayList (); mCommandQueue = new CommandQueue(this, iconList); mBarService = IStatusBarService.Stub.asInterface( ServiceManager.getService(Context.STATUS_BAR_SERVICE)); int[] switches = new int[7]; ArrayList binders = new ArrayList (); try { mBarService.registerStatusBar(mCommandQueue, iconList, notificationKeys, notifications, switches, binders); } catch (RemoteException ex) { // If the system process isn't there we're doomed anyway. } disable(switches[0]); setSystemUiVisibility(switches[1]); topAppWindowChanged(switches[2] != 0); // StatusBarManagerService has a back up of IME token and it's restored here. setImeWindowStatus(binders.get(0), switches[3], switches[4]); setHardKeyboardStatus(switches[5] != 0, switches[6] != 0); // Set up the initial icon state int N = iconList.size(); int viewIndex = 0; for (int i=0; i mBarService = IStatusBarService.Stub.asInterface(ServiceManager.getService(Context.STATUS_BAR_SERVICE));
这不正是我们前面add的StatusBarManagerSerivce吗?这里通过AIDL的方式来获取它的对象。
整个代码执行的时序图如图2.2所示:
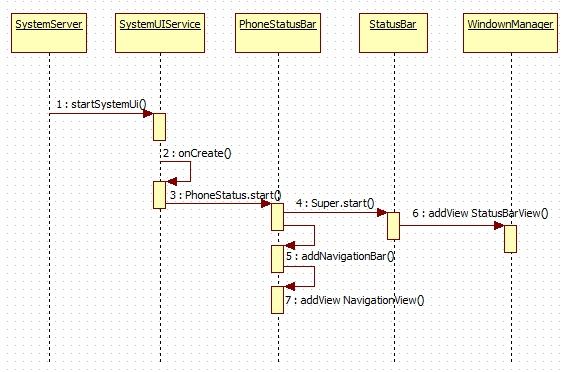
图 2.2
3.总结
Android 4.0的SystemUI加载启动的过程大致就是这样,虽然看似简单,但这仅仅是个开始,master还是后面呢!!各家厂商根据自家的需求,需要定制SystemUI或者美化SystemUI,不同的平台(QCOM、MTK等等)也会有不同的修改,但大体框架是没有变的,无非是在原有基础上的修修改改或者增加一些自己的类等等。通过对Android源码框架性的理解,可以学习到很多设计上的知识(虽然自己还很欠缺)。通过这次分析,开始逐渐用StarUML来画时序图,这也是一个学习的过程。
4、附上system ui 修改后可编译运行的源代码地址