27.3smb服务
-
-
- smb服务
- windows共享看不见盘符
- 自动挂载
- 共享samba用户账号的家目录(默认)
- 创建samba账号
- 更改samba用户账号共享的目录
- 不同用户配置不同配置文件
-
smb服务
1、 SMB:Server Message Block服务器消息块,IBM发布,最早是DOS网络文件共享协议
2、 Cifs:common internet file system,微软基于SMB发布
3、 SAMBA:1991年Andrew Tridgell,实现windows和UNIX相通
4、 SAMBA的功能:
• 共享文件和打印,实现在线编辑
• 实现登录SAMBA用户的身份认证
• 可以进行NetBIOS名称解析
• 外围设备共享
5、 计算机网络管理模式:
• 工作组WORKGROUP:计算机对等关系,帐号信息各自管理
• 域DOMAIN:C/S结构,帐号信息集中管理,DC,AD
6、 相关包:
- Samba 提供smb服务
- Samba-client 客户端软件
- samba-common 通用软件
- cifs-utils smb客户端工具
- samba-winbind 和AD相关
7、 相关服务进程:
- smbd 提供smb(cifs)服务 TCP:139,445
- nmbd NetBIOS名称解析 UDP:137,138
8、 主配置文件:/etc/samba/smb.conf
- 帮助参看:man smb.conf
9、 语法检查: testparm [-v] [/etc/samba/smb.conf]
10、客户端工具:smbclient,mount.cifs
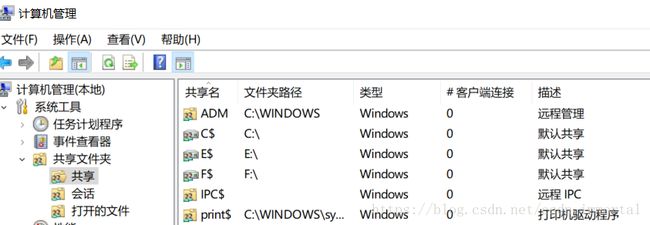
windows共享看不见盘符
通过命令cmd ; net share  查看   #C:\Windows\System32 找到cmd.exe右键以管理员运行
C:\Users\29256>net share
共享名       资源                            注解

\-------------------------------------------------------------------------------
C$           C:\                             默认共享
E$           E:\                             默认共享
F$           F:\                             默认共享
IPC$                                         远程 IPC
print$       C:\WINDOWS\system32\spool\drivers
                                             打印机驱动程序
ADMIN$       C:\WINDOWS                      远程管理
sharetools   E:\sharetools
命令成功完成。
C:\WINDOWS\system32>net share sharetools /del
sharetools 已经删除。 C:\WINDOWS\system32>net user dhy centos /add
命令成功完成。[root@centos7:~]# locate cifs.ko
/usr/lib/modules/3.10.0-862.el7.x86_64/kernel/fs/cifs/cifs.ko.xz
[root@centos7:~]# yum install samba-client
[root@centos7:~]# rpm -ql samba-client
/usr/bin/cifsdd
/usr/bin/dbwrap_tool
/usr/bin/findsmb
/usr/bin/mvxattr
/usr/bin/nmblookup
/usr/bin/oLschema2ldif
/usr/bin/regdiff
/usr/bin/regpatch
/usr/bin/regshell
/usr/bin/regtree
/usr/bin/rpcclient
/usr/bin/samba-regedit
/usr/bin/sharesec
/usr/bin/smbcacls
/usr/bin/smbclient
\**省略**
[root@centos7:~]# smbclient -L 192.168.31.1 -U dhy%centos
Sharename Type Comment
--------- ---- -------
ADMIN$ Disk 远程管理
C$ Disk 默认共享
E$ Disk 默认共享
F$ Disk 默认共享
IPC$ IPC 远程 IPC
print$ Disk 打印机驱动程序
sharewin Disk
Reconnecting with SMB1 for workgroup listing.
Connection to 192.168.31.1 failed (Error NT_STATUS_RESOURCE_NAME_NOT_FOUND)
Failed to connect with SMB1 -- no workgroup available
UNC(Universal Naming Convention)通用命名规则,也称通用命名规范
//192.168.31.1/sharewin linux
\\172.18.118.99\sharewin windows
[root@centos7:~]# smbclient //192.168.31.1/sharewin -U dhy%centos
Try "help" to get a list of possible commands.
smb: \> help
[root@centos7:app]# mount -o username=dhy,password=centos //192.168.31.1/sharewin /app/smb/
//192.168.31.1/sharewin 299G 54G 246G 18% /app/smb #挂载windows共享的文件
[root@centos7:app]# vim /etc/fstab
//192.168.31.1/winshare /app/smb cifs username=dhy,password=centos 0 0
或者
//192.168.31.1/winshare /app/smb cifs credentials=/etc/smb.txt 0 0
[root@centos7:app]#cat > /etc/smb.txt
username=dhy
password=centos
[root@centos7:app]# mount -a #挂载失败时需要装包
[root@centos7:app]# yum install cifs-utils #mount.cifs
[root@centos7:app]#chmod 600 /etc/smb.txt[root@cos7 ~ ]#smbclient -L 192.168.31.1 -U dhy%centos
Connection to 192.168.31.1 failed (Error NT_STATUS_IO_TIMEOUT)
由于从新安装了一个虚拟机,结果在仅主机模式下,windows(192.168.31.1即vmnet1)可以ping通linux,而linux ping不通windows,解决方法如图

自动挂载
[root@cos7 ~ ]#vim /etc/auto.master
/- /etc/auto.dhy
[root@cos7 ~ ]#vim /etc/auto.dhy
/app/smb -fstype=cifs,username=dhy,pass=centos ://192.168.31.1/winshare
共享samba用户账号的家目录(默认)
两个linux,一个当客户端,一个当samba服务器,windows当客户端
[root@cos17 ~ ]#yum install samba -y   #安装服务包
[root@cos17 ~ ]#rpm -ql samba
/usr/lib/systemd/system/nmb.service  #提供名称解析为ip,若共享用ip,此服务可以不启用
/usr/lib/systemd/system/smb.service  #提供共享服务
/usr/sbin/nmbd    # netbios名解析支持,如windows计算机名解析为ip,可以通过wins,lmhost,广播
/usr/sbin/smbd    # samba共享
**省略*8
#windows10如下
C:\Users\29256>ping acer-zhang    #通过广播找到此计算机名的ip
正在 Ping Acer-Zhang [fe80::f1fb:c301:6a94:9a%8] 具有 32 字节的数据:
来自 fe80::f1fb:c301:6a94:9a%8 的回复: 时间<1ms
来自 fe80::f1fb:c301:6a94:9a%8 的回复: 时间<1ms
来自 fe80::f1fb:c301:6a94:9a%8 的回复: 时间<1ms
来自 fe80::f1fb:c301:6a94:9a%8 的回复: 时间<1ms
netbios=计算机名+字符 00 20  #00代表服务
C:\Users\29256>nbtstat -c
以太网:
节点 IP 址址: [172.18.118.99] 范围 ID: []
缓存中没有名称[root@cos17 ~ ]#ll /etc/samba
total 20
-rw-r--r--. 1 root root 20 Apr 13 23:34 lmhosts #类似hosts文件
-rw-r--r--. 1 root root 706 Apr 13 23:34 smb.conf
-rw-r--r--. 1 root root 11327 Apr 13 23:34 smb.conf.example
#windows开始用FQDN来代替netbios,类似hosts文件
[root@cos17 ~ ]#rpm -qf /etc/samba/smb.conf
samba-common-4.7.1-6.el7.noarch
[root@cos17 ~ ]#mkdir /data/smb1 -p
[root@cos17 ~ ]#mkdir /data/smb2 -p
[root@cos17 ~ ]#systemctl start smb
[root@cos17 ~ ]#ss -ntlp #139 ,445端口
[root@cos17 ~ ]#systemctl start nmb
[root@cos17 ~ ]#ss -nulp #137 138端口创建samba账号
创建samba账号,依赖linux账号
[root@cos17 ~ ]#useradd -s /sbin/nologin smb1   #系统账号
[root@cos17 ~ ]#smbpasswd -a smb1      由系统账号变为samba账号,改密码不需要-a选项
New SMB password:
Retype new SMB password:
Added user smb1.
[root@cos17 ~ ]#pdbedit -L
smb1:1001:
[root@cos17 ~ ]#useradd -s /sbin/nologin smb2
[root@cos17 ~ ]#smbpasswd -a smb1
New SMB password:
Retype new SMB password:
[root@cos17 ~ ]#useradd -s /sbin/nologin smb3
[root@cos17 ~ ]#smbpasswd -a smb3
New SMB password:
Retype new SMB password:
Added user smb3.
[root@cos17 ~ ]#ll /var/lib/samba/private/passdb.tdb
-rw------- 1 root root 421888 Aug 19 21:49 /var/lib/samba/private/passdb.tdb
[root@cos17 ~ ]#smbpasswd -x smb3
Deleted user smb3.
[root@cos17 ~ ]#iptables -F #清空防火墙策略
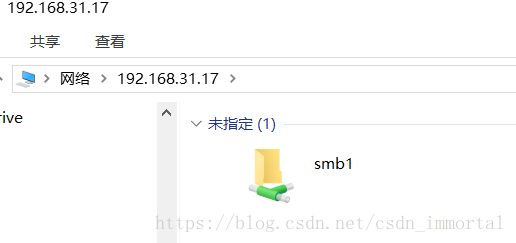
windows10中win键+r键 输入 \192.168.31.17 如图 ,2个图片
windows连接
windows10中win键+r键 输入 \192.168.31.17\smb2 如图


由于samba服务只运行一个客户端登录一个用户,故而先删除smb1用户,再登录smb2用户即可,具体如下:
C:\Users\29256>net use
会记录新的网络连接。

状态       本地        远程                      网络

-------------------------------------------------------------------------------
OK                     \\192.168.31.17\IPC$      Microsoft Windows Network
命令成功完成。
C:\Users\29256>net use \\192.168.31.17\IPC$ /del
\\192.168.31.17\IPC$ 已经删除。
linux客户端连接
[root@cos7 ~ ]#smbclient -L 192.168.31.17
Enter SAMBA\root's password:
Anonymous login successful

    Sharename       Type      Comment
    ---------       ----      -------
    print$          Disk      Printer Drivers
    IPC$            IPC       IPC Service (Samba 4.7.1)
Reconnecting with SMB1 for workgroup listing.
Anonymous login successful

    Server               Comment
    ---------            -------

    Workgroup            Master
    ---------            -------
    SAMBA                COS17
    WORKGROUP            DESKTOP-977TN2L
[root@cos7 ~ ]#smbclient -L 192.168.31.17 -U smb1%centos

    Sharename       Type      Comment
    ---------       ----      -------
    print$          Disk      Printer Drivers
    IPC$            IPC       IPC Service (Samba 4.7.1)
    smb1            Disk      Home Directories
Reconnecting with SMB1 for workgroup listing.

    Server               Comment
    ---------            -------

    Workgroup            Master
    ---------            -------
    SAMBA                COS17
    WORKGROUP            DESKTOP-977TN2L
[root@cos7 ~ ]#smbclient //192.168.31.17/smb1 -U smb1%centos
Try "help" to get a list of possible commands.
smb: \> ls
  .                                   D        0  Sun Aug 19 21:47:04 2018
  ..                                  D        0  Sun Aug 19 21:49:46 2018
  .mozilla                           DH        0  Sun Aug 19 23:14:23 2018
  .bash_logout                        H       18  Wed Apr 11 08:53:01 2018
  .bash_profile                       H      193  Wed Apr 11 08:53:01 2018
  .bashrc                             H      231  Wed Apr 11 08:53:01 2018

[root@cos7 samba ]#ll
total 20
-rw-r--r--. 1 root root    20 Apr 13 23:34 lmhosts
-rw-r--r--. 1 root root   706 Apr 13 23:34 smb.conf   #配置文件,centos7此文件有详细说明
-rw-r--r--. 1 root root 11327 Apr 13 23:34 smb.conf.example #配置文件详细说明
[root@cos17 samba ]#pwd
/etc/samba
[root@cos17 samba ]#vim smb.conf #ini格式的文件
[global]
        workgroup = SAMBA
        security = user         #用户名验证
                            \#netbios name = cos17 可以ping cos17
                            \#hosts allow = 172. 192.168.31.7
                            \#log file = /var/log/samba/log.%m
                            \#log level = 2  参考man smb.conf
                            \#max log size = 50
                            \#参考smb.conf.example文件
        passdb backend = tdbsam #存放用户名密码的数据库文件

        printing = cups         #打印服务,打印机共享
        printcap name = cups
        load printers = yes
        cups options = raw

[homes]                           #家目录共享,不想共享,可以注释掉此几行
        comment = Home Directories
        valid users = %S, %D%w%S
        browseable = No
        read only = No
        inherit acls = Yes

[printers]
        comment = All Printers
        path = /var/tmp
        printable = Yes
        create mask = 0600        #此配置文件可参考smb.conf.example


[root@cos17 samba ]#smbclient -L 192.168.31.1 -U dhy%centos  #windows
Failed to connect with SMB1 -- no workgroup available   #工作组,逻辑上的概念
更改samba用户账号共享的目录
[root@cos17 samba ]#vim smb.conf.example
;       [public]                   #最后几行,自定义共享设置
;       comment = Public Stuff     #注释信息
;       path = /home/samba         #共享路径
;       public = yes               #是否共享,yes匿名用户也可以登录
;       writable = no              #是否可写
;       printable = no
;       write list = +staff        #哪些用户可以写

[root@cos17 data ]#mkdir smb1dir
[root@cos17 samba ]#vim smb.conf
[share1]
path=/data/smb1dir
writable = yes
public = yes
write list=smb1,smb3   #write list=smb3,+sales;smb3用户,sales组中成员可以访问
#browsable=no  #表示不可以浏览,即隐藏效果
[root@cos7 ~ ]#smbclient //192.168.31.17/share1
Enter SAMBA\root's password:
Anonymous login successful
tree connect failed: NT_STATUS_ACCESS_DENIED  #writable = no的错误提示
[root@cos7 ~ ]#smbclient -L 192.168.31.17
Enter SAMBA\root's password:
Anonymous login successful

    Sharename       Type      Comment
    ---------       ----      -------
    print$          Disk      Printer Drivers     #windows中$符号表示隐藏共享
    share1          Disk
    IPC$            IPC       IPC Service (Samba 4.7.1)
不同用户配置不同配置文件
[root@cos17 samba ]#vim /etc/samba/smb.conf
[global]
        workgroup = SAMBA
        security = user
        passdb backend = tdbsam
        printing = cups
        printcap name = cups
        load printers = yes
        cups options = raw
        config file = /etc/samba/conf.d/%u    #添加此行
[root@cos17 samba ]#mkdir conf.d
[root@cos17 samba ]#cd conf.d

[root@cos17 samba ]#vim smb1
[share1]
comment=test dir1
path=/data/smb1dir111
[root@cos17 samba ]#cd conf.d
[root@cos17 samba ]#mkdir /data/smb1dir111
[root@cos17 samba ]#touch test1.txt

[root@cos17 samba ]#vim smb2
[share1]
comment=test dir1
path=/data/smb1dir111
writable=yes          #可写,同时注意系统文件系统权限
[root@cos17 samba ]#chmod 777 /data/smb1dir111
[root@cos7 ~ ]#smbclient //192.168.31.17/share1 -U smb1%centos


