手把手教你SpringBoot+pagehelper实现分页效果
今天,我们用springboot来实现pagehelper插件分页效果,ssm项目同样适用,项目是Maven项目,前端使用Thymeleaf。
首先,先引用pom依赖,此依赖同适用于springboot与ssm,非Maven项目可以导入JAR包
  com.github.pagehelper
  pagehelper-spring-boot-starter
  1.2.3
spring boot需要在application.properties加入配置
pagehelper.helperDialect=mysql
pagehelper.reasonable=true
pagehelper.supportMethodsArguments=true
pagehelper.params=count=countSql
在dao层以注解的形式写一个查询所有信息的方法。
@Mapper
public interface ShopMapper {

    //查询所有
    @Select("SELECT * FROM shop")
    List all();
    }
然后service层调用dao层
@Service
public class ShopService {
@Autowired
ShopMapper shopMapper;
//查看所有接口
public Listall() {
return shopMapper.all();
}
控制器端,pageNum是显示当前在第几页
@Controller
public class ShopController(){

@Autowired
    ShopService shopService;

@RequestMapping("/cc")
public String index(Model model,@RequestParam(defaultValue = "1") Integer pageNum){

    PageHelper.startPage(pageNum,5);
    System.out.println("开始查询");
    List list = shopService.all();
    PageInfo pageInfo = new PageInfo<>(list);
    System.out.println(pageInfo);
    model.addAttribute("pageInfo",pageInfo);
    return "shop/test1";
}
}
前端页面遍历商品信息
{
pageInfo.list}">
![]() {
{
items.shopimg}">
{
items.shopprice}" >
前端页面实现分页组件及逻辑,这里用的是bootstrap样式
"pager" style=" position:absolute; margin-right:510px; right:15%; top:1320px; cursor:pointer;">
- {
pageInfo.pageNum!=1}">{
/cc(pageNum=1)}">首页
{
pageInfo.pageNum!=1}">{
/cc(pageNum=${
pageInfo.hasPreviousPage}?${
pageInfo.prePage}:${
pageInfo.pages})}">上一页
{
pageInfo.pageNum}+页">
{
pageInfo.pages}+页">
{
pageInfo.pageNum != pageInfo.pages}">{
/cc(pageNum=${
pageInfo.hasNextPage}?${
pageInfo.nextPage}:${
pageInfo.pages})}">下一页
{
pageInfo.pageNum != pageInfo.pages}">{
/cc(pageNum=${
pageInfo.pages})}">尾页
页面显示

至此,分页完成,下面给出代码的详细解释。
代码详解
PageHelper.startPage(pageNum,5);
List<Shop> list = shopService.all();
startPage里面的pageNum是当前显示页,我们默认显示页都是第一页,所以控制器的参数默认赋值了一个1,后面的5便是每页显示信息的条数。
切记startPage要放在查询语句的前面,否则分页功能将无法实现!!
因为PageHelper可以获取到同一线程中的预编译好的SQL语句,之后将SQL语句包装成具有分页功能的SQL语句,并将其再次赋值给下一步操作,所以实际执行的SQL语句默认先执行两条数据库语句:select count(0)以及在原有语句后加的LIMIT。
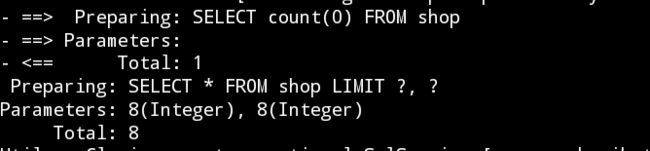
下面这条代码就是将查询到的list封装到PageInfo类里面的list集合。
PageInfo<Shop> pageInfo = new PageInfo<>(list);
我们可以Crtl+鼠标点击看一下PageInfo的类,里面有很多封装的数据信息
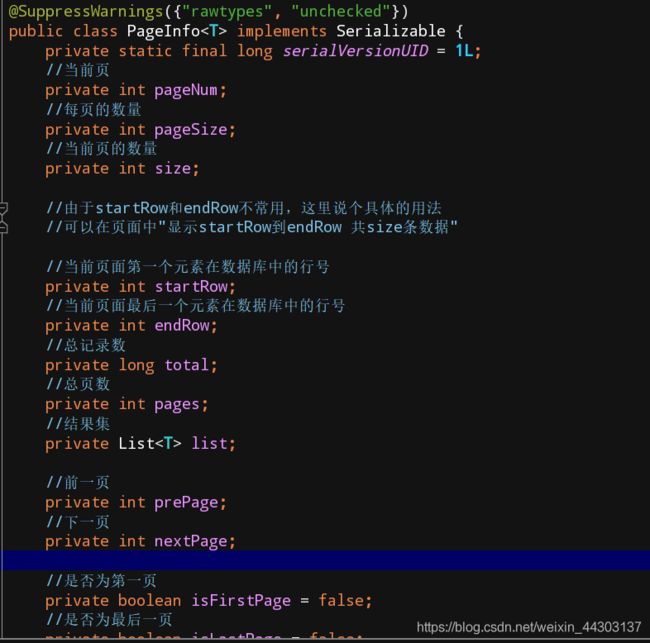
打印一下pageInfo瞧瞧,可以看到所有的分页信息都能打印出来。
PageInfo<Shop> pageInfo = new PageInfo<>(list);
System.out.println(pageInfo);
PageInfo{
pageNum=1, pageSize=8, size=8, startRow=1, endRow=8, total=39, pages=5, list=Page{
count=true, pageNum=1, pageSize=8, startRow=0, endRow=8, total=39, pages=5, reasonable=false, pageSizeZero=false}, prePage=0, nextPage=2, isFirstPage=true, isLastPage=false, hasPreviousPage=false, hasNextPage=true, navigatePages=8, navigateFirstPage=1, navigateLastPage=5, navigatepageNums=[1, 2, 3, 4, 5]}
pageHelper操作简单,适用于ssm以及springBoot等项目,重点是在控制器调用startPage方法和将信息封装到pageInfo在前端显示,希望这篇文章对正在学习分页的你有所帮助!