关于图片验证码Kaptcha的应用
关于Kaptcha的项目应用
应用环境Spring boot + Spring Cloud
首先pom.xml 种注入kaptcha的相关依赖:
下面配置等信息我采用的是代码的方式:
这里要重点提及一下关于@Configuration 和@Component得区别
https://blog.csdn.net/isea533/article/details/78072133
配置信息:
@Configuration
public class CaptchaConfig
{
@Bean(name = "captchaProducerMath")
public DefaultKaptcha getKaptchaBeanMath()
{
DefaultKaptcha defaultKaptcha = new DefaultKaptcha();
Properties properties = new Properties();
// 是否有边框 默认为true 我们可以自己设置yes,no
properties.setProperty("kaptcha.border", "yes");
// 边框颜色 默认为Color.BLACK
properties.setProperty("kaptcha.border.color", "105,179,90");
// 验证码文本字符颜色 默认为Color.BLACK
properties.setProperty("kaptcha.textproducer.font.color", "blue");
// 验证码图片宽度 默认为200
properties.setProperty("kaptcha.image.width", "160");
// 验证码图片高度 默认为50
properties.setProperty("kaptcha.image.height", "60");
// 验证码文本字符大小 默认为40
properties.setProperty("kaptcha.textproducer.font.size", "35");
// KAPTCHA_SESSION_KEY
properties.setProperty("kaptcha.session.key", "kaptchaCodeMath");
// 验证码文本生成器
properties.setProperty("kaptcha.textproducer.impl", "com.ruoyi.gateway.config.KaptchaTextCreator");
// 验证码文本字符间距 默认为2
properties.setProperty("kaptcha.textproducer.char.space", "3");
// 验证码文本字符长度 默认为5
properties.setProperty("kaptcha.textproducer.char.length", "6");
// 验证码文本字体样式 默认为new Font("Arial", 1, fontSize), new Font("Courier", 1,
// fontSize)
properties.setProperty("kaptcha.textproducer.font.names", "Arial,Courier");
// 验证码噪点颜色 默认为Color.BLACK
properties.setProperty("kaptcha.noise.color", "white");
// 干扰实现类
properties.setProperty("kaptcha.noise.impl", "com.google.code.kaptcha.impl.NoNoise");
// 图片样式 水纹com.google.code.kaptcha.impl.WaterRipple
// 鱼眼com.google.code.kaptcha.impl.FishEyeGimpy
// 阴影com.google.code.kaptcha.impl.ShadowGimpy
properties.setProperty("kaptcha.obscurificator.impl", "com.google.code.kaptcha.impl.ShadowGimpy");
Config config = new Config(properties);
defaultKaptcha.setConfig(config);
return defaultKaptcha;
}
}
生成验证信息:
public class KaptchaTextCreator extends DefaultTextCreator
{
private static final String[] CNUMBERS = "0,1,2,3,4,5,6,7,8,9,10".split(",");
@Override
public String getText()
{
Integer result = 0;
Random random = new Random();
int x = random.nextInt(10);
int y = random.nextInt(10);
StringBuilder suChinese = new StringBuilder();
int randomoperands = (int) Math.round(Math.random() * 2);
if (randomoperands == 0)
{
result = x * y;
suChinese.append(CNUMBERS[x]);
suChinese.append("*");
suChinese.append(CNUMBERS[y]);
}
else if (randomoperands == 1)
{
if (!(x == 0) && y % x == 0)
{
result = y / x;
suChinese.append(CNUMBERS[y]);
suChinese.append("/");
suChinese.append(CNUMBERS[x]);
}
else
{
result = x + y;
suChinese.append(CNUMBERS[x]);
suChinese.append("+");
suChinese.append(CNUMBERS[y]);
}
}
else if (randomoperands == 2)
{
if (x >= y)
{
result = x - y;
suChinese.append(CNUMBERS[x]);
suChinese.append("-");
suChinese.append(CNUMBERS[y]);
}
else
{
result = y - x;
suChinese.append(CNUMBERS[y]);
suChinese.append("-");
suChinese.append(CNUMBERS[x]);
}
}
else
{
result = x + y;
suChinese.append(CNUMBERS[x]);
suChinese.append("+");
suChinese.append(CNUMBERS[y]);
}
suChinese.append("=?@" + result);
return suChinese.toString();
}
}
生成验证信息的类需要实现DefaultTextCreator;
下面是请求验证码的类:
public class ImgCodeHandler implements HandlerFunction
{
private final Producer producer;
private final StringRedisTemplate redisTemplate;
@Override
public Mono
{
System.err.println("------------------生成验证码-----------------");
// 生成验证码
String capText = producer.createText();
String capStr = capText.substring(0, capText.lastIndexOf("@"));
String code = capText.substring(capText.lastIndexOf("@") + 1);
BufferedImage image = producer.createImage(capStr);
// 保存验证码信息
String randomStr = UUID.randomUUID().toString().replaceAll("-", "");
redisTemplate.opsForValue().set(Constants.DEFAULT_CODE_KEY + randomStr, code, 60, TimeUnit.SECONDS);
// 转换流信息写出
FastByteArrayOutputStream os = new FastByteArrayOutputStream();
try
{
ImageIO.write(image, "jpg", os);
}
catch (IOException e)
{
log.error("ImageIO write err", e);
return Mono.error(e);
}
return ServerResponse.status(HttpStatus.OK).contentType(MediaType.IMAGE_JPEG).header("randomstr", randomStr)
.body(BodyInserters.fromResource(new ByteArrayResource(os.toByteArray())));
}
我简单讲解一下代码:
生成二维码中我们用到了这么一行代码
private final Producer producer;
Producer 是一个interface的接口 我们去查看它的实现类,发现
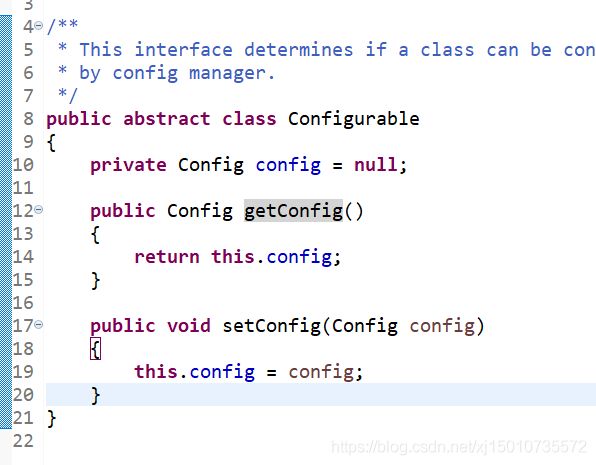
同时DefaultKaptcha 还继承了 Configurable
这里的代码就对应了我们CaptchaConfig这个配置类,这个配置类中我们将 对应的配置信息存放到DefaultKaptcha 中,以便于我们在生成验证码时使用。
因为我们用了@Configuration 所以配置类中DefaultKaptcha 和我们ImgCodeHandler 中使用的是同一个。
接下来我们注意看源码中的这段代码
不难发现其是使用了我们config中配置的
// 验证码文本生成器
properties.setProperty("kaptcha.textproducer.impl", "com.ruoyi.gateway.config.KaptchaTextCreator");
这段信息其中配置了我们自定义实现的文本生成器。这下代码就基本串起来了。
这边我附上一个比较全的Kaptchar详细配置表
| Constant |
描述 |
默认值 |
| kaptcha.border |
图片边框,合法值:yes , no |
yes |
| kaptcha.border.color |
边框颜色,合法值: r,g,b (and optional alpha) 或者 white,black,blue. |
black |
| kaptcha.border.thickness |
边框厚度,合法值:>0 |
1 |
| kaptcha.image.width |
图片宽 |
200 |
| kaptcha.image.height |
图片高 |
50 |
| kaptcha.producer.impl |
图片实现类 |
com.google.code.kaptcha.impl.DefaultKaptcha |
| kaptcha.textproducer.impl |
文本实现类 |
com.google.code.kaptcha.text.impl.DefaultTextCreator |
| kaptcha.textproducer.char.string |
文本集合,验证码值从此集合中获取 |
abcde2345678gfynmnpwx |
| kaptcha.textproducer.char.length |
验证码长度 |
5 |
| kaptcha.textproducer.font.names |
字体 |
Arial, Courier |
| kaptcha.textproducer.font.size |
字体大小 |
40px. |
| kaptcha.textproducer.font.color |
字体颜色,合法值: r,g,b 或者 white,black,blue. |
black |
| kaptcha.textproducer.char.space |
文字间隔 |
2 |
| kaptcha.noise.impl |
干扰实现类 |
com.google.code.kaptcha.impl.DefaultNoise |
| kaptcha.noise.color |
干扰 颜色,合法值: r,g,b 或者 white,black,blue. |
black |
| kaptcha.obscurificator.impl |
图片样式: 水纹com.google.code.kaptcha.impl.WaterRipple 鱼眼com.google.code.kaptcha.impl.FishEyeGimpy阴影com.google.code.kaptcha.impl.ShadowGimpy |
com.google.code.kaptcha.impl.WaterRipple |
| kaptcha.background.impl |
背景实现类 |
com.google.code.kaptcha.impl.DefaultBackground |
| kaptcha.background.clear.from |
背景颜色渐变,开始颜色 |
light grey |
| kaptcha.background.clear.to |
背景颜色渐变, 结束颜色 |
white |
| kaptcha.word.impl |
文字渲染器 |
com.google.code.kaptcha.text.impl.DefaultWordRenderer |
| kaptcha.session.key |
session key |
KAPTCHA_SESSION_KEY |
| kaptcha.session.date |
session date |
KAPTCHA_SESSION_DATE |


