上一篇博文我们主要聊了下分布式文件系统MogileFS的组件以及部署使用,回顾请参考https://www.cnblogs.com/qiuhom-1874/p/13677279.html;今天我们主要来聊一下MogileFS的客户端代理,用nginx做反代的相关配置;
我们知道mogilefs的tracker和客户端通信使用的http协议,客户端和storage通信也是使用http协议;客户端向tracker发送请求获取文件的内容,tracker收到请求后,去数据库中查,把查到的结果返回给客户端,然后客户端再通过tracker返回的结果去请求对应的存储节点,通过这样一个过程客户端就拿到对应文件的内容;从上面描述的过程来看,要想使用mogilefs得有一款智能的客户端,它必须满足能够理解到tracker返回的内容,然后再向存储节点请求对应的文件;其次这个客户端还能通过http协议同tracker和storage交互,也就说我们需要一款能够理解tracker返回的内容的http协议的反代服务器;nginx作为http的方向代理服务器是没有问题,问题在它还需要能够理解到tracker返回的内容,然后去storage上请求对应的文件;我们知道nginx是一款高度模块化的软件,需要什么功能,可以通过模块的方式加入到nginx里;这样一来用nginx来做这个方向代理是最佳人选;默认nginx是不支持反代mogilefs集群,所以我们需要手动去找第三方模块,通过编译的方式让它支持反代mogilefs集群;
下载nignx源码包和支持反代mogilefs集群的第三方模块
提示:下载nginx的源码包我们直接上官网下载就好;第三方模块源码包去https://www.nginx.com/resources/wiki/modules/找;对于nignx支持mogilefs集群的文档和包下载可以去这个地址上查看和下载http://www.grid.net.ru/nginx/mogilefs.en.html;
安装基本的编译环境包组
[root@node04 ~]# yum groupinstall "Development Tools" -y
Loaded plugins: fastestmirror
Setting up Group Process
Loading mirror speeds from cached hostfile
 * base: mirrors.aliyun.com
 * extras: mirrors.aliyun.com
 * updates: mirrors.aliyun.com
base/group_gz                                                                      | 242 kB     00:00
epel/group_gz                                                                      |  74 kB     00:00
Package gcc-4.4.7-23.el6.x86_64 already installed and latest version
Package 1:make-3.81-23.el6.x86_64 already installed and latest version
Package 1:pkgconfig-0.23-9.1.el6.x86_64 already installed and latest version
Package gcc-c++-4.4.7-23.el6.x86_64 already installed and latest version
Resolving Dependencies
--> Running transaction check
---> Package autoconf.noarch 0:2.63-5.1.el6 will be installed
---> Package automake.noarch 0:1.11.1-4.el6 will be installed
---> Package binutils.x86_64 0:2.20.51.0.2-5.46.el6 will be updated
---> Package binutils.x86_64 0:2.20.51.0.2-5.48.el6_10.1 will be an update
---> Package bison.x86_64 0:2.4.1-5.el6 will be installed
……省略部分内容……
Installed:
  autoconf.noarch 0:2.63-5.1.el6                            automake.noarch 0:1.11.1-4.el6
  bison.x86_64 0:2.4.1-5.el6                                byacc.x86_64 0:1.9.20070509-7.el6
  cscope.x86_64 0:15.6-7.el6                                ctags.x86_64 0:5.8-2.el6
  cvs.x86_64 0:1.11.23-16.el6                               diffstat.x86_64 0:1.51-2.el6
  doxygen.x86_64 1:1.6.1-6.el6                              elfutils.x86_64 0:0.164-2.el6
  flex.x86_64 0:2.5.35-9.el6                                gcc-gfortran.x86_64 0:4.4.7-23.el6
  gettext.x86_64 0:0.17-18.el6                              git.x86_64 0:1.7.1-10.el6_10
  indent.x86_64 0:2.2.10-7.el6                              intltool.noarch 0:0.41.0-1.1.el6
  libtool.x86_64 0:2.2.6-15.5.el6                           patch.x86_64 0:2.6-8.el6_9
  patchutils.x86_64 0:0.3.1-3.1.el6                         rcs.x86_64 0:5.7-37.el6
  redhat-rpm-config.noarch 0:9.0.3-51.el6.centos            rpm-build.x86_64 0:4.8.0-59.el6
  subversion.x86_64 0:1.6.11-15.el6_7                       swig.x86_64 0:1.3.40-6.el6
  systemtap.x86_64 0:2.9-9.el6

Dependency Installed:
  alsa-lib.x86_64 0:1.1.0-4.el6                             apr.x86_64 0:1.3.9-5.el6_9.1
  apr-util.x86_64 0:1.3.9-3.el6_0.1                         atk.x86_64 0:1.30.0-1.el6
  avahi-libs.x86_64 0:0.6.25-17.el6                         cairo.x86_64 0:1.8.8-6.el6_6
  cups-libs.x86_64 1:1.4.2-81.el6_10                        fontconfig.x86_64 0:2.8.0-5.el6
  freetype.x86_64 0:2.3.11-19.el6_10                        gdb.x86_64 0:7.2-92.el6
  gdk-pixbuf2.x86_64 0:2.24.1-6.el6_7                       gettext-devel.x86_64 0:0.17-18.el6
  gettext-libs.x86_64 0:0.17-18.el6                         gnutls.x86_64 0:2.12.23-22.el6
  gtk2.x86_64 0:2.24.23-9.el6                               hicolor-icon-theme.noarch 0:0.11-1.1.el6
  jasper-libs.x86_64 0:1.900.1-22.el6                       kernel-devel.x86_64 0:2.6.32-754.33.1.el6
  libICE.x86_64 0:1.0.6-1.el6                               libSM.x86_64 0:1.2.1-2.el6
  libX11.x86_64 0:1.6.4-3.el6                               libX11-common.noarch 0:1.6.4-3.el6
  libXau.x86_64 0:1.0.6-4.el6                               libXcomposite.x86_64 0:0.4.3-4.el6
  libXcursor.x86_64 0:1.1.14-2.1.el6                        libXdamage.x86_64 0:1.1.3-4.el6
  libXext.x86_64 0:1.3.3-1.el6                              libXfixes.x86_64 0:5.0.3-1.el6
  libXft.x86_64 0:2.3.2-1.el6                               libXi.x86_64 0:1.7.8-1.el6
  libXinerama.x86_64 0:1.1.3-2.1.el6                        libXrandr.x86_64 0:1.5.1-1.el6
  libXrender.x86_64 0:0.9.10-1.el6                          libXtst.x86_64 0:1.2.3-1.el6
  libart_lgpl.x86_64 0:2.3.20-5.1.el6                       libgcj.x86_64 0:4.4.7-23.el6
  libgfortran.x86_64 0:4.4.7-23.el6                         libjpeg-turbo.x86_64 0:1.2.1-3.el6_5
  libpng.x86_64 2:1.2.49-2.el6_7                            libproxy.x86_64 0:0.3.0-10.el6
  libproxy-bin.x86_64 0:0.3.0-10.el6                        libproxy-python.x86_64 0:0.3.0-10.el6
  libthai.x86_64 0:0.1.12-3.el6                             libtiff.x86_64 0:3.9.4-21.el6_8
  libxcb.x86_64 0:1.12-4.el6                                mailcap.noarch 0:2.1.31-2.el6
  neon.x86_64 0:0.29.3-3.el6_4                              pakchois.x86_64 0:0.4-3.2.el6
  pango.x86_64 0:1.28.1-11.el6                              perl-Compress-Raw-Zlib.x86_64 1:2.021-144.el6
  perl-Compress-Zlib.x86_64 0:2.021-144.el6                 perl-Error.noarch 1:0.17015-4.el6
  perl-Git.noarch 0:1.7.1-10.el6_10                         perl-HTML-Parser.x86_64 0:3.64-2.el6
  perl-HTML-Tagset.noarch 0:3.20-4.el6                      perl-IO-Compress-Base.x86_64 0:2.021-144.el6
  perl-IO-Compress-Zlib.x86_64 0:2.021-144.el6              perl-URI.noarch 0:1.40-2.el6
  perl-XML-Parser.x86_64 0:2.36-7.el6                       perl-libwww-perl.noarch 0:5.833-5.el6
  pixman.x86_64 0:0.32.8-1.el6                              rsync.x86_64 0:3.0.6-12.el6
  systemtap-client.x86_64 0:2.9-9.el6                       systemtap-devel.x86_64 0:2.9-9.el6
  systemtap-runtime.x86_64 0:2.9-9.el6                      xz.x86_64 0:4.999.9-0.5.beta.20091007git.el6
  xz-lzma-compat.x86_64 0:4.999.9-0.5.beta.20091007git.el6

Updated:
  binutils.x86_64 0:2.20.51.0.2-5.48.el6_10.1

Dependency Updated:
  rpm.x86_64 0:4.8.0-59.el6      rpm-libs.x86_64 0:4.8.0-59.el6      rpm-python.x86_64 0:4.8.0-59.el6

Complete!
[root@node04 ~]#
解压nginx源包和第三方模块包,并进入到nginx源码目录下
创建nginx用户
预编译,检查编译环境
./configure \
--prefix=/usr/share/nginx \
--sbin-path=/usr/sbin/nginx \
--modules-path=/usr/lib64/nginx/modules \
--conf-path=/etc/nginx/nginx.conf \
--error-log-path=/var/log/nginx/error.log \
--http-log-path=/var/log/nginx/access.log \
--http-client-body-temp-path=/var/lib/nginx/tmp/client_body \
--http-proxy-temp-path=/var/lib/nginx/tmp/proxy \
--http-fastcgi-temp-path=/var/lib/nginx/tmp/fastcgi \
--http-uwsgi-temp-path=/var/lib/nginx/tmp/uwsgi \
--http-scgi-temp-path=/var/lib/nginx/tmp/scgi \
--pid-path=/var/run/nginx.pid \
--lock-path=/var/lock/subsys/nginx \
--user=nginx \
--group=nginx \
--with-file-aio \
--with-ipv6 \
--with-http_ssl_module \
--with-http_v2_module \
--with-http_realip_module \
--with-http_addition_module \
--with-http_xslt_module=dynamic \
--with-http_image_filter_module=dynamic \
--with-http_geoip_module=dynamic \
--with-http_sub_module \
--with-http_dav_module \
--with-http_flv_module \
--with-http_mp4_module \
--with-http_gunzip_module \
--with-http_gzip_static_module \
--with-http_random_index_module \
--with-http_secure_link_module \
--with-http_degradation_module \
--with-http_slice_module \
--with-http_stub_status_module \
--with-http_perl_module=dynamic \
--with-mail=dynamic \
--with-mail_ssl_module \
--with-pcre --with-pcre-jit \
--with-stream=dynamic \
--with-stream_ssl_module \
--with-debug \
--with-cc-opt='-O2 -g -pipe -Wall -Wp,-D_FORTIFY_SOURCE=2 -fexceptions -fstack-protector --param=ssp-buffer-size=4 -m64 -mtune=generic' \
--with-ld-opt=' -Wl,-E' \
--add-module=../nginx_mogilefs_module-1.0.4
提示:我们在最后用--add-module选项来指定要编译的第三方模块的源码路径;这样就可以把我们下载的第三方模块编译到nginx中去,让其支持指定的功能;
提示:出现上面的错误,是因为系统环境没有libxml2或libxslt相关包;
解决办法安装对应的devel包即可;
yum install -y libxslt-devel
再次预编译,检查编译环境
解决办法
yum install -y gd-devel
解决办法
yum install -y perl-ExtUtils-Embed
解决办法
yum install -y geoip-devel
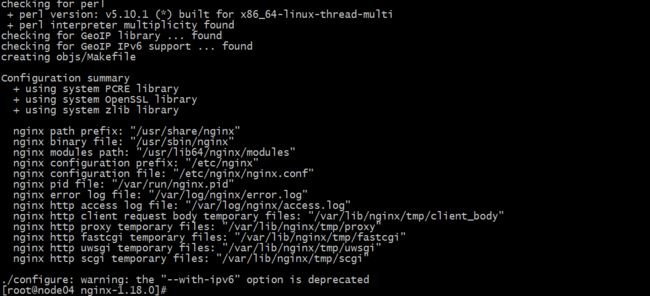
提示:到此预编译检查环境就没有问题了;
编译和安装
make -j 4 && make install
提示:-j是用于指定同时多少线程一起编译;这样编译要快一点;
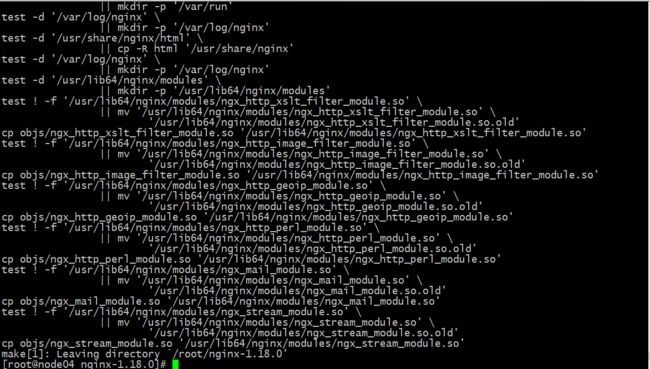
提示:最后能够看到上面内容,就表示nginx编译安装就完成了;这里提醒一下,在centos7上编译安装nginx和支持反代mogilefs的第三方模块,在预编译的时候没有问题,编译时总是编译不过,总是出现这样的错误error: variable ‘pclcf’ set but not used [-Werror=unused-but-set-variable];在网上查了一圈,有的说把Makefile中的-werror选项去掉,去掉是能够编译过,但是后面配置文件检查通过不过,nginx启动不了,会出现段错误;我个人估计是centos7系统上的perl环境要稍微新一些,对mogilefs的支持不是很好,所以建议使用mogilefs都跑在centos6上比较好一点;
提供配置文件
完整的配置文件内容
[root@node04 nginx]# cat /etc/nginx/nginx.conf

#user  nobody;
worker_processes  1;

#error_log  logs/error.log;
#error_log  logs/error.log  notice;
#error_log  logs/error.log  info;

#pid        logs/nginx.pid;


events {
    worker_connections  1024;
}


http {
    include       mime.types;
    default_type  application/octet-stream;

    #log_format  main  '$remote_addr - $remote_user [$time_local] "$request" '
    #                  '$status $body_bytes_sent "$http_referer" '
    #                  '"$http_user_agent" "$http_x_forwarded_for"';

    #access_log  logs/access.log  main;

    sendfile        on;
    #tcp_nopush     on;

    #keepalive_timeout  0;
    keepalive_timeout  65;

    #gzip  on;
        upstream mogilefs_trackers {
            server 192.168.0.41:7001;
            server 192.168.0.42:7001;
        }
    server {
        listen       80;
        server_name  localhost;

        #charset koi8-r;

        #access_log  logs/host.access.log  main;

        location / {
            root   html;
            index  index.html index.htm;
        }
        location /files {
           mogilefs_tracker mogilefs_trackers;
           mogilefs_domain files;
           mogilefs_class default;
           mogilefs_methods GET PUT DELETE;

           mogilefs_pass {
               proxy_pass $mogilefs_path;
               proxy_hide_header Content-Type;
               proxy_buffering off;
           }
            expires 1h;
        }

        location /images {
           mogilefs_tracker mogilefs_trackers;
           mogilefs_domain images;
           mogilefs_class default;
           mogilefs_methods GET PUT DELETE;

           mogilefs_pass {
               proxy_pass $mogilefs_path;
               proxy_hide_header Content-Type;
               proxy_buffering off;
           }
            expires 1h;
        }

        #error_page  404              /404.html;

        # redirect server error pages to the static page /50x.html
        #
        error_page   500 502 503 504  /50x.html;
        location = /50x.html {
            root   html;
        }

        # proxy the PHP scripts to Apache listening on 127.0.0.1:80
        #
        #location ~ \.php$ {
        #    proxy_pass   http://127.0.0.1;
        #}

        # pass the PHP scripts to FastCGI server listening on 127.0.0.1:9000
        #
        #location ~ \.php$ {
        #    root           html;
        #    fastcgi_pass   127.0.0.1:9000;
        #    fastcgi_index  index.php;
        #    fastcgi_param  SCRIPT_FILENAME  /scripts$fastcgi_script_name;
        #    include        fastcgi_params;
        #}

        # deny access to .htaccess files, if Apache's document root
        # concurs with nginx's one
        #
        #location ~ /\.ht {
        #    deny  all;
        #}
    }


    # another virtual host using mix of IP-, name-, and port-based configuration
    #
    #server {
    #    listen       8000;
    #    listen       somename:8080;
    #    server_name  somename  alias  another.alias;

    #    location / {
    #        root   html;
    #        index  index.html index.htm;
    #    }
    #}


    # HTTPS server
    #
    #server {
    #    listen       443 ssl;
    #    server_name  localhost;

    #    ssl_certificate      cert.pem;
    #    ssl_certificate_key  cert.key;

    #    ssl_session_cache    shared:SSL:1m;
    #    ssl_session_timeout  5m;

    #    ssl_ciphers  HIGH:!aNULL:!MD5;
    #    ssl_prefer_server_ciphers  on;

    #    location / {
    #        root   html;
    #        index  index.html index.htm;
    #    }
    #}

}
[root@node04 nginx]#
提示:upstream是把多个tracker定义成一个组,让用户的请求调度到这个组上;后面的location 根据业务的规划来定义location的名称,通常用mogilefs中的domain来做location比较好;mogilefs_tracker用于指定tracker的地址或服务器组;mogilefs_domain用于指定mogilefs中的域,也就是文件的名称空间;mogilefs_class用于指定class的名称;mogilefs_methods用于指定支持的方法,如果你只允许对应location为只读,我们在这里指定一个get方法就可以;如果还需要上传和删除需要把put和delete方法加上;通常加上put和delete方法后,为了安全建议做访问限制;后面的mogilefs_pass这个配置段是用于配置代理mogilefs的配置,其中$mogilefs_path是一个内置的变量;其作用是变量$mogilefs_path包含存储节点上文件的绝对URL。fetch块创建一个名为/mogilefs_fetch_XXXXXXXX的隐藏内部位置,在跟踪器成功响应后将在其中执行重定向。后面的proxy_hide_header用于指定代理时要隐藏的头部;proxy_buffering用于指定是否启用代理buffer;更多配置指令的说明请到官网http://www.grid.net.ru/nginx/mogilefs.en.html;
检查配置文件语法
这里提示我们没有client_body这个目录
创建client_body目录后再次检查配置文件语法是否有误
提示:这里告诉我们配置文件语法ok,这意味着nginx支持我们编写的配置文件;
启动nginx
好了,到此ngxin反代mogilefs集群的安装配置就完成了
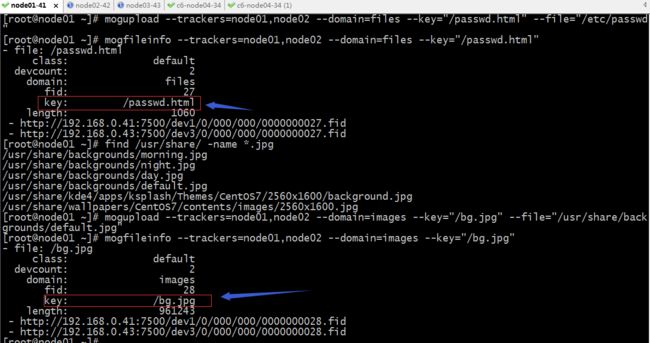
验证:在mogilefs的tracker上使用mogupload上传一个文件,然后用别的机器访问nginx,看看对应的文件内容是否能够访问到?
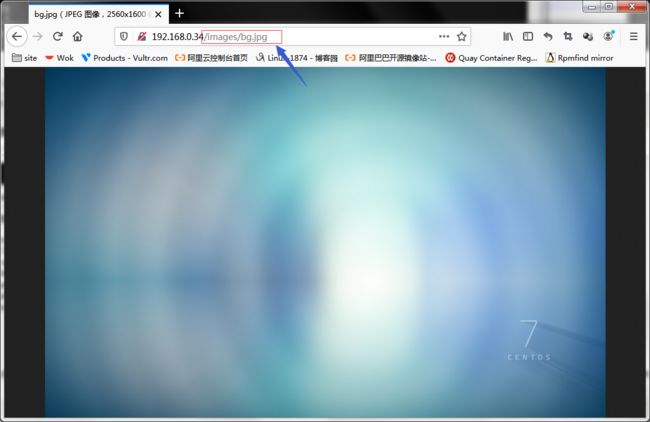
用浏览器访问对应文件的key看看是否能够访问到我们上传到文件呢?
提示:可以看到在客户端直接访问nginx所在主机监听的地址和端口+指定文件的domain+文件的key就能够访问到对应文件的内容;


