Android 用户界面---状态栏通知(三)
创建定制化的通知布局
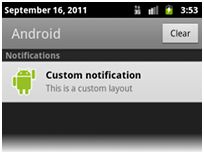
默认情况下,在通知窗口显示的通知包括标题和消息文本。这两项内容使用通过setLatestEventInfo()方法的contentTitle和contentText参数来定义的。但是,你也能够使用RemoteViews类给通知定义一个定制化的布局。如图3所示就是一个定制的通知布局的例子。它看上去与默认的通知类似,但是实际上它是用一个定制的XML布局来创建的。

图3.带有定制化布局的通知。
要给通知创建自己的布局,就要实例化一个RemoteViews对象,用它来填充一个定制的布局文件,然后把RemoteViews对象传递给通知的contentView属性字段。
下面用一个例子来更好的理解如何创建定制化的通知:
1. 给通知创建XML布局,如以下在custom_notification.xml文件中定义的通知布局:
<RelativeLayoutxmlns:android="http://schemas.android.com/apk/res/android"
android:id="@+id/layout"
android:layout_width="fill_parent"
android:layout_height="fill_parent"
android:padding="10dp">
<ImageViewandroid:id="@+id/image"
android:layout_width="wrap_content"
android:layout_height="fill_parent"
android:layout_alignParentLeft="true"
android:layout_marginRight="10dp"/>
<TextViewandroid:id="@+id/title"
android:layout_width="wrap_content"
android:layout_height="wrap_content"
android:layout_toRightOf="@id/image"
style="@style/NotificationTitle"/>
<TextViewandroid:id="@+id/text"
android:layout_width="wrap_content"
android:layout_height="wrap_content"
android:layout_toRightOf="@id/image"
android:layout_below="@id/title"
style="@style/NotificationText"/>
</RelativeLayout>
我们注意到,两个TextView元素都包含了style属性,给定制的通知中的文本使用样式资源是至关重要的,因为通知的背景色在不同设备和平台版本中会有所差异。从Android2.3(API级别9)开始,系统给默认的通知布局所使用的文本定义了样式,这样你就应该在Android2.3或更高的版本上运行时使用样式,以便确保文本针对背景是可见的。
例如,要在比Android2.3低的版本上使用标准的文本色,应该使用下列样式(res/values/styles.xml):
<?xml version="1.0" encoding="utf-8"?>
<resources>
<stylename="NotificationText">
<itemname="android:textColor">?android:attr/textColorPrimary</item>
</style>
<stylename="NotificationTitle">
<itemname="android:textColor">?android:attr/textColorPrimary</item>
<itemname="android:textStyle">bold</item>
</style>
<!-- If you want a slightly different color for some text,
consider using ?android:attr/textColorSecondary -->
</resources>
如果要在Android2.3以上的版本上给通知应用系统默认的颜色,就要使用以下样式(res/values-v9/styles.xml):
<?xml version="1.0" encoding="utf-8"?>
<resources>
<stylename="NotificationText"parent="android:TextAppearance.StatusBar.EventContent"/>
<stylename="NotificationTitle"parent="android:TextAppearance.StatusBar.EventContent.Title"/>
</resources>
现在,在Android2.3(API级别9)或更高的版本上运行时,在自己定制的View对象中的文本会使用与系统给默认的通知相同的颜色。这是重要的,因为Android的后续版本实际上把通知的背景色改变成深色的。继承系统的样式,确保文本会高亮显示,而且,如果背景是其他的不期望的颜色,那么文本也要做适当的改变。
2. 现在,在应用程序的代码中,使用RemoveViews类的方法来定义图片和文本,然后把RemoteView对象传递给通知的contentView属性字段,如下例所示:
RemoteViews contentView =newRemoteViews(getPackageName(), R.layout.custom_notification_layout);
contentView.setImageViewResource(R.id.image, R.drawable.notification_image);
contentView.setTextViewText(R.id.title,"Custom notification");
contentView.setTextViewText(R.id.text,"This is a custom layout");
notification.contentView = contentView;
如上例所示,把应用程序的包名和布局资源ID传递给RemoteViews类的构造器,然后,使用setImageViewResource()和setTextViewText()方法,给ImageView和TextView对象定义内容。在每个语句中,都要把你设置的适当的View对象的引用ID连同设置给View对象的值一起作为参数传递给这两个方法。最后RemoteViews对象被传给Notification对象镇南关的contentView属性字段。
3. 因为在使用定制化的View对象时,不需要setLatestEventInfo()方法,就必须用contentIntent字段给通知定义Intent对象,如下例所示:
Intent notificationIntent = new Intent(this, MyClass.class);
PendingIntent contentIntent = PendingIntent.getActivity(this, 0, notificationIntent, 0);
notification.contentIntent = contentIntent;
4. 使用通常的方法发送通知:
mNotificationManager.notify(CUSTOM_VIEW_ID, notification);
Remote类还包含了容易把计时器或进度条添加到通知布局中的方法。有关给通知创建定制布局的更多信息,可参照RemoteViews类。
警告:在创建定制化的通知布局时,必须特别小心,以确保定制化的布局在不同的方向和分辨率的设备中能够正常的运行。尽管这个建议适用于在Android中创建的所有View对象布局,但是在这个场景中尤其重要,因为布局的实际空间非常受限,因此不要让定制的布局太复杂,并且要在各种配置中做好测试。