oc项目中使用swift
一、为什么写这篇文章
我们整个移动开发团队都在从老的语言向新的语言过度,Android团队所有项目都在使用Kotlin开发了,但是iOS团队还在使用OC开发项目。团队负责人也已经发话了,iOS端从下个新项目开始都要使用swift开发了,对于基本没怎么使用过swift的同学来说,马上用新语言开发项目还是有一定难度、有一定风险的。从OC和swift混编开始,从OC向swift逐渐熟悉过度,是最佳选择,积累的经验,降低了难度,也降低了风险!
二、Swift目前现状
苹果在WWDC2014正式发布Swift,目的是用于替代OC语言。在之后的时间里经历了标准库变动,语法的增减,特性变动,几乎每一年 Swift 都会迎来比较大的改动,甚至 API 都发生了变化,让很多第一批吃螃蟹的开发者苦不堪言,戏称《Swift 从入门到重学》。如今已是2020年了,经过 6 年多的不断迭代更新,WWDC2019苹果发布了Swift5.0,苹果终于宣布了Swift的稳定。这标志着Swift这门语言已经趋于稳定,语法已经不会再大变,已经有越来越多的个人和公司在使用Swift,现在也到了重拾Swift的时候了。
三、本篇文章主要内容
1、在OC工程中配置swift需要的基本环境
2、oc和swift页面相互跳转,oc和swift属性相互调用,oc和swift方法相互调用,oc和swift页面delegate相互传值,oc和swift页面block相互传值
1、环境的基本配置
1.1、新建一个基于OC的工程名为OcAndSwift,已经存在的OC工程也是一样的。
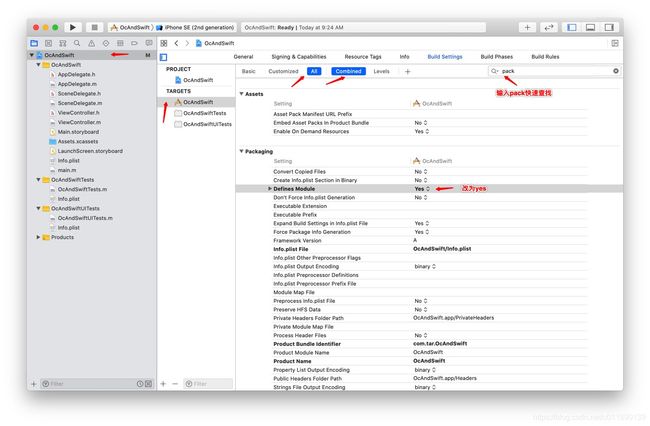
1.2、工程配置配置
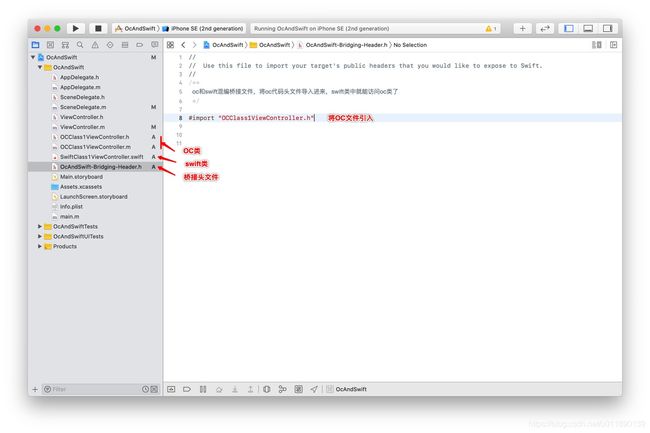
新建一个OC类OCClass1ViewController
新建一个swift类SwiftClass1ViewController.swift
完整目录结构
2、实现 页面相互跳转返回,属性相互调用,方法相互调用,delegate传值,block传值
2.1、代码实现
ViewController.m
//
//  ViewController.m
//  OcAndSwift
//
//  Created by AiRongTang on 2020/9/29.
//  Copyright © 2020 AiRongTang. All rights reserved.
//
/**
 主界面
 */
#import "ViewController.h"
#import "OcAndSwift-Swift.h"

@interface ViewController ()

@end

@implementation ViewController

- (void)viewDidLoad {
    [super viewDidLoad];
    // Do any additional setup after loading the view.
    self.title = @"主页";
    [self createButton];
}

/// 创建按钮
-(void)createButton{
    //跳转按钮
    UIButton *butotn = [UIButton buttonWithType:UIButtonTypeSystem];
    [butotn addTarget:self action:@selector(buttonAction:) forControlEvents:UIControlEventTouchUpInside];
    butotn.frame = CGRectMake(0, 64, 150, 40);
    [butotn setTitle:@"跳转到swift1" forState:UIControlStateNormal];
    [butotn setTitleColor:[UIColor redColor] forState:UIControlStateNormal];
    butotn.tag = 1;
    [self.view addSubview:butotn];

    //调用swift方法的按钮
    UIButton *ocCallButton = [UIButton buttonWithType:UIButtonTypeSystem];
    [ocCallButton addTarget:self action:@selector(buttonAction:) forControlEvents:UIControlEventTouchUpInside];
    ocCallButton.frame = CGRectMake(0, 64+40+10, 150, 40);
    [ocCallButton setTitle:@"调用swift的方法" forState:UIControlStateNormal];
    [ocCallButton setTitleColor:[UIColor redColor] forState:UIControlStateNormal];
    ocCallButton.tag = 2;
    [self.view addSubview:ocCallButton];
}

/// 按钮点击事件
/// @param sender 点击的按钮
-(void)buttonAction:(UIButton*)sender{
    SwiftClass1ViewController *class1 = [[SwiftClass1ViewController alloc]init];
    switch (sender.tag) {
        case 1:{
            //跳转到Swift界面
            class1.delegate = self;
            [self.navigationController pushViewController:class1 animated:YES];
            //实现swift类对象的block方法
            class1.myBlock = ^(NSString * _Nonnull data) {
                NSLog(@"myEidtorBlock==%@",data);
            };
            break;
        }
        case 2:{
            //调用swift的方法
            NSString *string = [class1 ocCallMethod:@"ocCallMethod成功"];
            NSLog(@"ocCallMethodReturn==%@",string);
            break;
        }
        default:
            break;
    }

}

/// 实现swift类对象的代理方法
/// @param data 接受数据
-(void)delegateMethod1:(NSString *)data{
    NSLog(@"delegateMethod1==%@",data);
}

@end
SwiftClass1ViewController.swift
//
//  SwiftClass1ViewController.swift
//  OcAndSwift
//
//  Created by AiRongTang on 2020/9/29.
//  Copyright © 2020 AiRongTang. All rights reserved.
//
/**
 Swift界面
 */
import UIKit

//必须加上@objc 代理才能在oc类中可见。
@objc(SwiftClass1ViewControllerDelegate)
protocol SwiftClass1ViewControllerDelegate:NSObjectProtocol {
    func delegateMethod1(_ data: String);
}
//必须加上@objcMembers SwiftClass1ViewController中的属性才能在oc类中可见。
@objcMembers
class SwiftClass1ViewController: UIViewController, OCClass1ViewControllerDelegate {
    //定义delegate
    var delegate:SwiftClass1ViewControllerDelegate?

    //定义Block
    typealias SwiftClass1ViewControllerBlock = (_ tttt:String) -> Void
    var myBlock:SwiftClass1ViewControllerBlock?;

    override func viewDidLoad() {
        super.viewDidLoad()
        // Do any additional setup after loading the view.
        self.title = "swift界面1";
        self.createButton()
    }

    /// 创建按钮
    func createButton(){
        //跳转按钮
        let btn = UIButton(frame: CGRect(x: 0, y: 100, width:150, height: 40))
        btn.setTitle("跳转到OC界面1", for: .normal);
        btn.setTitleColor(UIColor.red, for: .normal);
        btn.tag = 1;
        view.addSubview(btn);
        btn.addTarget(self, action: #selector(btnClicked), for: .touchUpInside);

        //调用OC方法的按钮
        let swiftCallButton = UIButton(frame: CGRect(x: 0, y: 100+40+10, width:150, height: 40))
        swiftCallButton.setTitle("调用OC的方法", for: .normal);
        swiftCallButton.setTitleColor(UIColor.red, for: .normal);
        swiftCallButton.tag = 2;
        view.addSubview(swiftCallButton);
        swiftCallButton.addTarget(self, action: #selector(btnClicked(button:)), for: .touchUpInside);

        //带数据返回按钮
        let returnButton = UIButton(frame: CGRect(x: 0, y: 100+40+40+10, width:150, height: 40))
        returnButton.setTitle("带数据返回", for: .normal);
        returnButton.setTitleColor(UIColor.red, for: .normal);
        returnButton.tag = 3;
        view.addSubview(returnButton);
        returnButton.addTarget(self, action: #selector(btnClicked(button:)), for: .touchUpInside);
    }

    /// 按钮点击事件
    /// - Parameter button: 点击的按钮
    @objc func btnClicked(button:UIButton){
        let vc = OCClass1ViewController();
        switch button.tag {
        case 1  :
            //跳转到OC界面
            vc.delegate = self;
            vc.selectConfirmBlock = {(data:String?)in
                print("selectConfirmBlock==",data!);
            }
            self.navigationController?.pushViewController(vc, animated: true);
        case 2  :
            //调用OC的方法
            let string = vc.swiftCallMethod("swiftCallMethod成功");
            print("delegateMethod1==", string);
        case 3  :
            //调用delegate返回数据
            if delegate != nil {
                delegate?.delegateMethod1("我是从swift页面返回的delegate数据");
            }
            //调用block返回数据
            if (self.myBlock != nil){
                self.myBlock!("我是从swift页面返回的block数据");
            }
            self.navigationController?.popViewController(animated: true);
        default :
            print("默认case")
        }
    }

    /// 代理方法实现
    /// - Parameter data: 接受数据
    func delegateMethod1(_ data: String) {
        print("delegateMethod1==", data);
    }

    /// 供OC调用的方法
    /// - Parameter data: OC传过来的值
    /// - Returns: 返回值
    @objc func ocCallMethod(_ data: String) -> String {
        return data;
    }

    /*
     // MARK: - Navigation

     // In a storyboard-based application, you will often want to do a little preparation before navigation
     override func prepare(for segue: UIStoryboardSegue, sender: Any?) {
     // Get the new view controller using segue.destination.
     // Pass the selected object to the new view controller.
     }
     */

}
OCClass1ViewController.h
//
//  OCClass1ViewController.h
//  OcAndSwift
//
//  Created by AiRongTang on 2020/9/29.
//  Copyright © 2020 AiRongTang. All rights reserved.
//
/**
 OC界面
 */
#import

NS_ASSUME_NONNULL_BEGIN

///Delegate
@protocol OCClass1ViewControllerDelegate

-(void)delegateMethod1:(NSString *)data;

@end

///Block回调
typedef void(^SelectConfirmBlock)(NSString *data);

@interface OCClass1ViewController : UIViewController

@property (nonatomic, copy) SelectConfirmBlock selectConfirmBlock;

@property (nonatomic, weak) id delegate;


/// 供swift调用的方法
/// @param data swift传过来的值
-(NSString *)swiftCallMethod:(NSString*)data;


@end

NS_ASSUME_NONNULL_END
OCClass1ViewController.m
//
//  OCClass1ViewController.m
//  OcAndSwift
//
//  Created by AiRongTang on 2020/9/29.
//  Copyright © 2020 AiRongTang. All rights reserved.
//
/**
 OC界面
 */
#import "OCClass1ViewController.h"

@interface OCClass1ViewController ()

@end

@implementation OCClass1ViewController

- (void)viewDidLoad {
    [super viewDidLoad];
    // Do any additional setup after loading the view.
    self.title = @"OC界面1";
    [self createButton];

}

/// 创建按钮
-(void)createButton{
    UIButton *butotn = [UIButton buttonWithType:UIButtonTypeSystem];
    [butotn addTarget:self action:@selector(buttonAction:) forControlEvents:UIControlEventTouchUpInside];
    butotn.frame = CGRectMake(0, 64, 150, 40);
    [butotn setTitle:@"带数据返回" forState:UIControlStateNormal];
    [butotn setTitleColor:[UIColor redColor] forState:UIControlStateNormal];
    [self.view addSubview:butotn];
}

/// 按钮点击事件
/// @param sender 点击的按钮
-(void)buttonAction:(UIButton*)sender{
    if (self.delegate && [self.delegate respondsToSelector:@selector(delegateMethod1:)]) {
        [self.delegate delegateMethod1:@"我是从OC页面返回的delegate数据"];
    }
    if (self.selectConfirmBlock) {
        self.selectConfirmBlock(@"我是从OC页面返回的block数据");
    }
    [self.navigationController popViewControllerAnimated:YES];
}

/// 供swift调用的方法
/// @param data swift传过来的值
-(NSString *)swiftCallMethod:(NSString*)data{
    return data;
}


/*
 #pragma mark - Navigation

 // In a storyboard-based application, you will often want to do a little preparation before navigation
 - (void)prepareForSegue:(UIStoryboardSegue *)segue sender:(id)sender {
 // Get the new view controller using [segue destinationViewController].
 // Pass the selected object to the new view controller.
 }
 */

@end
2.2、操作结果打印
2.3、注意要点
//必须加上@objc 代理才能在oc类中可见。
@objc(SwiftClass1ViewControllerDelegate)
//必须加上@objcMembers SwiftClass1ViewController中的属性才能在oc类中可见。
@objcMembers四、最后
希望大家能喜欢我分享的oc和swift混编这篇文章,希望它能为大家带来帮助。重点在于熟悉关键点的配置以及swift语法的使用。好的技术有很多,好的文章也有很多,只要我们善于总结,乐于分享,发扬人人为我,我为人人的观念,我们大家都会越来越好。
CSDN链接:https://blog.csdn.net/u011890139/article/details/108967123
demo链接:https://blog.csdn.net/u011890139/article/details/108967123


