时隔很久的交作业。。。拖延症晚期,sorry。。。
Gitlab Runner打印Hello World
在完成这一项任务之前,我们需要先了解一个概念:钩子
GitHub 仓库管理中的钩子与服务区块是 GitHub 与外部系统交互最简单的方式,另外GitLab 在项目和系统级别上都支持钩子程序。 对任意级别,当有相关事件发生时,GitLab 的服务器会执行一个包含描述性 JSON 数据的 HTTP 请求。 这是自动化连接你的 git 版本库和 GitLab 实例到其他的开发工具,比如 CI 服务器,聊天室,或者部署工具的一个极好方法钩子
下面我们就通过添加钩子来实现Gitlab Runner打印Hello World这一操作
1. 设置Gitlab Runner监听
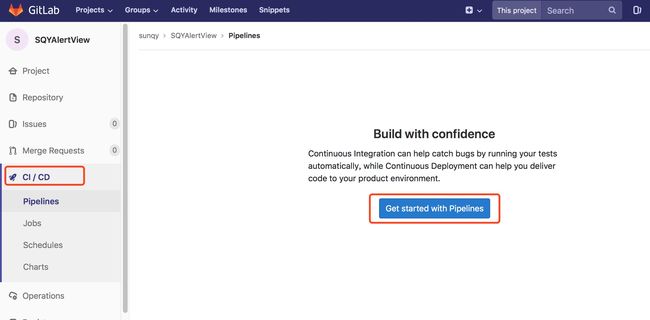
在你项目的setting->CI/CD->get start
之后会跳转到
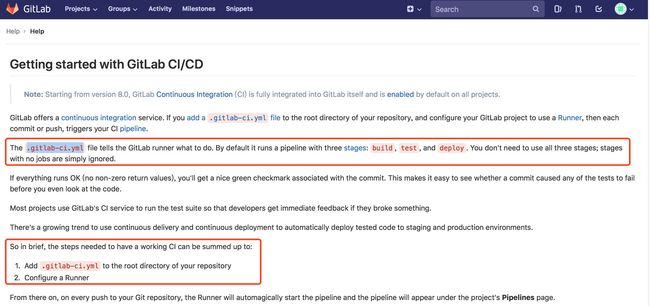
介绍页面
在这个页面我们可以阅读到实际上Gitlab Runner是通过在项目中配置.gitlab-ci.yml这一文件实现的
另外我们还读到我们需要做以下两步:
1.在仓库中添加.gitlab-ci.yml文件
2.创建一个Runner
我们一步一步来实现
tip
在上述图片中我们可以看到一个名词:continuous integration
也就是CI,持续集成,那么具体是指什么呢?
软件集成是软件开发过程的一个环节,一般会包括以下流程:合并代码---->安装依赖---->编译---->测试---->发布。而持续集成就是频繁地(一天多次)将代码集成到主干。集成的工作一般会比较细碎繁琐,为了不影响开发效率,以前软件集成这个环节一般不会经常进行或者只会等到项目后期再进行。但是有些问题,如果等到后期才发现,解决问题的代价很大,有可能导致项目延期或者失败。因此,为了尽早发现集成错误,另外防止分支偏离主干过多,所以衍生了持续集成。它的核心措施是,代码集成到主干之前,必须通过自动化测试。只要有一个测试用例失败,就不能集成。
1.1 在仓库中添加.gitlab-ci.yml文件
由上述描述可知每次提交均会触发.gitlab-ci.yml文件的默认执行,那么我们在项目中添加该文件,具体文件内容如下:
# 指定名称
stages:
 - fruit
FruitJob:
 stage: fruit
# 设置可获取分支层级深度
 variables:
  GIT_DEPTH: "3"

# 选定是哪个分支ortag有提交的时候,触发runner
 only:
# 监听tag变更
 - tags
# 监听master分支
 - master
# 监听任意dev分支
 - /^.*/dev$/

# 设定执行脚本
 script:
# curl 命令用作网络数据包收发,默认启用传输进度条用于显示总传输数据大小、传输速度、预计剩余传输时间等
# -f 禁止服务器在打开页面失败或脚本调用失败时向客户端发送错误说明,取而代之,curl 会返回错误码 22。
# -L 当服务器报告被请求的页面已被移动到另一个位置时(通常返回 3XX 错误代码), 允许 curl 使用新的地址重新访问。如果跳转链接指向了一个不同的主机,curl 将不向其发送用户名和密码。
# -o 将获取到的数据存入文件中,而不是打印出来
# --create-dirs 建立本地目录的目录层次结构
# --netrc-optional 使用 .netrc 或者 URL来覆盖-n
# 即下载脚本文件到指定路径
  - curl -f -L -o ./FruitCIConfig.sh https://gitlab.com/sunqy/SQYLibaryConfig/raw/master/FruitCIConfig.sh --create-dirs --netrc-optional
# 执行路径下的脚本
  - bash ./FruitCIConfig.sh
1.1.1 方法一
如上述文件所示,script下声明的为默认执行内容,所以我们可以直接在script声明下书写打印代码(将上述文件中的script下的脚本改为):
script:
- echo "HELLO WORLD!\n"
- printf "hello world"
是现在我们试着来进行一次提交:
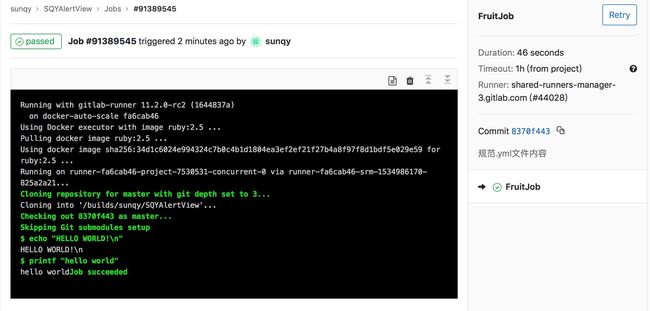
可以在项目->CI/CD->Pipelines下看到一个执行完成的记录:
点击查看详情:
可以看到提交完成后执行了.gitlab-ci.yml书写的打印脚本命令
tip
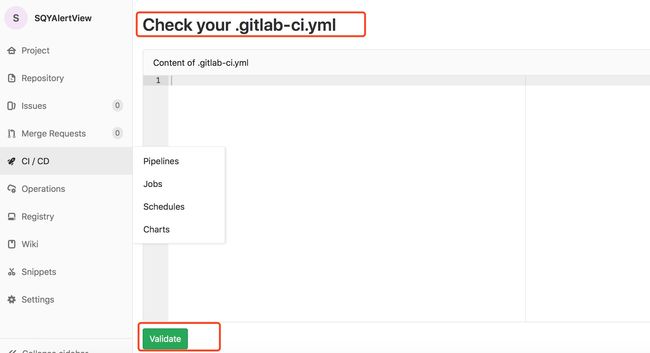
此处需要注意的.gitlab-ci.yml文件有着很强的对齐要求,同一层级的元素必须对齐,子层级元素必须使用空格(tab不可以)去对齐,且短线-及冒号:后也都必须空格,我自己尝试的时候因为这个一直检验不通过。。。大家可以注意一下这一点,另外可以通过项目->CI/CD->Pipelines->CI Lint
然后将你书写好的.gitlab-ci.yml文件内容贴在这里进行检验是否通过
1.1.2 方法二
如果按照上述文件中,将执行脚本放入一个.sh文件中,那么需要注意的是由于.gitlab-ci.yml中指定了下载脚本文件的url,所以需要我们先创建该文件。在我的gitlab上我创建了一个SQYLibaryConfig项目,将要执行的脚本文件FruitCIConfig.sh放在了这个目录下,拿到了该脚本文件的url,以便在.gitlab-ci.yml中使用。(此处需注意,脚本文件的url地址中使用了raw地址,raw代表纯文本访问方式,blob代表网页访问方式)
既然在项目提交时会按照.gitlab-ci.yml中寻址到FruitCIConfig.sh脚本去执行,那么我们将打印放在FruitCIConfig.sh脚本中即可。脚本代码如下:
#!/bin/sh
# CI_COMMIT_TAG=''
# CI_COMMIT_REF_NAME='master'
# fruit

echo 'HELLO WORLD!\n'
printf "hello world"
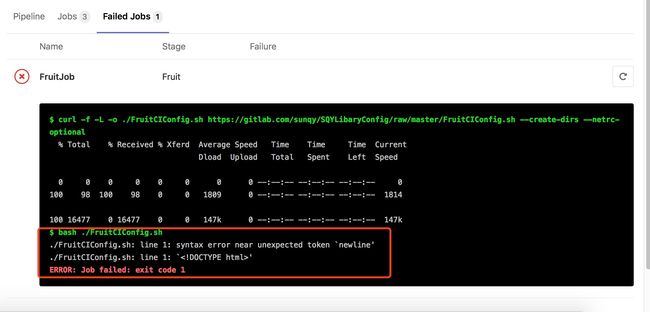
现在我们来进行一次提交,结果如下图所示,失败了:
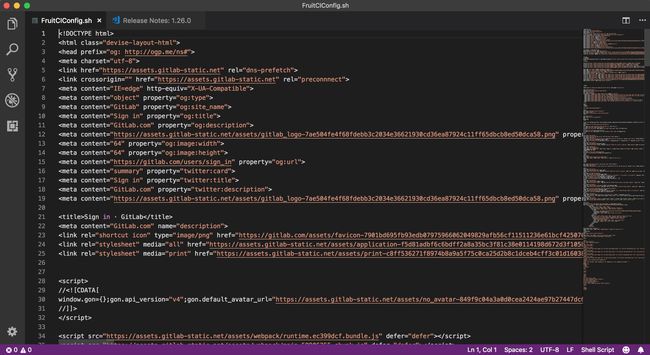
查看图片,提示了执行失败,甚至出现了 的字眼,这是怎么回事呢?有点懵啊,请教大神后得知:gitlab是有访问权限的。只能通过http/ssh的形式去访问。
https访问的话不加private_token的话是无法访问的。然而我所创建的.gitlab-ci.yml中所使用的url地址为https://gitlab.com/sunqy/SQYLibaryConfig/raw/master/FruitCIConfig.sh,并没有注明private_token,所以实际上执行完-curl的下载语句后,下载到本地的并非是FruitCIConfig的实际脚本,而是一个gitlab的html登录网页
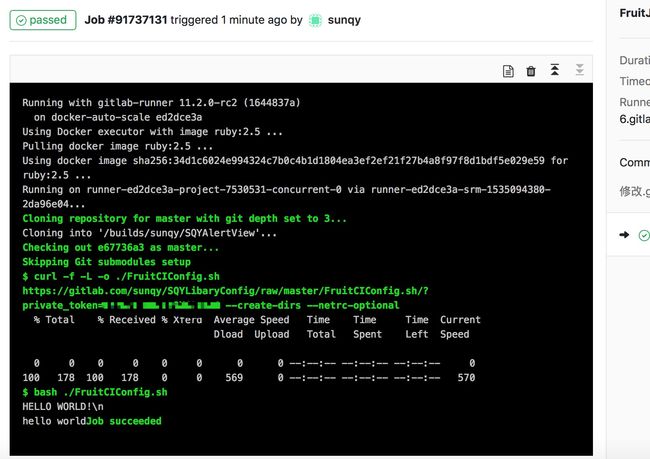
下面我们把url添加上private_token再尝试一次提交,这次执行结果成功了:
tip
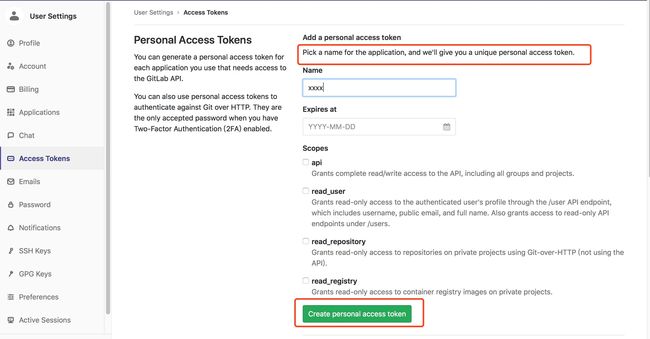
可能有些同学找不到所谓private_token,这里说一下:setting->Access Tokens->可以看到填写名称/过期时间/选择token权限后即可生成private_token
1.2 Configure a Runner
1.2.1 浅析runner
我们首先来了解一下什么是runner:
In GitLab, Runners run the jobs that you define in .gitlab-ci.yml. A Runner
can be a virtual machine, a VPS, a bare-metal machine, a docker container or
even a cluster of containers. GitLab and the Runners communicate through an API,
so the only requirement is that the Runner's machine has network access to the
GitLab server.
A Runner can be specific to a certain project or serve multiple projects in
GitLab. If it serves all projects it's called a Shared Runner.
在GitLab中,runner执行你在.gitlab-ci.yml中写的命令,一个runner可能是虚拟机/VPS/一台裸机/一个docker容器或者一群机器。GitLab和runner之间通过API进行沟通,所以我们只需要一台能够访问GitLab服务器的电脑就可以把它当作一个runner。
一个runner可以针对于一个或多个GitLab上的项目,如果他服务于多个项目那么就是共享runner。
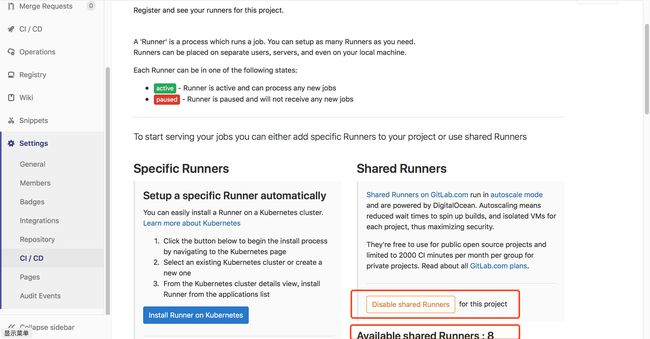
所以简而言之,runner就是通过配置自助帮我们执行任何命令的服务。所以在1.1节中为什么我们只是提交了.gitlab-ci.yml文件提交代码后就会有对应job被执行并显示执行结果呢?这是因为默认创建项目的时候项目的Shared Runners配置为默认开启,你可以通过项目->Settings->CI/CD->Runner->Expand查看到目前的runner配置情况(我并未做过任何修改,只是简单新建了一个项目,由此可见Shared Runners为默认开启)
当然你可以通过点击Disable Shared Runners关闭这一配置,
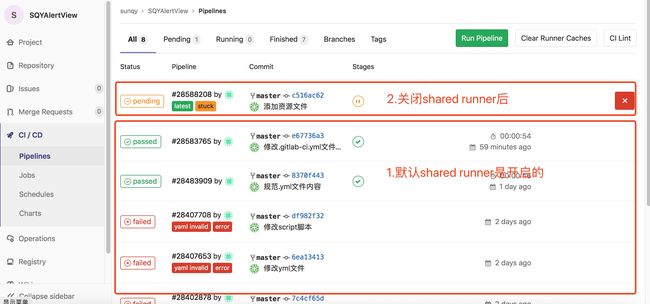
如上图所示,是我在默认开启和手动关闭之后提交项目代码Pipelines的对比,如果Shared Runners存在,那么在你提交代码时会使用Shared Runners执行.gitlab-ci.yml文件得出结论是成功或失败,但是手动关闭后,Shared Runners被关闭了,而你又并没有创建自己的runner去支持服务,那么提交任务只会达到pending状态,以等待你配置了runner,以利用runner服务去执行。所以这一点需要注意:runner是否存在决定了服务是否会被执行还是一直等待服务资源。
另外,runner分为两类:Shared Runner(共享型)和Specific Runner(指定型)。Shared Runner:这种Runner是所有工程都能使用的,只有系统管理员能够创建Shared Runner。
Specific Runner:这种Runner只能为指定的工程服务,拥有该工程访问权限的人都能够为该工程创建Shared Runner。
1.2.2 构建runner
一脸懵逼不知道从哪开始?当然是官方文档走起啊我的小可爱[Hey]因为本人电脑是mac,所以果断选择macOS版本开始一波阅读理解[Facepalm]其实按照官方文档执行就好了:
// 1安装
// 1.1下载二进制文件
sudo curl --output /usr/local/bin/gitlab-runner https://gitlab-runner-downloads.s3.amazonaws.com/latest/binaries/gitlab-runner-darwin-amd64
// 1.2授予执行权限
sudo chmod +x /usr/local/bin/gitlab-runner

// 2注册
// 2.1开始注册
gitlab-runner register
// 2.2填写gitlab url
Please enter the gitlab-ci coordinator URL (e.g. https://gitlab.com )
https://gitlab.com
// 2.3填写token,获取token可以通过项目->Settings->CI/CD->Runner->Expand,在Specific Runners一栏下可以获取到这个项目针对的token
Please enter the gitlab-ci token for this runner
yourProjectSpecificRunnersToken
// 2.4填写你对于此runner的描述
Please enter the gitlab-ci description for this runner
[hostame] my-runner
// 2.5填写tag名称,以逗号隔开(此tag名称可以用来筛选.gitlab-ci.yml文件中你要执行的多个脚本,匹配tag的脚本才会被执行)
Please enter the gitlab-ci tags for this runner (comma separated):
my-tag,another-tag
// 2.6填写环境部署方式(因为没有任何多余设备所以我选择了shell)
Please enter the executor: ssh, docker+machine, docker-ssh+machine, kubernetes, docker, parallels, virtualbox, docker-ssh, shell:
shell

// 3.初始化并开始
cd ~
gitlab-runner install
gitlab-runner start

// 4.运行(这一步就表示你开启了runner,那么只要你控制台开着且未执行停止命令那么你的机器会一直开启服务占用资源,如果想要停止,请执行下面一步)
gitlab-runner run

// 5.停止
gitlab-runner stop
(或者使用快捷键control+z,再或者直接关闭控制台)
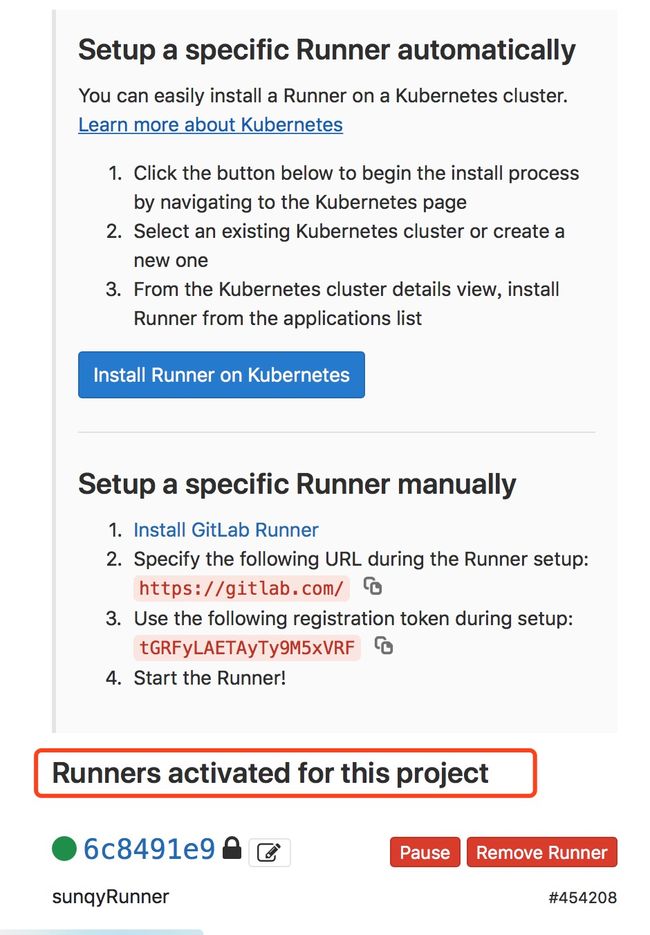
执行完上述命令到第2步注册完成后,我们就可以在项目->Settings->CI/CD->Runner->Expand中查看到你创建的runner了:
这个时候我们进行一次提交,然后执行3和4将runner跑起来,就可以看到这个runner处理了我们的提交操作,终于生效了,开森:
另外,因为你使用的token是针对单独项目的,所以这个runner是针对于这一个project的Specific Runners,如果你想要创建shared runner你需要使用管理员权限的token。
Runner打包.framework/.a文件
从上一章节可知,其实要利用runner为我们做一些事情,重点就在于.gitlab-ci.yml文件中脚本的书写,所以我们只要修改上述流程中
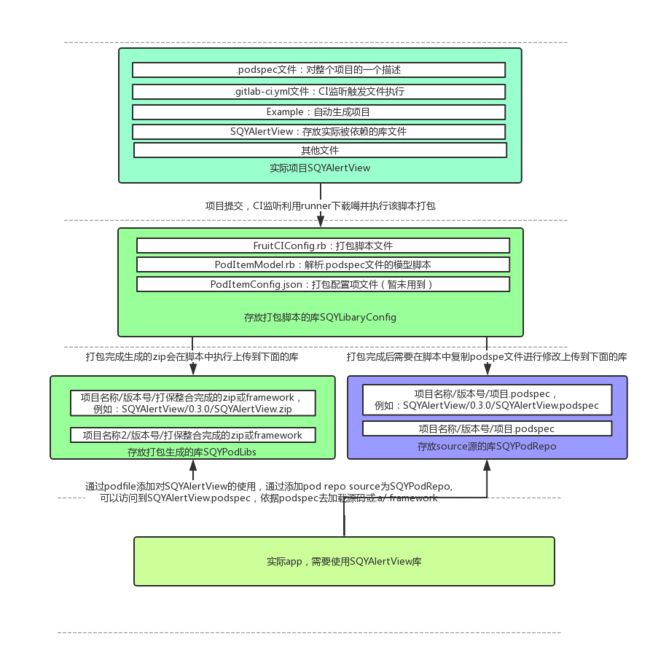
SQYLibaryConfig项目中的脚本文件FruitCIConfig.sh即可实现对应功能。那么应该怎样书写脚本才能实现打包.framework/.a文件呢?(后期我们使用ruby脚本实现打包,即将FruitCIConfig.sh更换为FruitCIConfig.rb,而且我们需要修改.gitlab-ci.yml文件中的脚本,请参照上文自行修改,此处不再赘述)
【1】PodItemConfig.json文件
// 用来控制包的配置(当前仅举例,未具体实现,package_a代表.a包,)
{
  "SQYAlertView": {
    "type": "package_a"
  },
}

require 'JSON'
【2】PodItemModel.rb文件
// 将.podspec解析为配置模型,方便解析
class PodItemModel
attr_accessor :name
attr_accessor :version
attr_accessor :homepage
attr_accessor :source

attr_accessor :public_header_files
attr_accessor :source_files

attr_accessor :resources
attr_accessor :resource_bundles

attr_accessor :vendored_frameworks
attr_accessor :vendored_libraries

attr_accessor :dependencies

attr_accessor :type

    def initialize (json)

      obj = JSON.parse(json)
      self.name = obj["name"]
      self.version = obj["version"]
      self.homepage = obj["homepage"]
      self.source = obj["source"]

      self.public_header_files = obj["public_header_files"]
      self.source_files = obj["source_files"]

      self.resources = obj["resources"]
      self.resource_bundles = obj["resource_bundles"]

      self.vendored_frameworks = obj["vendored_frameworks"]
      self.vendored_libraries = obj["vendored_libraries"]

      self.dependencies = obj["dependencies"]

    #      self.type = json['type']
    end

end
【3】FruitCIConfig.rb文件
 // 实际执行文件
 require './PodItemModel'
 require 'fileutils'


 class Command

#拷贝源文件至目标文件
def handle_copy_file_to_target (copy_source_file_path, copy_target_file_path)
    #如果源文件为string
    if "#{copy_source_file_path.class}".eql?("String")
        path_arr = Dir.glob(copy_source_file_path)
        path_arr.each { |path_item|
            #如果路径是一个文件夹则跳过
            if File.directory?(path_item)
                next
            end
            FileUtils.cp_r path_item, copy_target_file_path
        }
    elsif "#{copy_source_file_path.class}".eql?("Array")
        copy_source_file_path.each { |file_item|
            path_arr = Dir.glob(file_item)
            path_arr.each { |path_item|
                if File.directory?(path_item)
                    next
                end
                FileUtils.cp_r path_item, copy_target_file_path
            }
        }
    end

    #因为podspec文件中指定的source_files可能不止包含.h文件,但我们只需要.h文件,所以拷贝完成后删除非.h文件
    FileUtils.rm_r Dir.glob("./#{copy_target_file_path}/*.[^h]")
end

#上传文件到固定git仓库
def handle_library_upload (file_path,library_name,library_version)
    #检查文件是否存在
    unless File.exist?("#{file_path}")
        raise "压缩文件不存在,请检查。"
    end

    #替换本地存放打包的仓库
    localPodLibsGitPath = "/Users/sunqy/SQYPodLibs"
    localPodLibsGitPath_library_name = "#{localPodLibsGitPath}/#{library_name}"
    localPodLibsGitPath_library_name_version = "#{localPodLibsGitPath}/#{library_name}/#{library_version}"
    if !Dir.exist?(localPodLibsGitPath_library_name)
        FileUtils.mkdir_p localPodLibsGitPath_library_name
    end
    if !Dir.exist?(localPodLibsGitPath_library_name_version)
        FileUtils.mkdir_p localPodLibsGitPath_library_name_version
    end

    #覆盖拷贝
    FileUtils.cp_r file_path, localPodLibsGitPath_library_name_version
    puts "---------- 拷贝文件到本地 git 仓库,准备上传到远端 gitlab ./"


    gitCommand = <<-EOF
    git add .
    git commit -m "Update #{library_name} : #{library_version}"
    git push origin
    EOF
    Dir.chdir("#{localPodLibsGitPath}") do
        puts "开始上传文件到git仓库"
        result = system gitCommand
        unless result
            puts '上传文件失败'
            exit 1
        end
        puts "上传文件成功"
    end

    puts "上传完成"

end

#集合文件资源成为一个真正可用的库
def handle_file_group (podspec_file_path)
    # - 项目名称
        #     - .a/.framework
        #     - Headers
        #     - Resources
        #     - Vendored_frameworks
        #     _ Verdored_libraries


    #获取项目名称
    library_name = File.basename(podspec_file_path,".podspec")
    puts "开始整合资源,项目名称" + "#{library_name}"

    # 若本地存在podspec解析成的json文件,则先删除
    if File.exist?("#{library_name}.json")
        FileUtils.rm_r "#{library_name}.json", :force => true
    end
    #将 podspec 文件转化为 json 文件,并保存在 library_name.json 中
    jsonCommand = "pod ipc spec #{podspec_file_path} >> #{library_name}.json"
    system jsonCommand

    # 生成 spec_model 对象
    json = File.read("#{library_name}.json")
    puts
    spec_model = PodItemModel.new(json)
    #生成spec_model对象后,删除 .json 中间文件
    FileUtils.rm_r "./#{library_name}.json", :force => true

    #最终的所有文件所属路径
    target_file_path = "/temp/#{library_name}"
    #获取package打包自动生成的文件夹名字
    libFileFolderName = "#{library_name}-#{spec_model.version}"

    #若整合文件路径下存在文件则先删除
    if Dir.exist?("./#{libFileFolderName}/temp/#{library_name}")
        FileUtils.rm_r "./#{libFileFolderName}/temp/#{library_name}", :force => true
    end
    #重新生成整合文件路径
    FileUtils.mkdir_p "./#{libFileFolderName}/temp/#{library_name}"

    #1.将打出来的.a包拷贝到指定目录
    libPath = "#{libFileFolderName}/ios/lib#{library_name}.a"
    if File.exist?(libPath)
        FileUtils.cp_r libPath, "./#{libFileFolderName}/#{target_file_path}"
    else
        raise "打包生成的.a并不存在"
    end

    #2.获取所有.h文件拷贝到指定目录
    #最终的.h文件所属路径
    target_h_file_path = "./#{libFileFolderName}/#{target_file_path}/Headers"
    #如果podspec文件中指定了.h文件的目录,则直接使用指定的文件
    if !spec_model.public_header_files.nil?
        FileUtils.mkdir_p target_h_file_path
        self.handle_copy_file_to_target(spec_model.public_header_files,target_h_file_path)
    else
        #如果podspec文件中未指定了.h文件的目录,则使用source_files解析
        unless spec_model.source_files.nil?
            FileUtils.mkdir_p target_h_file_path
            self.handle_copy_file_to_target(spec_model.source_files,target_h_file_path)
        end
    end


    #3.获取资源文件(如果存在的话)拷贝到指定目录
    #最终的Resources文件所属路径
    target_r_file_path = "./#{libFileFolderName}/#{target_file_path}/Resources"
    # podspec采用resources 指定资源文件
    if !spec_model.resources.nil?
        if !Dir.exist?(target_r_file_path)
            FileUtils.mkdir_p target_r_file_path
        end

        if "#{spec_model.resources.class}".eql?("String")
            puts "---------- string spec_model.resources " + "#{spec_model.resources}"
            resources_arr = Dir.glob(spec_model.resources)
            puts "---------- resources path arr " + "#{resources_arr}"
            resources_arr.each { |resource_item|
                puts "---------- resources item " + "#{resource_item}"
                #如果路径是文件夹形式的话可能是bundle形式,如果是bundle形式直接拷贝整个bundle
                if File.directory?(resource_item)
                    if File.extname(resource_item).eql?(".bundle")
                        FileUtils.cp_r resource_item, target_r_file_path
                    end
                    next
                end
                FileUtils.cp_r resource_item, target_r_file_path
            }
        elsif "#{spec_model.resources.class}".eql?("Array")
            puts "---------- array spec_model.resources " + "#{spec_model.resources}"
            spec_model.resources.each { |resource|
                puts "---------- resource " + "#{resource}"
                res_path_arr = Dir.glob(resource)
                puts "---------- resources path arr " + "#{res_path_arr}"
                res_path_arr.each { |res_path_item|
                    puts "---------- resources item " + "#{res_path_item}"
                    if File.directory?(res_path_item)
                        if File.extname(res_path_item).eql?(".bundle")
                            FileUtils.cp_r res_path_item, target_r_file_path
                        end
                        next
                    end
                    FileUtils.cp_r res_path_item, target_r_file_path
                }
            }
        end
    end
    # podspec 采用 resource_bundles 指定资源文件
    # 打包静态库后,将 resource_bundles 指定的资源按照键值对打包成对应的 .bundle 文件,同样拷贝到 ./libFileFolderName/temp/library_name/Resources 中
    # 这样,外部引用资源,都统一使用 s.resources = [...] 即可
    unless spec_model.resource_bundles.nil?
        if !Dir.exist?(target_r_file_path)
            FileUtils.mkdir_p target_r_file_path
        end

        if "#{spec_model.resource_bundles.class}".eql?("Hash")
            spec_model.resource_bundles.each { |key,value|
                FileUtils.mkdir_p "./#{target_r_file_path}/#{key}.bundle" # 创建多层文件夹,如果某个文件夹已经存在,则该文件夹不再创建
                if "#{value.class}".eql?("String")
                    resbundle_path_arr = Dir.glob(value)
                    resbundle_path_arr.each { |resbundle_path_item|
                        if File.directory?(resbundle_path_item)
                            # 如果 resource_bundles 中又引入了 bundle 资源,则终止程序并给出错误警告,因为此时,编译后会在 key bundle 中再次嵌入这个 sour bundle,也就是bundle中包含bundle,这种情况往往不是我们预期的。
                        if File.extname(resbundle_path_item).eql?(".bundle")
                            raise "!!!!!!!!! resource_bundles 中,不能指定引入 bundle 文件 !> #{resbundle_path_item}"
                        end
                            next
                        end
                        FileUtils.cp_r resbundle_path_item, "./#{target_r_file_path}/#{key}.bundle"
                    }
                elsif "#{value.class}".eql?("Array")
                    value.each { |value_item|
                        resbundle_path_arr = Dir.glob(value_item)
                        resbundle_path_arr.each { |resbundle_path_item|
                            if File.directory?(resbundle_path_item)
                                if resbundle_path_item.include?(".bundle")
                                    raise "!!!!!!!!!!! resource_bundles 中,不能指定引入 bundle 文件 !> #{resbundle_path_item}"
                                end
                                next
                            end
                            FileUtils.cp_r resbundle_path_item, "./#{target_r_file_path}/#{key}.bundle"
                        }
                    }
                end
            }
        else
            raise "!!!!!!!!!!!! resource_bundles 不是 Hash 类型,请检查 podspec 文件中关于 resource_bundles 的配置"
        end
    end


    #4.如果有依赖于第三方的.a/.framework文件,拷贝到最终整合文件
    #最终的依赖的第三方.framework文件所属路径
    target_vf_file_path = "./#{libFileFolderName}/#{target_file_path}/Vendored_frameworks"
    unless spec_model.vendored_frameworks.nil?
        FileUtils.mkdir_p target_vf_file_path
        if "#{spec_model.vendored_frameworks.class}".eql?("String")
            vendored_f_path_arr = Dir.glob(spec_model.vendored_frameworks)
            vendored_f_path_arr.each { |vendored_f_path_item|
                if File.extname(vendored_f_path_item).eql?(".framework")
                    FileUtils.cp_r vendored_f_path_item, target_vf_file_path
                end
            }
        elsif "#{spec_model.vendored_frameworks.class}".eql?("Array")
            spec_model.vendored_frameworks.each { |vendored_framework_item|
                vendored_f_path_arr = Dir.glob(vendored_framework_item)
                vendored_f_path_arr.each { |vendored_f_path_item|
                    if File.extname(vendored_f_path_item).eql?(".framework")
                        FileUtils.cp_r vendored_f_path_item, target_vf_file_path
                    end
                }
            }
        end
    end

    #最终的依赖的第三方.a文件所属路径
    target_vl_file_path = "./#{libFileFolderName}/#{target_file_path}/Verdored_libraries"
    unless spec_model.vendored_libraries.nil?
        FileUtils.mkdir_p target_vl_file_path
        self.handle_copy_file_to_target(spec_model.vendored_libraries,target_vl_file_path)
    end


    #4.压缩指定目录
    puts "---------- 更改当前进程工作路径到 ./temp 下,执行压缩命令"
    Dir.chdir("./#{libFileFolderName}/temp") do
        zip_command = "zip -r ./#{library_name}.zip ./#{library_name}"
        system zip_command
        puts "---------- 压缩完成!"
    end
    puts "---------- 恢复到原始工作路径 ./"

    puts "---------- 开始上传压缩文件到 gitlab ./"
    libZipFile = "./#{libFileFolderName}/temp/#{library_name}.zip"
    handle_library_upload(libZipFile,library_name,spec_model.version)

end

#处理打包事件
def handle_package
    #获取并打印当前目录
    current_file_path = Dir.pwd
    puts '当前的工作目录' + current_file_path

    #因为脚本下载应和podspec文件处于同级目录,所以可以根据当前目录和文件后缀获取podspec文件目录
    Dir.glob('*.podspec').each {|f|
        puts f
        puts '开始打包'

        #尝试切换.podspec文件中的打包格式,切换打包生成.a或.framework
        is_library = 1
        #根据podspec文件设置要打包成的格式为.a还是.framework
        package_command = ''
        if is_library == 1
            package_command = "pod package #{f} --library --force --verbose"
        else
            package_command = "pod package #{f} --embedded --force --verbose"
        end

        #如果使用exec ‘shell code’的话我们无法得知命令的执行结果是否是成功,所以此处我们选择system命令来执行shell脚本打包
        packet_success = system package_command
        puts "--------打包结果----" + "#{packet_success}"


        if packet_success == true
            puts '打包结束'
            #如果打包成功,且打出的包为.a包,那么我们需要将项目中的.h和资源文件与.a包合并成为一个真正可用的包
            if is_library == 1
                puts '.a打包完成,整合为可用包'
                self.handle_file_group(f)
            else
                puts 'framework打包完成'
            end

        else
            puts '打包失败'
            next
        end
    }

end

end

command = Command.new
command.handle_package
有对应提交就会触发runner,从而执行yml文件去下载对应脚本并执行,脚本功能如上所示,另外因为上述脚本执行完成之后打包生成的文件放在了另外一个项目地址中,所以需要对podspec文件进项相应的修改并对应上传,此处请读者自行利用脚本完成,不再赘述
tip1
友情提示:利用本地runner打包的话,需要本地安装cocoapods-packager,
sudo gem install cocoapods-packager //安装命令
那么可能会像我一样遇到下列的错误:
这是由于我本地的源不支持,可以利用下列命令修改cocoapods的数据源
/* 添加新的数据源*/
gem sources --add https://rubygems.org/
/* 移除旧的淘宝数据源*/
gem sources --remove https://gems.ruby-china.org/
/*查看数据源*/
gem sources -l
tip2
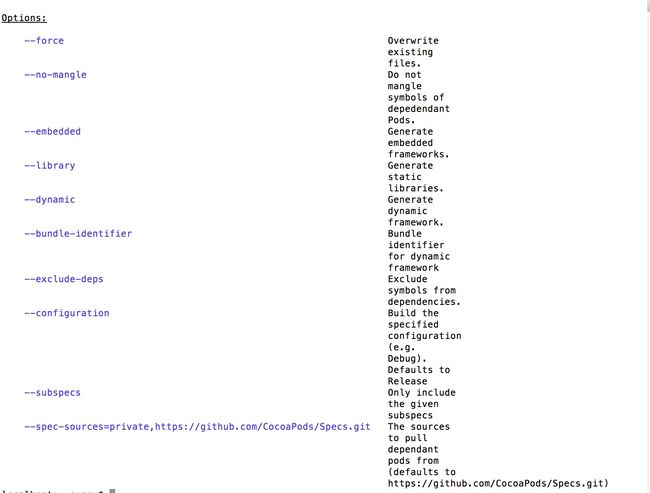
pod package 命令各个参数含义:
--force //强制覆盖之前已经生成过的二进制库
--no-mangle //表示不使用name mangling技术,pod package默认是使用这个技术的。我们能在用pod package生成二进制库的时候会看到终端有输出Mangling symbols和Building mangled framework。表示使用了这个技术。如果你的pod库没有其他依赖的话,那么不使用这个命令也不会报错。但是如果有其他依赖,不使用--no-mangle这个命令的话,那么你在工程里使用生成的二进制库的时候就会报错:Undefined symbols for architecture x86_64。
--embedded //生成静态.framework
--library //生成静态.a
--dynamic //生成动态.framework
--bundle-identifier //动态.framework是需要签名的,所以只有生成动态库的时候需要这个BundleId
--exclude-deps //不包含依赖的符号表,生成动态库的时候不能包含这个命令,动态库一定需要包含依赖的符号表。
--configuration //表示生成的库是debug还是release,默认是release。--configuration=Debug
--subspecs //如果你的pod库有subspec,那么加上这个命名表示只给某个或几个subspec生成二进制库,--subspecs=subspec1,subspec2。生成的库的名字就是你podspec的名字,如果你想生成的库的名字跟subspec的名字一样,那么就需要修改podspec的名字。
这个脚本就是批量生成subspec的二进制库,每一个subspec的库名就是podspecName+subspecName。
--spec-sources //一些依赖的source,如果你有依赖是来自于私有库的,那就需要加上那个私有库的source,默认是cocoapods的Specs仓库。--spec-sources=private,https://github.com/CocoaPods/Specs.git
tip3
参考文档:1
2
