这是这个系列的最后一篇文章了,终于收尾了 。
React Hooks 可以说完全颠覆了之前 Class Component 的写法,进一步增强了状态复用的能力,让 Function Component 也具有了内部状态,对于我个人来说,更加喜欢 Hooks 的写法。当然如果你是一个使用 Class Component 的老手,初期上手时会觉得很苦恼,毕竟之前沉淀的很多 HOC、Render Props 组件基本没法用。而且之前的 Function Component 是无副作用的无状态组件,现在又能通过 Hooks 引入状态,看起来真的很让人疑惑。Function Component 的另一个优势就是可以完全告别 this ,在 Class Component 里面 this 真的是一个让人讨厌的东西。
Hook 如何与组件关联
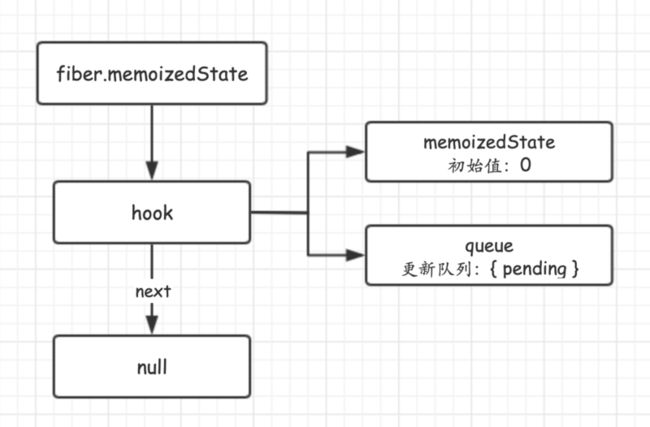
在之前的文章中多次提到,Fiber 架构下的 updateQueue、effectList 都是链表的数据结构,然后挂载的 Fiber 节点上。而一个函数组件内所有的 Hooks 也是通过链表的形式存储的,最后挂载到 fiber.memoizedState 上。
function App() {
  const [num, updateNum] = useState(0)

  return  updateNum(num => num + 1)}
  >{ num }
}

export default App
我们先简单看下,调用 useState 时,构造链表的过程:
var workInProgressHook = null
var HooksDispatcherOnMount = {
  useState: function (initialState) {
    return mountState(initialState)
  }
}

function function mountState(initialState) {
  // 新的 Hook 节点
  var hook = mountWorkInProgressHook()
  // 缓存初始值
  hook.memoizedState = initialState
  // 构造更新队列,类似于 fiber.updateQueue
  var queue = hook.queue = {
    pending: null,
    dispatch: null,
    lastRenderedState: initialState
  }
  // 用于派发更新
  var dispatch = queue.dispatch = dispatchAction.bind(
    null, workInProgress, queue
  )
  // [num, updateNum] = useState(0)
  return [hook.memoizedState, dispatch]
}

function mountWorkInProgressHook() {
  var hook = {
    memoizedState: null,
    baseState: null,
    baseQueue: null,
    queue: null,
    next: null
  }

  if (workInProgressHook === null) {
    // 构造链表头节点
    workInProgress.memoizedState = workInProgressHook = hook
  } else {
    // 如果链表已经存在,在挂载到 next
    workInProgressHook = workInProgressHook.next = hook
  }

  return workInProgressHook
}
如果此时有两个 Hook,第二个 Hook 就会挂载到第一个 Hook 的 next 属性上。
function App() {
  const [num, updateNum] = useState(0)
  const [str, updateStr] = useState('value: ')

  return  updateNum(num => num + 1)}
  >{ str } { num }
}

export default App
Hook 的更新队列
Hook 通过 .next 彼此相连,而每个 Hook 对象下,还有个 queue 字段,该字段和 Fiber 节点上的 updateQueue 一样,是一个更新队列在,上篇文章 《React 架构的演变-更新机制》中有讲到,React Fiber 架构中,更新队列通过链表结构进行存储。
class App extends React.Component {
  state = { val: 0 }
  click () {
    for (let i = 0; i < 3; i++) {
      this.setState({ val: this.state.val + 1 })
    }
  }
  render() {
    return  {
      this.click()
    }}>val: { this.state.val }
  }
}
点击 div 之后,产生的 3 次 setState 通过链表的形式挂载到 fiber.updateQueue 上,待到 MessageChannel 收到通知后,真正执行更新操作时,取出更新队列,将计算结果更新到 fiber.memoizedState 。
![]()
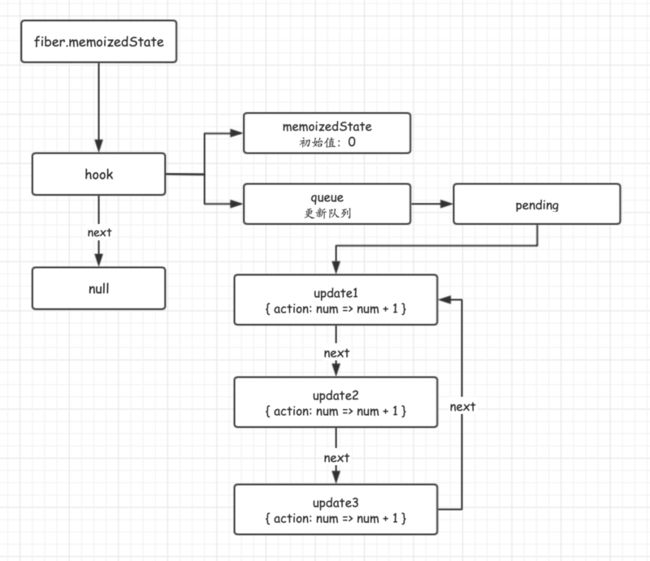
而 hook.queue 的逻辑和 fiber.updateQueue 的逻辑也是完全一致的。
function App() {
  const [num, updateNum] = useState(0)

  return  {
      // 连续更新 3 次
      updateNum(num => num + 1)
      updateNum(num => num + 1)
      updateNum(num => num + 1)
    }}
  >
    { num }

}

export default App;
var dispatch = queue.dispatch = dispatchAction.bind(
null, workInProgress, queue
)
// [num, updateNum] = useState(0)
return [hook.memoizedState, dispatch]调用 useState 的时候,返回的数组第二个参数为 dispatch,而 dispatch 由 dispatchAction bind 后得到。
function dispatchAction(fiber, queue, action) {
  var update = {
    next: null,
    action: action,
    // 省略调度相关的参数...
  };

  var pending = queue.pending
  if (pending === null) {
    update.next = update
  } else {
    update.next = pending.next
    pending.next = update
  }
  queue.pending = update

  // 执行更新
  scheduleUpdateOnFiber()
}
可以看到这里构造链表的方式与 fiber.updateQueue 如出一辙。之前我们通过 updateNum 对 num 连续更新了 3 次,最后形成的更新队列如下:
函数组件的更新
前面的文章分享过,Fiber 架构下的更新流程分为递(beginWork)、归(completeWork)两个步骤,在 beginWork 中,会依据组件类型进行 render 操作构造子组件。
function beginWork(current, workInProgress) {
  switch (workInProgress.tag) {
    // 其他类型组件代码省略...
    case FunctionComponent: {
      // 这里的 type 就是函数组件的函数
      // 例如,前面的 App 组件,type 就是 function App() {}
      var Component = workInProgress.type
      var resolvedProps = workInProgress.pendingProps
      // 组件更新
      return updateFunctionComponent(
        current, workInProgress, Component, resolvedProps
      )
    }
  }
}

function updateFunctionComponent(
    current, workInProgress, Component, nextProps
) {
  // 构造子组件
  var nextChildren = renderWithHooks(
    current, workInProgress, Component, nextProps
  )
  reconcileChildren(current, workInProgress, nextChildren)
  return workInProgress.child
}
看名字就能看出来,renderWithHooks 方法就是构造带 Hooks 的子组件。
function renderWithHooks(
    current, workInProgress, Component, props
) {
  if (current !== null && current.memoizedState !== null) {
    ReactCurrentDispatcher.current = HooksDispatcherOnUpdate
  } else {
    ReactCurrentDispatcher.current = HooksDispatcherOnMount
  }
  var children = Component(props)
  return children
}
从上面的代码可以看出,函数组件更新或者首次渲染时,本质就是将函数取出执行了一遍。不同的地方在于给 ReactCurrentDispatcher 进行了不同的赋值,而 ReactCurrentDispatcher 的值最终会影响 useState 调用不同的方法。
根据之前文章讲过的双缓存机制,current 存在的时候表示是更新操作,不存在的时候表示首次渲染。
function useState(initialState) {
  // 首次渲染时指向 HooksDispatcherOnMount
  // 更新操作时指向 HooksDispatcherOnUpdate
  var dispatcher = ReactCurrentDispatcher.current
  return dispatcher.useState(initialState)
}
HooksDispatcherOnMount.useState 的代码前面已经介绍过,这里不再着重介绍。
// HooksDispatcherOnMount 的代码前面已经介绍过
var HooksDispatcherOnMount = {
  useState: function (initialState) {
    return mountState(initialState)
  }
}
我们重点看看 HooksDispatcherOnMount.useState 的逻辑。
var HooksDispatcherOnUpdateInDEV = {
  useState: function (initialState) {
    return updateState()
  }
}

function updateState() {
  // 取出当前 hook
  workInProgressHook = nextWorkInProgressHook
  nextWorkInProgressHook = workInProgressHook.next

  var hook = nextWorkInProgressHook
  var queue = hook.queue
  var pendingQueue = queue.pending

  // 处理更新
  var first = pendingQueue.next
  var state = hook.memoizedState
  var update = first

  do {
    var action = update.action
    state = typeof action === 'function' ? action(state) : action

    update = update.next;
  } while (update !== null && update !== first)


  hook.memoizedState = state

  var dispatch = queue.dispatch
  return [hook.memoizedState, dispatch]
}
如果有看之前的 setState 的代码,这里的逻辑其实是一样的。将更新对象的 action 取出,如果是函数就执行,如果不是函数就直接对 state 进行替换操作。
总结
React 系列的文章终于写完了,这一篇文章应该是最简单的一篇,如果想抛开 React 源码,单独看 Hooks 实现可以看这篇文章:《React Hooks 原理》。Fiber 架构为了能够实现循环的方式更新,将所有涉及到数据的地方结构都改成了链表,这样的优势就是可以随时中断,为异步模式让路,Fiber 树就像一颗圣诞树,上面挂满了各种彩灯(alternate、EffectList、updateQueue、Hooks)。
推荐大家可以将这个系列从头到尾看一遍,相信会特别有收获的。
![]()


