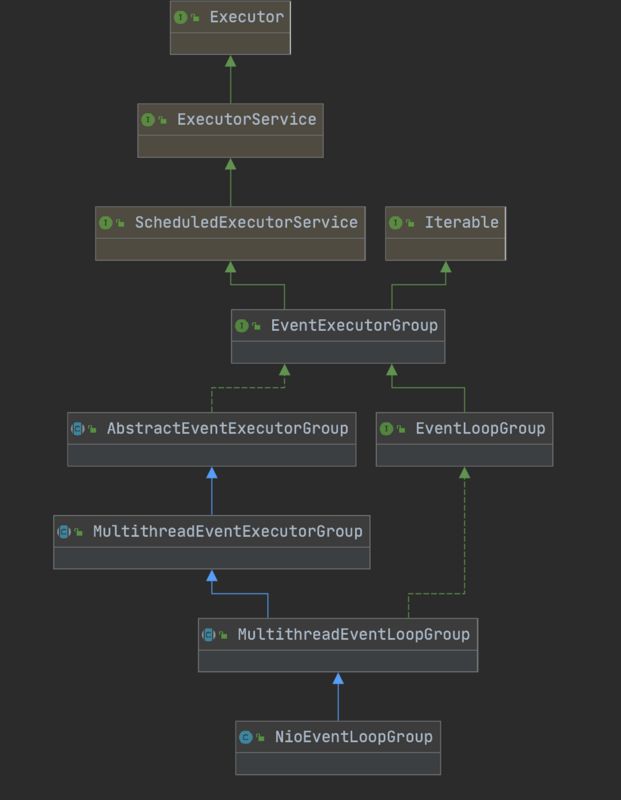
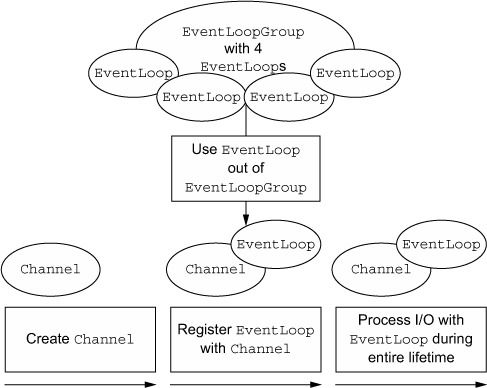
EventLoop是Netty Server用于处理IO事件的事件轮询处理器,职责上类似于Redis的eventLoop,EventLoop通常是由EventLoopGroup来管理的,EventLoopGroup负责调度指派EventLoop,而EventLoop负责具体的执行。
先看一下常用的NioEventLoopGroup结构关系图
继承关系:
顺着关系图,先从各组件的基础功能说起。
EventExecutorGroup
自身提供shutdownGracefully执行器优雅关闭得接口
EventExecutorGroup接口继承ScheduleExecutorService和Iterable
ScheduleExecutorService负责任务调度
Iterable负责返回next()的EventExecutor对象
EventExecutor
EventExecutor继承EventExecutorGroup,在原有的接口基础上提供一些查看线程状态的接口
AbstractEventExecutorGroup
AbstractEventExecutorGroup是基于EventExecutorGroup的抽象类,提供简单的任务调用,主要是一些通过next()获取Executor并执行任务的简单模板,如下
@Override
public  Future submit(Runnable task, T result) {
    return next().submit(task, result);
}
MultithreadEventExecutorGroup
继承AbstractEventExecutorGroup的简单抽象类,初始化children,该字段保存EventLoop数组。提供缺省的线程工厂和Executor,还有一些批量处理children的实现(比如shutdown)
需要特殊注意的是,创建的EventLoop的接口声明也是在这个抽象类中
protected abstract EventExecutor newChild(Executor executor, Object... args) throws Exception;最终NioEventLoopGroup构造器都会进入下面的父类构造器
protected MultithreadEventExecutorGroup(int nThreads, Executor executor,
EventExecutorChooserFactory chooserFactory, Object... args) {- nThread指定EventExecutor个数
- executor指定执行器,默认使用ThreadPerTaskExecutor执行器,提供最基本的线程执行功能
- chooserFactory生产EventExecutorChooser,chooser主要功能就是从executors列表中获取下一个EventExecutor(根据列表个数是否位2次幂选择PowerOfTwoEventExecutorChooser或GenericEventExecutorChooser),常用于next()方法用于获取下一个EventLoop
- args主要是提供构造Java Selector的SelectorProvider
MultithreadEventLoopGroup
MultithreadEventLoopGroup继承MultithreadEventExecutorGroup接口,并实现EventLoopGroup接口,提供Channel注册相关的模板。
NioEventLoopGroup
NioEventLoopGroup就是常见的Bootstrap(或ServerBootstrap)用于构造group()的实现类,其中实现了newChild接口用于创建具体的EventLoop实例。
    @Override
    protected EventLoop newChild(Executor executor, Object... args) throws Exception {
        EventLoopTaskQueueFactory queueFactory = args.length == 4 ? (EventLoopTaskQueueFactory) args[3] : null;
        return new NioEventLoop(this, executor, (SelectorProvider) args[0],
            ((SelectStrategyFactory) args[1]).newSelectStrategy(), (RejectedExecutionHandler) args[2], queueFactory);
    }
NioEventLoop
最常见的Netty EventLoop实现类,先看下NioEventLoop关系图
看起来很复杂,别慌下面会对几个组件大致说明一下,先看几个基础的抽象类
AbstractExecutorService
首先看AbstractExecutorService抽象类,熟悉JUC线程池工具包的应该比较眼熟,常用的用于构造线程池的ThreadPoolExecutor对象就是继承自它,netty并没有沿用JUC的线程池而是选择自己实现,AbstractExecutorService类只是提供基础的task创建,submit和invoke等操作的基础实现。
AbstractEventExecutor
AbstractEventExecutor继承AbstractExecutorService和EventExecutor接口,是个抽象基类,东西不多这里略过。
AbstractScheduledEventExecutor
AbstractScheduledEventExecutor有些类似JUC的ScheduledThreadPoolExecutor,主要是任务调度的模板。
SingleThreadEventExecutor 和SingleThreadEventLoop
SingleThreadEventExecutor,任务调度的基本实现都在这个类里,execute具体实现也在当中。
SingleThreadEventLoop继承SingleThreadEventExecutor,实现了部分注册Channel和执行全部已提交任务的模板。
NioEventLoop
接下来终于轮到NioEventLoop了,主要负责Nio轮询逻辑。
首先如上所述NioEventLoop是在构建NioEventLoopGroup时由其父类MultithreadEventExecutorGroup在构造器中初始EventExecutor数组(children)时调用newChild创建的。
下面是NioEventLoop的构造器,内有注释
NioEventLoop(NioEventLoopGroup parent, Executor executor, SelectorProvider selectorProvider,
             SelectStrategy strategy, RejectedExecutionHandler rejectedExecutionHandler,
             EventLoopTaskQueueFactory queueFactory) {
    //newTaskQueue创建队列(jctools)
    super(parent, executor, false, newTaskQueue(queueFactory), newTaskQueue(queueFactory),
            rejectedExecutionHandler);
    //设置nio selectorProvider
    this.provider = ObjectUtil.checkNotNull(selectorProvider, "selectorProvider");
    //设置select策略选择器,负责控制nio loop逻辑
    this.selectStrategy = ObjectUtil.checkNotNull(strategy, "selectStrategy");
    //selectorTuple其实就是一个简单的bean,内部存有原生selector和包装后的selector
    final SelectorTuple selectorTuple = openSelector();
    this.selector = selectorTuple.selector;
    this.unwrappedSelector = selectorTuple.unwrappedSelector;
}
taskQueue任务队列也是在这个时候创建的,默认使用的是JCTools的MPSC队列,是一个多生产单消费的高性能队列。
任务的调度
上面主要是梳理了一下NioEventLoopGroup的继承关系,下面会详细分析netty是如何设计事件模型来进行IO任务调度。
为了更好的梳理流程,我们不妨从一个简单的netty服务端demo出发
下面是一个netty官方提供的EchoServer
public final class EchoServer {

    static final boolean SSL = System.getProperty("ssl") != null;
    static final int PORT = Integer.parseInt(System.getProperty("port", "8007"));

    public static void main(String[] args) throws Exception {
        // Configure SSL.
        final SslContext sslCtx;
        if (SSL) {
            SelfSignedCertificate ssc = new SelfSignedCertificate();
            sslCtx = SslContextBuilder.forServer(ssc.certificate(), ssc.privateKey()).build();
        } else {
            sslCtx = null;
        }

        // Configure the server.
        EventLoopGroup bossGroup = new NioEventLoopGroup(1);
        EventLoopGroup workerGroup = new NioEventLoopGroup();
        final EchoServerHandler serverHandler = new EchoServerHandler();
        try {
            ServerBootstrap b = new ServerBootstrap();
            b.group(bossGroup, workerGroup)
             .channel(NioServerSocketChannel.class)
             .option(ChannelOption.SO_BACKLOG, 100)
             .handler(new LoggingHandler(LogLevel.INFO))
             .childHandler(new ChannelInitializer() {
                 @Override
                 public void initChannel(SocketChannel ch)  {
                     ChannelPipeline p = ch.pipeline();
                     if (sslCtx != null) {
                         p.addLast(sslCtx.newHandler(ch.alloc()));
                     }
                     //p.addLast(new LoggingHandler(LogLevel.INFO));
                     p.addLast(serverHandler);
                 }
             });

            // Start the server.
            ChannelFuture f = b.bind(PORT).sync();

            // Wait until the server socket is closed.
            f.channel().closeFuture().sync();
        } finally {
            // Shut down all event loops to terminate all threads.
            bossGroup.shutdownGracefully();
            workerGroup.shutdownGracefully();
        }
    }
}
忽略掉ssl部分,首先构建了两个EventLoopGroup实例,在这过程中发生了什么前面已经说过了,然后是设置channel和handler以及childHandler,最终调用bind(),下面会解释netty内部都做了些什么。
AbstractBootstrap
上面的例子执行bind()方法后,最后进入到AbstractBootstrap.doBind()方法中
private ChannelFuture doBind(final SocketAddress localAddress) {
    final ChannelFuture regFuture = initAndRegister();
    final Channel channel = regFuture.channel();
    if (regFuture.cause() != null) {
        return regFuture;
    }

    //忽略掉一些细节,最主要的就是执行下面的一段代码
    ChannelPromise promise = channel.newPromise();
    doBind0(regFuture, channel, localAddress, promise);
    return promise;
    }
}
initAndRegister
initAndRegister()负责创建和初始化channel,并返回ChannelFuture对象用于后续添加监听器来异步的处理后续的任务。
initAndRegister是初始化流程中非常重要的一步,channel的构建,注册, eventLoop线程启动都是在这之中,下面会依次注明netty是如何初始化这几个对象,一些重要的说明会在代码中注释
final ChannelFuture initAndRegister() {
    Channel channel = null;
    try {
        //构造netty的channel实例,也是这个时候和java nio中的原生channel做绑定
        channel = channelFactory.newChannel();
        //初始化channel,server端和客户端的初始逻辑不同,server端会为pipelinee额外添加名为ServerBootstrapAcceptor的handler,而客户端只会添加初始化时用户指定的handler
        init(channel);
    } catch (Throwable t) {
        if (channel != null) {
            // channel can be null if newChannel crashed (eg SocketException("too many open files"))
            channel.unsafe().closeForcibly();
            // as the Channel is not registered yet we need to force the usage of the GlobalEventExecutor
            return new DefaultChannelPromise(channel, GlobalEventExecutor.INSTANCE).setFailure(t);
        }
        // as the Channel is not registered yet we need to force the usage of the GlobalEventExecutor
        return new DefaultChannelPromise(new FailedChannel(), GlobalEventExecutor.INSTANCE).setFailure(t);
    }
    //为channel执行register注册逻辑,主要完成nio中channel的register操作,nio的selector在eventloop初始化时就已经创建好了
    ChannelFuture regFuture = config().group().register(channel);
    if (regFuture.cause() != null) {
        if (channel.isRegistered()) {
            channel.close();
        } else {
            channel.unsafe().closeForcibly();
        }
    }

    return regFuture;
}
- init(channel) 初始化channel,server端和客户端的初始逻辑不同,server端会为pipeline额外添加名为ServerBootstrapAcceptor的handler,而客户端只会添加初始化时用户指定的handler.
- config().group().register(channel) 为channel执行register注册逻辑,主要完成nio中channel的register操作, selector在eventloop初始化时就已经创建好了。
而eventloop轮询线程的启动也是在调用register()时触发的。
首先调用MultithreadEventLoopGroup.register()
public ChannelFuture register(Channel channel) {
    return next().register(channel);
}
next()就是从children中获取下一个eventloop, 获取具体的eventloop实例后首先通过SingleThreadEventLoop抽象类把channel包装成ChannelPromise(channelFuture接口的可写模式)并获取unsafe()来完成底层的register功能
public ChannelFuture register(final ChannelPromise promise) {
    ObjectUtil.checkNotNull(promise, "promise");
    promise.channel().unsafe().register(this, promise);
    return promise;
}


public ChannelFuture register(final Channel channel, final ChannelPromise promise) {
    ObjectUtil.checkNotNull(promise, "promise");
    ObjectUtil.checkNotNull(channel, "channel");
    channel.unsafe().register(this, promise);
    return promise;
}最后由AbstractChannel抽象类的内部类AbstractUnsafe来完成底层的register操作
public final void register(EventLoop eventLoop, final ChannelPromise promise) {
    ObjectUtil.checkNotNull(eventLoop, "eventLoop");
    //已注册直接返回,future标记错误
    if (isRegistered()) {
        promise.setFailure(new IllegalStateException("registered to an event loop already"));
        return;
    }
    //校验是否兼容
    if (!isCompatible(eventLoop)) {
        promise.setFailure(
                new IllegalStateException("incompatible event loop type: " + eventLoop.getClass().getName()));
        return;
    }
    //为channel绑定eventLoop
    AbstractChannel.this.eventLoop = eventLoop;
    //检查当前线程是否为ecentLoo绑定线程,绑定线程是在启动ecentloop时设置的
    if (eventLoop.inEventLoop()) {
        //调用实际绑定方法
        register0(promise);
    } else {
        try {
            //调用execure来执行refister0()实际注册逻辑
            eventLoop.execute(new Runnable() {
                @Override
                public void run() {
                    register0(promise);
                }
            });
        } catch (Throwable t) {
            logger.warn(
                    "Force-closing a channel whose registration task was not accepted by an event loop: {}",
                    AbstractChannel.this, t);
            closeForcibly();
            closeFuture.setClosed();
            safeSetFailure(promise, t);
        }
    }
}
经过一些校验后,通过register0()中的doRegister()来完成实际注册操作
private void register0(ChannelPromise promise) {
    try {
        // check if the channel is still open as it could be closed in the mean time when the register
        // call was outside of the eventLoop
        if (!promise.setUncancellable() || !ensureOpen(promise)) {
            return;
        }
        boolean firstRegistration = neverRegistered;
        doRegister();//完成channel的注册
        neverRegistered = false;
        registered = true;//标记为已注册

        ... pipeline部分逻辑省略
}
doRegister()的实现则在AbstractNioChannel抽象类中
protected void doRegister() throws Exception {
boolean selected = false;
for (;;) {
    try {
        selectionKey = javaChannel().register(eventLoop().unwrappedSelector(), 0, this);
        return;
    } catch (CancelledKeyException e) {
        ...
}
}
到这里netty才完成实际的java NioChannel的注册逻辑。
EventLoop线程
上面讲到了如何为channel实现register绑定操作,那么回到正题EventLoop的轮询调度线程是何时被启动的呢?其实就是在刚才AbstractChannel调用register时启动的。
public final void register(EventLoop eventLoop, final ChannelPromise promise) {
    ...
    if (eventLoop.inEventLoop()) {
        register0(promise);
    } else {
        try {
            eventLoop.execute(new Runnable() {
                @Override
                public void run() {
                    register0(promise);
                }
            });
        } catch (Throwable t) {
            ...
        }
    }
}
register会调用eventLoop的execute方法来执行register0,现在来看一下execute做了些什么。首先会进入到SingleThreadEventExecutor.execute
private void execute(Runnable task, boolean immediate) {
    //inEventLoop判断当前线程是否与SingleThreadEventExecutor.thread相同,thread是在启动loop线程时设置的,所以为启动前为null
    boolean inEventLoop = inEventLoop();
    //添加任务至队列
    addTask(task);
    if (!inEventLoop) {
        //启动eventLoop线程
        startThread();
        if (isShutdown()) {
            boolean reject = false;
            try {
                if (removeTask(task)) {
                    reject = true;
                }
            } catch (UnsupportedOperationException e) {1
            }
            if (reject) {
                reject();
            }
        }
    }

    if (!addTaskWakesUp && immediate) {
        wakeup(inEventLoop);
    }
}inEventLoop判断当前线程是否与SingleThreadEventExecutor.thread相同,thread是在启动loop线程时设置的,所以未启动前为null。
SingleThreadEventExecutor先将要执行的任务添加至队列,上文提到的register任务也会添加至该队列,队列初始则是由上文提到的NioEventLoop构造器来完成的。
startThread方法主要是对状态字段state作CAS检查并执行doStartThread()
private void startThread() {
    if (state == ST_NOT_STARTED) {
        if (STATE_UPDATER.compareAndSet(this, ST_NOT_STARTED, ST_STARTED)) {
            boolean success = false;
            try {
                doStartThread();
                success = true;
            } finally {
                if (!success) {
                    STATE_UPDATER.compareAndSet(this, ST_STARTED, ST_NOT_STARTED);
                }
            }
        }
    }
}
doStartThread通过executor来执行真正负责轮询逻辑的SingleThreadEventExecutor.this.run()方法, 另外executor可以通过NioEventLoopGroup构造器指定, 默认使用ThreadPerTaskExecutor每一次执行任务创建一个新线程执行任务。
private void doStartThread() {
    assert thread == null;
    executor.execute(new Runnable() {
        @Override
        public void run() {
            thread = Thread.currentThread();
            //检查是否中断
            if (interrupted) {
                thread.interrupt();
            }
            boolean success = false;
            //更新时间单位为纳秒
            updateLastExecutionTime();
            try {
                //执行具体的轮询任务,该方法为抽象方法
                SingleThreadEventExecutor.this.run();
                success = true;
            } catch (Throwable t) {
                logger.warn("Unexpected exception from an event executor: ", t);
            } finally {
                //省略掉了shutdown后续确认逻辑,感兴趣的可以看一下源码
            }
        }
    });
}
SingleThreadEventExecutor.this.run()是抽象方法,而在netty中
实现类默认为NioEventLoop(NioEventLoop由NioEventLoopGroup确定,支持epoll的linux中用户也可以通过指定EpollEventLoopGroup来获取EpollEventLoop,java nio其实已经支持epoll操作,不过相比nio来说EpollEventLoop性能更好些,因为采用ET模式,同时更少的gc, 因为执行run的大致逻辑相同,这里就基于常用的NioEventLoop来说明)
run主要执行以下步骤:
- 检查当前是否有任务,如果有通过supplier非阻塞调用select获取事件个数(selectNow方法,即select超时时间设置0),否则返回SelectStrategy.SELECT枚举表示进行阻塞select
- 获取scheduleTask定时任务堆顶任务的deadline时间,如果枚举为SELECT则先通过deadline计算timeout并select阻塞。
- 获取ioRatio参数,该值决定一次轮询处理任务的 预计最大时间 = io等待时间 * (100 - ratio)/ratio,假设ratio为50则处理任务最大耗时为io时间相同,默认设置为50.
- 调用processSelectedKeys处理selectKeys,通过ioRatio获得处理任务最大时间并执行任务。
下面是源码附注释:
protected void run() {
    //计数器记录select次数
    int selectCnt = 0;
    for (;;) {
        try {
            int strategy;
            try {//当前有任务通过supplier非阻塞调用select获取事件个数,否则返回SelectStrategy.SELECT枚举表示进行阻塞select
                strategy = selectStrategy.calculateStrategy(selectNowSupplier, hasTasks());
                switch (strategy) {
                case SelectStrategy.CONTINUE:
                    continue;

                case SelectStrategy.BUSY_WAIT:
                    // fall-through to SELECT since the busy-wait is not supported with NIO

                case SelectStrategy.SELECT:
                    //获取schedule定时任务的deadline
                    long curDeadlineNanos = nextScheduledTaskDeadlineNanos();
                    if (curDeadlineNanos == -1L) {
                        curDeadlineNanos = NONE; // nothing on the calendar
                    }
                    nextWakeupNanos.set(curDeadlineNanos);
                    try {
                        if (!hasTasks()) {
                            strategy = select(curDeadlineNanos);
                        }
                    } finally {
                        // This update is just to help block unnecessary selector wakeups
                        // so use of lazySet is ok (no race condition)
                        nextWakeupNanos.lazySet(AWAKE);
                    }
                    // fall through
                default:
                }
            } catch (IOException e) {
                // If we receive an IOException here its because the Selector is messed up. Let's rebuild
                // the selector and retry. https://github.com/netty/netty/issues/8566
                rebuildSelector0();
                selectCnt = 0;
                handleLoopException(e);
                continue;
            }

            selectCnt++;
            cancelledKeys = 0;
            needsToSelectAgain = false;
            //ioRatio默认为50
            final int ioRatio = this.ioRatio;
            boolean ranTasks;
            //100一次性执行全部任务
            if (ioRatio == 100) {
                try {
                    if (strategy > 0) {
                        processSelectedKeys();
                    }
                } finally {
                    // Ensure we always run tasks.
                    ranTasks = runAllTasks();
                }
            } else if (strategy > 0) {
                final long ioStartTime = System.nanoTime();
                try {
                    //处理selectKey
                    processSelectedKeys();
                } finally {
                    // Ensure we always run tasks.
                    final long ioTime = System.nanoTime() - ioStartTime;
                    //根据ioRatio设置任务的处理时间
                    ranTasks = runAllTasks(ioTime * (100 - ioRatio) / ioRatio);
                }
            } else {
                ranTasks = runAllTasks(0); // This will run the minimum number of tasks
            }

            if (ranTasks || strategy > 0) {
                if (selectCnt > MIN_PREMATURE_SELECTOR_RETURNS && logger.isDebugEnabled()) {
                    logger.debug("Selector.select() returned prematurely {} times in a row for Selector {}.",
                            selectCnt - 1, selector);
                }
                selectCnt = 0;
            } else if (unexpectedSelectorWakeup(selectCnt)) { // Unexpected wakeup (unusual case)
                selectCnt = 0;
            }
        } catch (CancelledKeyException e) {
            // Harmless exception - log anyway
            if (logger.isDebugEnabled()) {
                logger.debug(CancelledKeyException.class.getSimpleName() + " raised by a Selector {} - JDK bug?",
                        selector, e);
            }
        } catch (Throwable t) {
            handleLoopException(t);
        }
        // Always handle shutdown even if the loop processing threw an exception.
        try {
            if (isShuttingDown()) {
                closeAll();
                if (confirmShutdown()) {
                    return;
                }
            }
        } catch (Throwable t) {
            handleLoopException(t);
        }
    }
}
关于轮询逻辑还有两个比较重要的点:
- 这里处理任务最大时间是预估时间,原理是串行处理任务时刷新并比对deadline时间,可想而知如果任务是阻塞的就会严重影响nioEventLoop的性能,因此要求用户不要执行阻塞的任务。
- 细心的可能注意到有一个计数变量selectCnt用来表示select次数,在末尾处会调用unexpectedSelectorWakeup方法校验selectCnt数值是否超出阈值(默认512),如果超出阈值则调用rebuildSelector重新创建新的selector,并把旧的selector已注册的channel重新加入到新的selector中.
private boolean unexpectedSelectorWakeup(int selectCnt) {
    ...省略部分代码

    //检查selectCnt是否超出阈值,如果超出阈值则调用rebuildSelector重新创建新的selector,并把旧的selector已注册的channel重新加入到新的selector中
    if (SELECTOR_AUTO_REBUILD_THRESHOLD > 0 &&
            selectCnt >= SELECTOR_AUTO_REBUILD_THRESHOLD) {
        // The selector returned prematurely many times in a row.
        // Rebuild the selector to work around the problem.
        logger.warn("Selector.select() returned prematurely {} times in a row; rebuilding Selector {}.",
                selectCnt, selector);
        rebuildSelector();
        return true;
    }
    return false;
}
为什么超出阈值就要重新构造selector呢,这来源于jdk nio一个有名的epoll cpu 100%的bug,jdk-bug-6403933,该bug使select不能正常阻塞,因用户nio线程空转导致cpu飙升,所以netty使用计数的方式来检测该问题,并重新构建selector。
worker、boss的分工
BootStrap初始化的时候会要求设置worker和boss,例如EchoServer例子中的bossGroup和workerGroup,一般介绍中都会说到boss负责accpet,worker负责IO事件如下图,下面来解析netty如何调度流转worker和boss
首先Java NIO server需要指定ServerSocketChannel来完成bind、accept等操作,而netty则是对NIO的封装,那么ServerSocketChannel是在何时构造的呢,是在调用initAndRegister是,initAndRegister时会调用channelFactory.newChannel()
final ChannelFuture initAndRegister() {
    Channel channel = null;
    try {
        channel = channelFactory.newChannel();
        init(channel);
    }
    ....
}
channelFactory需要指定class来实例化channel,这个channel即使在构造BootStrap时声明的,如下实例声明的NioServerSocketChannel.class
ServerBootstrap b = new ServerBootstrap();
b.group(bossGroup, workerGroup)
    .channel(NioServerSocketChannel.class)
    .option(ChannelOption.SO_BACKLOG, 100)
.handler(new LoggingHandler(LogLevel.INFO))之后就执行BossGroup下的EventLoop轮询逻辑,到目前为止其实与Worker还没有关系,先看一下如果用户声明的是ServerBootstrap,那么在调用initAndRegester时会调用init(),init又一个重要操作就是通过匿名函数将ServerBootstrapAcceptor加入到链表尾部。
void init(Channel channel) {
    //设置参数
    setChannelOptions(channel, newOptionsArray(), logger);
    setAttributes(channel, attrs0().entrySet().toArray(EMPTY_ATTRIBUTE_ARRAY));
    //获取pipelone
    ChannelPipeline p = channel.pipeline();

    final EventLoopGroup currentChildGroup = childGroup;
    final ChannelHandler currentChildHandler = childHandler;
    final Entry, Object>[] currentChildOptions;
    synchronized (childOptions) {
        currentChildOptions = childOptions.entrySet().toArray(EMPTY_OPTION_ARRAY);
    }
    final Entry, Object>[] currentChildAttrs = childAttrs.entrySet().toArray(EMPTY_ATTRIBUTE_ARRAY);
    //将handler添加至尾部
    p.addLast(new ChannelInitializer() {
        @Override
        public void initChannel(final Channel ch) {
            final ChannelPipeline pipeline = ch.pipeline();
            ChannelHandler handler = config.handler();
            if (handler != null) {
                pipeline.addLast(handler);
            }

            ch.eventLoop().execute(new Runnable() {
                @Override
                public void run() {
                    pipeline.addLast(new ServerBootstrapAcceptor(
                            ch, currentChildGroup, currentChildHandler, currentChildOptions, currentChildAttrs));
                }
            });
        }
    });
}
ServerBootstrapAcceptor是InboundHandler类型,会把BossGroup下的Eventloop监听到的Channel事件注册到childGroup(即worker)下,代码如下
public void channelRead(ChannelHandlerContext ctx, Object msg) {
    final Channel child = (Channel) msg;
    //将childHandler加入链表
    child.pipeline().addLast(childHandler);

    setChannelOptions(child, childOptions, logger);
    setAttributes(child, childAttrs);

    try {
        //将channel注册至childGroup,即workerGroup下
        childGroup.register(child).addListener(new ChannelFutureListener() {
            @Override
            public void operationComplete(ChannelFuture future) throws Exception {
                if (!future.isSuccess()) {
                    forceClose(child, future.cause());
                }
            }
        });
    } catch (Throwable t) {
        //出现异常关闭channel
        forceClose(child, t);
    }
}
到此就完成了boss和worker之间的流转,至于channel是如何流转,pipeline原理等其他内容就放到Channel篇来讲述。
