欢迎关注我的公众号睿Talk,获取我最新的文章:
一、前言
目前最流行的两大前端框架,React和Vue,都不约而同的借助Virtual DOM技术提高页面的渲染效率。那么,什么是Virtual DOM?它是通过什么方式去提升页面渲染效率的呢?本系列文章会详细讲解Virtual DOM的创建过程,并实现一个简单的Diff算法来更新页面。本文的内容脱离于任何的前端框架,只讲最纯粹的Virtual DOM。敲单词太累了,下文Virtual DOM一律用VD表示。
这是VD系列文章的第五篇,以下是本系列其它文章的传送门:
你不知道的Virtual DOM(一):Virtual Dom介绍
你不知道的Virtual DOM(二):Virtual Dom的更新
你不知道的Virtual DOM(三):Virtual Dom更新优化
你不知道的Virtual DOM(四):key的作用
你不知道的Virtual DOM(五):自定义组件
你不知道的Virtual DOM(六):事件处理&异步更新
今天,我们继续在之前项目的基础上扩展功能。现在流行的前端框架都支持自定义组件,组件化开发已经成为提高前端开发效率的银弹。下面我们就将自定义组件功能加到项目中去,目标是正确的渲染和更新自定义组件。
二、JSX对自定义组件的支持
要想正确的渲染组件,第一步就是要告诉JSX某个标签是自定义组件。这个实现起来很简单,只要标签名的首字母大写就可以了。下面的例子里,MyComp就是一个自定义组件。
普通标签
经过JSX编译后,是下面这个样子。
h(
    'div',
    null,
    h(
        'div',
        null,
        '\u666E\u901A\u6807\u7B7E'
    ),
    h(MyComp, null)
);
当首字母大写当时候,JSX会将标签名当作变量处理,而不是像普通标签一样当字符串处理。解决了识别自定义标签的问题,下一步就是定义标签了。
三、定义基类Component
在React中,所有自定义组件都要继承Component基类,它为我们提供了一系列生命周期方法和修改组件的方法。我们也对应的定义一个自己的Component类:
class Component {
    constructor(props) {
        this.props = props;
        this.state = {};
    }

    setState(newState) {
        this.state = {...this.state, ...newState};
        const vdom = this.render();
        diff(this.dom, vdom, this.parent);
    }

    render() {
        throw new Error('component should define its own render method')
    }
};如果用一句话描述Component,那就是属性和状态的UI表达。我们先不考虑生命周期函数,先定义一个最精简版的Component。首先在初始化的时候,需要传入props属性,然后提供一个setState方法来改变组件的状态,最后就是子类必须要实现的render函数。如果子类没有实现,就会沿着原型链查找到Component类,然后会抛出一个错误。
有了Component基类后,我们就可以定义自己的组件了。我们来定义一个最简单的显示属性和状态信息的组件。
class MyComp extends Component {
    constructor(props) {
        super(props);
        this.state = {
            name: 'Tina'
        }
    }

    render() {
        return(

                This is My Component! {this.props.count}
                name: {this.state.name}

        )
    }
}
定义好组件后,就要考虑渲染的逻辑了。
四、组件渲染逻辑
在对VD进行diff操作的时候,要对tag为函数类型(自定义组件)的节点做特殊处理,同时对新建的节点,也要加入一些额外的逻辑。
function diff(dom, newVDom, parent, componentInst) {
    if (typeof newVDom == 'object' && typeof newVDom.tag == 'function') {
        buildComponentFromVDom(dom, newVDom, parent);
        return false;
    }

    // 新建node
    if (dom == undefined) {
        const dom = createElement(newVDom);

        // 自定义组件
        if (componentInst) {
            dom._component = componentInst;
            dom._componentConstructor = componentInst.constructor;
            componentInst.dom = dom;
        }

        parent.appendChild(dom);
        return false;
    }
    ...
}

function buildComponentFromVDom(dom, vdom, parent) {
    const cpnt = vdom.tag;
    if (!typeof cpnt === 'function') {
        throw new Error('vdom is not a component type');
    }

    const props = getVDomProps(vdom);
    let componentInst = dom && dom._component;

    // 创建组件
    if (componentInst == undefined) {
        try {
            componentInst = new cpnt(props);
            setTimeout(() => {componentInst.setState({name: 'Dickens'})}, 5000);
        } catch (error) {
            throw new Error(`component creation error: ${cpnt.name}`);
        }
    }
    // 组件更新
    else {
        componentInst.props = props;
    }

    const componentVDom = componentInst.render();

    diff(dom, componentVDom, parent, componentInst);
}

function getVDomProps(vdom) {
    const props = vdom.props;
    props.children = vdom.children;

    return props;
}如果是自定义组件,会调用buildComponentFromVDom方法。先通过getVDomProps方法获取vdom最新的属性,包括children。如果dom对象有_component属性,说明是组件更新的过程,否则为组件创建的过程。如果是创建过程则直接实例化一个对象,setTimeout部分主要为了验证setState能不能正常工作,可以先忽略。如果是更新过程,则传入最新的props。最后通过组件的render方法得到最新的vdom后,再进行diff操作。
diff多了一个componentInst的参数,在新建dom节点的时候,如果有这个参数,说明是自定义组件创建的节点,需要用_component和_componentConstructor做一下标识。其中_component上面就用到了,用来判断是组件更新过程还是组件创建过程。_componentConstructor用在组件更新过程中判断组件的类型是否相同。
function isSameType(element, newVDom) {
    if (typeof newVDom.tag == 'function') {
        return element._componentConstructor == newVDom.tag;
    }
    ...
}
到此为止,自定义组件的被动更新过程已经完成了,下面来看看主动更新的逻辑。
五、setState
setState的逻辑很简单,就是更新state后再render一次,获取到最新的vdom,再走一遍diff的过程。setState的前提是组件已经实例化并且已经渲染出来了,this.dom就是组件渲染出来的dom的顶级节点。
setState(newState) {
    this.state = {...this.state, ...newState};
    const vdom = this.render();
    diff(this.dom, vdom, this.parent);
}

function buildComponentFromVDom(dom, vdom, parent) {
    ...
    // 创建组件
    if (componentInst == undefined) {
        ...
        setTimeout(() => {componentInst.setState({name: 'Dickens'})}, 5000);
    ...
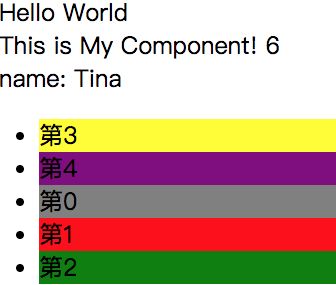
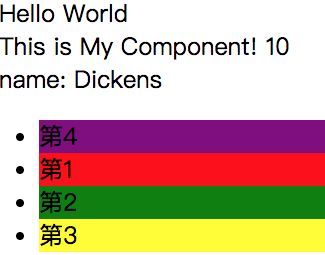
}为了验证setState能否按预期运行,在创建组件的时候我们在5秒后更新一下state,看看名字能否正确更新。我们的页面是长这个样子的:
function view() {
const elm = arr.pop();
// 用于测试能不能正常删除元素
if (state.num !== 9) arr.unshift(elm);
// 用于测试能不能正常添加元素
if (state.num === 12) arr.push(9);
return (
Hello World
{
arr.map( i => (
-
第{i}
))
}
);
}刚开始渲染出来是这个样子:
5秒之后是这个样子:
可以看到props和state都得到了正确都渲染。
六、总结
本文基于上一个版本的代码,加入了对自定义组件的支持,大大提高代码的复用性。基于当前这个版本的代码还能做怎样的优化呢,请看下一篇的内容:你不知道的Virtual DOM(六):事件处理&异步更新。
P.S.: 想看完整代码见这里,如果有必要建一个仓库的话请留言给我:代码

