关于WPF装饰器的笔记
关于装饰器
参见这几篇文章,较为详尽
http://www.cnblogs.com/nankezhishi/archive/2010/07/10/adornerlayer.html
http://www.cnblogs.com/jacksonyin/archive/2008/04/28/1174393.html
http://www.cnblogs.com/nankezhishi/archive/2009/12/04/sortlistview.html
WPF自定义控件 — 装饰器
http://www.cnblogs.com/Curry/archive/2009/09/16/WPFDecorator.html
装饰器概述
http://msdn.microsoft.com/zh-cn/library/ms743737.aspx
MSDN 例子
http://archive.msdn.microsoft.com/wpfsamples 中 ResizingAdorner Sample
WPF: Sticky Notes ListBox
http://www.codeproject.com/KB/WPF/StickyNotes.aspx
WPF 为装饰视觉元素提供一个基本框架。下表列出了装饰对象时使用的主要类型及其用途。
| Decorator |
|
| 一个抽象基类,所有具体装饰器的实现都从该类继承。 |
|
| 一个类,表示一个或多个装饰元素的装饰器的呈现层。 |
|
| 一个类,使装饰器层与元素集合相关联。 |
Decorator
自定义Decorator如下:
  public class SimpleDecorator : Decorator


    {


        protected override void OnRender(System.Windows.Media.DrawingContext drawingContext)


        {


            drawingContext.DrawEllipse(Brushes.Red, new Pen(Brushes.Green, .5), new Point(0, 0), 5, 5);


            drawingContext.DrawEllipse(Brushes.Red, new Pen(Brushes.Green, .5), new Point(Child.RenderSize.Width, 0), 5, 5);


            drawingContext.DrawEllipse(Brushes.Red, new Pen(Brushes.Green, .5), new Point(0, Child.RenderSize.Height), 5, 5);


            drawingContext.DrawEllipse(Brushes.Red, new Pen(Brushes.Green, .5), new Point(Child.RenderSize.Width, Child.RenderSize.Height), 5, 5);


        }


    }
在元素的四周画了四个红色的小圆圈。
使用方法类似Border:
<local:SimpleDecorator Margin="249,212,154,69" x:Name="xPand" HorizontalAlignment="Stretch" VerticalAlignment="Stretch">
<Rectangle Fill="Green" />
</local:SimpleDecorator>
一个用来放装饰器的层,层次ZIndex关系最高,永远处于装饰元素的顶部,且无法修改Zindex。
Represents a surface for rendering adorners. 表示用于呈现装饰器的图面。
This example shows how to programmatically bind an adorner to a specified UIElement.
To bind an adorner to a particular UIElement, follow these steps:
- Call the static method GetAdornerLayer to get an AdornerLayer object for the UIElement to be adorned. GetAdornerLayer walks up the visual tree, starting at the specified UIElement, and returns the first adorner layer it finds. (If no adorner layers are found, the method returns null.)
- Call the Add method to bind the adorner to the target UIElement.
The following example binds a SimpleCircleAdorner (shown above) to a TextBox named myTextBox.
myAdornerLayer = AdornerLayer.GetAdornerLayer(myTextBox)
myAdornerLayer.Add(New SimpleCircleAdorner(myTextBox))
一般来说,子元素的和父元素的AdornerLayer 是同一个,详细见参考文档的第一个。
联系 装饰器层 和 被装饰元素 之间的纽带,每一个window都有这个东东,里面放装饰器层AdornerLayer,例如window的Style如下:
<Style x:Key="{x:Type Window}"


       TargetType="{x:Type Window}">


  <Setter Property="SnapsToDevicePixels"


          Value="true" />


  <Setter Property="Template">


    <Setter.Value>


      <ControlTemplate TargetType="{x:Type Window}">


        <Grid>


          <Grid.Background>


            <SolidColorBrush Color="{DynamicResource WindowColor}"/>


          </Grid.Background>


          <AdornerDecorator>


            <ContentPresenter />


          </AdornerDecorator>


          <ResizeGrip x:Name="WindowResizeGrip"


                      HorizontalAlignment="Right"


                      VerticalAlignment="Bottom"


                      Visibility="Collapsed"


                      IsTabStop="false" />


        </Grid>


        <ControlTemplate.Triggers>


          <Trigger Property="ResizeMode"


                   Value="CanResizeWithGrip">


            <Setter TargetName="WindowResizeGrip"


                    Property="Visibility"


                    Value="Visible" />


          </Trigger>


        </ControlTemplate.Triggers>


      </ControlTemplate>


    </Setter.Value>


  </Setter>


</Style>
最经典的装饰器了,就相当于胶布,想贴哪里贴哪里。
如果装饰的东东必须在 topMost的层次上,那么用Adorner,个人觉得如果不是,可以考虑Decorator。
也许可以把装饰器和被装饰元素封装为一个控件,例如倒影和元素封装在一起,但是有一个问题是,如果元素高50,倒影高50,封装后控件的高度就是100了,布局的时候按100来搞。
如果用装饰器,倒影的高度是不需要考虑的,因为倒影的在【空中飞】的,布局的时候按照50来考虑就可以了。
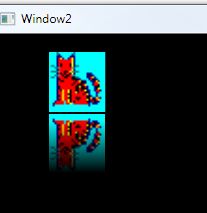
这里是一个 产生倒影的装饰器代码,如下:
    public class ReflectorAdorner : Adorner


    {


        Rectangle rec;


        VisualCollection VisualChildren;


        public ReflectorAdorner(UIElement adnoredElement)


            : base(adnoredElement)


        {


            rec = new Rectangle();


            VisualChildren = new VisualCollection(this);


            AddReflection(adnoredElement);


        }


        void AddReflection(UIElement element)


        {


            //产生倒影的Rectangle


            rec.RenderTransformOrigin = new Point(.5, .5);


            rec.Margin = new Thickness(0, 1, 0, 0);


            VisualBrush brush = new VisualBrush(element) { Stretch = Stretch.Fill, AlignmentY = AlignmentY.Bottom };


            rec.Fill = brush;


            LinearGradientBrush linerBrush = new LinearGradientBrush() { StartPoint = new Point(.5, 1), EndPoint = new Point(0.5, 0) };


            linerBrush.GradientStops.Add(new GradientStop() { Color = Colors.Black, Offset = 0.124 });


            linerBrush.GradientStops.Add(new GradientStop() { Color = Color.FromArgb(0, 255, 255, 255), Offset = 1 });


            rec.OpacityMask = linerBrush;


            rec.RenderTransform = new ScaleTransform() { ScaleX = 1, ScaleY = -1 };


            VisualChildren.Add(rec);


        }


        public void HiddenReflector()


        {


            rec.Visibility = rec.Visibility == Visibility.Hidden ? Visibility.Visible : Visibility.Hidden;


        }


        protected override int VisualChildrenCount


        {


            get


            {


                return 1;


            }


        }


        protected override Visual GetVisualChild(int index)


        {


            return rec;


        }


        protected override Size ArrangeOverride(Size finalSize)


        {


            rec.Width = this.DesiredSize.Width;


            rec.Height = this.DesiredSize.Height;


            rec.Arrange(new Rect(0, this.DesiredSize.Height, this.DesiredSize.Width, this.DesiredSize.Height));


            return base.ArrangeOverride(finalSize);


        }


    }
调用如下:
 <Grid x:Name="gridMain" Background="Black">


        <Image Source="cat.png" Width="60" Height="60" x:Name="img" HorizontalAlignment="Left" VerticalAlignment="Top" Margin="49,18,0,0" />


    </Grid>
public Window2()


        {


            InitializeComponent();


            Loaded += new RoutedEventHandler(Window2_Loaded);


        }


        void Window2_Loaded(object sender, RoutedEventArgs e)


        {


            AdornerLayer layer = AdornerLayer.GetAdornerLayer(gridMain);


            layer.Add(new ReflectorAdorner(img));


        }
效果图如下 :
