前言
Spring AMQP 项目是应用了spring的核心概念到AMQP协议消息解决方案中。我们提供了一个“template”作为更高级别的抽象去发送和接收消息。我也提供了消息驱动类的支持。使用依赖注入和声明式编程可以更好的管理AMQP源代码。此项目中你可以看到和SpringFramework中JMS一些相似的地方。
RabbitMQ简介
1.消息队列是应用程序和应用程序之间的一种通信方法。
2.RabbitMQ : erlang语言开发、 基于AMQP协议。
3.同类产品:ActiveMQ、 ZeroMQ、 RabbitMQ、 RocketMQ、 Kafka。
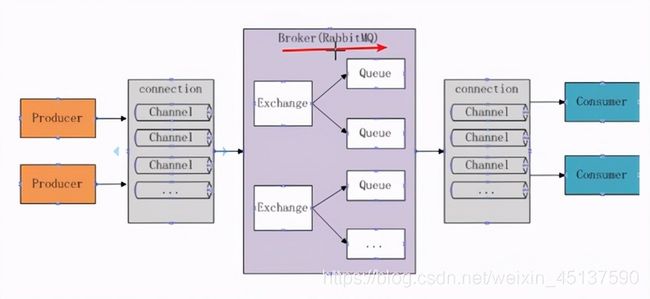
4.物理模型
5.Broker 消息队列服务进程、 Exchange消息队列交换机,Queue 消息队列、 Producer 消息生产者、 Consumer 消息消费者。
6.六种模式: 简单模式、 工作模式、 发布与订阅模式、 路由模式、通配符模式、 远程调用模式(基本不会用到)。
7.关键词:{Broker: 服务器实体、 Exchange :消息交换机、 Queue: 消息队列载体、Binding: 绑定 、Routing Key: 路由关键字、 VHost: 虚拟主机、Producer: 消息生产者 、 Consumer: 消息消费者、Channel: 消息通道 }
8.关键概念:由Exchange、Queue、RoutingKey三个才能决定一个从Exchange到Queue的唯一的线路。
RabbitMQ五大模式实战
此次是基于SpringBoot开发的RabbitMQ应用程序,利用SpringBoot的自动配置和起步依赖会让你更快更方便的构建项目。
让我们实战开始。
- 准备阶段
- 启动一台RabbitMQ服务器
- 此次使用的是SpringBoot项目
- 应用的pom依赖
 org.springframework.boot
    spring-boot-starter-parent
    2.3.4.RELEASE


        org.springframework.boot
        spring-boot-starter-amqp


        org.springframework.boot
        spring-boot-starter-web


        org.springframework.boot
        spring-boot-configuration-processor
        true


        org.springframework.boot
        spring-boot-starter-test
        test


                org.junit.vintage
                junit-vintage-engine


        org.springframework.amqp
        spring-rabbit-test
        test


            org.springframework.boot
            spring-boot-maven-plugin


123456789101112131415161718192021222324252627282930313233343536373839404142434445- 配置application.yml文件
spring:
  rabbitmq:
    host: 127.0.0.1
    port: 5672
    username: guest
    password: guest
server:
port: 8082- 启动类和目录结构是SpringBoot常规设置,这里不再赘述。
注意:启动类名设置为RabbitmqProducerApplication
- 简单模式
- 简单模式配置文件
@Configuration
public class RabbitSimpleConfig {
    @Bean
    public Queue simpleQueue(){
        return new Queue("simpleQueue");
    }
}- 简单模式生产者部分
@SpringBootTest(classes = RabbitmqProducerApplication.class)
public class ProducerTest {
    @Autowired
    RabbitTemplate rabbitTemplate;
    @Test
    public void simpleProduct(){
        for (int num = 0; num < 20; num++) {
            rabbitTemplate.convertAndSend("simpleQueue", "简单模式"+num);
        }
    }
}- 简单模式消费者部分
@Component
public class MessageListener {
    @RabbitListener(queues = "simpleQueue")
    public void simpleListener(String message){
        System.out.println("简单模式监听器:"+message);
    }
}- 工作模式
- 工作模式配置文件
@Bean
 public Queue workQueue(){
     return new Queue("workQueue");
}- 工作模式生产者部分
@Test
public void workProduct(){
    for (int num = 0; num < 20; num++) {
        rabbitTemplate.convertAndSend("workQueue", "工作模式"+num);
    }
}- 工作模式消费者部分
 @RabbitListener(queues = "workQueue")
 public void workListener1(String message) {
     System.out.println("工作模式监听器1:" + message);
 }

 @RabbitListener(queues = "workQueue")
 public void workListener2(String message) {
     System.out.println("工作模式监听器2:" + message);
}- 发布订阅模式
- 发布订阅模式配置文件
//配置交换器
@Bean
public FanoutExchange fanoutExchange() {
    return new FanoutExchange("fanoutExchange");
}
//配置队列
@Bean
public Queue fanoutQueue1() {
    return new Queue("fanoutQueue1", true, false, false, null);
}

@Bean
public Queue fanoutQueue2() {
    return new Queue("fanoutQueue2", true, false, false, null);
}
//配置绑定
@Bean
public Binding fanoutBinding1(FanoutExchange fanoutExchange, Queue fanoutQueue1) {
        return BindingBuilder.bind(fanoutQueue1).to(fanoutExchange);
}

@Bean
public Binding fanoutBinding2(FanoutExchange fanoutExchange, Queue fanoutQueue2) {
    return BindingBuilder.bind(fanoutQueue2).to(fanoutExchange);
}- 发布订阅模式生产者部分
@Test
public void FanoutProduct(){
    for (int num = 0; num < 10; num++) {
        rabbitTemplate.convertAndSend("fanoutExchange","","发布订阅模式"+num);
    }
}- 发布订阅模式消费者部分
@RabbitListener(queues = "fanoutQueue1")
public void fanoutListener1(String message) {
    System.out.println("发布订阅监听器1:" + message);
}

@RabbitListener(queues = "fanoutQueue2")
public void fanoutListener2(String message) {
    System.out.println("发布订阅监听器2:" + message);
}- 路由模式
- 路由模式配置文件
//配置交换机
@Bean
public DirectExchange directExchange() {
    return new DirectExchange("directExchange");
}

//配置队列
@Bean
public Queue directQueue1() {
    return new Queue("directQueue1", true, false, false, null);
}

@Bean
public Queue directQueue2() {
    return new Queue("directQueue2", true, false, false, null);
}
//配置绑定
@Bean
public Binding directBinding1(Queue directQueue1, DirectExchange directExchange) {
    return BindingBuilder.bind(directQueue1).to(directExchange).with("one");
}

@Bean
public Binding directBinding2(Queue directQueue2, DirectExchange directExchange) {
    return BindingBuilder.bind(directQueue2).to(directExchange).with("two");
}- 路由模式生产者部分
@Test
public void directProduct1() {
    for (int num = 0; num < 5; num++) {
        rabbitTemplate.convertAndSend("directExchange","one", "发送到路由队列1消息"+num);
    }
}
@Test
public void directProduct2() {
    for (int num = 0; num < 5; num++) {
        rabbitTemplate.convertAndSend("directExchange","two", "发送到路由队列2消息"+num);
    }
}- 路由模式消费者部分
@RabbitListener(queues = "directQueue1")
public void fanoutListener1(String message) {
    System.out.println("路由模式监听器1:" + message);
}

@RabbitListener(queues = "directQueue2")
public void fanoutListener2(String message) {
    System.out.println("路由模式监听器2:" + message);
}- 通配符模式
- 通配符模式配置文件
//配置队列
@Bean
public Queue topicQueue1() {
   return new Queue("topicQueue1");
}

@Bean
public Queue topicQueue2() {
   return new Queue("topicQueue2");
}
//配置交换器
@Bean
public TopicExchange topicExchange() {
   return new TopicExchange("topicExchange");
}
//配置绑定
@Bean
public Binding topicBinding1(Queue topicQueue1, TopicExchange topicExchange) {
   return BindingBuilder.bind(topicQueue1).to(topicExchange).with("topic.*");
}

@Bean
public Binding topicBinding2(Queue topicQueue2, TopicExchange topicExchange) {
   return BindingBuilder.bind(topicQueue2).to(topicExchange).with("topic.#");
}- 通配符模式生产者部分
/*
 * 通配符模式测试
 * */
@Test
public void topicProduct() {
    rabbitTemplate.convertAndSend("topicExchange","topic.one", "routkey为topic.one的消息");
    rabbitTemplate.convertAndSend("topicExchange","topic.one.two", "routkey为topic.one.two的消息");
}- 通配符模式消费者部分
@RabbitListener(queues = "topicQueue1")
public void fanoutListener1(String message) {
    System.out.println("通配符监听器1:" + message);
}

@RabbitListener(queues = "topicQueue2")
public void fanoutListener2(String message) {
    System.out.println("通配符监听器2:" + message);
}
总结
以上就是SpringBoot+RabbitMQ五大模式的简单使用实例,到目前为止RabbitMQ也是Sping AMQP的唯一实现。下一节将会讲解RabbitMQ可视化管理界面,可视化管理界面帮助我们可以直观地看到RabbitMQ服务器的运行情况。如果你觉得文章对你有帮助,欢迎关注,谢谢。


