如何快速构建一个Spring Boot的项目工具 ideaJDK版本 1.8Spring Boot 版本 1.5.9环境搭建实现:最基础前端可以访问到数据库内的内容
开始
1.IDEA 内部新建一个项目,项目类型选择Spring Initializr,Project SDK选择适合你当前环境的版本,这里我选择的是1.8(Spring Boot 2.0以上的版本,JDK选择请选择1.8即以上版本),构建服务选择默认就好,点击Next

2.填写Group和Artifact(此处我使用的是默认,请根据实际情况填写),项目类型选择Maven项目,语言选择Java,打包类型选择Jar(SpringBoot内置Tomcat,web项目可以直接以Jar包的方式运行),Java 版本选择8,Name自己填写,Next

3. 选择Spring Boot的版本,这里先随便选一个,我们稍后在pom文件中进行更改,
在下面的可以选择相应的starter包,我们可以在此处快速选择,也可以等到pom文件中再手动添加。我们选择最常用的最基本的几个:Spring bootDevTools:实现热部署,Lombok:使用Lombok的注释,Spring Web,Mybatis和MySQL驱动,选择完毕后,Next

4. 选择项目保存的名称和路径,然后Finish

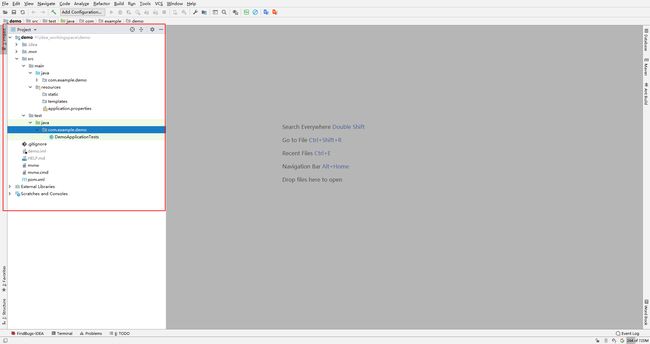
5.等待项目下载完成,下面的读条全部完成后,我们就可以点开项目查看项目的结构是否完整
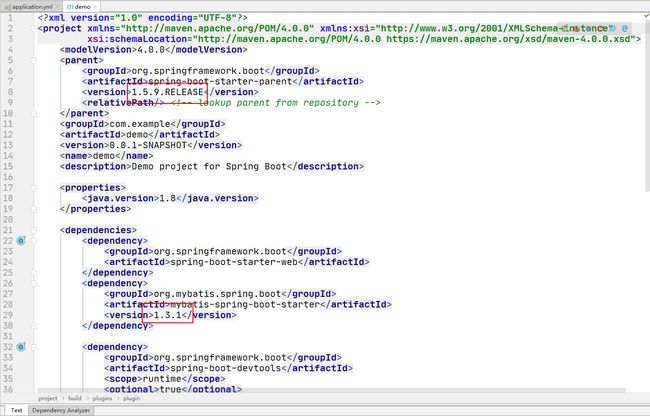
打开pom.xml文件,修改spring boot的版本为1.5.9,修改mybstis依赖的版本为1.3.1,我们使用阿里的Druid数据库连接池,添加Druid依赖,我是用的mysql为8.0,spring boot1.5.9默认的连接驱动是5.*的,修改驱动版本为8.0.11(在pom源码中列出)
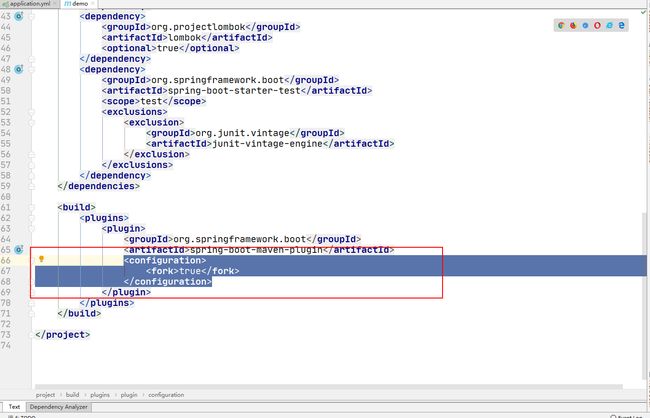
在spring boot maven plugin中添加如下配置,不配置fork无法进行热部署
pom.xml
 4.0.0

  org.springframework.boot
  spring-boot-starter-parent
  1.5.9.RELEASE


 com.example
 demo
 0.0.1-SNAPSHOT
 demo
 Demo project for Spring Boot


  1.8


   org.springframework.boot
   spring-boot-starter-web


   org.mybatis.spring.boot
   mybatis-spring-boot-starter
   1.3.1


   com.alibaba
   druid
8.开始配置项目,我们选择使用yum文件进行配置,在resources文件夹下新建application.yml,删除原来的application.properties,在yum文件中配置下面的内容,此处使用的为8.0的Mysql,8.0以下版本请修改连接驱动的名称
# 配置数据库连接 8.0
spring:
 datasource:
 # =====================MySQL相关配置=====================
 # 数据库类型
 name: mysql
 #数据库连接驱动
 driver-class-name: com.mysql.cj.jdbc.Driver
 #数据库连接url
 url: jdbc:mysql://127.0.0.1:3306/数据库名?useUnicode=true&characterEncoding=utf8&serverTimezone=GMT%2B8&useSSL=false
 #数据库连接账号
 username: root
 #数据库连接密码
 password: root
 #使用druid数据源
 type: com.alibaba.druid.pool.DruidDataSource
 #==================druid相关配置=========================================
 druid:
  #监控统计用的filter:stat 日志用filter:log4j 防御sql注入用filter:wall
  filters: stat,log4j,wall
  #最大链接数量
  max-active: 20
  #初始化时建立物理连接的个数 初始化发生在显示调用init() 或者第一次getConnection时
  initial-size: 1
  #获取连接时的最大等待时间 毫秒
  max-wait: 60000
  #最小连接池数量
  min-idle: 1
  time-between-eviction-runs-millis: 60000
  #链接保持空闲而不被驱逐的最长时间
  min-evictable-idle-time-millis: 300000
  #用来检验连接是否有效的sql mysql为select 1
  # 如果validationQuery为null,testOnBorrow、testOnReturn、testWhileIdle都不会其作用
  validation-query: select 1
  # 申请连接的时候检测,如果空闲时间大于timeBetweenEvictionRunsMillis,执行validationQuery检测连接是否有效
  test-while-idle: true
  # 申请连接时执行validationQuery检测连接是否有效,做了这个配置会降低性能
  test-on-borrow: false
  # 归还连接时执行validationQuery检测连接是否有效,做了这个配置会降低性能
  test-on-return: false
  # 归还连接时执行validationQuery检测连接是否有效,做了这个配置会降低性能
  pool-prepared-statements: false
  # 要启用PSCache,必须配置大于0,当大于0时,poolPreparedStatements自动触发修改为true
  max-open-prepared-statements: -1


# ====================mybatis==============================
mybatis:
 #配置mybatis的mapper xml文件映射
 mapper-locations: classpath*:mapper/*.xml
 #配置pojo映射
 type-aliases-package: com.example.demo.pojo

#服务端口
server:
 port: 8080
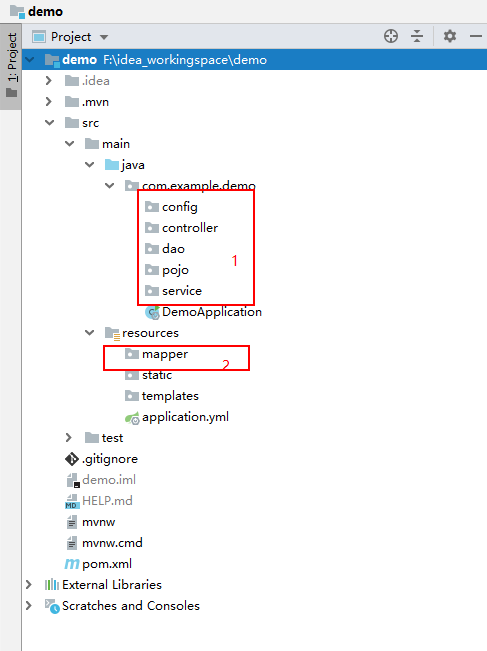
9.创建如下包(config,controller,dao,pojo,service,mapper)
10.在config下创建DruidConfig
DruidConfig
package com.example.demo.config;
import com.alibaba.druid.pool.DruidDataSource;
import org.springframework.boot.context.properties.ConfigurationProperties;
import org.springframework.context.annotation.Bean;
import org.springframework.context.annotation.Configuration;
import javax.sql.DataSource;
//标记这是一个配置类
@Configuration
public class DruidConfig {
 //配置Druid的Bean 读取yml配置中spring.datasource为前缀的配置
 @ConfigurationProperties(prefix = "spring.datasource")
 @Bean
 public DataSource druid(){
  return new DruidDataSource();
 }
}
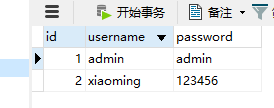
11.测试表结构如下:
12.创建pojo,使用lombok的注解生成get和set方法
package com.example.demo.pojo;
import lombok.Getter;
import lombok.Setter;
import java.io.Serializable;
@Setter
@Getter
public class FtbAdmin implements Serializable {
 private Integer id;
 private String username;
 private String password;
}
13.在dao下创建mapper接口(别忘了打上mapper注解),在resources/mapper下创建xml文件
mapper接口
package com.example.demo.dao;
import com.example.demo.pojo.FtbAdmin;
import org.apache.ibatis.annotations.Mapper;
import java.util.List;
/**
 * @author 11699
 * @date 2020/2/15 - 13:04
 */
@Mapper
public interface FtbAdminMapper {

 public List findAll();
}
mapper.xml
14.在service包下创建service接口,在此包下新建impl包,创建service的实现类(别忘记打上service注解)
service接口
package com.example.demo.service;
import com.example.demo.pojo.FtbAdmin;
import java.util.List;
/**
 * @author 11699
 * @date 2020/2/15 - 13:14
 *
 */
public interface FtbAdminService {
 public List findAll();
}
service实现类
package com.example.demo.service.impl;

import com.example.demo.dao.FtbAdminMapper;
import com.example.demo.pojo.FtbAdmin;
import com.example.demo.service.FtbAdminService;
import org.springframework.beans.factory.annotation.Autowired;
import org.springframework.stereotype.Service;

import java.util.List;

/**
 * @author 11699
 * @date 2020/2/15 - 13:16
 *
 * 服务层实现,不要忘记打上service注解
 */
@Service
public class FtbAdminServiceImpl implements FtbAdminService {

 //注入mapper
 @Autowired
 private FtbAdminMapper adminMapper;

 @Override
 public List findAll() {

  return adminMapper.findAll();
 }
}
在controller包下创建controller类
package com.example.demo.controller;

import com.example.demo.pojo.FtbAdmin;
import com.example.demo.service.FtbAdminService;
import org.springframework.beans.factory.annotation.Autowired;
import org.springframework.web.bind.annotation.RequestMapping;
import org.springframework.web.bind.annotation.RestController;

import java.util.List;

/**
 * @author 11699
 * @date 2020/2/15 - 13:29
 *
 * @RestController:返回整个controller返回的都是json字符串
 * @RequestMapping("/admin"):请求映射
 */

@RestController
@RequestMapping("/admin")
public class FtbAdminController {

 //注入服务层
 @Autowired
 private FtbAdminService adminService;

 //添加映射 无需与方法名一样
 @RequestMapping("/findAll")
 public List findAll(){
  return adminService.findAll();
 }
}
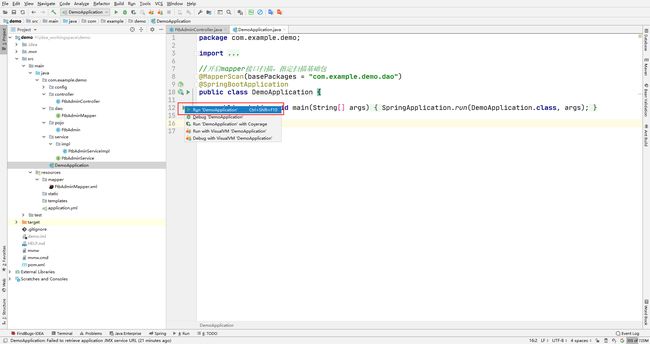
在spring boot启动类添加mapper自动扫描注解
package com.example.demo;

import org.mybatis.spring.annotation.MapperScan;
import org.springframework.boot.SpringApplication;
import org.springframework.boot.autoconfigure.SpringBootApplication;

//开启mapper接口扫描,指定扫描基础包
@MapperScan(basePackages = "com.example.demo.dao")
@SpringBootApplication
public class DemoApplication {

 public static void main(String[] args) {
  SpringApplication.run(DemoApplication.class, args);
 }

}
运行,在springboot启动类的main方法上运行
18 启动没有报错的话,我们可以开始测试了在浏览器中输入地址↓
http://localhost:8080/admin/findAll
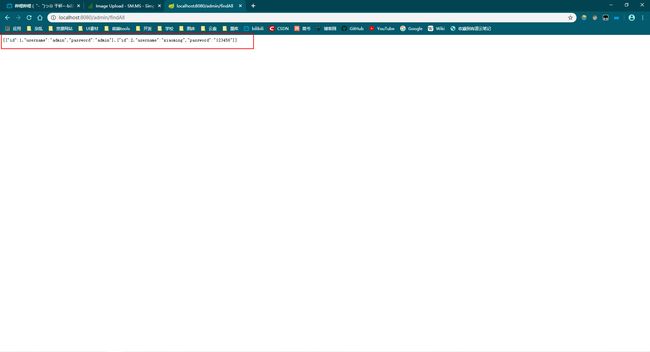
OK,到此为止,我们就完成了!!!
附上项目的完整结构

源码下载
到此这篇关于快速搭建Spring Boot+MyBatis的项目IDEA(附源码下载)的文章就介绍到这了,更多相关Spring Boot+MyBatis的项目IDEA内容请搜索脚本之家以前的文章或继续浏览下面的相关文章希望大家以后多多支持脚本之家!