本来想做一个集合浮动定位和鼠标跟随的tooltips效果,但发现定位和鼠标跟随在一些关键的地方还是不同的,还是分开来吧。
效果预览
test
水平位置:
垂直位置:
自定义定位: left:
top:
点击方式
触发方式
延时时间:
其他应用范例:
流行的头像显示效果:
关闭按钮:
Table行定位效果
程序特点
1,同一个提示框用在多个触发元素时,只需一个实例;
程序说明 【Tip对象】
Tip对象就是用来显示提示信息的容器,程序用Tip属性表示。这个没什么要求,程序初始化时会对它进行一些设置。
Code
this ._cssTip.margin = 0 ; this ._cssTip.position = " absolute " ; this ._cssTip.visibility = " hidden " ; this ._cssTip.display = " block " ; this ._cssTip.zIndex = 99 ; this ._cssTip.left = this ._cssTip.top = " -9999px " ;
var
iLeft
=
iTop
=
0
, p
=
this
.Tip;
while
(p.offsetParent) {
=
p.offsetParent; iLeft
+=
p.offsetLeft; iTop
+=
p.offsetTop;
this
._offsetleft
=
iLeft;
this
._offsettop
=
iTop;
【触发对象】
由于很多情况下都是一个Tip对应多个地方的提示,所以程序参考了Table排序 的方式,添加了一个Add方法。
【显示和隐藏】
提示效果的一个重点就是显示和隐藏提示信息。程序是通过设置Tip的visibility是否hidden来显示和隐藏Tip的。
this
.Check(e.relatedTarget)
&&
clearTimeout(
this
._timer);
这里的外部元素是指触发元素和Tip对象本身及其内部元素以外的元素。
return
!
this
._trigger
||
!
(
this
.Tip
===
elem
||
this
._trigger.Elem
===
elem
||
this
.Tip, elem)
||
Contains(
this
._trigger.Elem, elem)
这里的比较文档位置 。
【点击方式】
点击方式显示是指点击触发元素的时候显示Tip。
Code
addEvent(elem, " click " , BindAsEventListener( this , function (e){ if (trigger.ClickShow) { if ( this .CheckShow(trigger)) { this .ReadyShow(trigger.ClickShowDelay); else { this ._timer);
if
(trigger
!==
this
._trigger) {
this
.Hide();
this
._trigger
=
trigger;
return
true
;
else
{
return
false
; };
对应的,点击方式隐藏是指点击外部元素的时候隐藏Tip。
trigger.ClickHide
&&
addEvent(document,
"
click
"
,
this
._fCH);
其中_fCH是在初始化时定义的一个属性,用于添加和移除点击隐藏事件:
this
._fCH
=
BindAsEventListener(
this
,
function
(e) {
if
(
this
.Check(e.target)
&&
this
.CheckHide()) {
this
.ReadyHide(
this
._trigger.ClickHideDelay);
其中CheckHide是作用是检查Tip当前是不是隐藏状态:
Code
if ( this ._cssTip.visibility === " hidden " ) { this ._timer); this ._trigger.Elem, " mouseout " , this ._fTH); this ._trigger = null ; " click " , this ._fCH); return false ; else { return true ; };
【触发方式】
触发方式针对的是mouseover和mouseout,它的流程跟点击方式是差不多的。
触发方式显示是指鼠标从外部元素进入触发元素(触发mouseover)的时候显示Tip。
Code
addEvent(elem, " mouseover " , BindAsEventListener( this , function (e){ if (trigger.TouchShow) { if ( this .CheckShow(trigger)) { this .ReadyShow(trigger.TouchShowDelay); else if ( this .Check(e.relatedTarget)) { this ._timer);
对应的,触发方式隐藏是指鼠标从触发元素或Tip离开时隐藏Tip。
trigger.TouchHide
&&
addEvent(
this
._trigger.Elem,
"
mouseout
"
,
this
._fTH);
trigger.TouchHide
&&
addEvent(
this
.Tip,
"
mouseout
"
,
this
._fTH);
其中_fTH跟_fCH类似,也是在初始化时定义的一个属性,用于添加和移除触发隐藏事件:
this
._fTH
=
BindAsEventListener(
this
,
function
(e) {
if
(
this
.Check(e.relatedTarget)
&&
this
.CheckHide()) {
this
.ReadyHide(
this
._trigger.TouchHideDelay);
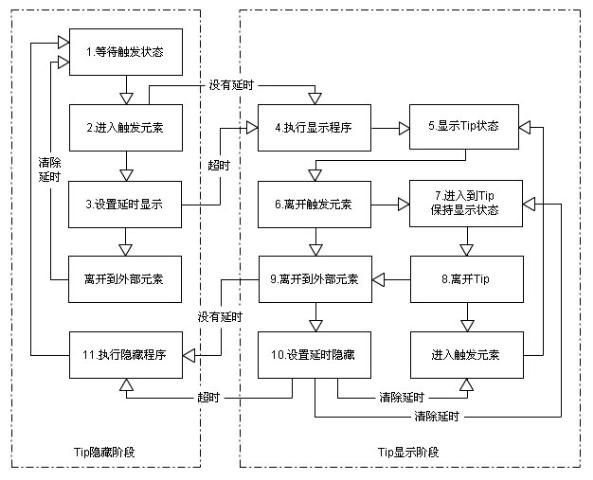
【触发原理】
上面是从程序的角度说明了触发显示和隐藏的过程,但要真正理解的话还需要做一次细致的分析。
再对照程序,应该就能理解整个流程了,当然可能还不是那么好理解。
【元素定位】
完成了显示隐藏,就到本程序另一个重点,元素定位。
【预设定位和自定义定位】
预设定位的意思是使用程序25个预设位置来定位。
1
2
3
4
5
6
7
8
9
10
11
12
13
14
15
16
17
18
19
20
21
22
23
24
25
下面说说如何获取这些坐标的值,首先通过getBoundingClientRect要获取触发元素的坐标对象。这里的元素位置 。
使用时,把水平坐标和垂直坐标的标识值(字符)分别赋给触发对象的Align和vAlign属性,系统就会自动设置对应的位置。
至于自定义定位就是在预设定位得到的坐标基础上,根据Custom(形式如{ left: 50, top: -10 })的设置再进行left和top的修正。
if
(trigger.Percent.left) { iLeft
+=
.
01
*
trigger.Percent.left
*
trigger.Elem.offsetWidth; };
if
(trigger.Percent.top) { iTop
+=
.
01
*
trigger.Percent.top
*
trigger.Elem.offsetHeight; };
【自适应定位】
自适应定位的作用是当Tip显示的范围超过浏览器可视范围的时候,自动修正到可视范围里面。
var
maxLeft
=
this
._doc.clientWidth
-
this
.Tip.offsetWidth,
=
this
._doc.clientHeight
-
this
.Tip.offsetHeight;
如果Reset属性是true会使用重新定位的方法。
Code
if (iLeft > maxLeft || iLeft < 0 ) { = this .GetLeft(rect, 2 * iLeft > maxLeft ? " left " : " right " ) + customLeft; if (iTop > maxTop || iTop < 0 ) { = this .GetTop(rect, 2 * iTop > maxTop ? " top " : " bottom " ) + customTop;
如果不是用Reset重新定位,只需要根据这几个值获取适合的值就行了:
iLeft
=
Math.max(Math.min(iLeft, maxLeft),
0
);
=
Math.max(Math.min(iTop, maxTop),
0
);
【隐藏select】
又是ie6的隐藏select问题,这里用的是iframe遮盖法。
首先初始化时插入iframe:
this
._iframe
=
document.createElement(
"
<iframe style='position:absolute;filter:alpha(opacity=0);display:none;'>
"
);
this
._iframe, document.body.childNodes[
0
]);
Code
this ._iframe.style.left = iLeft + this ._docScroll.scrollLeft + " px " ; this ._iframe.style.top = iTop + this ._docScroll.scrollTop + " px " ; this ._iframe.style.width = this .Tip.offsetWidth + " px " ; this ._iframe.style.height = this .Tip.offsetHeight + " px " ; this ._iframe.style.display = "" ;
在Hidde时隐藏就可以了。
使用说明
实例化时,第一个必要参数是Tip对象:
var
ft
=
new
FixedTips(
"
idTip
"
);
然后用Add方法添加触发对象:
var
trigger1
=
ft.Add(
"
idTrigger1
"
);
要添加多个触发对象时只需继续用Add添加就行了。
程序源码
Code
var FixedTips = function (tip, options){ this .Tip = $$(tip); // 提示框 this ._trigger = null ; // 触发对象 this ._timer = null ; // 定时器 this ._cssTip = this .Tip.style; // 简化代码 this ._onshow = false ; // 记录当前显示状态 this .SetOptions(options); // 处理Tip对象 this ._cssTip.margin = 0 ; // 避免定位问题 this ._cssTip.position = " absolute " ; this ._cssTip.visibility = " hidden " ; this ._cssTip.display = " block " ; this ._cssTip.zIndex = 99 ; this ._cssTip.left = this ._cssTip.top = " -9999px " ; // 避免占位出现滚动条 // offset修正参数 var iLeft = iTop = 0 , p = this .Tip; while (p.offsetParent) { = p.offsetParent; iLeft += p.offsetLeft; iTop += p.offsetTop; this ._offsetleft = iLeft; this ._offsettop = iTop; // 移入Tip对象时保持显示状态 addEvent( this .Tip, " mouseover " , BindAsEventListener( this , function (e){ // 如果是外部元素进入,说明当前是隐藏延时阶段,那么清除定时器取消隐藏 this .Check(e.relatedTarget) && clearTimeout( this ._timer); // ie6处理select if (isIE6) { this ._iframe = document.createElement( " <iframe style='position:absolute;filter:alpha(opacity=0);display:none;'> " ); this ._iframe, document.body.childNodes[ 0 ]); // 用于点击方式隐藏 this ._fCH = BindAsEventListener( this , function (e) { if ( this .Check(e.target) && this .CheckHide()) { this .ReadyHide( this ._trigger.ClickHideDelay); // 用于触发方式隐藏 this ._fTH = BindAsEventListener( this , function (e) { if ( this .Check(e.relatedTarget) && this .CheckHide()) { this .ReadyHide( this ._trigger.TouchHideDelay); = { // 简化代码 // 设置默认属性 SetOptions: function (options) { this .options = { // 默认值 ClickShow: true , // 是否点击方式显示 ClickShowDelay: false , // 是否点击显示延时 ClickHide: true , // 是否点击方式隐藏 ClickHideDelay: false , // 是否点击隐藏延时 TouchShow: true , // 是否触发方式显示 TouchShowDelay: true , // 是否触发显示延时 TouchHide: true , // 是否触发方式隐藏 TouchHideDelay: true , // 是否触发隐藏延时 ShowDelay: 300 , // 显示延时时间 HideDelay: 300 , // 隐藏延时时间 Align: " clientleft " , // 水平方向定位 vAlign: " clienttop " , // 垂直方向定位 Custom: { left: 0 , top: 0 }, // 自定义定位 Percent: { left: 0 , top: 0 }, // 自定义百分比定位 Adaptive: false , // 是否自适应定位 Reset: false , // 自适应定位时是否重新定位 onShow: function (){}, // 显示时执行 onHide: function (){} // 隐藏时执行 }; this .options, options || {}); // 检查触发元素 Check: function (elem) { // 返回是否外部元素(即触发元素和Tip对象本身及其内部元素以外的元素对象) return ! this ._trigger || ! ( this .Tip === elem || this ._trigger.Elem === elem || this .Tip, elem) || Contains( this ._trigger.Elem, elem) // 准备显示 ReadyShow: function (delay) { this ._timer); var trigger = this ._trigger; // 点击方式隐藏 trigger.ClickHide && addEvent(document, " click " , this ._fCH); // 触发方式隐藏 trigger.TouchHide && addEvent( this ._trigger.Elem, " mouseout " , this ._fTH); // 是否延迟触发 if (delay) { this ._timer = setTimeout(Bind( this , this .Show), trigger.ShowDelay); else { this .Show(); }; // 显示 Show: function () { this ._timer); this ._trigger.onShow(); // 放在前面方便修改属性 // 根据预设定位和自定义定位计算left和top var trigger = this ._trigger, rect = trigger.Elem.getBoundingClientRect(), = isChrome || isSafari ? document.body : this ._doc, = scrolldoc.scrollLeft, scrollTop = scrolldoc.scrollTop, = trigger.Custom.left, customTop = trigger.Custom.top, = this .GetLeft(rect, trigger.Align) + customLeft, = this .GetTop(rect, trigger.vAlign) + customTop; // 自定义百分比定位 if (trigger.Percent.left) { iLeft += . 01 * trigger.Percent.left * trigger.Elem.offsetWidth; }; if (trigger.Percent.top) { iTop += . 01 * trigger.Percent.top * trigger.Elem.offsetHeight; }; // 自适应视窗定位 if (trigger.Adaptive) { // 修正定位参数 var maxLeft = this ._doc.clientWidth - this .Tip.offsetWidth, = this ._doc.clientHeight - this .Tip.offsetHeight; if (trigger.Reset) { // 自动重新定位 if (iLeft > maxLeft || iLeft < 0 ) { = this .GetLeft(rect, 2 * iLeft > maxLeft ? " left " : " right " ) + customLeft; if (iTop > maxTop || iTop < 0 ) { = this .GetTop(rect, 2 * iTop > maxTop ? " top " : " bottom " ) + customTop; else { // 修正到适合位置 iLeft = Math.max(Math.min(iLeft, maxLeft), 0 ); = Math.max(Math.min(iTop, maxTop), 0 ); // 设置位置并显示 this ._cssTip.left = iLeft + scrollLeft - this ._offsetleft + " px " ; this ._cssTip.top = iTop + scrollTop - this ._offsettop + " px " ; this ._cssTip.visibility = " visible " ; // ie6处理select if (isIE6) { this ._iframe.style.left = iLeft + scrollLeft + " px " ; this ._iframe.style.top = iTop + scrollTop + " px " ; this ._iframe.style.width = this .Tip.offsetWidth + " px " ; this ._iframe.style.height = this .Tip.offsetHeight + " px " ; this ._iframe.style.display = "" ; // 触发方式隐藏 trigger.TouchHide && addEvent( this .Tip, " mouseout " , this ._fTH); // 获取相对触发元素的left GetLeft: function (rect, align) { switch (align.toLowerCase()) { case " left " : return rect.left - this .Tip.offsetWidth; case " clientleft " : return rect.left; case " center " : return (rect.left + rect.right - this .Tip.offsetWidth) / 2; case " clientright " : return rect.right - this .Tip.offsetWidth; case " right " : default : return rect.right; // 获取相对触发元素的top GetTop: function (rect, valign) { switch (valign.toLowerCase()) { case " top " : return rect.top - this .Tip.offsetHeight; case " clienttop " : return rect.top; case " center " : return (rect.top + rect.bottom - this .Tip.offsetHeight) / 2; case " clientbottom " : return rect.bottom - this .Tip.offsetHeight; case " bottom " : default : return rect.bottom; // 准备隐藏 ReadyHide: function (delay) { this ._timer); if (delay) { this ._timer = setTimeout(Bind( this , this .Hide), this ._trigger.HideDelay); else { this .Hide(); }; // 隐藏 Hide: function () { this ._timer); // 设置隐藏 this ._cssTip.visibility = " hidden " ; this ._cssTip.left = this ._cssTip.top = " -9999px " ; // ie6处理select if (isIE6) { this ._iframe.style.display = " none " ; }; // 处理触发对象 if ( !! this ._trigger) { this ._trigger.onHide(); this ._trigger.Elem, " mouseout " , this ._fTH); this ._trigger = null ; // 移除事件 removeEvent( this .Tip, " mouseout " , this ._fTH); " click " , this ._fCH); // 添加触发对象 Add: function (elem, options) { // 创建一个触发对象 var elem = $$(elem), trigger = Extend(Extend({ Elem: elem }, this .options), options || {}); // 点击方式显示 addEvent(elem, " click " , BindAsEventListener( this , function (e){ if (trigger.ClickShow) { if ( this .CheckShow(trigger)) { this .ReadyShow(trigger.ClickShowDelay); else { this ._timer); // 触发方式显示 addEvent(elem, " mouseover " , BindAsEventListener( this , function (e){ if (trigger.TouchShow) { if ( this .CheckShow(trigger)) { this .ReadyShow(trigger.TouchShowDelay); else if ( this .Check(e.relatedTarget)) { this ._timer); // 返回触发对象 return trigger; // 显示检查 CheckShow: function (trigger) { if (trigger !== this ._trigger) { // 不是同一个触发对象就先执行Hide防止冲突 this .Hide(); this ._trigger = trigger; return true ; else { return false ; }; // 隐藏检查 CheckHide: function () { if ( this ._cssTip.visibility === " hidden " ) { // 本来就是隐藏状态,不需要再执行Hide clearTimeout( this ._timer); this ._trigger.Elem, " mouseout " , this ._fTH); this ._trigger = null ; " click " , this ._fCH); return false ; else { return true ; };
完整实例下载