安卓开发25:碎片 Fragment使用
Fragment说明
为了解决不同屏幕分辩率的动态和灵活UI设计。大屏幕如平板小屏幕如手机,平板电脑的设计使得其有更多的空间来放更多的UI组件,而多出来的空间存放UI使其会产生更多的交互,从而诞生了fragment。fragments 的设计不需要你来亲自管理view hierarchy 的复杂变化,通过将Activity 的布局分散到frament 中,可以在运行时修改activity 的外观,并且由activity 管理的back stack 中保存些变化。

生命周期:
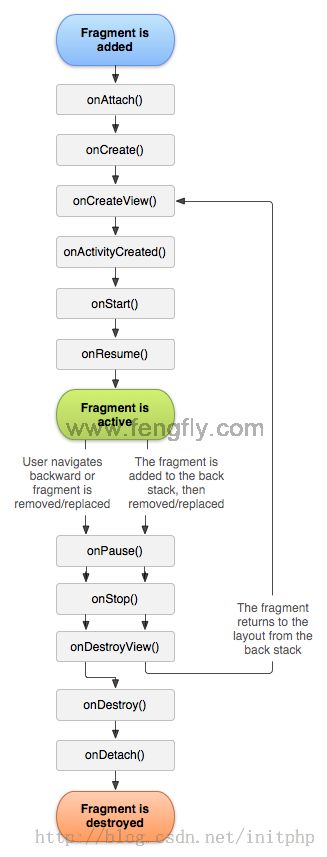
1.onAttach() 当Fragment附加到Activity上调用。
2.onCreate() Fragment初始化操作
3.onCreateView() 用于首次绘制用户界面的回调方法,必须返回要创建的Fragments 视图UI。假如你不希望提供Fragments 用户界面则可以返回NULL。
4.onActivityCreated() 父Activity和Fragment的UI都被完全创建完后调用。
5.onDestoryView() Fragment的UI被分离时调用。
6.onDatch() Fragment从父Activity身上分离的时候调用。
7.onPause() 当用户离开这个Fragments 的时候调用,这时你要提交任何应该持久的变化,因为用户可能不会回来。
通过XML布局方式将Fragment放进Activity中
MainActivity
package com.example.test.com;


import android.app.Activity;

import android.os.Bundle;

import android.view.Window;


public class MainActivity extends Activity {


    @Override

    protected void onCreate(Bundle savedInstanceState) {

        super.onCreate(savedInstanceState);

        requestWindowFeature(Window.FEATURE_NO_TITLE);

        setContentView(R.layout.main);

    }


}
main.xml
<RelativeLayout xmlns:android="http://schemas.android.com/apk/res/android"

    android:layout_width="700dp"

    android:layout_height="300dp"

    android:orientation="horizontal"

    android:padding="10dp" >


   <!-- 通过name指定 TestFragment -->

    <fragment

        android:id="@+id/fragment1"

        android:name="com.example.test.com.TestFragment"

        android:layout_width="wrap_content"

        android:layout_height="wrap_content"

        android:layout_marginBottom="52dp"/>


</RelativeLayout>
TestFragment
package com.example.test.com;


import android.app.Fragment;

import android.os.Bundle;

import android.view.LayoutInflater;

import android.view.View;

import android.view.ViewGroup;


/**

 * 一个测试的Fragment

 * @author zhuli.zhul

 * @date 2013 2013-8-23 下午6:44:22

 */

public class TestFragment extends Fragment {


    /**

     * 显示页面

     */

    @Override

    public View onCreateView(LayoutInflater inflater, ViewGroup container, Bundle savedInstanceState) {

        super.onCreateView(inflater, container, savedInstanceState);

        return inflater.inflate(R.layout.test_f, container, false); //指定test_f layout

    }


}
test_f.xml
<RelativeLayout xmlns:android="http://schemas.android.com/apk/res/android"

    android:layout_width="700dp"

    android:layout_height="300dp"

    android:orientation="horizontal"

    android:padding="10dp" >


    <Button

        android:id="@+id/button1"

        android:layout_width="wrap_content"

        android:layout_height="wrap_content"

        android:layout_alignParentLeft="true"

        android:layout_centerVertical="true"

        android:layout_marginLeft="148dp"

        android:text="Button" />


</RelativeLayout>

说明:
使用这种xml中指定Fragment的方法,有一种缺陷就是不能再Java代码中动态修改Fragment。下面我们会有一种通过Java代码动态控制Fragment的简单例子。
动态添加和控制Fragment
MainActivity
package com.example.test.com;


import android.app.Activity;

import android.app.FragmentManager;

import android.app.FragmentTransaction;

import android.os.Bundle;

import android.view.Window;


public class MainActivity extends Activity {


    @Override

    protected void onCreate(Bundle savedInstanceState) {

        super.onCreate(savedInstanceState);

        requestWindowFeature(Window.FEATURE_NO_TITLE);

        setContentView(R.layout.main);


        //通过fragmentManager 就可以动态新增一个Fragment

        FragmentManager fragmentManager = getFragmentManager();

        FragmentTransaction fTransaction = fragmentManager.beginTransaction();

        fTransaction.add(R.id.frame, new TestFragment()); //新增

        //Fragment fragment = fragmentManager.findFragmentById(R.id.frame); //通过id查找

        //fTransaction.remove(fragment); //删除

        //fTransaction.replace(R.id.frame, new TestFragment()); //替换

        fTransaction.commit(); //提交

    }


}
main.xml
<RelativeLayout xmlns:android="http://schemas.android.com/apk/res/android"

    android:layout_width="700dp"

    android:layout_height="300dp"

    android:orientation="horizontal"

    android:padding="10dp" >


    <!-- 这个是可以动态修改的FrameLayout -->


    <FrameLayout

        android:id="@+id/frame"

        android:layout_width="wrap_content"

        android:layout_height="wrap_content"

        android:layout_alignParentLeft="true"

        android:layout_alignParentTop="true"

        android:layout_marginLeft="106dp"

        android:layout_marginTop="92dp" >

    </FrameLayout>


</RelativeLayout>
TestFragment
package com.example.test.com;


import android.app.Fragment;

import android.os.Bundle;

import android.view.LayoutInflater;

import android.view.View;

import android.view.ViewGroup;


/**

 * 一个测试的Fragment

 * @author zhuli.zhul

 * @date 2013 2013-8-23 下午6:44:22

 */

public class TestFragment extends Fragment {


    /**

     * 显示页面

     */

    @Override

    public View onCreateView(LayoutInflater inflater, ViewGroup container, Bundle savedInstanceState) {

        super.onCreateView(inflater, container, savedInstanceState);

        return inflater.inflate(R.layout.test_f, container, false); //指定test_f layout

    }


}
test_f.xml
<RelativeLayout xmlns:android="http://schemas.android.com/apk/res/android"

    android:layout_width="700dp"

    android:layout_height="300dp"

    android:orientation="horizontal"

    android:padding="10dp" >


    <Button

        android:id="@+id/button1"

        android:layout_width="wrap_content"

        android:layout_height="wrap_content"

        android:layout_alignParentLeft="true"

        android:layout_centerVertical="true"

        android:layout_marginLeft="148dp"

        android:text="Button2" />


</RelativeLayout>
说明:
效果是一样的,但是可以动态添加删除以及隐藏显示等操作。