Android新手入门1
文章目录
- 前言
- 开发文档
- 一、创建安卓项目
-
- 1.目录结构
- 二、Activity活动基本用法
-
- 1.创建活动
- 2.创建和加载布局
- 3.在AndroidManifest.xml注册
- 4.在活动中使用Toast
- 5.在活动中使用Menu
- 6.使用intent
-
-
- 页面创建
- 页面跳转
- 活动之间数据传递
-
- 总结
前言
本人从零开始学习安卓开发,在b站上看up主视频,可搜索“卓越工作室”,2020年安卓(Android)最新基础知识详解,一起学习!相关源码可见本人发布的资源
开发文档
一、创建安卓项目
1.目录结构
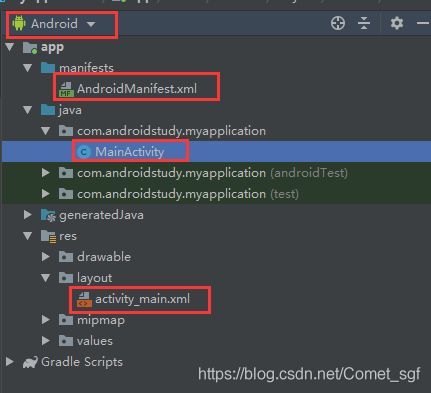
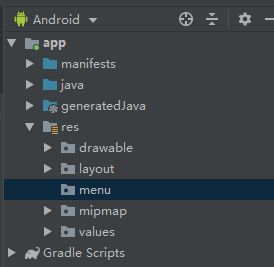
推荐使用Android APP 项目视图
AndroidManifest.xml是项目全局配置、注册文件
MainActivity是一个页面,也是主页面,并不是单一一个java文件,而是由许多配置文件组成的
activity_main.xml是MainActivity的布局配置文件,二者一一对应
二、Activity活动基本用法
1.创建活动
(有MainActivity可跳过此步,仅理解即可)在新建页面activity时,使用模板创建,如下图:
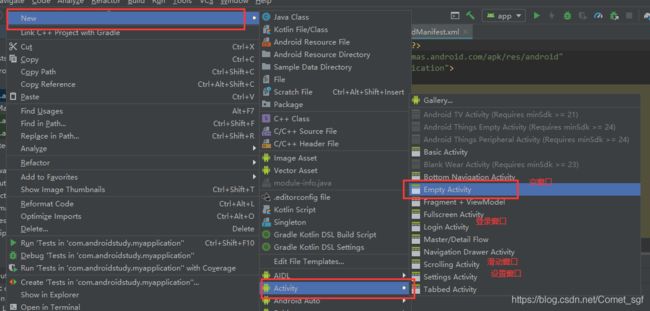
活动创建后,会在res->layout文件夹下生成布局文件,AndroidManifest.xml中也会生成对应配置语句
2.创建和加载布局
在初始的新建项目中,有hello world的文本,可以作为参考。
在activity_main.xml中新添加Button组件,代码如下:
<androidx.constraintlayout.widget.ConstraintLayout xmlns:android="http://schemas.android.com/apk/res/android"
    xmlns:app="http://schemas.android.com/apk/res-auto"
    xmlns:tools="http://schemas.android.com/tools"
    android:layout_width="match_parent"
    android:layout_height="match_parent"
    tools:context=".MainActivity">

    <Button
        android:id="@+id/button1"
        android:text="Button1"
        android:layout_width="match_parent"
        android:layout_height="wrap_content"
        tools:ignore="MissingConstraints" />
    <TextView
        android:layout_width="wrap_content"
        android:layout_height="wrap_content"
        android:text="Hello World!"
        app:layout_constraintBottom_toBottomOf="parent"
        app:layout_constraintLeft_toLeftOf="parent"
        app:layout_constraintRight_toRightOf="parent"
        app:layout_constraintTop_toTopOf="parent" />

androidx.constraintlayout.widget.ConstraintLayout>
敲出Button时会有自动补全,完善layout布局属性,其他属性自行添加,id要求以“@+id/”形式编写,text内容自定义,tools:ignore是忽略其布局限制的语句,可不添加。
3.在AndroidManifest.xml注册
<manifest xmlns:android="http://schemas.android.com/apk/res/android"
    package="com.androidstudy.myapplication">

    <application
        android:allowBackup="true"
        android:icon="@mipmap/ic_launcher"
        android:label="@string/app_name"
        android:roundIcon="@mipmap/ic_launcher_round"
        android:supportsRtl="true"
        android:theme="@style/AppTheme">
        <activity android:name=".MainActivity">
            <intent-filter>
                <action android:name="android.intent.action.MAIN" />

                <category android:name="android.intent.category.LAUNCHER" />
            intent-filter>
        activity>
    application>

manifest>
activity标签为页面注册功能,intent-filter标签内通常含有action和category标签
- action中name属性只能有唯一的MAIN作为主入口,在其他activity中可自定义
- category中name属性为LAUNCHER,作为第一个打开的页面,其他页面用DEFAULT
(目前理解如上,如有错误,还请指出,谢谢)
4.在活动中使用Toast
第二步中已经添加了按钮的配置文件,现在在activity中进行初始化,并且添加点击监听。
package com.androidstudy.myapplication;

import androidx.appcompat.app.AppCompatActivity;

import android.os.Bundle;
import android.view.View;
import android.widget.Button;
import android.widget.Toast;

public class MainActivity extends AppCompatActivity {

    //定义页面中按钮
    private Button button1;

    @Override
    protected void onCreate(Bundle savedInstanceState) {

        super.onCreate(savedInstanceState);
        setContentView(R.layout.activity_main);
        initView();
    }

    public void initView(){

        //通过R类id找到配置中的按钮
        button1 = findViewById(R.id.button1);
        //设置点击监听器,用匿名内部类直接重写
        button1.setOnClickListener(new View.OnClickListener() {

            @Override
            public void onClick(View v) {

                Toast.makeText(MainActivity.this, "SHOW ME", Toast.LENGTH_SHORT).show();
            }
        });
    }
}
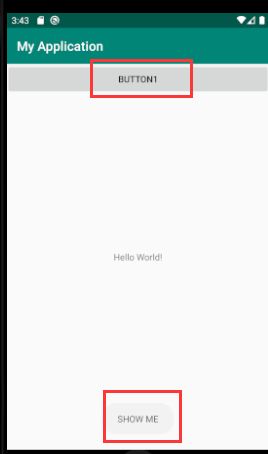
Toast类中,makeText函数可以显示如上图提示信息,第二个参数为内容,第三个参数为信息的显示时间长度,可自行更改;
上午中Button按钮的文字全是大写,是由于页面设置的问题。可通过如下方式解决:
<resources>
<style name="AppTheme" parent="Theme.AppCompat.Light.DarkActionBar">
- "colorPrimary"
>@color/colorPrimary
- "colorPrimaryDark">@color/colorPrimaryDark
- "colorAccent">@color/colorAccent
- "android:textAllCaps">false
style>
resources>
重新运行即可。
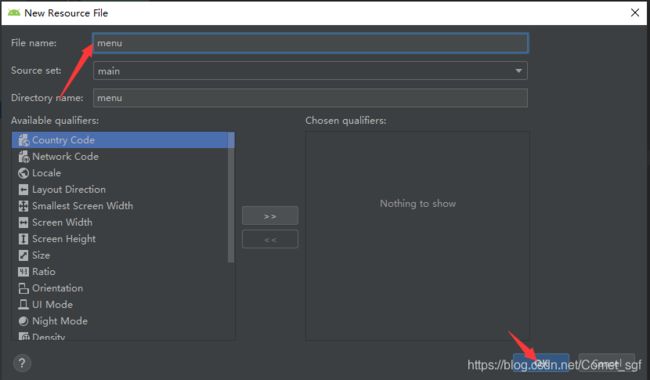
5.在活动中使用Menu
<menu xmlns:android="http://schemas.android.com/apk/res/android">

    <item
        android:id="@+id/add"
        android:title="Add" />
    <item
        android:id="@+id/remove"
        android:title="Remove" />

menu>
4.在MainActivity中进行初始化,有专门的初始化onCreateOptionsMenu方法,以及点击时onOptionsItemSelected方法。
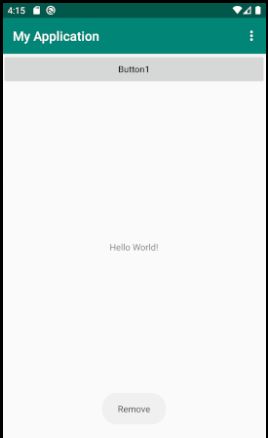
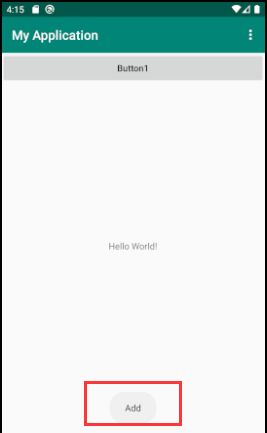
此处设置为点击时显示Toast提示。
@Override
    public boolean onCreateOptionsMenu(Menu menu) {

        getMenuInflater().inflate(R.menu.menu,menu);
        return true;
    }

    @Override
    public boolean onOptionsItemSelected(@NonNull MenuItem item) {

       switch (item.getItemId()){

           case R.id.add:
               Toast.makeText(MainActivity.this, "Add",Toast.LENGTH_LONG).show();
               break;
           case R.id.remove:
               Toast.makeText(MainActivity.this, "Remove",Toast.LENGTH_SHORT).show();
               break;
       }
       return true;
    }
6.使用intent
Intent类可以完成页面跳转以及数据传递等功能,下面一一举例说明。
页面创建
- 新建页面SecondActivity,添加按钮Button2,操作方式如第一步所述。
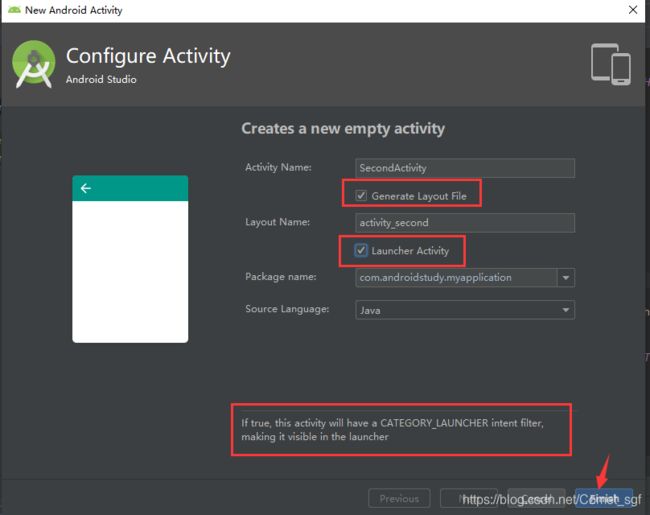
两个都勾选,然后点击finish。 - 修改AndroidManifest.xml,更改SecondActivity的Action和Category如下,name可以自定义,但不可以重复
<activity android:name=".SecondActivity">
            <intent-filter>
                <action android:name="com.androidstudy.myapplication.SEC_ACTION" />

                <category android:name="android.intent.category.DEFAULT" />
            intent-filter>
        activity>
页面跳转
- 显式intent,在Button1的监听器中添加Intent,完成两个页面的跳转
public void initView(){

        //通过R类id找到配置中的按钮
        button1 = findViewById(R.id.button1);
        //设置点击监听器,用匿名内部类直接重写
        button1.setOnClickListener(new View.OnClickListener() {

            @Override
            public void onClick(View v) {

                Toast.makeText(MainActivity.this, "SHOW ME", Toast.LENGTH_SHORT).show();

                //显式Intent
                Intent intent = new Intent(MainActivity.this, SecondActivity.class);
                startActivity(intent);
            }
        });
    }
- 隐式intent,不指明特定Class
//隐式Intent
Intent intent = new Intent("com.androidstudy.myapplication.SEC_ACTION");
startActivity(intent);
活动之间数据传递
1. Main-信息传递->Second
点击Main中Button1,跳转到Second并发送消息。
- Main发送方,在button按钮的监听器中
Intent intent = new Intent("com.androidstudy.myapplication.SEC_ACTION");
intent.putExtra("Data","Main to Second");
startActivity(intent);
- Second接收方
protected void onCreate(Bundle savedInstanceState) {

        super.onCreate(savedInstanceState);
        setContentView(R.layout.activity_second);
        initView();
        //接收Intent
        Intent intent = getIntent();
        String data = intent.getStringExtra("Data");
        //日志输出
        Log.d("Sec",data);
    }
2. Main-跳转->Second-信息传递->Main
点击Main中Button1,跳转到Second,点击Second中Button2,发送消息,关闭Second,Main接收消息。
- Main接收方
public void initView(){

        //通过R类id找到配置中的按钮
        button1 = findViewById(R.id.button1);
        //设置点击监听器,用匿名内部类直接重写
        button1.setOnClickListener(new View.OnClickListener() {

            @Override
            public void onClick(View v) {

                Toast.makeText(MainActivity.this, "SHOW ME", Toast.LENGTH_SHORT).show();

                Intent intent = new Intent(MainActivity.this, SecondActivity.class);

                //接收信息 请求码 识别请求和响应
                startActivityForResult(intent,1);
            }
        });
    }
    @Override
    protected void onActivityResult(int requestCode, int resultCode, @Nullable Intent data) {

        switch (requestCode){

            case 1 :
                if(resultCode == RESULT_OK){

                    String dataResult = data.getStringExtra("data_return");
                    Log.d("MainActivity",dataResult);
                }
                break;
        }
    }
- Second发送方
public void initView(){

        button2 = findViewById(R.id.button2);
        button2.setOnClickListener(new View.OnClickListener() {

            @Override
            public void onClick(View v) {

                Intent intent = new Intent();
                intent.putExtra("data_return","Hello Main");
                setResult(RESULT_OK, intent);
                finish();//关闭窗口
            }
        });
    }
总结
简单学习了Android,感觉不太陌生了。下次会有新的学习内容。如果以上有哪里值得讨论或者有问题,都可以留言。希望与大家共同进步!


