Ansible中的playbook,变量及加密
文章目录
-
-
- 一、Playbook
-
- 1、Playbook的功能
- 2、特点
- 3、语法简介
- 4、playbook执行命令
- 5、Playbook的核心组件
- 二、vim 设定技巧
-
- 1、自动化部署
- 2、脚本调用
- 3、JINJA2模板
- 三、 Ansible中的变量及加密
-
- 1.变量命名
- 2.变量级别
- 3.变量设定和使用方式
- 4.认证
- 5. ansible的加密控制
-
一、Playbook
1、Playbook的功能
playbook 是由一个或多个play组成的列表
Playboot 文件使用YAML来写的
2、特点
可读性好
和脚本语言交互性号
易于实现
适用程序执行流梳理方式
可扩展性强
3、语法简介
在文件中用[—]开始
在文件中用[…]结尾
次行一般书写文件内容
缩进严格
大小写敏感
key/value可以多行书写也可一行书写,一行书写用,隔开
value可以是个字符串,也可是list
一个play需要包括name和tasks
name 是描述
tasks 是动作
一个name只能包含一个task
扩展名称yml或者yaml
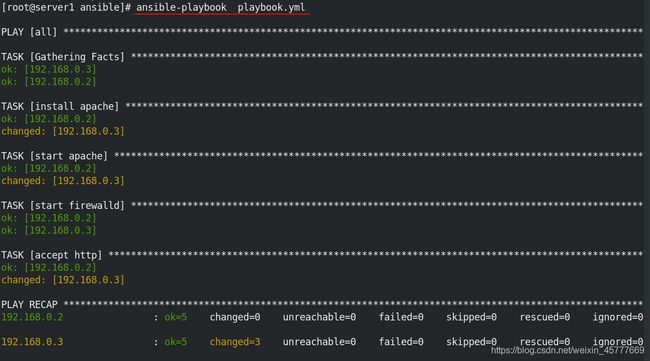
4、playbook执行命令
ansible-playbook xxx.yml …
–check|-C ##检测
–syntax-check ##check language
–list-hosts ##列出hosts
–list-tags ##列出tag
–list-tasks ##列出task
–limit ##指定执行主机
-v -vv ##现实过程
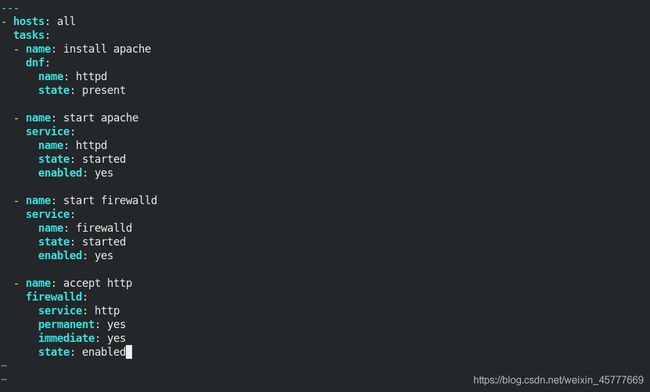
5、Playbook的核心组件
name #可选,建议使用多用于说明
hosts #受控主机列表
tasks #任务
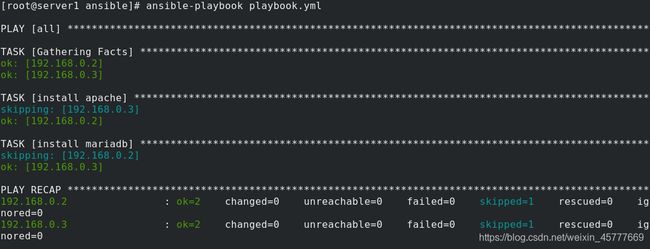
#用与选择执行部分代码
[root@foundation15 isos]# mount /isos/rhel-8.2-x86_64-dvd.iso /var/www/html/rhel8.2
[root@server1 ansible]# vim hosts
[test]
172.25.15.2
[prod]
172.25.15.3
二、vim 设定技巧
autocmd FileType yaml setlocal ai ts=2 sw=2 et
setlocal ##设定当前文件
ai ##自动退格对齐 auto indent
ts ##tab建长度为2空格 tabstop=2
sw ##缩进长度为2 shiftwidth=2
et ##把tab键变成空格 expandtab

1、自动化部署

2、脚本调用


3、JINJA2模板
#介绍
Jinja2是Python下一个被广泛应用的模版引擎
他的设计思想来源于Django的模板引擎,
并扩展了其语法和一系列强大的功能。
其中最显著的一个是增加了沙箱执行功能和可选的自动转义功能
##j2模板书写规则#
{# /etc/hosts line #}
127.0.0.1 localhost
{ { ansible_facts[‘all_ipv4_addresses’] }} { {ansible_facts[‘fqdn’]}}
[root@server1 ansible]# vim httpd.conf  httpd.conf.j2
[root@server1 ansible]# vim httpd.conf.j2
Listen {
     {
      http_port }}


[root@server1 ansible]# vim webserver.yml
8000
[root@server2 ansible]# getenforce
Enforcing
[root@server2 ansible]# setenforce 0
[root@server2 tmp]# curl localhost:8000
www.westos.org

[root@server1 ansible]# ansible-playbook  -e "http_port=80" webserver.yml
[root@server1 ansible]# curl 192.168.0.2
www.westos.org

[root@server1 ansible]# vim webserver.yml
[root@server1 ansible]# ansible-playbook webserver.yml
[root@server1 ansible]# curl 192.168.0.2:8080
www.westos.org
三、 Ansible中的变量及加密
1.变量命名
只能包含数字,下划线,字母
只能用下划线或字母开头
2.变量级别
全局: 从命令行或配置文件中设定的
paly: 在play和相关结构中设定的
主机: 由清单,事实收集或注册的任务
变量优先级设定:
狭窄范围有限与广域范围
3.变量设定和使用方式
1.在playbook中直接定义变量
[root@server1 ansible]# vim webserver.yml
- import_tasks: task.yml #取消注释
[root@server1 ansible]# ansible-playbook webserver.yml
[root@server1 ansible]# vim task.yml
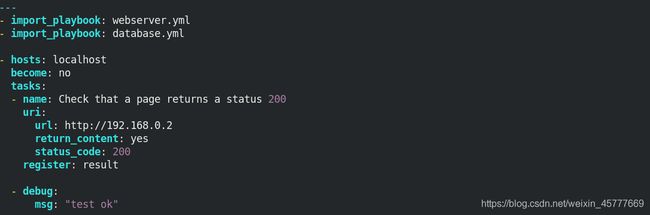
- name: Check that a page returns a status 200
uri:
url: "http://172.25.15.2:{
{ http_port }}"
return_content: yes
status_code: 200
register: result
[root@server1 ansible]# ansible-playbook webserver.yml

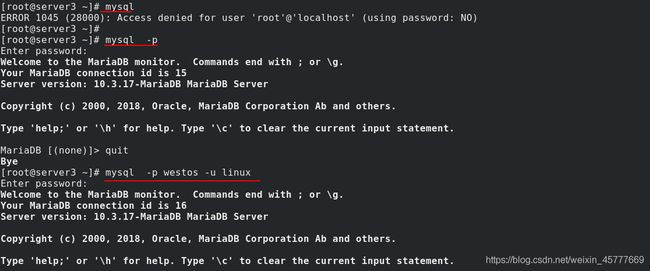
4.认证
[root@server2 conf]# cd /var/www/html
[root@server2 html]# ls
index.html
[root@server2 html]# vim .htaccess
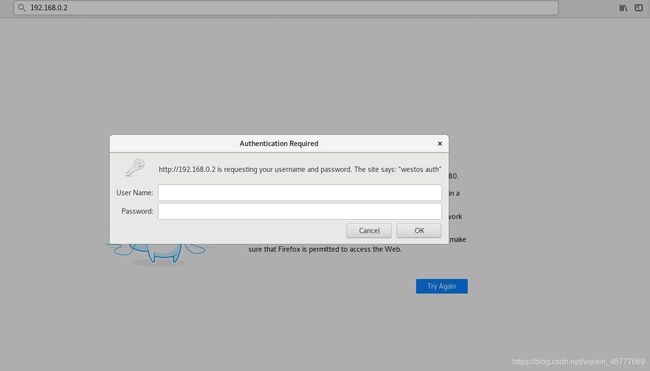
AuthType Basic
AuthName "westos auth"
AuthUserFile /etc/httpd/conf/htpasswd
require valid-user
[root@server2 httpd]# htpasswd -c /etc/httpd/conf/htpasswd linux
New password:
Re-type new password:
Adding password for user linux
[root@server2 httpd]# htpasswd /etc/httpd/conf/htpasswd admin
New password:
Re-type new password:
Adding password for user admin
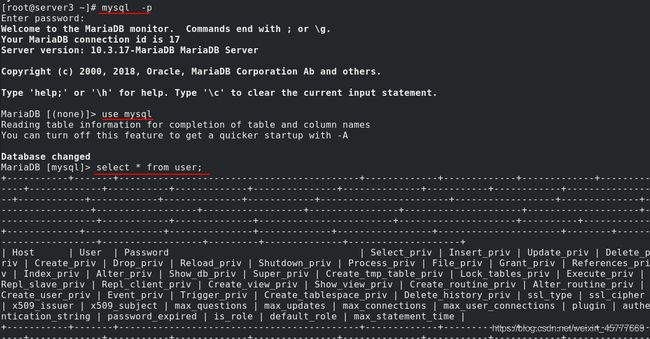
[root@server2 httpd]# cat /etc/httpd/conf/htpasswd
linux:$apr1$903QlUf9$tGUxGQRLh58AtzxgnIcKf0
admin:$apr1$ai0ZpQvF$C1eoNHR5KwYt7T7GE7nVR1
[root@server2 html]# l.
. .. .htaccess
[root@server2 html]# pwd
/var/www/html
[root@server2 html]# scp .htaccess server1:/mnt/ansible/
[root@server2 html]# scp /etc/httpd/conf/htpasswd  server1:/mnt/ansible/

[root@server1 ansible]# pwd
/mnt/ansible
[root@server1 ansible]# ls
ansible.cfg  apache  database.yml  hosts  playbook.yml
[root@server1 ansible]# ansible-playbook apache/webserver.yml
[root@server1 ansible]# curl 192.168.0.2:8080
401
[root@server1 apache]# vim webserver.yml
80
[root@server1 apache]# vim httpd.conf.j2
    AllowOverride All
[root@server1 apache]# l.
.  ..  .htaccess
[root@server1 apache]# mv .htaccess htaccess
[root@server1 apache]# ls
[root@server1 apache]# vim webserver.yml
[root@server1 ansible]# ansible-playbook apache/webserver.yml
[root@server1 ansible]# curl 192.168.0.2
401

[root@server1 ansible]# vim apache/webserver.yml
[root@server1 ansible]# vim apache/task.yml
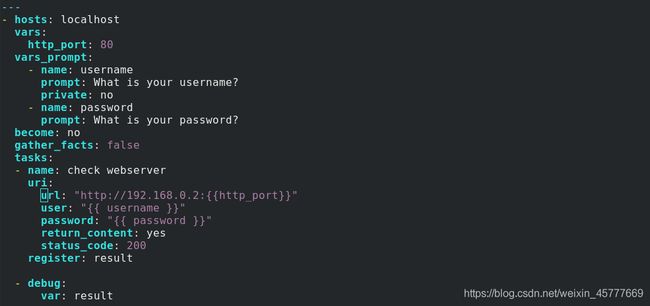
---
- name: Check webserver
uri:
url: "http://192.168.0.2:{
{ http_port }}"
user: linux
password: westos
return_content: yes
status_code: 200
register: result
- debug:
var: result
[root@server1 ansible]# ansible-playbook --list-tasks apache/webserver.yml
[root@server1 ansible]# ansible-playbook --start-at-task "Check webserver" apache/webserver.yml
[root@server1 ansible]# vim apache/task.yml
[root@server1 ansible]# ansible-playbook apache/task.yml

[root@server1 ansible]# vim apache/webserver.yml
- import_playbook: task.yml  ##最后
[root@server1 ansible]# ansible-playbook apache/webserver.yml
[root@server1 ansible]# vim apache/webserver.yml
  - name: create index.html
    copy:
      content: "{
     { ansible_hostname }}\n"
      dest: /var/www/html/index.html

#- import_playbook: task.yml

[root@server1 ansible]# vim apache/httpd.conf.j2
    AllowOverride None

[root@server1 ansible]# ansible-playbook apache/webserver.yml
[root@server1 ansible]# curl 192.168.0.2
server2
[root@server1 ansible]# curl 192.168.0.3
server3
[root@server1 ansible]# vim playbook.yml
---
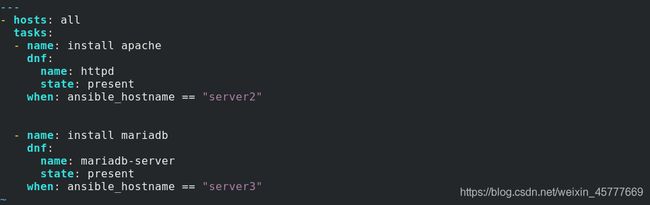
- hosts: all
tasks:
- name: system info
template:
src: hostinfo.j2
dest: /tmp/hostinfo
[root@server1 ansible]# vim hostinfo.j2
hostname: {
{
ansible_facts['hostname'] }}
ip: {
{
ansible_facts["enp1s0"]["ipv4"]["address"] }}
DNS: {
{
ansible_facts['dns']['nameservers'][-1] }}
vad1: {
{
ansible_facts['devices']['vda']['partitions']['vda1']['size'] }}
kernel: {
{
ansible_facts['kernel'] }}
[root@server1 ansible]# ansible-playbook playbook.yml
[root@server2 html]# cat /tmp/hostinfo
hostname: server2
ip: 192.168.0.2
DNS: 114.114.114.114
vad1: 1021.00 MB
kernel: 4.18.0-193.el8.x86_64
[root@server1 ansible]# vim apache/httpd.conf.j2
Listen {
{
ansible_facts["enp1s0"]["ipv4"]["address"] }}:{
{
http_port }}
[root@server1 ansible]# ansible-playbook apache/webserver.yml
[root@server2 html]# netstat -antlp
tcp 0 0 192.168.0.2:80 0.0.0.0:* LISTEN 40700/httpd


loop

5. ansible的加密控制
#创建建立文件
ansible-vault create westos
vim westos-vault
lee
ansible-vault create --vault-password-file=westos-valut westos
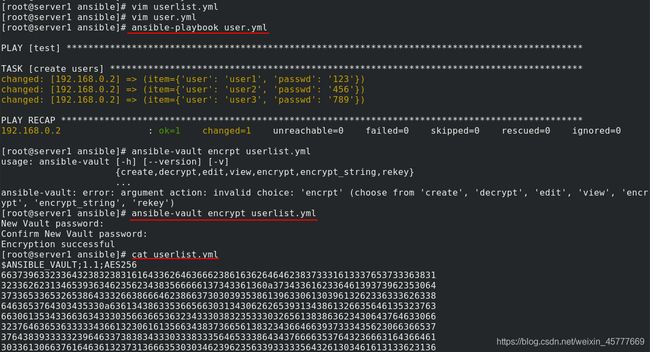
#加密现有文件
ansible-vault encrypt test
#查看加密文件
ansible-vault view westos
ansible-vault view --vault-password-file=westos-valut westos
#编辑加密文件
ansible-vault edit westos1
ansible-vault edit --vault-password-file=westos-valut westos
##解密文件
ansible-vault decrypt westos ##文件永久解密
ansible-vault decrypt westos --output=linux ##文件解密保存为linux
##更改密码
ansible-vault rekey westos1
ansible-vault rekey westos1 --new-vault-password-file=key1
#playbook#
ansible-playbook apache_install.yml --ask-vault-pass
#2.在文件中定义变量#
#7.使用数组设定变量#
