HTML、CSS、JavaScript学习笔记 图文并茂 案例详实(再次系统学习-持续更新)
HTML学习笔记
-
- 2020/7/11 P1~P31
-
- HTML基础知识点
- 2020/7/12 P31~P92
-
- P31~P61 HTML基础
- P62~P92 CSS基础
- 2020/7/13 P93~P114
-
- P93~P105 CSS的各类选择器
- P105~P114 元素显示模式
- 2020/7/14 P115~P135
-
- P115~P128 背景属性
- P129~P135 CSS三大特性
- 2020/7/17 P136~P168
-
- P136~P152盒子模型、表格细线边框
- P153~P168
-
- 垂直外边距塌陷问题
- ps基本操作(简)
- 文字、盒子的阴影
- 2020/7/19 P169~P220
-
- P169~P188 网页布局案例
-
- 案例1
- 案例2
- 2020/8/3
-
- 一个小成果
- P222~P237 定位详解
-
- 相对定位特性
- 绝对定位特性
- “子绝父相”
- 固定定位fixed 图示
- 粘性定位 sticky
- 小总结
- 定位叠放次序 z-index
- 绝对定位的盒子居中
- 定位的特殊特性
- 2020/8/4
-
- 淘宝轮播图
2020/7/11 P1~P31
HTML基础知识点
<!DOCTYPE html> <!--文档类型声明标签-->
<html lang="zh-CN"> <!--en是英文-->
<head>
<meta charset="UTF-8"> <!--万国码-->
<meta name="viewport" content="width=device-width, initial-scale=1.0">
<title>Document</title>
</head>
<body>
我是<strong>加粗</strong>的文字
<b>加粗</b>
我是<em>倾斜</em>的文字
<i>倾斜</i>
添加<del>删除线</del>
<s>删除线</s>
添加<ins>下划线</ins>
<u>下划线</u>
<!--div和span都是盒子,无实际含义-->
<div>我是div标签我一人占一行</div>
<div>我是div标签我一人占一行</div>
<span>span标签是个小盒子</span>
<span>小盒子</span>
<span>小盒子</span>
<br />
<img src="img1.JPG" alt="如果图片链接挂了就显示这个" title="当鼠标滑到图片显示这个" width="300px"/>
<img src="img.JPG" alt="如果图片链接挂了就显示这个" title="当鼠标滑到图片显示这个" width="300px" />
<!--宽或高设置一个,另一个就会根据长宽比自己调节-->
<br />
<a href="http://www.qq.com" target="_self">腾讯</a>
<a href="http://www.qq.com" target="_blank">腾讯</a>
<!--target 打开窗口的方式 默认的值是_self 当前窗口打开页面 _blank新窗口打开页面-->
<h4>下载链接:地址链接的是 文件 .exe 或者是 .zip 等压缩包形式</h4>
<a href="img1.zip">下载文件</a><!--点击可以下载文件-->
<a href="http://www.qq.com"><img src="img1.JPG"/></a><!--网页元素链接-->
<br />
<!--锚点链接:点击链接可以快速定位到页面中的某一个位置-->
<!--1.在链接文本的href属性中,设置属性值为 #名字 的形式,如-->
<a href=" #two">我的资料</a>
<!--2.找到目标位置标签,里面添加一个id 属性=刚才的名字,如:-->
<h3>早年经历</h3>
<p>刘亦菲原名为安风,小名为茜茜(读 xīxī)。因父母离异,后随她的母亲刘晓莉
刘亦菲童年照
刘亦菲童年照(8张)
改姓刘,她的姥姥为她取名刘茜美子。
1995年,8岁的刘亦菲参加了中南商都第2届童花杯童装模特比赛,她在参赛的1800多名少年儿童中以自己良好的表演水平和优越的形体条件夺得冠军 [21] 。
刘亦菲在武汉市鄱阳街小学上学,她在“庆六一”文艺晚会上还表演了舞蹈《欢乐的节日》 [22] 。1997年,刘亦菲从鄱阳街小学退学,因母亲工作关系移居美国 [7] 。因念书关系及待在美国时间较长,故刘亦菲母亲将其国籍改为美国。同年,刘亦菲在美国纽约开始上中学 [23] 。
2002年,回国的刘亦菲参加了北京电影学院的招生考试,并且顺利通过了三轮考试,从而被北京电影学院正式录取 [24] 。</p>
<h3 id="two">个人资料</h3>
<p>刘亦菲,1987年8月25日出生于湖北省武汉市,华语影视女演员、歌手,毕业于北京电影学院2002级表演系本科。
2002年主演个人首部电视剧《金粉世家》,从而踏入演艺圈。2003年因主演武侠剧《天龙八部》崭露头角。
2004年凭借仙侠剧《仙剑奇侠传》赵灵儿一角获得了高人气与关注度。</p>
<!-- Ctrl+/ 自动生成注释 -->
<!-- 特殊字符 -->
<!-- 空格符 -->
<!-- 小于号 --><
<!-- 大于号 -->>
<!-- 注册商标 -->®
<!-- 版权 -->©
</body>
</html>
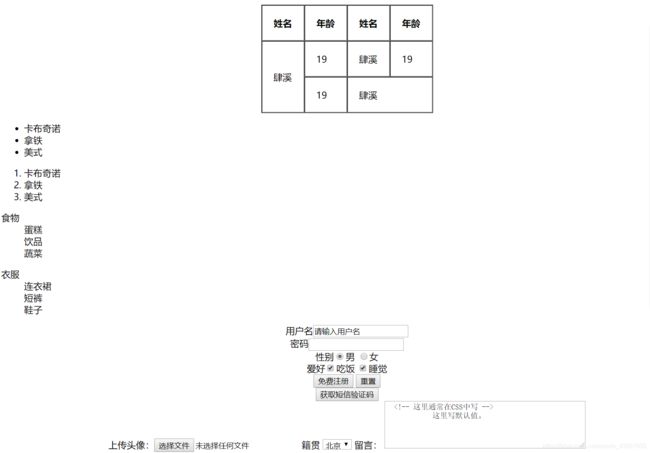
效果展示:
2020/7/12 P31~P92
P31~P61 HTML基础
<!DOCTYPE html>
<html lang="zh-CN">

<head>
    <meta charset="UTF-8">
    <meta name="viewport" content="width=device-width, initial-scale=1.0">
    <title>Document</title>
</head>

<body>
    <!-- align left、center. right 规定表格相对周围元素的对齐方式。
            border 1或" " 规定表格单元是否拥有边框,默认为"",表示没有边框
            cellpadding 像索值 规定单元边沿与其内容之间的空白,默认1像素。
            cellspacing 像素值 规定单元格之间的空白,默认2像素。
            width 像素值或百分比 规定表格的宽度。 -->
    <!-- 1. <thead> </thead> :用于定义表格的头部。<thead> 内部必须拥有<tr>标签。-般是位于第一 行。
         2. <tbody> </tbody> :用于定义表格的主体,主要用于放数据本体。
         3.以上标签都是放在<table> </table>标签中。 -->
    <!-- 合并单元格方式:
        ●跨行合并: rowspan="合并单元格的个数"
        ●跨列合并: colspan=”合并单元格的个数" -->
    <table align="center" border="1" cellpadding="20" cellspacing="0" width="300px">
        <thead>
            <tr>
                <th>姓名</th>
                <th>年龄</th>
                <th>姓名</th>
                <th>年龄</th>
            </tr>
        </thead>
        <tbody>
            <tr>
                <td rowspan="2">肆溪</td>
                <td>19</td>
                <td>肆溪</td>
                <td>19</td>
            </tr>
            <tr>
                <td>19</td>
                <td colspan="2">肆溪</td>
            </tr>
        </tbody>
    </table>

    <!-- 无序列表 -->
    <ul><li>卡布奇诺</li><li>拿铁</li><li>美式</li></ul>
    <!-- 有序列表 -->
    <ol><li>卡布奇诺</li><li>拿铁</li><li>美式</li></ol>
    <!-- 自定义列表 -->
    <dl><dt>食物</dt><dd>蛋糕</dd><dd>饮品</dd><dd>蔬菜</dd></dl>
    <dl><dt>衣服</dt><dd>连衣裙</dd><dd>短裤</dd><dd>鞋子</dd></dl>

    <form align="center">
        <!-- <label>标签为input元索定义标注(标签)。
            <label>标签用于(for)绑定一个表单元素当点击<label>标签内的文本时,
            浏览器就会自动将焦点光标转到或者选择对应的表单元素上用来增加用户体验
            表单元素上要加for对应的id -->
        <label for="text">用户名</label><input type="text" name="username" id="text" value="请输入用户名" maxlength="6"><br>
        <!-- value 默认值   placeholder 提示语 maxlength 正整数 规定输入字段中的字符的最大长度-->
        密码<input type="password" name="pwd"><br>
        <!-- radio单选按钮 可以实现多选 -->
        <!-- name 是表单元素名字这里性别单选按钮必须有相同的名字name 才可以实现多选1 -->
        性别<input type="radio" name="sex" value="男" checked="checked" id="male"><label for="male">男</label>
            <input type="radio" name="sex" value="女" id="female"><label for="female">女</label><br>
        <!-- checkbox 复选框 可以实现多选 -->
        爱好<input type="checkbox" name="hobby" value="吃饭" checked="checked" id="eating"><label for="eating">吃饭</label>
            <input type="checkbox" name="hobby" value="睡觉" checked="checked" id="sleeping"><label for="sleeping">睡觉</label><br>
        <!-- 单选按钮和复选框可以设置checked 属性, 当页面打开的时候就可以默认选中这个按钮-->
            <input type="submit" value="免费注册">
            <input type="reset"><br>
            <input type="button" value="获取短信验证码"><br>
        <!-- 文件域 -->
        上传头像:<input type="file">

        <!-- 下拉表单元素 -->
        <!-- selected="selected" 默认选择项 -->
        <label>籍贯</label>
        <select>
            <option>山东</option>
            <option selected="selected">北京</option>
            <option>天津</option>
        </select>

        <!-- 文本域元素 -->
        留言:
        <textarea cols="50" rows="5">  <!-- 这里通常在CSS中写 -->
            这里写默认值。
        </textarea>
    </form>
</body>

</html>
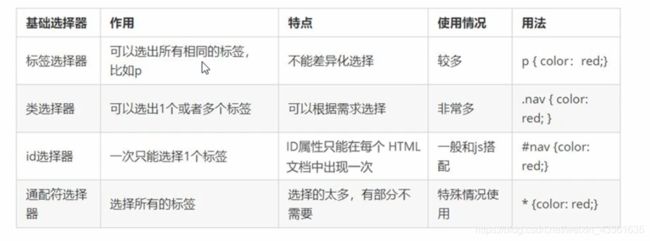
P62~P92 CSS基础
**类命名规则:**头: header
内容: content/containers
尾: footer
导航: nav
侧栏: sidebar
栏目: column
页面外围控制整体布局宽度: wr
左右中: left right centers
登录条:loginbar
标志: logo
广告: banner
页面主体: main
热点: hot
新闻: news
下载: download
子导航: subnav
<!DOCTYPE html>
<html lang="en">
<head>
    <meta charset="UTF-8">
    <meta name="viewport" content="width=device-width, initial-scale=1.0">
    <title>Document</title>
</head>
<style>
    /*选择器{样式} */
    /*给谁改样式{改什么样式} */
    p{

        color: C red;
        font-size: 12px; /*修改了文字大小为12像素*/
        font-weight: bold; /* 字体粗细 */
        /* 400等同于normal , 而700等同于bold , 注意这个数字后面不跟单位 */
        font-style: italic;/* 让字体倾斜 */
    }
    .red{

        color: red;
        /*coLor: "deeppink"; 预定义的颜色值
          color: #cc00ff; 十六进制
          color:rgb(200,0,0); RGB代码 */
    }
    .font35{

        font-size: 35px;
    }
    .pfont{

        font: italic 700 16px 'Microsoft yahei';
        /*字体 font: font-style font-weight font-size font-family;
        注:不能更换顺序; font-size font-family必须要有 */
    }
    .text{

        text-align: left; /* 文本对齐 */
        text-decoration: none; /* 文本装饰 */
        text-indent: 2em; /* 文本首行缩进 */
        line-height: 26px;
    }
 </style>

<body>
    <p>你好</p>
    <div class="red font35">不是很好</div><!-- 一个标签可以指定多个类名,但id名具有唯一性 -->
    <p class="pfont">很晚了要睡觉了</p>
    <p class="text">2018年经济萎靡的背景下,美妆消费市场依然火热,美妆巨头集团仍然赚得盆满钵满。
        中国被预测在2019年将超过美国成为世界第一大零售国,各大美妆巨头纷纷加紧在中国市场的高端布局。
        电商渠道和旅游零售渠道成为未来重要趋势。
        报告依据国家产业发展政策和有关部门的行业发展规划以及项目承办单位的实际情况,
        按照项目的建设要求,对项目的实施在技术、经济、社会和环境保护、安全生产等领域的科学性、合理性和可行性进行研究论证;
        本报告通过对项目进行技术化和经济化比较和分析,阐述投资项目的市场必要性、技术可行性与经济合理性。</p>
</body>
</html>
2020/7/13 P93~P114
P93~P105 CSS的各类选择器
<!DOCTYPE html>
<html lang="en">

<head>
    <meta charset="UTF-8">
    <meta name="viewport" content="width=device-width, initial-scale=1.0">
    <title>Document</title>
    <style>
        /* 快捷键 */
        .two {

            /* tac + */
            text-align: center;
            text-indent: 2em;
            /* 宽高生成w200 h100 */
        }

        /* 复合选择器之后代选择器 */
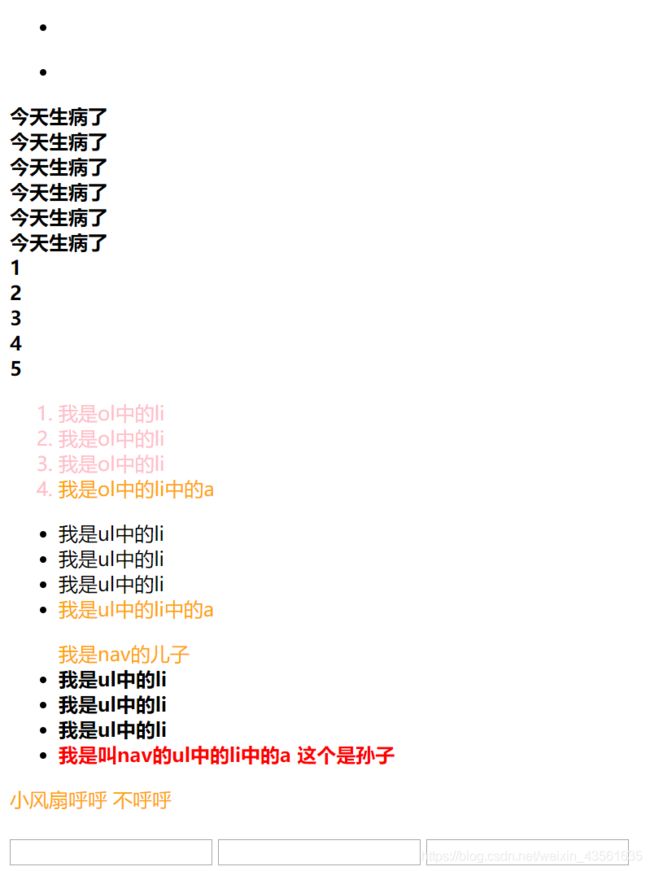
        ol li {

            color: pink;
        }

        ol li a {

            color: maroon;
        }

        .nav li a {

            color: red;
        }

        /* 子选择器 只选择儿子 */
        .nav>a {

            color: seagreen;
        }

        /* 并集选择器 用于选择多种标签 一般竖着写 */
        div,
        p,
        .nav li {

            font-weight: 900;
        }

        /* 伪类选择器 用于添加特殊的效果,或选择第1个 用冒号表示
        链接伪类选择器
        a:link 选择所有未被访问的链接
        a:visited 选择所有己被访问的链接
        a:hover 选择鼠标指针位于其上的链接
        a:active 选择活动链接(鼠标按下未弹起的链接)
        注:要按照顺序写*/
        a:link {

            color: #333;
            text-decoration: none;
        }

        a:visited {

            color: orange;
        }

        a:hover {

            color: skyblue;
        }

        a:active {

            color: green;
        }
        /* 实际开发中通常是
        a {
            color: gray;
        }
        a:hover {
            color: skyblue;
        }*/

        /* :focus伪类选择器用于选取获得焦点的表单元素 */
        input:focus{

            background-color: yellow;
            color: red;
        }
    </style>
</head>

<body>
    <!-- 快速生成HTML结构语法 ( Emmet语法 )
            1.生成标签直接输入标签名按tab键即可比如div 然后tab键,就可以生成<div> </div>
            2.如果想要生成多个相同标签加上*就可以了比如div*3 就可以快速生成3个div
            3.如果有父子级关系的标签,可以用>比如ul > li就可以了
            4.如果有兄弟关系的标签,用+就可以了比如div+p
            5.如果生成带有类名或者id名字的,直接写.demo或者#two tab 键就可以了
            6.如果生成的div类名是有顺序的,可以用自增符号$
            7.如果想要在生成的标签内部写内容可以用{
     }表示 -->

    <!-- div + tab键/enter键 -->
    <div></div>
    <!-- div*3 +  -->
    <div></div>
    <div></div>
    <div></div>
    <!-- ul>li +  -->
    <ul>
        <li></li>
    </ul>
    <!-- div+p +  -->
    <div></div>
    <p></p>
    <!-- .demo +  -->
    <div class="demo"></div>
    <!-- #two +  -->
    <div id="two"></div>
    <!-- p.one + -->
    <p class="one"></p>
    <!-- span.gray + -->
    <span class="gray"></span>
    <!-- ul>li#two -->
    <ul>
        <li id="two"></li>
    </ul>
    <!-- .demo$*5 -->
    <div class="demo1"></div>
    <div class="demo2"></div>
    <div class="demo3"></div>
    <div class="demo4"></div>
    <div class="demo5"></div>
    <!-- div{
     今天生病了} -->
    <div>今天生病了</div>
    <!-- div{
     今天生病了}*5 -->
    <div>今天生病了</div>
    <div>今天生病了</div>
    <div>今天生病了</div>
    <div>今天生病了</div>
    <div>今天生病了</div>
    <!-- div{
     $}*5 -->
    <div>1</div>
    <div>2</div>
    <div>3</div>
    <div>4</div>
    <div>5</div>

    <ol>
        <li>我是ol中的li</li>
        <li>我是ol中的li</li>
        <li>我是ol中的li</li>
        <li><a href="#">我是ol中的li中的a</a></li>
    </ol>
    <ul>
        <li>我是ul中的li</li>
        <li>我是ul中的li</li>
        <li>我是ul中的li</li>
        <li><a href="#">我是ul中的li中的a</a></li>
    </ul>
    <ul class="nav">
        <a href="#">我是nav的儿子</a>
        <li>我是ul中的li</li>
        <li>我是ul中的li</li>
        <li>我是ul中的li</li>
        <li><a href="#">我是叫nav的ul中的li中的a 这个是孙子</a></li>
    </ul>

    <a href="#">小风扇呼呼</a>
    <a href="#">不呼呼</a><br><br>

    <input type="text">
    <input type="text">
    <input type="text">
</body>

</html>
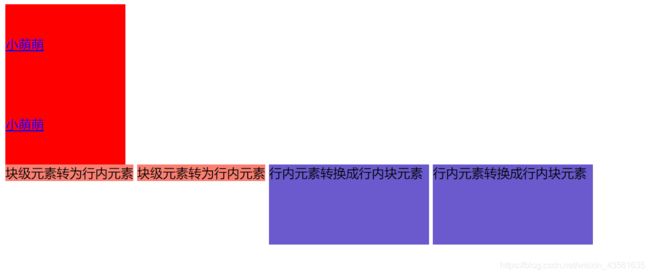
P105~P114 元素显示模式
外加一个小tips : 怎样文字垂直居中?
<!DOCTYPE html>
<html lang="en">

<head>
    <meta charset="UTF-8">
    <meta name="viewport" content="width=device-width, initial-scale=1.0">
    <title>Document</title>
    <style>
        a {

            width: 150px;
            height: 100px;
            background: red;
            display: block;
            /* 把行内元素a转换成块级元素 */

            line-height: 100px;
            /* 小tips 单行文字垂直居中的代码 --> 让文字的行高等于盒子的高度 */
        }

        div {

            width: 300px;
            height: 200px;
            background-color: salmon;
            display: inline; /* 把块级元素div转换成行内元素 */
        }

        span {

            width: 200px;
            height: 100px;
            background-color: slateblue;
            display: inline-block;
            /* 行内元素转换成行内块元素 */
        }


    </style>
</head>

<body>
    <!-- CSS的元素显示模式 块元素 和 行内元素 -->
    <!-- 常见的块元素有<h1>~<h6>、<p>、<div>、<ul>、<ol>、 <li>等 ,其中<div>标签是最典型的块元索。
        块级元素的特点:
        ①比较霸道,自己独占一行。
        ②高度,宽度,外边距以及内边距都可以控制。
        ③宽度默认是容器(父级宽度)的100%。
        ④是一个容器及盒子,面可以放行内或者块级元素。 -->
    <!-- 常见的行内元素有<a>、<strong>、 <b>、 <em>、<i>、 <del>. <s>、<ins>、 <u>、<span>等 ,
        其中<span>标签是最典型的行内元素。有的地方也将行内元素称为内联元素。
        行内元素的特点:
        ①相邻行内元素在一行上,一行可以显示多个。
        ②高、宽直接设置是无效的。
        ③默认宽度就是它本身内容的宽度。
        ④行内元索只能容纳文本或其他行内元素。
        注意:
        ●链接里面不能再放链接
        ●特殊情况链接<a>里面可以放块级元素,但是给<a>转换-下块级模式最安全 -->
    <!-- 行内块元素
        在行内元素中有几个特殊的标签一<img/>、<input/>、 <td> ,它们同时具有块元素和行内元素的特点。
        有些资料称它们为行内块元素。
        行内块元素的特点:
        ①和相邻行内元素(行内块)在一行上,但是他们之间会有空白缝隙。- 可以多个(行内元素特点)。
        ②默认宽度就是它本身内容的宽度(行内元素特点)。
        ③高度,行高、外边距以及内边距都可以控制(块级元素特点)。 -->

    <!-- 元素显示模式转换 -->
    <a href="#">小萌萌</a>
    <a href="#">小萌萌</a>
    <div>块级元素转为行内元素</div>
    <div>块级元素转为行内元素</div>
    <span>行内元素转换成行内块元素</span>
    <span>行内元素转换成行内块元素</span>
</body>

</html>
2020/7/14 P115~P135
P115~P128 背景属性
<!DOCTYPE html>
<html lang="en">
<head>
    <meta charset="UTF-8">
    <meta name="viewport" content="width=device-width, initial-scale=1.0">
    <title>Document</title>
    <style>
        div {

            width: 300px;
            height: 200px;
            background-color: grey;
            background-image: url(images/logo.png);
            background-repeat: no-repeat;
            /* repeat-x 沿着x轴平铺 repeat-y 沿着y轴平铺 */

            /* background-position: center top; */
            /* background-position: 20px 50px; */
            background-position:  center 20px;
            /*如果是方位名词right center 和center right 效果是等价的跟顺序没有关系*/
            /*background-position: right; 此时水平一定是靠右侧对齐第 二个参数省略y轴是垂直居中显示的*/
        }
        h3 {

            width: 118px;
            height: 40px;
            background-color: pink;
            font-size: 14px;
            font-weight: 400;
            line-height: 40px;
            background-image: url(images/bluray\ \(1\).png);
            background-repeat: no-repeat;
            background-position: left center;
            text-indent: 2em;
        }
        body {

            /* background-color: black;
            background-image: url(images/bg.jpg);
            background-repeat: no-repeat;
            background-position: center 40px;
            background-attachment: fixed; */ /* 背景附着 scroll 随对象滚动 fixed 背景图像固定 */

            background: black url(images/bg.jpg) no-repeat center 40px fixed;
            /* 复合写法 background:背景颜色 背景图片地址 背景平铺 背景图像 滚动背景 图片位置: */
        }
        p {

            color: maroon;
            background: rgba(0, 0, 0, 0.3);  /* 一般将0.3 写为.3 */

        }

    </style>
</head>
<body>
    <div></div>
    <h3>成长守护平台</h3>
    <p>过几天就去长沙玩啦啦啦</p>
    <p>过几天就去长沙玩啦啦啦</p>
    <p>过几天就去长沙玩啦啦啦</p>
    <p>过几天就去长沙玩啦啦啦</p>
    <p>过几天就去长沙玩啦啦啦</p>
    <p>过几天就去长沙玩啦啦啦</p>
    <p>过几天就去长沙玩啦啦啦</p>
    <p>过几天就去长沙玩啦啦啦</p>
    <p>过几天就去长沙玩啦啦啦</p>
    <p>过几天就去长沙玩啦啦啦</p>
    <p>过几天就去长沙玩啦啦啦</p>
    <p>过几天就去长沙玩啦啦啦</p>
    <p>过几天就去长沙玩啦啦啦</p>
    <p>过几天就去长沙玩啦啦啦</p>
    <p>过几天就去长沙玩啦啦啦</p>
    <p>过几天就去长沙玩啦啦啦</p>
    <p>过几天就去长沙玩啦啦啦</p>
    <p>过几天就去长沙玩啦啦啦</p>
    <p>过几天就去长沙玩啦啦啦</p>
</body>
</html>
效果展示:
P129~P135 CSS三大特性
<!DOCTYPE html>
<html lang="en">

<head>
    <meta charset="UTF-8">
    <meta name="viewport" content="width=device-width, initial-scale=1.0">
    <title>CSS的三大特性</title>
    <style>
        /* 层叠性 就近原则
        继承性 子标签会继承父标签的某些样式,如文本颜色和字号 */
        div {

            color: teal !important;
        }

        div {

            color: yellow;
            font-size: 16px;
            /* 当前行高 = 16*1.5 */
        }

        /* 行高的继承 */
        body {

            /* font: 12px/24px 'Microsoft Yahei'; */
            /* 1.5是当前元素文字大小的1.5倍 */
            font: 12px/1.5 'Microsoft Yahei';
        }

        /* css优先级 根据选择器权重 */
        /* 复合选择器会有权重叠加的问题 */
        /* 权重虽然会叠加 但是永远不会有进位的问题 */
        li {

            color: green;
            /* 标签选择器 权重为0,0,0,1 */
        }

        ul li {

            color: red;
            /* 后代选择器 0,0,0,1+0,0,0,1=0,0,0,2 */
        }

        .nav li {

            color: pink;
            /* 类选择器+标签选择器=0,0,1,0+0,0,0,1=0,0,1,1 */
        }
    </style>
</head>

<body>
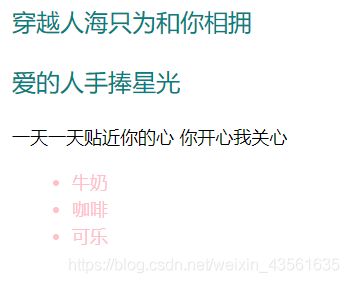
    <div>穿越人海只为和你相拥
        <p>爱的人手捧星光</p>
    </div>
    <p>一天一天贴近你的心 你开心我关心</p>
    <ul class="nav">
        <li>牛奶</li>
        <li>咖啡</li>
        <li>可乐</li>
    </ul>
</body>

</html>
2020/7/17 P136~P168
P136~P152盒子模型、表格细线边框
<!DOCTYPE html>
<html lang="en">

<head>
    <meta charset="UTF-8">
    <meta name="viewport" content="width=device-width, initial-scale=1.0">
    <title>盒子模型+表格细线边框</title>
    <style>
        .div1 {

            width: 300px;
            height: 100px;
            /* 边框粗细 */
            border-width: 5px;
            /* 边框样式 */
            /* solid 实现边框 dashed 虚线边框 dotted 点线边框 */
            border-style: solid;
            /* 边框颜色 */
            border-color: red;
            /* padiing和border都会影响盒子的实际大小 */
            padding: 20px;
        }

        .div2 {

            width: 300px;
            height: 100px;
            /* 边框的复合写法 简写 没有顺序 */
            /* 只改上边框 */
            border: 1px dotted yellow;
            border-top: 1px solid red;
            margin: 10px;
        }

        table {

            width: 500px;
            height: 250px;
        }

        th {

            height: 35px;
        }

        table,
        td,
        th {

            border: 1px solid pink;
            /* 合并相邻的边框 */
            border-collapse: collapse;
            font-size: 14px;
            text-align: center;
        }

        .nav {

            border-top: 3px solid #ff8500;
            border-bottom: 1px solid #edeef0;
            height: 41px;
            line-height: 41px;
            background-color: #fcfcfc;
        }

        a {

            /* 转换为行内块元素 既可以有高度也可以显示在一行上 */
            display: inline-block;
            color: #4c4c4c;
            font-size: 12px;
            text-decoration: none;
            height: 41px;
            /* 上下为0 左右为20 */
            padding: 0 20px;
        }

        .nav a:hover {

            background-color: #ccc;
        }

        .header {

            width: 900px;
            height: 200px;
            background-color: pink;
            margin: 10px auto;
            text-align: center;
        }

        /* 行内元素或者行内块元素水平居中给其父元素添加 text-align:center 即可 */
    </style>
</head>

<body>
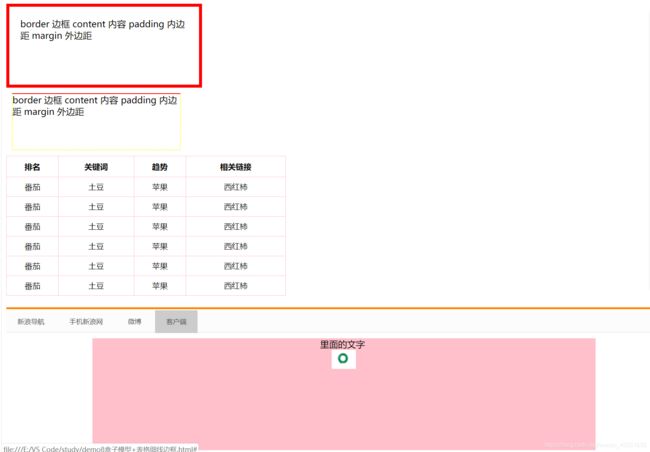
    <div class="div1">
        border 边框
        content 内容
        padding 内边距
        margin 外边距
    </div>
    <div class="div2">
        border 边框
        content 内容
        padding 内边距
        margin 外边距
    </div>
    <table>
        <thead>
            <tr>
                <th>排名</th>
                <th>关键词</th>
                <th>趋势</th>
                <th>相关链接</th>
            </tr>
        </thead>
        <tr>
            <td>番茄</td>
            <td>土豆</td>
            <td>苹果</td>
            <td>西红柿</td>
        </tr>
        <tr>
            <td>番茄</td>
            <td>土豆</td>
            <td>苹果</td>
            <td>西红柿</td>
        </tr>
        <tr>
            <td>番茄</td>
            <td>土豆</td>
            <td>苹果</td>
            <td>西红柿</td>
        </tr>
        <tr>
            <td>番茄</td>
            <td>土豆</td>
            <td>苹果</td>
            <td>西红柿</td>
        </tr>
        <tr>
            <td>番茄</td>
            <td>土豆</td>
            <td>苹果</td>
            <td>西红柿</td>
        </tr>
        <tr>
            <td>番茄</td>
            <td>土豆</td>
            <td>苹果</td>
            <td>西红柿</td>
        </tr>
    </table>

    <br>
    <div class="nav">
        <a href="#">新浪导航</a>
        <a href="#">手机新浪网</a>
        <a href="#">微博</a>
        <a href="#">客户端</a>
    </div>


    <!-- margin 让块级盒子水平居中对齐 左右外边距设为auto -->
    <div class="header">
        <span>里面的文字</span>
        <br>
        <img src="images/title_sprite.jpg" alt="">
    </div>
</body>

</html>
P153~P168
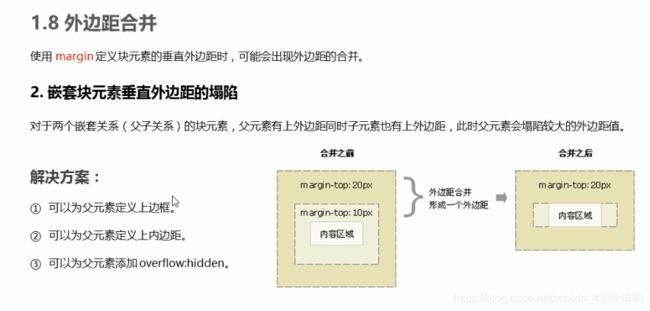
垂直外边距塌陷问题
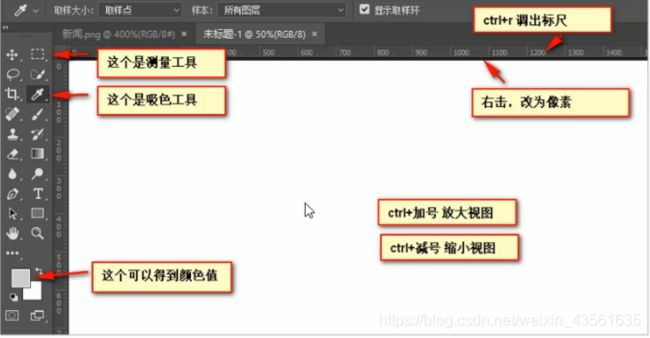
ps基本操作(简)
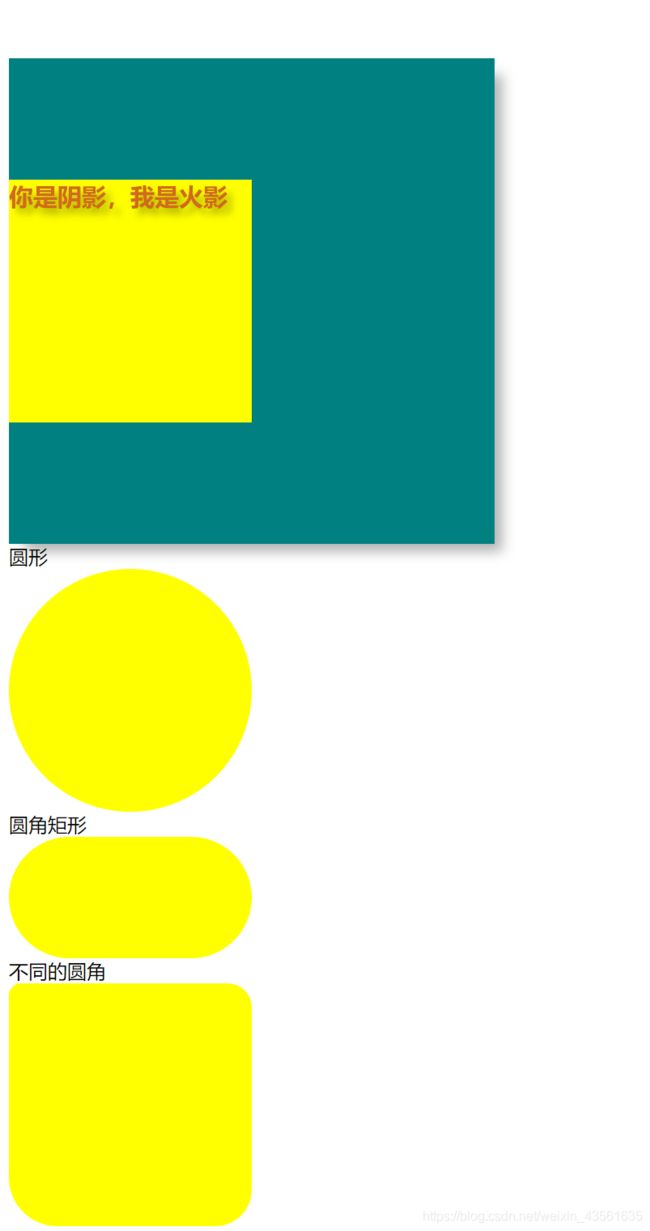
文字、盒子的阴影
<!DOCTYPE html>
<html lang="en">

<head>
    <meta charset="UTF-8">
    <meta name="viewport" content="width=device-width, initial-scale=1.0">
    <title></title>
    <style>
        CSS 的第一行代码 * {

            padding: 0px;
            margin: 0px;
        }

        .father {

            width: 400px;
            height: 400px;
            background-color: teal;
            margin-top: 50px;
            /* border: 1px solid transparent; */
            /* padding: 1px; */
            /* 不会影响盒子大小 */
            overflow: hidden;
        }

        /* box-shadow: h-shadow v-shadow blur spread color inset;
        h-shadow 必需。水平阴影的位置。允许负值。
        v-shadow 必需。垂直阴影的位置。允许负值。
        blur 可选。模糊距离。
        spread 可选。阴影的尺寸。
        color 可选。阴影的颜色。请参阅CSS颜色值。
        inset 可选。将外部阴影(outset)改为内部阴影。
        注意:
        1.默认的是外阴影(outset),但是不可以写这个单词,否则导致阴影无效
        2.盒子阴影不占用空间.不会影响其他盒子排列。 */

        .father:hover {

            box-shadow: 10px 10px 10px -4px rgba(0, 0, 0, .3);
        }

        .son {

            width: 200px;
            height: 200px;
            background-color: yellow;
            margin-top: 100px;
            font-size: 20px;
            color: chocolate;
            font-weight: 700;
            text-shadow: 5px 5px 6px rgba(0, 0, 0, .3);
        }

        .yuanxing {

            background-color: yellow;
            width: 200px;
            height: 200px;
            border-radius: 100px;
        }

        .juxing {

            background-color: yellow;
            width: 200px;
            height: 100px;
            border-radius: 50px;
        }

        .radius {

            background-color: yellow;
            width: 200px;
            height: 200px;
            border-radius: 10px 20px 30px 40px;
        }

        /* text- shadow: h-shadow v-shadow blur color;
        h-shadow 必需。水平阴影的位置。允许负值。
        v-shadow 必票。垂直阴影的位置。允许负值。
        blur 可选。模糊的距离。
        color 可选。阴影的颜色。参阅CSS颜色值。 */

    </style>
</head>

<body>
    <div class="father">
        <div class="son">你是阴影,我是火影</div>
    </div>
    圆形
    <div class="yuanxing"></div>
    圆角矩形
    <div class="juxing"></div>
    不同的圆角
    <div class="radius"></div>
</body>

</html>
2020/7/19 P169~P220
P169~P188 网页布局案例
案例1
<!DOCTYPE html>
<html lang="en">
<head>
    <meta charset="UTF-8">
    <meta name="viewport" content="width=device-width, initial-scale=1.0">
    <title>布局案例1</title>
    <style>
        * {

            margin: 0;
            padding: 0;
        }
        .box1{

            width: 1000px;
            height: 460px;
            background-color: pink;
            margin: 0 auto;
        }
        .left {

            float: left;
            width: 200px;
            height: 460px;
            background-color: purple;
        }
        .right {

            float: left;
            width: 800px;
            height: 460px;
            background-color: blue;
        }
        li {

            list-style: none;
        }
        .box2 {

            width: 1000px;
            height: 250px;
            background-color: pink;
            margin: 0 auto;
        }
        .box2 li {

            width: 241px;
            height: 250px;
            background-color: burlywood;
            float: left;
            margin-right: 12px;
        }
        /* 这里必须写 .box2 .last 要注意权重的问题 */
        .box2 .last {

            margin-right: 0px;
        }
        .box3 {

            width: 1000px;
            height: 460px;
            background-color: pink;
            margin: 0 auto;
        }
        .right>div {

            float: left;
            width: 190px;
            height: 220px;
            background-color: cornflowerblue;
            margin-left: 10px;
            margin-top: 10px;
        }
    </style>
</head>
<body>
    <div class="box1">
        <div class="left">左</div>
        <div class="right">右</div>
    </div>
    <ul class="box2">
        <li>1</li>
        <li>2</li>
        <li>3</li>
        <li class="last">4</li>
    </ul>
    <div class="box3">
        <div class="left"></div>
        <div class="right">
            <div>1</div>
            <div>2</div>
            <div>3</div>
            <div>4</div>
            <div>5</div>
            <div>6</div>
            <div>7</div>
            <div>8</div>
        </div>
    </div>
</body>
</html>
案例2
<!DOCTYPE html>
<html lang="en">
<head>
    <meta charset="UTF-8">
    <meta name="viewport" content="width=device-width, initial-scale=1.0">
    <title>布局案例2</title>
    <style>
        * {

            margin: 0;
            padding: 0;
        }
        li {

            list-style: none;
        }
        .top {

            height: 50px;
            background-color: gray;
        }
        .banner {

            width: 980px;
            height: 150px;
            background-color: gray;
            margin: 10px auto;
        }
        .box {

            width: 980px;
            height: 300px;
            margin: 0 auto;
            background-color: pink;
        }
        .box li {

            float: left;
            width: 237px;
            height: 300px;
            background-color: gray;
            margin-right: 10px;
        }
        .box .last {

            margin-right: 0px;
        }
        /* 只要是通栏的盒子(和浏览器一样宽)不需要指定宽度 */
        footer {

            height: 200px;
            background-color: gray;
            margin-top: 10px;
        }
    </style>
</head>
<body>
    <div class="top">top</div>
    <div class="banner">banner</div>
    <div class="box">
        <ul>
            <li>1</li>
            <li>2</li>
            <li>3</li>
            <li class="last">4</li>
        </ul>
    </div>
    <footer>footer</footer>
</body>
</html>
<!DOCTYPE html>
<html lang="en">

<head>
    <meta charset="UTF-8">
    <meta name="viewport" content="width=device-width, initial-scale=1.0">
    <title>清除浮动</title>
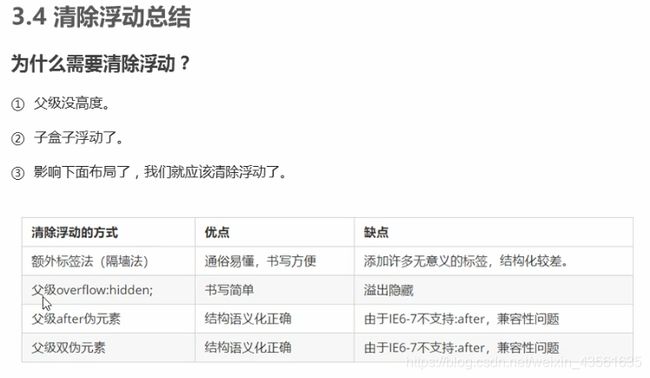
    <!-- 清除浮动的策略是闭合浮动 -->
    <style>
        /* after伪元素 */
         .clearfix:after {

            content: "";
            display: block;
            height: 0;
            clear: both;
            visibility: hidden;
        }

        .clearfix {

            /* IE6、7专有 */
            *zoom: 1;
        }

        .box {

            /* 父级添加overflow 优点 代码简洁 缺点 无法显示溢出的部分
            overflow: hidden;*/
            width: 200px;
            margin: 0 auto;
            background-color: pink;
        }

        .box>div {

            width: 100px;
            height: 100px;
            background-color: pink;
            float: left;
        }

        .footer {

            height: 100px;
            background-color: gray;
        }

        /* 额外标签法
        .clear {
            clear: both;
        }*/
    </style>
</head>

<body>

    <div class="box clearfix">
        <div>1</div>
        <div>2</div>
        <!--<div class="clear"></div> 额外标签法 这个新增的盒子必须是块级元素 不能是行内元素  W3C推荐 缺点 代码复杂-->
    </div>

    <div class="footer"></div>
</body>

</html>
2020/8/3
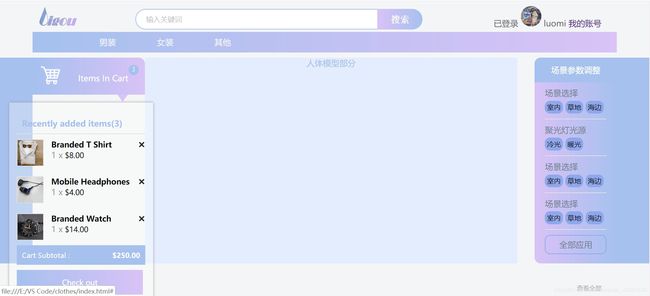
一个小成果
注:出去旅游了几天心就飞了,今天考完满分过了科二嘿嘿。接下来要好好学习了噢。上面成果是赶出去之前做的
代码:
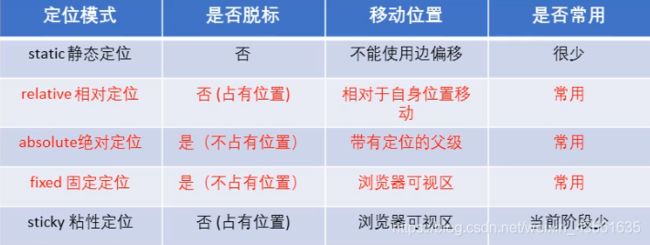
P222~P237 定位详解
- 定位 = 定位模式 + 位偏移
- 定位模式
static 静态定位
relative 相对定位
absolute 绝对定位
fixed 固定定位 - 边偏移
四个属性top、bottom、left、right
属性:top
例:top:200px
描述:顶端偏移量,定义元素相对于其父元素上边线的距离

相对定位特性
1 相对于它原来的位置移动 (灰色框为原来位置
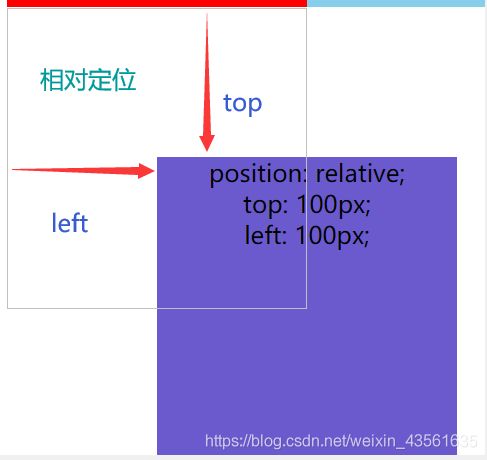
2 不脱标,继续保留(占有)原来位置
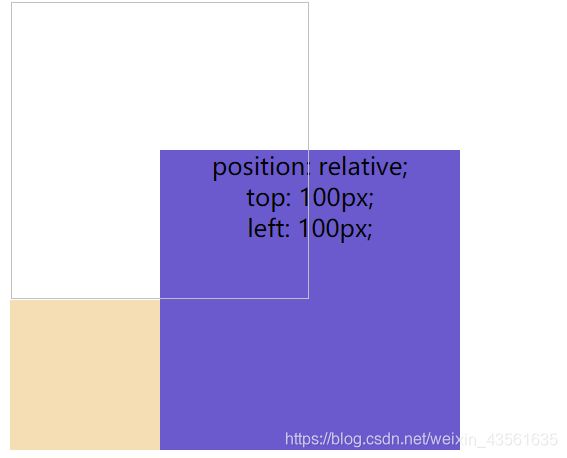
典型应用是用来给绝对定位当爹的 嘿嘿
绝对定位特性
1 相对于祖先元素来移动
2 如果没有祖先元素或者祖先元素没有定位,则以浏览器为准定位
		有父亲,父亲没定位,就随浏览器了。
        .father {

            width: 500px;
            height: 500px;
            background-color: skyblue;
        }
        .son {

            position: absolute;
            left: 0;
            bottom: 0;
            width: 200px;
            height: 200px;
            background-color: red;
        }

		<div class="father">
		    <div class="son"></div>
	    </div>
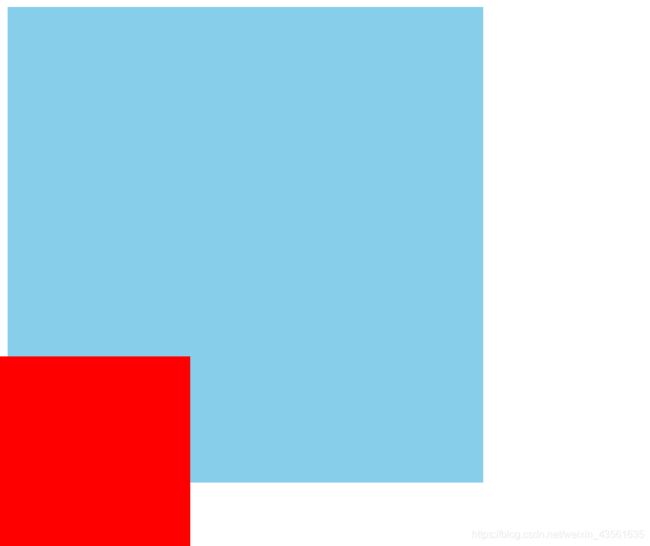
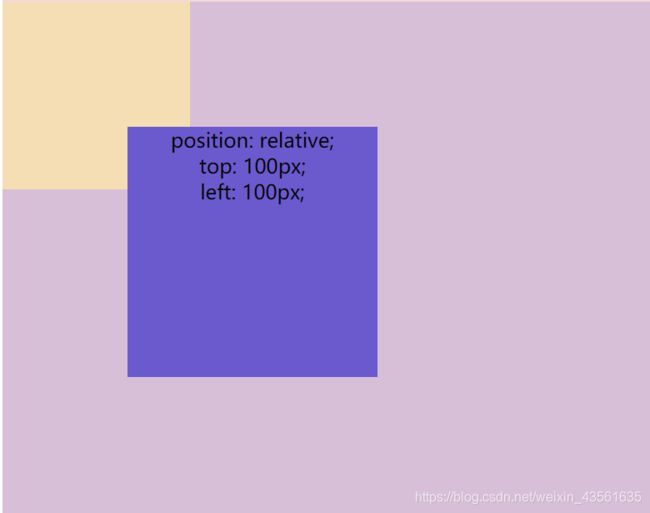
3 如果祖先元素有定位(相对、绝对、固定定位),则以最近一级的定位祖先元素为参考点移动位置。
有父亲,父亲没定位,爷爷有定位,就随爷爷。

4 脱标,不再占有原先的位置
“子绝父相”
1 子级绝对定位,不会占有位置,可以放到父盒子里面的任何一个地方,不会影响其他的兄弟盒子。
2 父盒子需要加定位限制子盒子在父盒子内显示。
3 父盒子布局时,需要占有位置,因此父亲只能是相对定位。
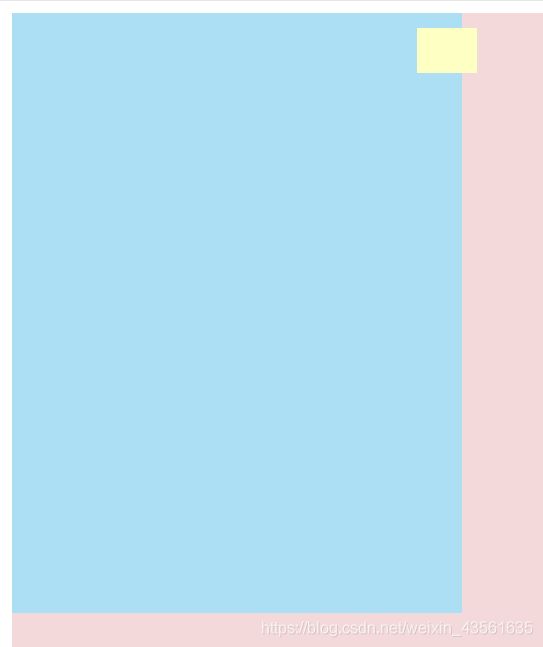
.father {

            position: relative;
            width: 300px;
            height: 400px;
            background-color: rgb(172, 223, 243);
        }
        .son {

            position: absolute;
            right: -10px;
            top: 10px;
            width: 40px;
            height: 30px;
            background-color: rgb(254, 255, 194);
        }
固定定位fixed 图示
1 以浏览器的可视窗口为参照点移动元素
跟父元素没有任何关系
不随滚动条滚动
2 不占有原先的位置(特殊的绝对定位)
3 实例
position: fixed;
top: 100px;
right: 40px;

4 小技巧
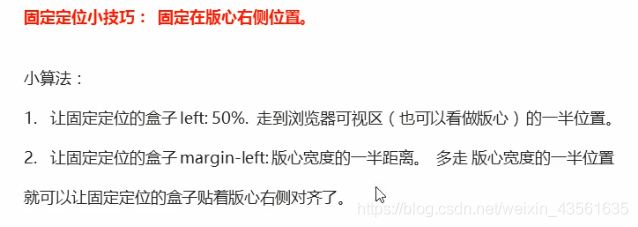
.w {

    width: 800px;
    height: 1400px;
    background-color: pink;
    margin: 0 auto;
    }
.fixed {

    position: fixed;
    /* 1 走浏览器宽度的一半 */
    left: 50%;

    /* 2 走版心的一半 */
    margin-left: 400px;

    width: 50px;
    height: 150px;
    background-color: skyblue;
}
粘性定位 sticky
1 粘性定位可认为是是相对定位和固定定位的混合。
2 以浏览器的可视窗口为参照点移动元素(固定定位特点)
3 粘性定位占有原先的位置(相对定位特点)
4 必须添加top、left、 right、 bottom 其中一个才有效。
与页面滚动相搭配。兼容性较差,IE不支持。
body {

    height: 2000px;
}
.nav {

    position: sticky;
    top: 0;
    width: 800px;
    height: 50px;
    background-color: wheat;
    margin: 100px auto;
}
小总结
定位叠放次序 z-index
z是z轴的意思
数值可以是正整数、负整数或0,默认是auto,数值越大,盒子越靠上。
选择器 { z-index: 1; }
●数值可以是正整数、负整数或0,默认是auto ,数值越大,盒子越靠上
●如果属性值相同,则按照书写顺序,后来居上
●数字后面不能加单位
●只有定位的盒子才有z- index属性
绝对定位的盒子居中
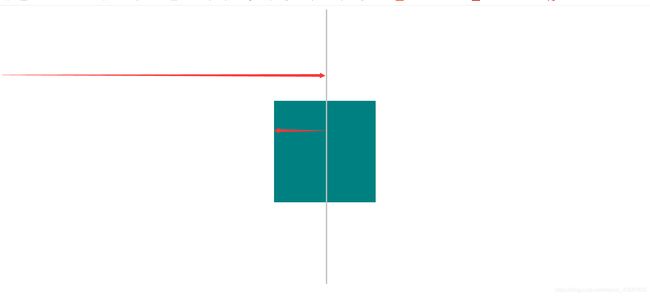
加了绝对定位的盒子不能通过 margin:0 auto 水平居中,但是可以通过以下计算方法实现水平和垂直居中。
①left: 50%; :让盒子的左侧移动到父级元素的水平中心位置。

②margin-left: -100px; :让盒子向左移动自身宽度的一半。
定位的特殊特性
绝对定位和固定定位也和浮动类似。
1 行内元素添加绝对或者固定定位,可以直接设置高度和宽度。
2 块级元素添加绝对或者固定定位,如果不给宽度或者高度,默认大小是内容的大小。
3.脱标的盒子不会触发外边距塌陷
浮动元素、绝对定位(固定定位)元素的都不会触发外边距合并的问题。
4.绝对定位(固定定位)会完全压住盒子
浮动元素不同,只会压住它下面标准流的盒子,但是不会压住下面标准流盒子里面的文字(图片)
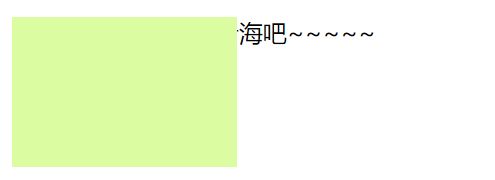
浮动最初就是用来做文字环绕效果的

2020/8/4
淘宝轮播图
emmmm明天写 一定
未完待续~~
