一、requests介绍
Python标准库中提供了:urllib、urllib2、httplib等模块以供Http请求,但是它的 API 太渣了。它是为另一个时代、另一个互联网所创建的。它需要巨量的工作,甚至包括各种方法覆盖,来完成最简单的任务。
import urllib2
import json
import cookielib

def urllib2_request(url, method="GET", cookie="", headers={}, data=None):
    """
    :param url: 要请求的url
    :param cookie: 请求方式,GET、POST、DELETE、PUT..
    :param cookie: 要传入的cookie,cookie= 'k1=v1;k1=v2'
    :param headers: 发送数据时携带的请求头,headers = {'ContentType':'application/json; charset=UTF-8'}
    :param data: 要发送的数据GET方式需要传入参数,data={'d1': 'v1'}
    :return: 返回元祖,响应的字符串内容 和 cookiejar对象
    对于cookiejar对象,可以使用for循环访问:
        for item in cookiejar:
            print item.name,item.value
    """
    if data:
        data = json.dumps(data)

    cookie_jar = cookielib.CookieJar()
    handler = urllib2.HTTPCookieProcessor(cookie_jar)
    opener = urllib2.build_opener(handler)
    opener.addheaders.append(['Cookie', 'k1=v1;k1=v2'])
    request = urllib2.Request(url=url, data=data, headers=headers)
    request.get_method = lambda: method

    response = opener.open(request)
    origin = response.read()

    return origin, cookie_jar


# GET
result = urllib2_request('http://127.0.0.1:8001/index/', method="GET")

# POST
result = urllib2_request('http://127.0.0.1:8001/index/',  method="POST", data= {'k1': 'v1'})

# PUT
result = urllib2_request('http://127.0.0.1:8001/index/',  method="PUT", data= {'k1': 'v1'})
1、requests模块概念相关
(1)什么是requests模块
requests模块是python中原生的基于网络请求的模块,其主要作用是用来模拟浏览器发起请求。功能强大,用法简洁高效。在爬虫领域中占据着半壁江山的地位。
使用 Apache2 Licensed 许可证的基于Python开发的HTTP库,其在Python内置模块的基础上进行了高度的封装,从而使得Pythoner进行网络请求时,变得美好了许多,使用Requests可以轻而易举的完成浏览器可有的任何操作。
(2)为什么要使用requests模块
1)因为在使用urllib模块的时候,会有诸多不便之处:
1.手动处理url编码
2.手动处理post请求的参数
3.处理cookie操作比较繁琐
    创建cookiejar对象
    创建handler对象
    创建opener对象
4.处理代理的操作比较繁琐
    创建handler对象,代理ip和端口封装到该对象
    创建opener对象
2)使用requests模块,相对来说的便利:
1.自动处理url编码
2.自动处理post请求参数
3.大大简化cookie和代理操作
...
Requests模块的api更加便捷(本质就是封装了urllib3)。
注意:Requests库发送请求将网页内容下载下来后,并不会执行js代码,这需要我们自己分析目标站点然后发起新的request请求。
1、Resquests库安装和使用
$ pip3 install requests
使用流程:
1.指定url
2.使用requests模块发起请求
3.获取响应数据
4.进行持久化存储
2、各种请求方式
常用的就是requests.get()和requests.post()
requests.get(url, params=None, **kwargs)
requests.post(url, data=None, json=None, **kwargs)
requests.put(url, data=None, **kwargs)
requests.head(url, **kwargs)
requests.delete(url, **kwargs)
requests.patch(url, data=None, **kwargs)
requests.options(url, **kwargs)

# 以上方法均是在此方法的基础上构建
requests.request(method, url, **kwargs)注意:requests.get()等价于requests.request(method="get")。
官网链接:http://docs.python-requests.org/en/master/
二、requests模块的GET请求
1、介绍
HTTP默认的请求方法就是GET:
- 没有请求体
- 数据必须在1K之内
- GET请求数据会暴露在浏览器的地址栏中
GET请求常用的操作:
- 在浏览器的地址栏中直接给出URL,那么就一定是GET请求
- 点击页面上的超链接也一定是GET请求
- 提交表单时,表单默认使用GET请求,但可以设置为POST
2、处理url无参数的get请求(基本请求)
import requests

# 指定url
url = 'https://www.sogou.com/'

# 发起get请求:get方法会返回请求成功的响应对象
response = requests.get(url=url)

# 获取响应中的数据值:text可以获取响应对象中字符串形式的页面数据
page_data = response.text

print(page_data)

# 持久化操作
with open('./sougou.html', "w", encoding="utf-8") as fp:
    fp.write(page_data)
注意:text属性可以获取响应对象中字符串形式的页面数据,其他response常见属性详见后面小节。
3、处理url携带参数的get请求
(1)方式一:参数以get请求形式拼接在url后面
需求:指定一个词条,获取搜狗的搜索结果所对应的页面数据。
import requests

# 只携带了重要参数,且中文不需要重新编码,requests可以自动处理
url = "https://www.sogou.com/web?query=周杰伦&ie=utf-8"

response = requests.get(url=url)

page_text = response.text   # 字符串形式页面数据

with open('./zhou.html', 'w', encoding="utf-8") as fp:
    fp.write(page_text)
打开zhou.html显示效果:
(2)方式二:参数抽取出来处理
requests.get()方法解析:
点击“+”,查看params的详细用法:
可以url携带的参数抽取出来,封装为是字典或者是bytes的形式,将封装好的数据赋值给params。
import requests

url = 'https://www.sogou.com/web'

# 将参数封装到字典中
params = {
    'query': "周杰伦",
    'ie': 'utf-8'
}

response = requests.get(url=url, params=params)

response.status_code   # 响应状态码:200

# 数据持久化
page_text = response.text   # 字符串形式页面数据

with open('./zhou.html', 'w', encoding="utf-8") as fp:
    fp.write(page_text)
4、get请求自定义请求头信息
import requests

url = 'https://www.sogou.com/web'

# 将参数封装到字典中
params = {
    'query': "周杰伦",
    'ie': 'utf-8'
}

# 自定义请求头信息
headers = {
    'User-Agent': 'Mozilla/5.0 (Macintosh; Intel Mac OS X 10_12_0) AppleWebKit/537.36 (KHTML, like Gecko) Chrome/70.0.3538.67 Safari/537.36',
}

# 将自定义请求头信息放入get方法第三个参数
response = requests.get(url=url, params=params, headers=headers)

response.status_code   # 200
三、基于requests模块发起的POST请求
1、介绍
(1)数据不会出现在地址栏中
(2)数据的大小没有上限
(3)有请求体
(4)请求体中如果存在中文,会使用URL编码
requests.post()用法与requests.get()完全一致,特殊的是requests.post()有一个data参数,用来存放请求体数据。
2、登录豆瓣电影,爬取登录成功后的页面数据
import requests

# 1.指定post请求的url
url = "https://accounts.douban.com/login"

# 封装post请求的参数
data = {
    "source": "movie",
    "redir": "https://www.douban.com/",
    "form_email": "18907281232",
    "form_password": "uashudh282",
    "login": "登录",
}

# 自定义请求头信息
headers = {
    'User-Agent': 'Mozilla/5.0 (Macintosh; Intel Mac OS X 10_12_0) AppleWebKit/537.36 (KHTML, like Gecko) Chrome/70.0.3538.67 Safari/537.36',
}

# 2.发起post请求
response = requests.post(url=url, data=data, headers=headers)  # 响应对象

# 3.获取响应对象中的页面数据
page_text = response.text

# 4.持久化操作
with open("./douban.html", "w", encoding="utf-8") as fp:
    fp.write(page_text)
由于豆瓣登录添加了验证码,上述代码已经无法登录,需要后面继续优化。
注意:
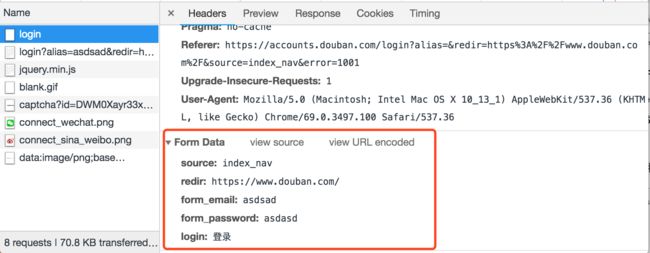
(1)使用抓包工具获取post对应的url
(2)在抓包工具中判断是否是点击登录按钮提交的post请求
1)查看Headers框的General信息,确认Request Method是POST。
2)携带的参数包含了用户名密码的值
(3)data封装post请求中携带的参数数据
通常,你想要发送一些编码为表单形式的数据——非常像一个 HTML 表单。要实现这个,只需简单地传递一个字典给 data 参数。你的数据字典在发出请求时会自动编码为表单形式:
>>> payload = {'key1': 'value1', 'key2': 'value2'}

>>> r = requests.post("http://httpbin.org/post", data=payload)
>>> print(r.text)
{
  ...
  "form": {
    "key2": "value2",
    "key1": "value1"
  },
  ...
}
还可以为 data 参数传入一个元组列表。在表单中多个元素使用同一 key 的时候,这种方式尤其有效:
>>> payload = (('key1', 'value1'), ('key1', 'value2'))
>>> r = requests.post('http://httpbin.org/post', data=payload)
>>> print(r.text)
{
  ...
  "form": {
    "key1": [
      "value1",
      "value2"
    ]
  },
  ...
}
四、requests模拟ajax异步请求
1、基于requests模块ajax的get请求
需求案例:爬取豆瓣电影分类排行榜 https://movie.douban.com/中的电影详情数据。
import requests

url = 'https://movie.douban.com/j/chart/top_list?'

# 封装ajax的请求中携带的参数
params = {
    "type": "13",
    "interval_id": "90:80",
    "action": "",
    "start": "0",
    "limit": "1"
}

# 自定义请求头信息
headers = {
    'User-Agent': 'Mozilla/5.0 (Macintosh; Intel Mac OS X 10_12_0) AppleWebKit/537.36 (KHTML, like Gecko) Chrome/70.0.3538.67 Safari/537.36',
}

# 获取响应对象
response = requests.get(url=url, params=params, headers=headers)

print(response.text)
"""
[{"rating":["8.2","45"],"rank":305,"cover_url":"https://img1.doubanio.com\/view\/photo\/s_ratio_poster\/public\/p1910831868.jpg",
"is_playable":false,"id":"1291564","types":["剧情","歌舞","爱情","科幻"],"regions":["英国","德国","法国"],"title":"十分钟年华老去:大提琴篇",
"url":"https:\/\/movie.douban.com\/subject\/1291564\/","release_date":"2002-09-03","actor_count":12,"vote_count":12708,"score":"8.2",
"actors":["瓦莱丽亚·布鲁尼·泰德斯基","Amit Arroz","Mark Long","Alexandra Staden","多米尼克·威斯特","毕碧安娜·贝格","伊尔姆·赫尔曼","鲁道夫·霍辛斯基",
"Jean-Luc Nancy","Ana Samardzija","阿莱克斯·德斯卡","丹尼尔·克雷格"],"is_watched":false}]
"""
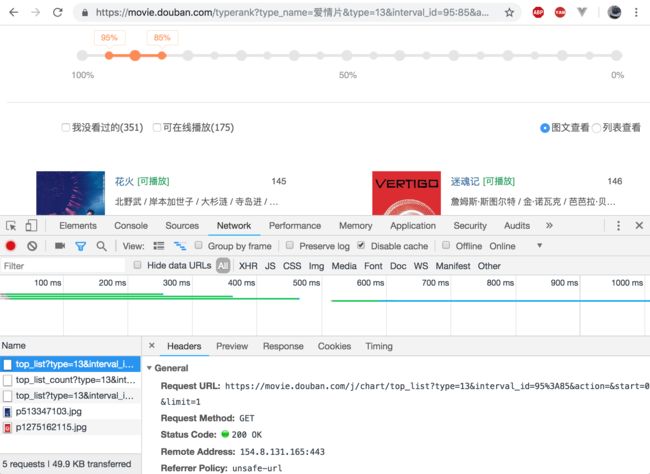
(1)查看获取url地址
点击进入豆瓣电影的排行榜——》爱情,在页面中点选喜好区间,获取ajax的get请求。
得到get请求的url地址和请求参数:https://movie.douban.com/j/chart/top_list?type=13&interval_id=95%3A85&action=&start=0&limit=1
(2)查看并封装ajax的get请求中携带的数据
点击页面百分比按钮,查看get请求携带的参数:
2、基于requests模块处理ajax的post请求
需求:爬取肯德基城市餐厅位置数据。
import requests

# 1.指定url
# 基于ajax的post请求的url
post_url = "http://www.kfc.com.cn/kfccda/ashx/GetStoreList.ashx?op=keyword"

# 处理post请求的参数
data = {
    "cname": "",
    "pid": "",
    "keyword": "上海",
    "pageIndex": "1",
    "pageSize": "10"
}

# 自定义请求头信息(伪装UA)
headers = {
    'User-Agent': 'Mozilla/5.0 (Macintosh; Intel Mac OS X 10_12_0) AppleWebKit/537.36 (KHTML, like Gecko) Chrome/70.0.3538.67 Safari/537.36',
}

# 2.发起基于ajax的post请求
response = requests.post(url=post_url, headers=headers, data=data)

response.text
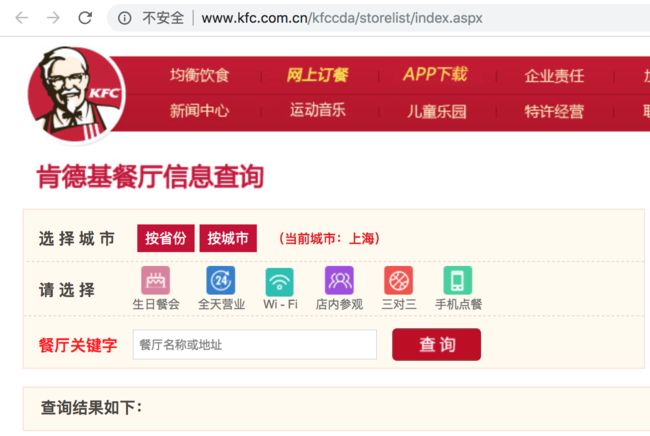
(1)找到kfc餐厅信息页面
打开kfc首页,在页面找到餐厅查询按钮,就可以进入kfc餐厅查询页面:
(2)通过抓包工具找到基于ajax的post请求
点击查询,地址栏url是不会发生变化的,因此不能通过地址栏获取post请求url,需要通过抓包工具获取异步请求所对应的url。
查看form表单携带的参数:
(3)输出结果如下所示
'{"Table":[{"rowcount":28}],"Table1":[{"rownum":1,"storeName":"开发区上海路",
"addressDetail":"开发区上海路80号利群时代超市一楼","pro":"Wi-Fi,店内参观,礼品卡,生日餐会",
"provinceName":"江苏省","cityName":"南通市"},......,{"rownum":10,"storeName":"上海南路",
"addressDetail":"上海南路3号699生活空间3号楼","pro":"Wi-Fi,店内参观,礼品卡,生日餐会","provinceName":"江西省",
"cityName":"南昌市"}]}'
3、综合项目实战
需求:爬取搜狗知乎某一个词条对应一定范围页面表示的页面数据。
import requests
import os

# 创建一个文件夹(判断,不能重复创建)
if not os.path.exists("./pages"):
    os.mkdir("./pages")

word = input("enter a word:")   # 外部赋值词条

# 动态指定页码的范围
start_pageNum = int(input("enter a start pageNum:"))
end_pageNum = int(input("enter a end pageNum:"))

# 自定义请求头信息(伪装UA)
headers = {
    'User-Agent': 'Mozilla/5.0 (Macintosh; Intel Mac OS X 10_12_0) AppleWebKit/537.36 (KHTML, like Gecko) Chrome/70.0.3538.67 Safari/537.36',
}

# 1.指定url:设计成一个具备通用的url
url = "http://zhihu.sogou.com/zhihu"
for page in range(start_pageNum, end_pageNum+1):  # 注意区间开闭
    params = {
        "query": word,
        "page": page,  # 1、2、3...
        "ie": "utf-8"
    }
    # 有几个不同的url就发起几个请求,拿到的对应的响应对象
    response = requests.get(url=url, params=params, headers=headers)

    # 获取响应中的页面数据(指定页码(page))
    page_text = response.text

    # 进行持久化存储
    filename = word + str(page) + ".html"   # 每个文件名的拼接
    filePath = "pages/" + filename
    with open(filePath, "w", encoding="utf-8") as fp:
        fp.write(page_text)
        print("第%d页数据写入成功" % page)
注意要点:
(1)外部赋值并动态指定页码范围
word = input("enter a word:")   # 外部赋值词条

# 动态指定页码的范围
start_pageNum = int(input("enter a start pageNum:"))
end_pageNum = int(input("enter a end pageNum:"))
(2)设计通用url动态查看页面数据
# 动态指定页码的范围
start_pageNum = int(input("enter a start pageNum:"))
end_pageNum = int(input("enter a end pageNum:"))

# 1.指定url:设计成一个具备通用的url
url = "http://zhihu.sogou.com/zhihu"
for page in range(start_pageNum, end_pageNum+1):  # 注意区间开闭
四、参数介绍
1、查看源码中参数列表
从import requests中,查看requests源码 ——>requests/__init__.py ——>查看from .api import request ——>requests/api.py:
def request(method, url, **kwargs):
    """Constructs and sends a :class:`Request `.

    :param method: method for the new :class:`Request` object.
    :param url: URL for the new :class:`Request` object.
    :param params: (optional) Dictionary or bytes to be sent in the query string for the :class:`Request`.
    :param data: (optional) Dictionary or list of tuples ``[(key, value)]`` (will be form-encoded), bytes, or file-like object to send in the body of the :class:`Request`.
    :param json: (optional) json data to send in the body of the :class:`Request`.
    :param headers: (optional) Dictionary of HTTP Headers to send with the :class:`Request`.
    :param cookies: (optional) Dict or CookieJar object to send with the :class:`Request`.
    :param files: (optional) Dictionary of ``'name': file-like-objects`` (or ``{'name': file-tuple}``) for multipart encoding upload.
        ``file-tuple`` can be a 2-tuple ``('filename', fileobj)``, 3-tuple ``('filename', fileobj, 'content_type')``
        or a 4-tuple ``('filename', fileobj, 'content_type', custom_headers)``, where ``'content-type'`` is a string
        defining the content type of the given file and ``custom_headers`` a dict-like object containing additional headers
        to add for the file.
    :param auth: (optional) Auth tuple to enable Basic/Digest/Custom HTTP Auth.
    :param timeout: (optional) How many seconds to wait for the server to send data
        before giving up, as a float, or a :ref:`(connect timeout, read
        timeout) ` tuple.
    :type timeout: float or tuple
    :param allow_redirects: (optional) Boolean. Enable/disable GET/OPTIONS/POST/PUT/PATCH/DELETE/HEAD redirection. Defaults to ``True``.
    :type allow_redirects: bool
    :param proxies: (optional) Dictionary mapping protocol to the URL of the proxy.
    :param verify: (optional) Either a boolean, in which case it controls whether we verify
            the server's TLS certificate, or a string, in which case it must be a path
            to a CA bundle to use. Defaults to ``True``.
    :param stream: (optional) if ``False``, the response content will be immediately downloaded.
    :param cert: (optional) if String, path to ssl client cert file (.pem). If Tuple, ('cert', 'key') pair.
    :return: :class:`Response ` object
    :rtype: requests.Response

    Usage::

      >>> import requests
      >>> req = requests.request('GET', 'http://httpbin.org/get')

    """
2、参数示例
def param_method_url():
    # requests.request(method='get', url='http://127.0.0.1:8000/test/')
    # requests.request(method='post', url='http://127.0.0.1:8000/test/')
    pass


def param_param():
    # - 可以是字典
    # - 可以是字符串
    # - 可以是字节(ascii编码以内)

    # requests.request(method='get',
    # url='http://127.0.0.1:8000/test/',
    # params={'k1': 'v1', 'k2': '水电费'})

    # requests.request(method='get',
    # url='http://127.0.0.1:8000/test/',
    # params="k1=v1&k2=水电费&k3=v3&k3=vv3")

    # requests.request(method='get',
    # url='http://127.0.0.1:8000/test/',
    # params=bytes("k1=v1&k2=k2&k3=v3&k3=vv3", encoding='utf8'))

    # 错误
    # requests.request(method='get',
    # url='http://127.0.0.1:8000/test/',
    # params=bytes("k1=v1&k2=水电费&k3=v3&k3=vv3", encoding='utf8'))
    pass


def param_data():
    # 可以是字典
    # 可以是字符串
    # 可以是字节
    # 可以是文件对象

    # requests.request(method='POST',
    # url='http://127.0.0.1:8000/test/',
    # data={'k1': 'v1', 'k2': '水电费'})

    # requests.request(method='POST',
    # url='http://127.0.0.1:8000/test/',
    # data="k1=v1; k2=v2; k3=v3; k3=v4"
    # )

    # requests.request(method='POST',
    # url='http://127.0.0.1:8000/test/',
    # data="k1=v1;k2=v2;k3=v3;k3=v4",
    # headers={'Content-Type': 'application/x-www-form-urlencoded'}
    # )

    # requests.request(method='POST',
    # url='http://127.0.0.1:8000/test/',
    # data=open('data_file.py', mode='r', encoding='utf-8'), # 文件内容是:k1=v1;k2=v2;k3=v3;k3=v4
    # headers={'Content-Type': 'application/x-www-form-urlencoded'}
    # )
    pass


def param_json():
    # 将json中对应的数据进行序列化成一个字符串,json.dumps(...)
    # 然后发送到服务器端的body中,并且Content-Type是 {'Content-Type': 'application/json'}
    requests.request(method='POST',
                     url='http://127.0.0.1:8000/test/',
                     json={'k1': 'v1', 'k2': '水电费'})


def param_headers():
    # 发送请求头到服务器端
    requests.request(method='POST',
                     url='http://127.0.0.1:8000/test/',
                     json={'k1': 'v1', 'k2': '水电费'},
                     headers={'Content-Type': 'application/x-www-form-urlencoded'}
                     )


def param_cookies():
    # 发送Cookie到服务器端
    requests.request(method='POST',
                     url='http://127.0.0.1:8000/test/',
                     data={'k1': 'v1', 'k2': 'v2'},
                     cookies={'cook1': 'value1'},
                     )
    # 也可以使用CookieJar(字典形式就是在此基础上封装)
    from http.cookiejar import CookieJar
    from http.cookiejar import Cookie

    obj = CookieJar()
    obj.set_cookie(Cookie(version=0, name='c1', value='v1', port=None, domain='', path='/', secure=False, expires=None,
                          discard=True, comment=None, comment_url=None, rest={'HttpOnly': None}, rfc2109=False,
                          port_specified=False, domain_specified=False, domain_initial_dot=False, path_specified=False)
                   )
    requests.request(method='POST',
                     url='http://127.0.0.1:8000/test/',
                     data={'k1': 'v1', 'k2': 'v2'},
                     cookies=obj)


def param_files():
    # 发送文件
    # file_dict = {
    # 'f1': open('readme', 'rb')
    # }
    # requests.request(method='POST',
    # url='http://127.0.0.1:8000/test/',
    # files=file_dict)

    # 发送文件,定制文件名
    # file_dict = {
    # 'f1': ('test.txt', open('readme', 'rb'))
    # }
    # requests.request(method='POST',
    # url='http://127.0.0.1:8000/test/',
    # files=file_dict)

    # 发送文件,定制文件名
    # file_dict = {
    # 'f1': ('test.txt', "hahsfaksfa9kasdjflaksdjf")
    # }
    # requests.request(method='POST',
    # url='http://127.0.0.1:8000/test/',
    # files=file_dict)

    # 发送文件,定制文件名
    # file_dict = {
    #     'f1': ('test.txt', "hahsfaksfa9kasdjflaksdjf", 'application/text', {'k1': '0'})
    # }
    # requests.request(method='POST',
    #                  url='http://127.0.0.1:8000/test/',
    #                  files=file_dict)

    pass


def param_auth():
    # 认证设置:登录网站时弹出一个框要求输入账户密码,此时是无法获取html的
    # 但本质原理是拼接成请求头发送
    # 一般的网站都不用默认的加密方式,都是自己写
    # 那么我们就需要按照网站的加密方式,自己写一个类似的方法。
    from requests.auth import HTTPBasicAuth, HTTPDigestAuth

    ret = requests.get('https://api.github.com/user', auth=HTTPBasicAuth('wupeiqi', 'sdfasdfasdf'))
    print(ret.text)

    # ret = requests.get('http://192.168.1.1',
    # auth=HTTPBasicAuth('admin', 'admin'))
    # ret.encoding = 'gbk'
    # print(ret.text)

    # ret = requests.get('http://httpbin.org/digest-auth/auth/user/pass', auth=HTTPDigestAuth('user', 'pass'))
    # print(ret)
    #


def param_timeout():
    # 设置超时时间
    # ret = requests.get('http://google.com/', timeout=1)   # 1秒能连上则连,否则放弃
    # print(ret)

    # ret = requests.get('http://google.com/', timeout=(5, 1))   # 两个参数时:请求链接等待时间、响应等待时间
    # print(ret)
    pass


def param_allow_redirects():
    # 关闭重定向
    ret = requests.get('http://127.0.0.1:8000/test/', allow_redirects=False)
    print(ret.text)


def param_proxies():
    # 代理:先发送请求给代理,再由代理帮忙发送(封ip是常见的事情)
    # 为任意请求方法提供 proxies 参数来配置单个请求
    # proxies = {
    #     "http": "61.172.249.96:80",
    #     "https": "http://61.185.219.126:3128",
    # }

    # proxies = {'http://10.20.1.128': 'http://10.10.1.10:5323'}   # 定向地 前面的地址用后面这个代理

    # ret = requests.get("http://www.proxy360.cn/Proxy", proxies=proxies)
    # print(ret.headers)

    # 代理加密
    # from requests.auth import HTTPProxyAuth
    #
    # proxyDict = {
    # 'http': '77.75.105.165',
    # 'https': '77.75.105.165'
    # }
    # auth = HTTPProxyAuth('username', 'mypassword')
    #
    # r = requests.get("http://www.google.com", proxies=proxyDict, auth=auth)
    # print(r.text)

    pass


def param_stream():
    # 默认情况下,当你进行网络请求后,响应体会立即被下载。
    # 响应体内容工作流:如果你在请求中把 stream 设为 True,Requests 无法将连接释放回连接池
    ret = requests.get('http://127.0.0.1:8000/test/', stream=True)
    print(ret.content)
    ret.close()

    # from contextlib import closing
    # with closing(requests.get('http://httpbin.org/get', stream=True)) as r:
    # # 在此处理响应。
    # for i in r.iter_content():
    # print(i)


def requests_session():
    import requests

    session = requests.Session()

    ### 1、首先登陆任何页面,获取cookie

    i1 = session.get(url="http://dig.chouti.com/help/service")

    ### 2、用户登陆,携带上一次的cookie,后台对cookie中的 gpsd 进行授权
    i2 = session.post(
        url="http://dig.chouti.com/login",
        data={
            'phone': "8615131255089",
            'password': "xxxxxx",
            'oneMonth': ""
        }
    )

    i3 = session.post(
        url="http://dig.chouti.com/link/vote?linksId=8589623",
    )
    print(i3.text)
(1)cert参数
发请求需要带证书的时候,需要带上这个参数,这个证书一般是.pem文件。
可以指定一个本地证书用作客户端证书,可以是单个文件(包含密钥和证书)或一个包含两个文件路径的元组:
requests.get('https://kennethreitz.org', cert=('/path/client.cert', '/path/client.key'))
(2)verify参数
Requests 可以为 HTTPS 请求验证 SSL 证书,就像 web 浏览器一样。SSL 验证默认是开启的,如果证书验证失败,Requests 会抛出 SSLError:
>>> requests.get('https://github.com', verify=True)
可以为 verify 传入 CA_BUNDLE 文件的路径,或者包含可信任 CA 证书文件的文件夹路径:
>>> requests.get('https://github.com', verify='/path/to/certfile')
注意:如果 verify 设为文件夹路径,文件夹必须通过 OpenSSL 提供的 c_rehash 工具处理。
默认情况下, verify 是设置为 True 的。选项 verify 仅应用于主机证书。
(3)session参数
session参数可用来自动管理cookie和headers。(不够灵活,不建议使用)
抽屉新热榜示例如下:
import requests

session = requests.Session()
i1 = session.get(url="http://dig.chouti.com/help/service")
i2 = session.post(
    url="http://dig.chouti.com/login",
    data={
        'phone': "8615131255089",
        'password': "xxooxxoo",
        'oneMonth': ""
    }
)
i3 = session.post(
    url="http://dig.chouti.com/link/vote?linksId=8589523"
)
print(i3.text)
(4)异常处理(requests.exceptions)
import requests
from requests.exceptions import * #可以查看requests.exceptions获取异常类型

try:
    r=requests.get('http://www.baidu.com',timeout=0.00001)
except ReadTimeout:
    print('===:')
# except ConnectionError: #网络不通
#     print('-----')
# except Timeout:
#     print('aaaaa')

except RequestException:
    print('Error')
3、更多requests模块相关的文档
http://cn.python-requests.org/zh_CN/latest/
五、响应Response
1、response常用属性
import requests

# 指定url并发起get请求
respone=requests.get('http://www.jianshu.com')

# 获取响应对象中字符串形式的页面数据
print(respone.text)
# 获取response对象中二进制(bytes)类型的页面数据
print(respone.content)
# 获取响应状态码
print(respone.status_code)
"""
403
"""
# 获取响应头信息(字典形式展示)
print(respone.headers)
"""
{'Date': 'Fri, 02 Nov 2018 03:04:23 GMT', 'Content-Type': 'text/html',...}
"""
# 获取响应头中的cookies
print(respone.cookies)
print(respone.cookies.get_dict())
print(respone.cookies.items())

# 获取请求指定的url
print(respone.url)
"""
https://www.jianshu.com/
"""
# 获取访问的历史记录
print(respone.history)
"""
[]
"""
# 获取请求编码
print(respone.encoding)
"""
ISO-8859-1
"""
# 关闭:response.close()
from contextlib import closing
with closing(requests.get('xxx',stream=True)) as response:
    for line in response.iter_content():
        pass
2、编码问题
import requests
response=requests.get('http://www.autohome.com/news')
# response.encoding='gbk' #汽车之家网站返回的页面内容为gb2312编码的,而requests的默认编码为ISO-8859-1,如果不设置成gbk则中文乱码
print(response.text)
3、获取二进制数据
(1)下载图片
import requests

response=requests.get('https://timgsa.baidu.com/timg?image&quality=80&size=b9999_10000&sec=1509868306530&di=712e4ef3ab258b36e9f4b48e85a81c9d&imgtype=0&src=http%3A%2F%2Fc.hiphotos.baidu.com%2Fimage%2Fpic%2Fitem%2F11385343fbf2b211e1fb58a1c08065380dd78e0c.jpg')

with open('a.jpg','wb') as f:
    f.write(response.content)
(2)下载视频
stream参数:一点一点的取,比如下载视频时,如果视频100G,用response.content然后一下子写到文件中是不合理的。
import requests

response=requests.get('https://gss3.baidu.com/6LZ0ej3k1Qd3ote6lo7D0j9wehsv/tieba-smallvideo-transcode/1767502_56ec685f9c7ec542eeaf6eac93a65dc7_6fe25cd1347c_3.mp4',
                      stream=True)

with open('b.mp4','wb') as f:
    for line in response.iter_content():
        f.write(line)
4、解析json
import requests
response=requests.get('http://httpbin.org/get')

import json
res1=json.loads(response.text) #太麻烦

res2=response.json() #直接获取json数据

print(res1 == res2) #True
5、Redirection and History
(1)官网解释
By default Requests will perform location redirection for all verbs except HEAD.

We can use the history property of the Response object to track redirection.

The Response.history list contains the Response objects that were created in order to complete the request. The list is sorted from the oldest to the most recent response.

For example, GitHub redirects all HTTP requests to HTTPS:

>>> r = requests.get('http://github.com')

>>> r.url
'https://github.com/'

>>> r.status_code

>>> r.history
[]
If you're using GET, OPTIONS, POST, PUT, PATCH or DELETE, you can disable redirection handling with the allow_redirects parameter:

>>> r = requests.get('http://github.com', allow_redirects=False)

>>> r.status_code

>>> r.history
[]
If you're using HEAD, you can enable redirection as well:

>>> r = requests.head('http://github.com', allow_redirects=True)

>>> r.url
'https://github.com/'

>>> r.history
[]
(2)github登录后跳转到主页面的例子来验证
import requests
import re

#第一次请求
r1=requests.get('https://github.com/login')
r1_cookie=r1.cookies.get_dict() #拿到初始cookie(未被授权)
authenticity_token=re.findall(r'name="authenticity_token".*?value="(.*?)"',r1.text)[0] #从页面中拿到CSRF TOKEN

#第二次请求:带着初始cookie和TOKEN发送POST请求给登录页面,带上账号密码
data={
    'commit':'Sign in',
    'utf8':'✓',
    'authenticity_token':authenticity_token,
    'login':'[email protected]',
    'password':'alex3714'
}


#测试一:没有指定allow_redirects=False,则响应头中出现Location就跳转到新页面,r2代表新页面的response
r2=requests.post('https://github.com/session',
             data=data,
             cookies=r1_cookie
             )

print(r2.status_code) #200
print(r2.url) #看到的是跳转后的页面
print(r2.history) #看到的是跳转前的response
print(r2.history[0].text) #看到的是跳转前的response.text


#测试二:指定allow_redirects=False,则响应头中即便出现Location也不会跳转到新页面,r2代表的仍然是老页面的response
r2=requests.post('https://github.com/session',
             data=data,
             cookies=r1_cookie,
             allow_redirects=False
             )


print(r2.status_code) #302
print(r2.url) #看到的是跳转前的页面https://github.com/session
print(r2.history) #[]
六、requests模块高级
1、cookie操作
基于用户的用户数据。
需求:爬取张三用户的豆瓣网的个人主页页面数据
import requests

session = requests.session()    # 获取一个session对象
# 1.发起登录请求:将cookie获取,且存储到session对象中
login_url = "https://accounts.douban.com/login"
data = {
    "source": "index_nav",
    "redir": "https://www.douban.com/",
    "form_email": "1xxxxxx0",
    "form_password": "xxxxxxxx",
    "login": "登录"
}
# 自定义请求头信息(伪装UA)
headers = {
    'User-Agent': 'Mozilla/5.0 (Macintosh; Intel Mac OS X 10_12_0) AppleWebKit/537.36 (KHTML, like Gecko) Chrome/70.0.3538.67 Safari/537.36',
}

# 使用session发起post请求
login_response = session.post(url=login_url, data=data, headers=headers)
# 这里完成时,session对象已经携带了cookie

# 2.对个人主页发起请求(session(cookie)),获取响应页面数据
url = "https://www.douban.com/people/186757832/"   # 地址栏对象的url
response = session.get(url=url, headers=headers)

# 获取响应对象中对应的页面数据
page_test = response.text

with open('./douban110.html', 'w', encoding='utf-8') as fp:
    fp.write(page_text)
(1)cookie作用
服务器端使用cookie来记录客户端的状态信息。
(2)实现流程
1.执行登录操作(获取cookie)
2.在发起个人主页请求时,需要将cookie携带到该请求中
注意:代码实现中会用到session对象,可以发送请求(会将cookie对象进行自动存储)。如果发起某一个请求,将cookie对象存到session对象中,第二次使用session对象发请求的时候,就会携带cookie对服务器端发送请求。
(3)session对象发请求
在此次请求发送成功后,服务器端响应回客户端一个cookie,这个cookie会自动存储在session对象当中,下一次请求时,session对象会自动携带cookie。
2、代理操作
代理:第三方代理本体执行相关事务。生活中:代购、微商、中介。
(1)爬虫程序中为什么要使用代理?
1)反爬操作关联:某些网站会在某时间段内检测某一个ip的访问次数。如果发现访问频率太快,快到不像是正常访客。典型的非正常访客就是爬虫和恶意程序等。
这些网站在发现非正常访客后,就会把非正常访客的ip禁用,导致他们无法正常访问网站。
2)反反爬手段:使用代理IP的话,如果一个地址被封了,还可以换一个ip继续访问。
(2)代理分类
正向代理:代替客户端获取数据。
反向代理:代理服务器端提供数据。
爬虫都是应用的正向代理,代替客户端获取数据。
(3)免费代理ip的网站提供商
www.goubanjia.com(推荐使用)、快代理、西祠代理。
(4)地址代理
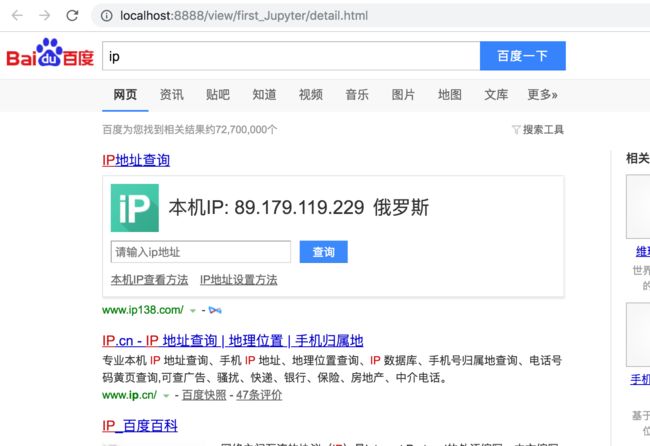
1)查看本地ip:
2)查看得到一个代理Ip:
(5)代码实现
import requests

url = "https://www.baidu.com/s?ie=utf-8&wd=ip"

# 将代理ip封装到字典
proxy = {
    "https": "89.179.119.229:55205"   # 注意ip对应的代理
}
# 自定义请求头信息(伪装UA)
headers = {
    'User-Agent': 'Mozilla/5.0 (Macintosh; Intel Mac OS X 10_12_0) AppleWebKit/537.36 (KHTML, like Gecko) Chrome/70.0.3538.67 Safari/537.36',
}

# 更换网络ip
response = requests.get(url=url, proxies=proxy, headers=headers)

with open('./detail.html', "w", encoding="utf-8") as fp:
    fp.write(response.text)
可以看到地址已经改为了指定的代理ip,显示本机地址为俄罗斯。
七、验证码处理
很多网站在登录时,都需要验证验证码。
1、验证码处理方式
(1)手动识别验证码
(2)云打码平台自动识别验证码
2、云打码平台处理验证码实现流程
(1)对携带验证码的页面数据进行抓取
import requests
from lxml import etree

# 1.对携带验证码的页面数据进行抓取
url = 'https://www.douban.com/accounts/login?source=movie'
headers = {
    'User-Agent': 'Mozilla/5.0 (Macintosh; Intel Mac OS X 10_13_1) AppleWebKit/537.36 (KHTML, like Gecko) Chrome/70.0.3538.77 Safari/537.36'
}
page_text = requests.get(url=url, headers=headers).text
(2)可以将页面数据中验证码进行解析,验证码图片下载到本地
from lxml import etree
# 2.可以将页面数据中验证码进行解析,验证码图片下载到本地
tree = etree.HTML(page_text)
# 利用xpath对指定内容解析:img标签的src属性
codeImg_url = tree.xpath('//*[@id="captcha_image"]/@src')[0]
if codeImg_url:
# 获取了验证码图片对应的二进制数据值
code_img = requests.get(url=codeImg_url, headers=headers).content
# 获取capture_id参数值
c_id = re.findall('![]() ', page_text, re.S)[0]
with open('./code.png', 'wb') as fp:
fp.write(code_img)
', page_text, re.S)[0]
with open('./code.png', 'wb') as fp:
fp.write(code_img)(3)云打码平台注册和使用
1)在官网中进行注册
访问网站:http://www.yundama.com/
需要同时注册普通用户和开发者用户。
2)登录开发者用户
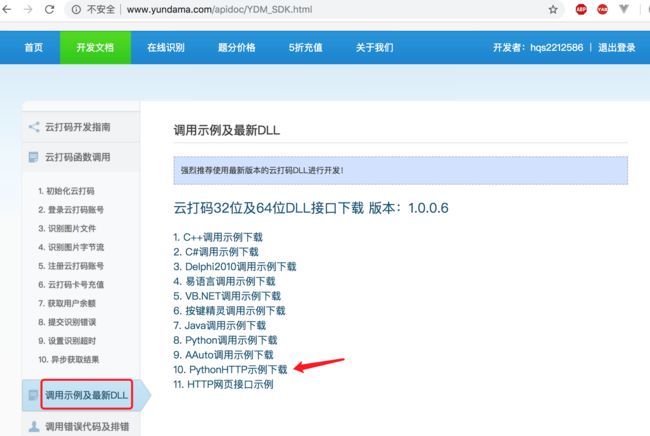
3)实例代码的下载
开发文档-》调用实例及最新的DLL
解压安装包得到如下文件:
4)创建一个软件
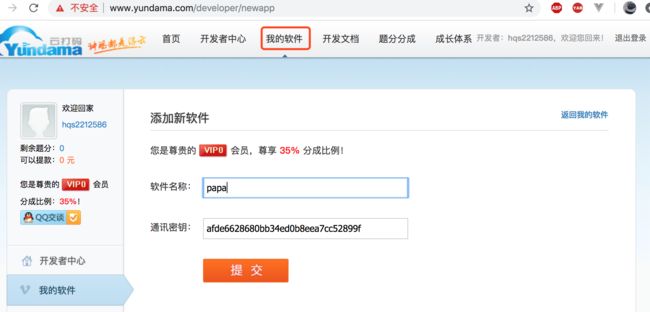
开发者页面中点击我的软件-》点击添加新的软件:
输入软件名称后提交:
得到的通讯密钥等下也会利用到。
(4)将验证码图片提交给三方平台进行识别,返回验证码图片上的数据值
使用前面下载的示例代码中的源码进行修改,就可以帮助识别验证码图片中的数据值了。
将YDMHTTPDemo3.x.py文件中,YDMHttp这个类的代码截取出来:
import http.client, mimetypes, urllib, json, time, requests

class YDMHttp:

    apiurl = 'http://api.yundama.com/api.php'
    username = ''
    password = ''
    appid = ''
    appkey = ''

    def __init__(self, username, password, appid, appkey):
        self.username = username
        self.password = password
        self.appid = str(appid)
        self.appkey = appkey

    def request(self, fields, files=[]):
        response = self.post_url(self.apiurl, fields, files)
        response = json.loads(response)
        return response

    def balance(self):
        data = {'method': 'balance', 'username': self.username, 'password': self.password, 'appid': self.appid, 'appkey': self.appkey}
        response = self.request(data)
        if (response):
            if (response['ret'] and response['ret'] < 0):
                return response['ret']
            else:
                return response['balance']
        else:
            return -9001

    def login(self):
        data = {'method': 'login', 'username': self.username, 'password': self.password, 'appid': self.appid, 'appkey': self.appkey}
        response = self.request(data)
        if (response):
            if (response['ret'] and response['ret'] < 0):
                return response['ret']
            else:
                return response['uid']
        else:
            return -9001

    def upload(self, filename, codetype, timeout):
        data = {'method': 'upload', 'username': self.username, 'password': self.password, 'appid': self.appid, 'appkey': self.appkey, 'codetype': str(codetype), 'timeout': str(timeout)}
        file = {'file': filename}
        response = self.request(data, file)
        if (response):
            if (response['ret'] and response['ret'] < 0):
                return response['ret']
            else:
                return response['cid']
        else:
            return -9001

    def result(self, cid):
        data = {'method': 'result', 'username': self.username, 'password': self.password, 'appid': self.appid, 'appkey': self.appkey, 'cid': str(cid)}
        response = self.request(data)
        return response and response['text'] or ''

    def decode(self, filename, codetype, timeout):
        cid = self.upload(filename, codetype, timeout)
        if (cid > 0):
            for i in range(0, timeout):
                result = self.result(cid)
                if (result != ''):
                    return cid, result
                else:
                    time.sleep(1)
            return -3003, ''
        else:
            return cid, ''

    def report(self, cid):
        data = {'method': 'report', 'username': self.username, 'password': self.password, 'appid': self.appid, 'appkey': self.appkey, 'cid': str(cid), 'flag': '0'}
        response = self.request(data)
        if (response):
            return response['ret']
        else:
            return -9001

    def post_url(self, url, fields, files=[]):
        for key in files:
            files[key] = open(files[key], 'rb');
        res = requests.post(url, files=files, data=fields)
        return res.text
如果是ipython的话,直接复制到cell中执行,这样就把这个类加载进内存中了。
3、代码实现
(1)自定义一个获取验证码的函数
利用YDMHTTPDemo3.x.py文件中剩余的代码定义一个获取验证码的函数:
def getCode(codeImg):
    """
    该函数调用了打码平台的相关接口,对指定的验证码图片进行识别
    返回图片上的数据值
    """
    # 云打码平台注册的普通用户名
    username = 'xxxxxxxx'

    # 密码
    password = 'xxxxxxxx'

    # 软件ID,开发者分成必要参数。登录开发者后台【我的软件】获得!
    appid = 6206

    # 软件密钥,开发者分成必要参数。登录开发者后台【我的软件】获得!
    appkey = 'afde6628xxxxxxxxx0b8eeaxxxxx899f'

    # 下载好的验证码图片文件
    filename = codeImg

    # 验证码类型,# 例:1004表示4位字母数字,不同类型收费不同。请准确填写,否则影响识别率。
    # 在此查询所有类型 http://www.yundama.com/price.html
    codetype = 3000  # 豆瓣验证码是不定长的英文

    # 超时时间,秒(10秒以上)
    timeout = 20

    # 检查
    if (username == 'username'):
        print('请设置好相关参数再测试')
    else:
        # 初始化
        yundama = YDMHttp(username, password, appid, appkey)

        # 登陆云打码
        uid = yundama.login();
        print('uid: %s' % uid)

        # 查询余额
        balance = yundama.balance();
        print('balance: %s' % balance)

        # 开始识别,图片路径,验证码类型ID,超时时间(秒),识别结果
        cid, result = yundama.decode(filename, codetype, timeout);
        print('cid: %s, result: %s' % (cid, result))
        return result
(2)爬取会带有验证码的页面
import re
import requests
from lxml import etree
# 1.对携带验证码的页面数据进行抓取
url = 'https://www.douban.com/accounts/login?source=movie'
headers = {
'User-Agent': 'Mozilla/5.0 (Macintosh; Intel Mac OS X 10_13_1) AppleWebKit/537.36 (KHTML, like Gecko) Chrome/70.0.3538.77 Safari/537.36'
}
page_text = requests.get(url=url, headers=headers).text
# 2.可以将页面数据中验证码进行解析,验证码图片下载到本地
tree = etree.HTML(page_text)
# 利用xpath对指定内容解析:img标签的src属性
codeImg_url = tree.xpath('//*[@id="captcha_image"]/@src')[0]
if codeImg_url:
# 获取了验证码图片对应的二进制数据值
code_img = requests.get(url=codeImg_url, headers=headers).content
# 获取capture_id参数值
c_id = re.findall('![]() ', page_text, re.S)[0]
with open('./code.png', 'wb') as fp:
fp.write(code_img)
# 获得了验证码图片上的数据值
codeText = getCode('./code.png')
# 进行登录操作
post = "https://accounts.douban.com/login"
data = {
'source': 'movie',
'redir': 'https://movie.douban.com/',
'form_email': 'xxxxxx',
'form_password': 'xxxxxxx',
'captcha-solution': codeText, # 验证码
'captcha-id': c_id, # 跟随验证码动态变化的id值
'login': '登录'
}
print(c_id)
# 登录后获取的信息
login_text = requests.post(url=post, data=data, headers=headers).text
with open('./login.html', 'w', encoding='utf-8') as fp:
fp.write(login_text)
else:
# 无验证码直接登录获取数据(未验证)
# 进行登录操作
post = "https://accounts.douban.com/login"
data = {
'source': 'movie',
'redir': 'https://movie.douban.com/',
'form_email': 'xxxxxxxx',
'form_password': 'xxxxxxx',
'login': '登录'
}
# 登录后获取的信息
login_text = requests.post(url=post, data=data, headers=headers).text
with open('./login_无验证.html', 'w', encoding='utf-8') as fp:
fp.write(login_text)
', page_text, re.S)[0]
with open('./code.png', 'wb') as fp:
fp.write(code_img)
# 获得了验证码图片上的数据值
codeText = getCode('./code.png')
# 进行登录操作
post = "https://accounts.douban.com/login"
data = {
'source': 'movie',
'redir': 'https://movie.douban.com/',
'form_email': 'xxxxxx',
'form_password': 'xxxxxxx',
'captcha-solution': codeText, # 验证码
'captcha-id': c_id, # 跟随验证码动态变化的id值
'login': '登录'
}
print(c_id)
# 登录后获取的信息
login_text = requests.post(url=post, data=data, headers=headers).text
with open('./login.html', 'w', encoding='utf-8') as fp:
fp.write(login_text)
else:
# 无验证码直接登录获取数据(未验证)
# 进行登录操作
post = "https://accounts.douban.com/login"
data = {
'source': 'movie',
'redir': 'https://movie.douban.com/',
'form_email': 'xxxxxxxx',
'form_password': 'xxxxxxx',
'login': '登录'
}
# 登录后获取的信息
login_text = requests.post(url=post, data=data, headers=headers).text
with open('./login_无验证.html', 'w', encoding='utf-8') as fp:
fp.write(login_text)
该代码中区分了页面登录需要验证码和不需要验证码的情况。
(3)注意引入前面的YDMHttp类
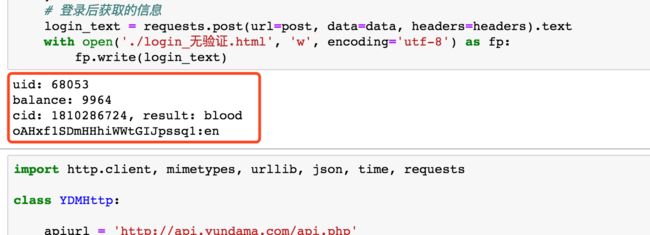
4、执行效果
控制台输出:
爬取的验证码图片:
爬取的页面:
八、更多参考博客
- requests模块
-
Python之路【第十九篇】:爬虫
-
Q2Day79
-
Requests: 让 HTTP 服务人类


