Bash脚本编程学习笔记02:脚本基础和bash配置文件
脚本基础
参考资料:Shell Scripts (Bash Reference Manual)
不严谨地说,编程语言根据代码运行的方式,可以分为两种方式:
- 编译运行:需要先将人类可识别的代码文件编译成机器可运行的二进制程序文件后,方可运行。例如C语言和Java语言。
- 解释运行:需要一个编程语言的解释器,运行时由解释器读取代码文件并运行。例如python语言(解释器:/usr/bin/python)和shell脚本(解释器:/bin/bash)。
根据其是否调用OS上的其他应用程序来分来:
- 脚本语言(shell脚本):依赖于bash自身以及OS中的其他应用程序(例如:grep/sed/awk等)。
- 完整编程语言:依赖自身的语法和其自身丰富的库文件来完成任务,对系统的依赖性很低,例如python、PHP等。
根据编程模型:
- 过程式:以指令为中心来组织代码,数据是服务于代码。像C语言和bash。
- 对象式:以数据为中心来组织代码,围绕数据组织指令。其编程的过程一般为创建类(class,例如:人类),根据类实例化出对象(例如:阿龙弟弟),对象具有类的通用属性(例如人类有手有脚,那么阿龙弟弟也有),对象可以具备自己的方法(method,例如写博客)。像Java语言。
像C++和python是既支持面向对象又支持面向过程。
因此我们可以总结出:bash是一门解释运行的过程式脚本语言,而bash的脚本,是一种将自身的编程逻辑和OS上的命令程序堆砌起来的待执行文件。
在shell脚本中,第一行我们需要向内核传达我们这个脚本是使用哪种解释器(interpreter)来解释运行。形如:
#!/bin/sh
或者
#!/bin/bash
或者
#!/usr/bin/python
“#!”是固定的格式,叫做shebang或者hashbang,后面跟着的是解释器程序的路径。如果是/bin/bash那就是bash脚本,如果是/usr/bin/python那就是python脚本。
shebang是可以添加选项的,例如可以使得脚本在执行时为登录式(login)shell。
#!/bin/bash -l
bash脚本的文件的后缀名(亦称扩展名)一般为“.sh”,这个名称主要用于让人易识别用的,具体脚本在执行的时候使用什么解释器,与文件的后缀名无关。
脚本还需要具备执行权限。在执行的时候,需要使用相对路径或者绝对路径方可正确执行。
~]# cat alongdidi.sh
#!/bin/bash
...
~]# chmod a+x alongdidi.sh
~]# ./alongdidi.sh
~]# /PATH/TO/alongdidi.sh
如果直接键入脚本的名称来执行的话,bash会从内置命令、PATH等中寻找alongdidi.sh命令,如果我们的脚本当前路径不存在于PATH中,就会报错。
~]# alongdidi.sh
bash: alongdidi.sh: command not found...
脚本也可以没有shebang和执行权限,我们依然可以通过调用bash命令,将脚本作为bash的参数来执行,这样也是可以的。
~]# bash alongdidi.sh
脚本中存在的空白行会被忽略,bash并不会将空白行打印出来。
除了shebang(#!)这种特殊的格式,其余位置出现#,其后面的字符均会被认为是脚本注释。
Bash执行一个脚本,实际上是在当前shell下创建子shell来执行的。
配置文件
参考资料:
bash启动时加载配置文件过程 - 骏马金龙 - 博客园
Bash Startup Files (Bash Reference Manual)
建议英文不好、bash新手直接参考骏马兄的博文来学习即可,直接跳过官网的参考资料。骏马兄本人也是基于官网学习并自己反复验证的,准确率应该很高,可放心。
无论我们直接通过连接至物理服务器/机器的物理设备(鼠标、键盘和显示器),还是我们通过SSH客户端(无论GUI或者CLI)连接至Linux服务器中。系统都会在我们所连接上的终端上启用一个bash,我们通过这个shell来与OS进行交互。
即使我们执行bash脚本,系统也会创建一个子bash来完成任务。
这些bash在启动的时候,就需要读取其配置文件,官方也将其称之为启动文件(startup files)。用于使bash在启动的时候读取这些文件并执行其中的指令来设置bash环境。
交互式和登录式
Bash需要判断自身是否具备交互式(interactive)和登录式(login)的特性来决定自己应该读取哪些配置文件。
判断shell是否为交互式有两种方法:
方法一:判断特殊变量“$-”是否包含字母i。bash还有其他的特殊变量,有兴趣的请参考Special Parameters (Bash Reference Manual)。
[root@c7-server ~]# echo $-
himBH
[root@c7-server ~]# cat alongdidi.sh
#!/bin/bash
echo $-
[root@c7-server ~]# bash alongdidi.sh
hB
方法二:判断变量“$PS1”是否为空。交互式登录会设置该变量,如果变量为空,则为非交互式,否则为交互式。PS1是Prompt String,提示符字符串的意思,在官网中它属于Bourne Shell的变量之一。
[root@c7-server ~]# echo $PS1
[\u@\h \W]\$
[root@c7-server ~]# cat alongdidi.sh
#!/bin/bash
echo $PS1
[root@c7-server ~]# bash alongdidi.sh

[root@c7-server ~]#
判断shell是否为登录式,使用bash的内置命令shopt来查看。它和内置命令set一起都用于修改shell的行为。Modifying Shell Behavior (Bash Reference Manual)
[root@c7-server ~]# shopt login_shell
login_shell        on
[root@c7-server ~]# cat alongdidi.sh
#!/bin/bash
shopt login_shell
[root@c7-server ~]# bash alongdidi.sh
login_shell        off
[root@c7-server ~]# bash
[root@c7-server ~]# shopt login_shell
login_shell        off
常见的bash启动方式
在此之前需要读者大概了解一下终端的概念,可参考【你真的知道什么是终端吗? - Linux大神博客】。
PS:最后还把Windows给黑了一下。确实感觉windows应该算不上多用户,以前维护Windows Server的时候,使用远程连接只能以超管用户连接上2或者3个而已,再多就不行了。目前也不晓得为什么,可能windows自身的限制如此。
1、通过Xshell客户端使用SSH协议登录。
伪终端。交互式,登录式。
[root@c7-server ~]# tty
/dev/pts/1
[root@c7-server ~]# who am i
root     pts/1        2019-12-12 15:39 (192.168.152.1)
[root@c7-server ~]# echo $PS1; shopt login_shell
[\u@\h \W]\$
login_shell        on
2、在图形界面下右击桌面打开的终端。
伪终端。交互式,非登录式。
[root@c7-server ~]# tty
/dev/pts/0
[root@c7-server ~]# who am i
root     pts/0        2019-12-12 15:28 (:0)
[root@c7-server ~]# echo $PS1; shopt login_shell
[\u@\h \W]\$
login_shell        off
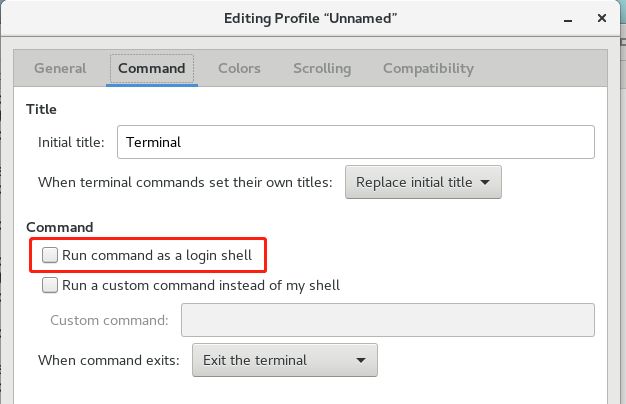
可通过设置终端的属性来使其变为登录式。
该图形界面,在CentOS 7上本身位于Ctrl+Alt+F1的虚拟终端上。
3、虚拟终端。
通过Ctrl+Alt+Fn来切换,n为正整数,该截图位于Ctrl+Alt+F2,这种叫虚拟终端。交互式,登录式。
4、su命令启动的bash。
不使用login选项的su。交互式,非登录式。
[root@c7-server ~]# su root
[root@c7-server ~]# echo $PS1; shopt login_shell
[\u@\h \W]\$
login_shell        off
使用login选项的su。交互式,登录式。
-, -l, --login:使shell为login shell。
[root@c7-server ~]# su - root
Last login: Thu Dec 12 16:10:36 CST 2019 on pts/1
[root@c7-server ~]# echo $PS1; shopt login_shell
[\u@\h \W]\$
login_shell        on
5、通过bash命令启动的子shell。
一定为交互式,是否登录式看是否带-l选项。
[root@c7-server ~]# echo $PS1; shopt login_shell
[\u@\h \W]\$
login_shell        off
[root@c7-server ~]# exit
exit
[root@c7-server ~]# bash -l
[root@c7-server ~]# echo $PS1; shopt login_shell
[\u@\h \W]\$
login_shell        on
6、命令组合时。
PS:这部分看不懂,来自骏马金龙。
这种情况下,登录式与交互式的情况继承于父shell。
[root@c7-server ~]# (echo $BASH_SUBSHELL; echo $PS1; shopt login_shell)
1
[\u@\h \W]\$
login_shell        on
[root@c7-server ~]# su
[root@c7-server ~]# (echo $BASH_SUBSHELL; echo $PS1; shopt login_shell)
1
[\u@\h \W]\$
login_shell        off
7、使用ssh命令远程执行命令。
非交互式,非登录式。这种方式,在官网叫做远程shell,Remote Shell Daemon。
[root@c7-server ~]# ssh localhost 'echo $PS1; shopt login_shell'
root@localhost's password:

login_shell        off
8、运行shell脚本。
通过bash命令运行。非交互式,是否登录式根据是否带-l选项。
[root@c7-server ~]# cat alongdidi.sh
#!/bin/bash
echo $PS1
shopt login_shell
[root@c7-server ~]# bash alongdidi.sh

login_shell        off
[root@c7-server ~]# bash -l alongdidi.sh

login_shell        on
文件具备执行权限后直接运行。非交互式,非登录式。
[root@c7-server ~]# ./alongdidi.sh

login_shell        off
如果shebang具备了-l选项,那么直接运行为非交互式、登录式。
通过不带-l选项的bash执行,依然是非交互式,非登录式。
也就是说是否为登录式,先看CLI中的bash是否带-l选项,再看shebang是否带-l选项。均为非交互式。
[root@c7-server ~]# cat alongdidi.sh
#!/bin/bash -l
echo $PS1
shopt login_shell
[root@c7-server ~]# ./alongdidi.sh

login_shell        on
[root@c7-server ~]# bash alongdidi.sh

login_shell        off
配置文件的加载方式
在bash中,加载配置文件的方式是通过读取命令来实现的,它们是bash的内置命令source和“.”。
source filename [arguments]
. filename [arguments]
注意这里是一个单独的小数点,是一个bash内置命令。如果有arguments的话就作为位置参数。
本质上是读取了文件并在当前的shell下执行文件中的命令。(不同于shell脚本的执行是需要创建子shell)
bash相关的配置文件,主要有这些:
/etc/profile
~/.bash_profile
~/.bashrc
/etc/bashrc
/etc/profile.d/*.sh
注意:这些配置文件,一般是都要求要具备可读取的权限才行(虽然对于root用户可能无所谓)
位于用户家目录下的配置文件,为用户私有的配置文件,只有对应的用户才会加载,可实现针对用户的定制。位于/etc/目录下的配置文件,可以理解为全局配置文件,对所有用户生效。
为了测试不同的bash启动场景会加载哪些文件,我们在上述文件的末尾处加上一句echo语句。注意,我们是在文件的末尾加的echo语句,bash脚本的执行是按顺序自上而下执行,位置很关键。
echo "echo '/etc/profile goes'" >>/etc/profile
echo "echo '~/.bash_profile goes'" >>~/.bash_profile
echo "echo '~/.bashrc goes'" >>~/.bashrc
echo "echo '/etc/bashrc goes'" >>/etc/bashrc
echo "echo '/etc/profile.d/test.sh goes'" >>/etc/profile.d/test.sh
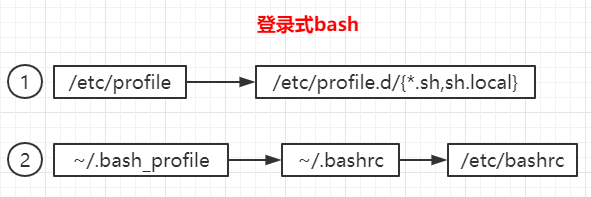
1、只要是登录式(无论是否交互式)的bash:先读取/etc/profile,再依次搜索~/.bash_profile、~/.bash_login和~/.profile并仅加载第一个搜索到的且可读的文件。在bash退出时,读取~/.bash_logout。
在/etc/profile文件中,有读取指令:
for i in /etc/profile.d/*.sh /etc/profile.d/sh.local ; do
    if [ -r "$i" ]; then
        if [ "${-#*i}" != "$-" ]; then
            . "$i"
        else
            . "$i" >/dev/null
        fi
    fi
done
判断/etc/profile.d/目录下的*.sh和sh.local文件是否存在且可读,如果是的话,则读取。红色粗体字的判断,是判断是否为交互式的bash,如果是的话在读取配置文件时输出STDOUT,否则不输出。
在CentOS 6中没有/etc/profile.d/sh.local文件,也没有加载该文件的指令。在CentOS 7上,这个文件也只有一行注释,以我蹩脚的英文水平,我猜应该是用来填写一些环境变量,可用于覆盖掉/etc/profile中的环境变量。
~]# cat /etc/profile.d/sh.local
#Add any required envvar overrides to this file, it is sourced from /etc/profile
对于root用户来说,由于存在~/.bash_profile文件且可读(在我的测试环境中,普通用户也具备有可读的~/.bash_profile),因此~/.bash_login和~/.profile就被忽略了。
在~/.bash_profile中,有读取指令:
PS:记得留意那段英文注释。
# Get the aliases and functions
if [ -f ~/.bashrc ]; then
        . ~/.bashrc
fi
在~/.bashrc中,也有读取指令:
# Source global definitions
if [ -f /etc/bashrc ]; then
        . /etc/bashrc
fi
在/etc/bashrc中,虽然有读取指令,但是这部分指令是在非登录式的情况下才执行:
if ! shopt -q login_shell ; then # We're not a login shell
...
    for i in /etc/profile.d/*.sh; do
        if [ -r "$i" ]; then
            if [ "$PS1" ]; then
                . "$i"
            else
                . "$i" >/dev/null
            fi
        fi
    done
...
fi
图示如下。按编号顺序,首先加载第一条,加载完再加载第二条。
我们来测试之前所述的几种bash启动场景来看看。注意,必须得是登录式的才行。因为我们这个小节讨论的是登录式的。
I. Xshell客户端,伪终端登录,交互式登录式。
/etc/profile.d/test.sh goes
/etc/profile goes
/etc/bashrc goes
~/.bashrc goes
~/.bash_profile goes
之所以后加载的先显示,那是因为我们的echo语句是添加在脚本的末尾,而读取后续配置文件是在脚本的中间段。
II. ssh远程登陆。交互式登录式。
[root@c7-server ~]# ssh localhost
root@localhost's password:
Last login: Fri Dec 13 16:01:43 2019 from 192.168.152.1
/etc/profile.d/test.sh goes
/etc/profile goes
/etc/bashrc goes
~/.bashrc goes
~/.bash_profile goes
III. 启动带有登录选项的子shell。
~]# bash -l
/etc/profile.d/test.sh goes
/etc/profile goes
/etc/bashrc goes
~/.bashrc goes
~/.bash_profile goes
IV. 登录式切换用户。
~]# su -l
Last login: Fri Dec 13 16:03:20 CST 2019 from localhost on pts/3
/etc/profile.d/test.sh goes
/etc/profile goes
/etc/bashrc goes
~/.bashrc goes
~/.bash_profile goes
V. 执行脚本时,带有登录选项。
[root@c7-server ~]# cat a.sh
#!/bin/bash -l
echo 'haha'
[root@c7-server ~]# ./a.sh
/etc/profile goes
/etc/bashrc goes
~/.bashrc goes
~/.bash_profile goes
haha
[root@c7-server ~]# bash -l a.sh
/etc/profile goes
/etc/bashrc goes
~/.bashrc goes
~/.bash_profile goes
haha
执行脚本属于非交互式,而在非交互式场景下读取/etc/profile.d/*.sh文件时,不会有输出。(在/etc/profile文件中有定义,可以翻上去看)
. "$i" >/dev/null 2>&1
因此就不会输出:
/etc/profile.d/test.sh goes
注意,仅仅只是不输出而已,但是还是有加载了配置文件的,如果涉及到比如环境变量的设置等,还是会执行的。
2、交互式但非登录式的bash:读取~/.bashrc文件,不读取/etc/profile、~/.bash_profile、~/.bash_login和~/.profile。
对应的场景为不带登录选项的子bash创建或者su用户切换。
[root@c7-server ~]# bash
/etc/profile.d/test.sh goes
/etc/bashrc goes
~/.bashrc goes
[root@c7-server ~]# su
/etc/profile.d/test.sh goes
/etc/bashrc goes
~/.bashrc goes
3、非交互式非登录式的bash。
不加载任何的配置文件,尝试展开环境变量BASH_ENV(这个变量一般是存储了某些个配置文件的路径),若有值则加载对应的配置文件,行为如下:
if [ -n "$BASH_ENV" ]; then . "$BASH_ENV"; fi
正常在编写和执行bash脚本时,都不会刻意加上登录选项,因此几乎所有的bash脚本的执行都属于这种情况。
存在一种非交互式非登录式的bash特例,不使用这种配置文件加载方式。看下一个例子。
4、非交互式非登录式的bash特例:远程shell(Remote Shell Daemon)。
加载方式如下图所示。
由于是非登录式的shell,因此在读取*.sh的时候不输出。
[root@c7-server ~]# ssh localhost echo 'Remote Shell Daemon'
root@localhost's password:
/etc/bashrc goes
~/.bashrc goes
Remote Shell Daemon


