红帽RHEL7下DHCP服务器的搭建环境
红帽RHEL7下DHCP服务器的搭建
下载DHCP服务器
[root@localhost ~]# yum install -y dhcp
已加载插件:langpacks, product-id, search-disabled-repos, subscription-manager
正在解决依赖关系
--> 正在检查事务
---> 软件包 dhcp.x86_64.12.4.2.5-82.el7 将被 安装
--> 解决依赖关系完成

依赖关系解决

=========================================================================================================
 Package          架构               版本                           源                              大小
=========================================================================================================
正在安装:
 dhcp             x86_64             12:4.2.5-82.el7                rhel-7-server-rpms             515 k

事务概要
=========================================================================================================
安装  1 软件包

总下载量:515 k
安装大小:1.4 M
Downloading packages:
dhcp-4.2.5-82.el7.x86_64.rpm                                                      | 515 kB  00:00:04
Running transaction check
Running transaction test
Transaction test succeeded
Running transaction
  正在安装    : 12:dhcp-4.2.5-82.el7.x86_64                                                          1/1
  验证中      : 12:dhcp-4.2.5-82.el7.x86_64                                                          1/1

已安装:
  dhcp.x86_64 12:4.2.5-82.el7

完毕!
配置
vim /etc/dhcp/dhcpd.conf
# DHCP Server Configuration file.
#   see /usr/share/doc/dhcp*/dhcpd.conf.example
#   see dhcpd.conf(5) man page
#
subnet 192.168.11.0 netmask 255.255.255.0 {

                  range 192.168.11.160 192.168.11.200;
#                 option domain-name-servers test.cn;
#                 option domain-name "ristar.ristar.com";
                  option routers 10.30.195.56;
                  option broadcast-address 192.168.11.255;
#                 default-lease-time 1600;
#                 max-lease-time 7200;
#                 filename "pxelinux.0";
#                 next-server 192.168.20.156;
保存配置文件后重启DHCP服务器
systemctl restart dhcpd
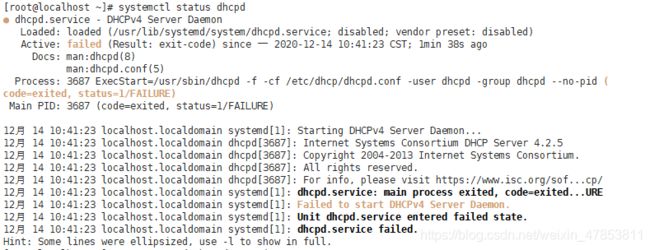
出现错误
Job for dhcpd.service failed because the control process exited with error code. See “systemctl status dhcpd.service” and “journalctl -xe” for details.
执行systemctl status dhcpd看看详细的错误原因

具体操作
环境部署
第一步,把网络连接改为NAT模式,能够连接网络,在系统上安装DHCP服务
第二步,把网络连接重新改为仅主机模式,在断网的情况下,进入网卡配置文件,配置静态IP
[root@localhost ~]# vim /etc/sysconfig/network-scripts/ifcfg-ens33 //进入网卡配置文件
TYPE=Ethernet
PROXY_METHOD=none
BROWSER_ONLY=no
BOOTPROTO=static               //把原来的dhcp改为static,静态
DEFROUTE=yes
IPV4_FAILURE_FATAL=no
IPV6INIT=yes
IPV6_AUTOCONF=yes
IPV6_DEFROUTE=yes
IPV6_FAILURE_FATAL=no
IPV6_ADDR_GEN_MODE=stable-privacy
NAME=ens33
UUID=3a6a3a2d-9930-4cd7-87af-6948d424ee0a
DEVICE=ens33
ONBOOT=yes
IPADDR=192.168.100.100         //添加IP地址
NETMASK=255.255.255.0          //添加子网掩码
GATEWAY=192.168.100.1          //添加网关
~
~
~
~
~
~
:wq                            //保存并退出
第三步,重启网卡,查看网络接口地址
[root@localhost ~]# systemctl restart network            //重启网卡
[root@localhost ~]# ifconfig                //查看网络接口地址
ens33: flags=4163<UP,BROADCAST,RUNNING,MULTICAST>  mtu 1500
        inet 192.168.100.100  netmask 255.255.255.0  broadcast 192.168.100.255
        inet6 fe80::64d7:1ee9:b61:8a14  prefixlen 64  scopeid 0x20<link>
        ether 00:0c:29:76:0e:7f  txqueuelen 1000  (Ethernet)
        RX packets 11552  bytes 16482533 (15.7 MiB)
        RX errors 0  dropped 0  overruns 0  frame 0
        TX packets 4450  bytes 305067 (297.9 KiB)
        TX errors 0  dropped 0 overruns 0  carrier 0  collisions 0

,,,, //省略部分信息
第四步,,查看UDP协议及相应进程,看DHCP服务是否起来
[root@localhost ~]# netstat -nuap     //以数字形式显示所有UDP协议,以及对应的进程信息
Active Internet connections (servers and established)
Proto Recv-Q Send-Q Local Address           Foreign Address         State       PID/Program name
udp        0      0 0.0.0.0:48556           0.0.0.0:*                           696/avahi-daemon: r
udp        0      0 192.168.122.1:53        0.0.0.0:*                           1305/dnsmasq
udp        0      0 0.0.0.0:67              0.0.0.0:*                           1305/dnsmasq
udp        0      0 0.0.0.0:5353            0.0.0.0:*                           696/avahi-daemon: r
udp        0      0 127.0.0.1:323           0.0.0.0:*                           702/chronyd
udp6       0      0 ::1:323                 :::*                                702/chronyd
第五步,查看后发现DHCP服务并没有起来,所以要接下来要进入配置文件去进行配置
[root@localhost ~]# rpm -qc dhcp      //查看DHCP配置文件路径
/etc/dhcp/dhcpd.conf
/etc/dhcp/dhcpd6.conf
/etc/openldap/schema/dhcp.schema
/etc/sysconfig/dhcpd
/var/lib/dhcpd/dhcpd.leases
/var/lib/dhcpd/dhcpd6.leases
第六步,进入后DHCP配置文件,查看模板 ,里面并没有配置文件
[root@localhost ~]# vim /etc/dhcp/dhcpd.conf //进入DHCP配置文件
/usr/share/doc/dhcp*/dhcpd.conf.example //模板
第七步,把模板文件复制到dhcpd.conf中,直接覆盖
[root@localhost ~]# cp /usr/share/doc/dhcp-4.2.5/dhcpd.conf.example /etc/dhcp/dhcpd.conf
cp:是否覆盖"/etc/dhcp/dhcpd.conf"? yes
文件配置
第一步,进入DHCP配置文件中,修改配置文件
[root@localhost ~]# vim /etc/dhcp/dhcpd.conf
修改前
27 subnet 10.152.187.0 netmask 255.255.255.0 {

 28 }
修改后
27 subnet 192.168.100.0 netmask 255.255.255.0 {

 28   range 192.168.100.128 192.168.100.200;       //分配的地址范围
 29   option routers 192.168.100.1;        //分配的网关
修改前
7 option domain-name "example.org";
  8 option domain-name-servers ns1.example.org, ns2.example.org;
  9
 10 default-lease-time 600;
 11 max-lease-time 7200;
修改后
 7 option domain-name "example.org";       //搜索域
  8 option domain-name-servers 9.9.9.9;      //分配DNS地址
  9
 10 default-lease-time 600;       //默认租约时间
 11 max-lease-time 7200;       //最大租约时间
第二步,启动服务,并进行查看
[root@localhost ~]# systemctl start dhcpd ///启动DHCP服务
[root@localhost ~]# netstat -nuap        //查看服务启动状况
Active Internet connections (servers and established)
Proto Recv-Q Send-Q Local Address           Foreign Address         State       PID/Program name
udp        0      0 0.0.0.0:48556           0.0.0.0:*                           696/avahi-daemon: r
udp        0      0 192.168.122.1:53        0.0.0.0:*                           1305/dnsmasq
udp        0      0 0.0.0.0:67              0.0.0.0:*                           42382/dhcpd        //表明DHCP服务已经启动
udp        0      0 0.0.0.0:67              0.0.0.0:*                           1305/dnsmasq
udp        0      0 0.0.0.0:5353            0.0.0.0:*                           696/avahi-daemon: r
udp        0      0 127.0.0.1:35640         127.0.0.1:53            ESTABLISHED 38968/python
udp        0      0 127.0.0.1:323           0.0.0.0:*                           702/chronyd
udp6       0      0 ::1:323                 :::*
第三步,设置为开机自启动
[root@localhost ~]# systemctl enable dhcpd       //设置为开机自启动
Created symlink from /etc/systemd/system/multi-user.target.wants/dhcpd.service to /usr/lib/systemd/system/dhcpd.service.
*检查开机自启动
[root@localhost ~]# systemctl is-enabled dhcpd         //检查开机自启动
\enabled
**
自动分配IP地址
**
第一步,用客户机win10去测试一下能否获得IP地址,前提:同主机相连,意思网络连接设置为仅主机模式
可以查看到IP地址以及网关
第二步,假设在DHCP配置文件中,把区域配置的配为8.8.8.8,全局配置不变,还是原来的9.9.9.9,配好后保存退出,并重启服务才能够生效
option domain-name "example.org";
option domain-name-servers 9.9.9.9;           //全局配置
subnet 192.168.100.0 netmask 255.255.255.0 {

  range 192.168.100.128 192.168.100.200;
  option routers 192.168.100.1;
  option domain-name-servers 8.8.8.8;          //区域配置
}
root@localhost ~]# systemctl restart dhcpd //重启服务