制作简易python爬虫工具——爬取租房信息(界面搭建->功能实现->数据抓取)一步到位
文章目录
-
- 功能使用
- 项目演示
- 一、开始界面
- 二、主界面
-
- 1、主界面执行的功能
- 2、依次获取每个区域对应的信息
- 3、 开始布局
- 4、数据爬取
- 三、三级界面
-
- 1、布局
- 2、详细信息爬取
- 3、绘制信息
- 4、绘制图片
- 四、说明
功能使用
运行start.py的时候启动整个项目,首页的右下角有一个开始按钮,在点击start按钮之后,一级界面会关闭,触发二级界面。二级界面为主要功能界面,在列表下拉框的位置可以选择区域,目前准备四个区域,分别是东城、西城、海淀、朝阳,选择了某一区域之后界面会显示一条该区域的租房信息,可以通过上一条下一条的按钮来实现动态显示租房条目,如果看到感兴趣的房源信息,可以通过点击右下角的详情按钮查看具体信息,如:面积,水电燃气等,详细信息在三级界面显示,左上角的返回按钮可以再次返回二级界面继续进行房源信息查询,如果想要关闭,可按下三级界面的退出按钮,程序结束
项目演示
一、开始界面
整个项目的界面的编写使用到的模块是tkinter,在此基础上加入爬虫的内容,开始界面非常简单,放置一张背景图,再放置一个start按钮。
先使用tkinter创建出窗口对象,自定义窗口大小,将标题写好,使用Label组件将背景加载好,用Button方法将按钮绘制完成,实现按钮的触发,点击了start按钮之后触发二级界面
import tkinter as tk
from PIL import Image, ImageTk
import pygame
import os
# 创建开始界面窗口
window = tk.Tk()
window.geometry('500x500')
window.resizable(0, 0)
window.title('Start')

def index():
	window.destroy()
	os.system('python index1.py')


# 背景
bg = ImageTk.PhotoImage(file = './images/bg.jpg')
bgLab = tk.Label(window, image = bg, width = 700, height = 700)
bgLab.pack()

# start按钮
startImage = ImageTk.PhotoImage(file = './images/start.png')
start = tk.Button(window, image = startImage, width = 100, height = 100, bd = 0, command = index)
start.place(x = 400, y = 400)

window.mainloop()
效果图
二、主界面
1、主界面执行的功能
主界面执行的功能是进行房源信息的爬取,整体的思路是要做链家房源信息的爬取,以东城、西城、海淀、朝阳这四个区域,每个区域爬取五条房源详细信息,首先是先获取房源的区域

2、依次获取每个区域对应的信息
然后依次获取每个区域的前5条最新房源信息,获取图片和相应的简单信息的描述

那么具体的水电租金等信息在三级界面显示
有了具体的目标之后,开始布局
3、 开始布局
1、首先二级界面要有一些特定的logo,各个区域要有各自的功能
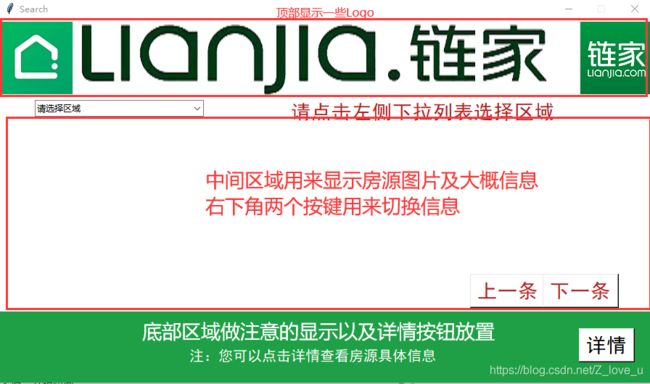
2、将界面的分布做出来之后进行功能的制作
界面分布代码如下:
主要内容:窗口,背景,提示文字
# 创建开始界面窗口
window = tk.Tk()
window.geometry('900x500')
window.resizable(0, 0)
window.title('Search')

# bg
bg = ImageTk.PhotoImage(file = './images/bg.png')
bgLab = tk.Label(window, image = bg, width = 900, height = 500)
bgLab.pack()

# frame
frame1 = tk.Frame(window, width = 900, height = 200, bg = 'white')
frame1.place(relx = 0, rely = 0)

frame2 = tk.Frame(window, width = 300, height = 280, bg = 'white')
frame2.place(x = 0, y = 200)
# topImg
topImg = ImageTk.PhotoImage(file = './images/index.jpg')
topLab = tk.Label(frame1, image = topImg, width = 700, height = 100)
topLab.place(x = 100, y = 0)

# left
left = ImageTk.PhotoImage(file = './images/index1_left.jpg')
leftLab = tk.Label(frame1, image = left, width = 100, height = 100)
leftLab.place(x = 0, y = 0)

# right
right = ImageTk.PhotoImage(file = './images/index1_right.png')
rightLab = tk.Label(frame1, image = right, width = 100, height = 100)
rightLab.place(x = 800, y = 0)

bottom = ImageTk.PhotoImage(file = './images/bottom.png')
bottomLab = tk.Label(window, image = bottom, width = 900, height = 200)
bottomLab.place(x = 0, y = 400)

# text提醒
text = tk.Label(frame1, text = '请点击左侧下拉列表选择区域', bg = 'white',
				fg = '#B22222', font = ('SimHei', 20))
text.place(x = 400, y = 110)


# 提醒
zhu = tk.Label(window, text = '注:您可以点击详情查看房源具体信息', bg = '#1fa046',
				fg = '#FFFFFF', font = ('SimHei', 15))
zhu.place(x = 260, y = 450)
3、下面是功能性按钮:详情,上一条,下一条
详情的按钮:用来传递参数,启动三级界面,将要显示的房源信息发送到三级界面上,三级界面用于爬取具体信息
上一条按钮:用来控制信息切换,将上一条房源信息显示到界面上
下一条按钮:用来切换下一条信息的显示
按钮要实现功能的跳转,那一定要用到command属性,调用具体函数去执行
def draw_next_text_Button():

	next_text = tk.Button(window, text='下一条', bg='white', fg='#B22222', font=('SimHei', 20), command=lambda :[chooseArea(), add_Ii()])

	next_text.place(x=750, y=350)


def draw_last_text_Button():

	last_text = tk.Button(window, text='上一条', bg='white', fg='#B22222', font=('SimHei', 20), command=lambda :[chooseArea(), sub_Ii()])

	last_text.place(x=650, y=350)

detail = tk.Button(window, text = '详情', bg = 'white', fg = '#000000',
				  font = ('SimHei', 20), command = showDetail)
detail.place(x = 800, y = 425)
(1)上一条和下一条这两个按钮都是要同时启动两个函数
a.函数一是界面的显示chooseArea()
def chooseArea(*args):
	global checkFlag, house_imgUrl, choice
	print(cbox.get())
	choice = cbox.get()
	if choice == '东城':
		get_DC_house_info(1)
		draw_house_info()

	elif choice == '西城':
		get_XC_house_info(2)
		draw_house_info()

	elif choice == '朝阳':
		get_CY_house_info(3)
		draw_house_info()

	elif choice == '海淀':
		get_HD_house_info(4)
		draw_house_info()

	draw_next_text_Button()
	draw_last_text_Button()
b.函数二是显示的具体条目,由于爬取的信息是存在列表当中的,所以通过数字去控制列表当中元素的显示,如果直接用全局变量的话不能很好的解决信息实时更新的问题,而且会出现逻辑紊乱,因此用类属性去代替全局变量是稳妥的做法
但是这样单纯的去增减的话还有一个问题,列表当中的元素个数是有限的,如果不对边界条件加以限制,那么整个程序会因为index超出范围而崩掉
class I():
	i = -1

def add_Ii():
	I.i += 1
	print('add', I.i)
	if I.i >= 4:
		I.i = 0
def sub_Ii():
	I.i -= 1
	print('sub', I.i)
	if I.i == 0:
		I.i = 0
(2)详情的按钮只需要进行窗口关闭和参数传递即可
def showDetail():

	window.destroy()
	os.system('python index2.py %s %s %s %s'%(totalInfo[choice][I.i]['house_link'],totalInfo[choice][I.i]['house_imgUrl'], choice, I.i))
4、以上的分布做完之后还有最关键的一项,如何进行区域的选择,并显示相应信息
用到的内容是ttk模块里面的Combobox装饰,在界面当中设置一个下拉列表,通过点击的值来进行不同区域的控制
首先,先将下拉列表创建出来
# 创建下拉列表
cbox = ttk.Combobox(frame1, width = 30)
cbox['values'] = ['请选择区域', '东城', '西城', '朝阳', '海淀']
cbox['state'] = 'readonly'
cbox.current(0)
cbox.place(x = 50, y = 110)
cbox.bind('<>' , chooseArea)
设置好对应的属性之后,绑定函数进行控制,根据捕获到的值,进行不同区域的显示,为了信息不会重合显示,各自区域进行独立显示
def chooseArea(*args):
	global checkFlag, house_imgUrl, choice
	print(cbox.get())
	choice = cbox.get()
	if choice == '东城':
		get_DC_house_info(1)
		draw_house_info()

	elif choice == '西城':
		get_XC_house_info(2)
		draw_house_info()

	elif choice == '朝阳':
		get_CY_house_info(3)
		draw_house_info()

	elif choice == '海淀':
		get_HD_house_info(4)
		draw_house_info()

	draw_next_text_Button()
	draw_last_text_Button()
4、数据爬取
布局做好之后,就要开始根据选择的区域,进行信息的爬取了
在具体爬取之前,要先获取首页当中不同区域的url,对不同的url进行不同的处理
将url进行完整拼接
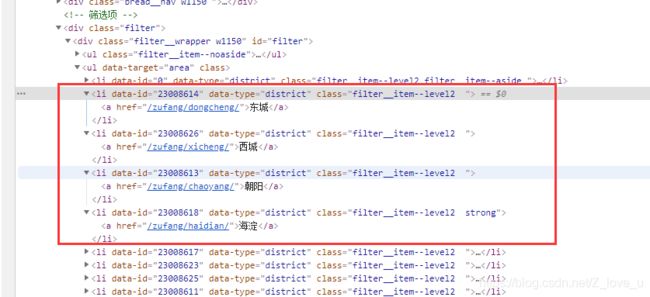
# 东城 西城 朝阳 海淀
def get_links(url):

	global select_url
	response = requests.get(url, headers = headers)
	response.encoding = 'utf-8'
	soup = BeautifulSoup(response.text, 'lxml')
	divList = soup.find_all('div', class_ = 'filter__wrapper w1150')

	liList = divList[0].find_all('li', class_ = 'filter__item--level2', limit = 5)
	for i in range(len(liList)):
		res = liList[i].find('a')['href'][8:]
		select_url.append(url + res)

get_links(url)
拿到各自区域的url之后,进行详细数据的爬取,以东城为例
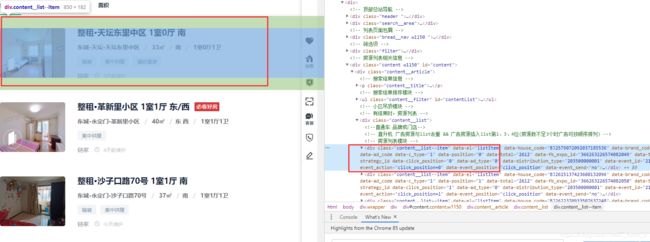
在这个界面当中,要获取房屋图片,房源的标题,简单的描述、价格等
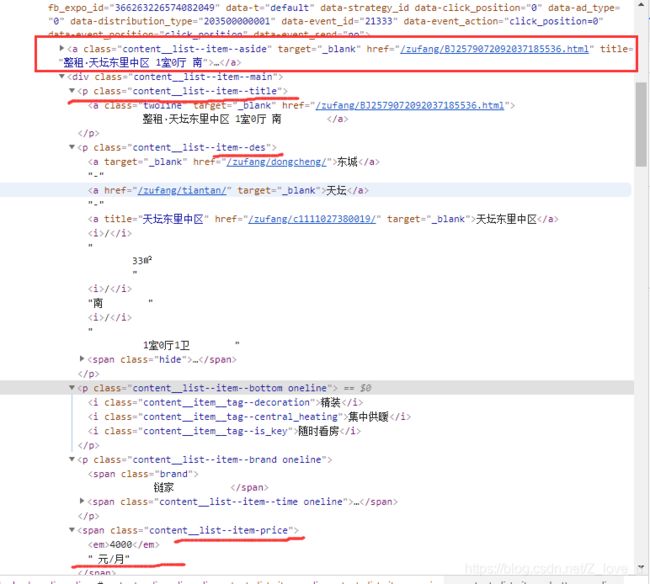
将这些信息获取到之后,都是要显示到二级界面上的,为了方便信息的查看,将图片、房屋信息、价格等数据存储到字典当中,一个房源一个字典,将多个房源整理到一个列表当中进行管理
# 东城-DC
DCList = []
def get_DC_house_info(i):


	DC = requests.get(select_url[i], headers = headers)
	DCsoup = BeautifulSoup(DC.text, 'lxml')

	DCDict = {
     }

	divList = DCsoup.find_all('div', class_='content__list--item--main', limit=5)
	imgList = DCsoup.find_all('div', class_ = 'content__list--item', limit = 5)
	for i in range(len(divList)):

		name = divList[i].find('p', class_='content__list--item--title')
		h_imgUrl = imgList[i].find_all('a', class_='content__list--item--aside')
		house_imgUrl = h_imgUrl[0].img.get('data-src')
		DCDict['house_imgUrl'] = house_imgUrl
		DCDict['house_link'] = url + name.a.get('href')[8:]
		DCDict['house_name'] = name.a.get_text().strip()
		DCDict['house_info'] = ''.join(divList[i].find('p', class_='content__list--item--des').get_text().split())
		DCDict['house_price'] = divList[i].find('span', class_='content__list--item-price').get_text()
		DCList.append(DCDict)
		DCDict = {
     }

	totalInfo['东城'] = DCList
房源的各类信息都获取好之后,剩下该思考的问题就是如何显示了,怎么显示图片,怎么显示房屋信息
图片的获取要先拿到具体的url,然后对图片的url发送请求,获取到图片的字节对象,将其写入到本地,画的时候将其打开即可
代码如下
def get_img(url, choice, i):

	response = requests.get(url, headers = headers)
	byte_img = response.content
	with open('./images/'+choice+str(i)+'.png', 'wb') as f:
		f.write(byte_img)

def draw_img(choice, i):

	img = ImageTk.PhotoImage(file = './images/'+str(choice)+str(i)+'.png')
	imgLab = tk.Label(frame2, image = img, width = 250, height = 182)
	imgLab.config(image = img)
	imgLab.image = img
	imgLab.place(x = 50, y = 0)

def draw_info(name, info, price):

	draw_text_bg()

	name_text = tk.Label(window, text = name, bg = 'white', fg = '#37A', font = ('SimHei', 15))
	name_text.place(x = 400, y = 200)

	info1_text = tk.Label(window, text=info[:21], bg = 'white', fg='#37A', font=('SimHei', 15))
	info1_text.place(x = 400, y = 250)

	info2_text = tk.Label(window, text=info[21:], bg='white', fg='#37A', font=('SimHei', 15))
	info2_text.place(x = 400, y = 300)

	price_text = tk.Label(window, text=price, bg = 'white', fg='#37A', font=('SimHei', 15))
	price_text.place(x = 400, y = 350)

def draw_house_info():
	'''
	:param choice: 每一个区域
	:param I.i: 第几条数据
	:return:
	'''

	get_img(totalInfo[choice][I.i]['house_imgUrl'], choice, I.i)  # 获取图片

	draw_img(choice, I.i)  # 绘制图片

	draw_info(totalInfo[choice][I.i]['house_name'], totalInfo[choice][I.i]['house_info'], totalInfo[choice][I.i]['house_price'])
效果图
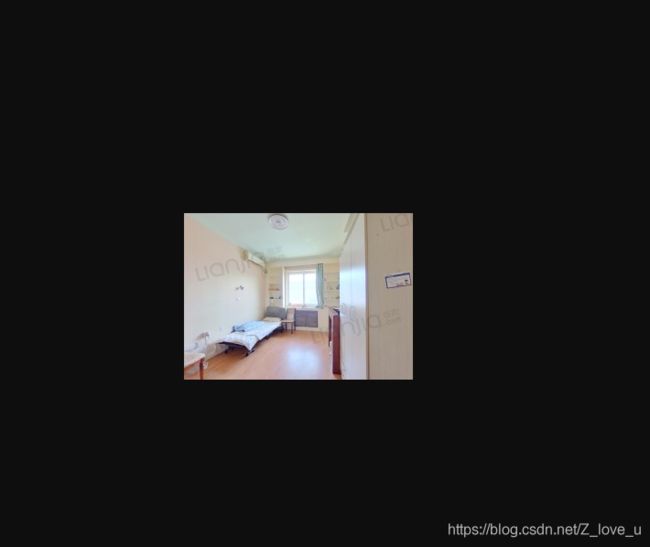
在这里插入图片描述
三、三级界面
搞定二级界面的基本信息爬取和显示之后,三级界面要做的事情就是要显示对应的房源的具体信息,所以在详情按钮的时候方法一定要将参数传递准确并完整
参数一:对应房源的url
参数二:对应房源照片的url
参数三:选择的区域,后期要根据区域加载对应图片
参数四:具体选择的哪一个房源的index
house_detail = sys.argv[1]
house_imgUrl = sys.argv[2]
house_choice = sys.argv[3]
house_Ii = sys.argv[4]
参数搞定之后,首先开始的也是界面的布局,背景窗口大小和二级界面大小一致,左上角做返回按钮,右下角做退出按钮,中间部分显示房源详细信息,以及房间照片
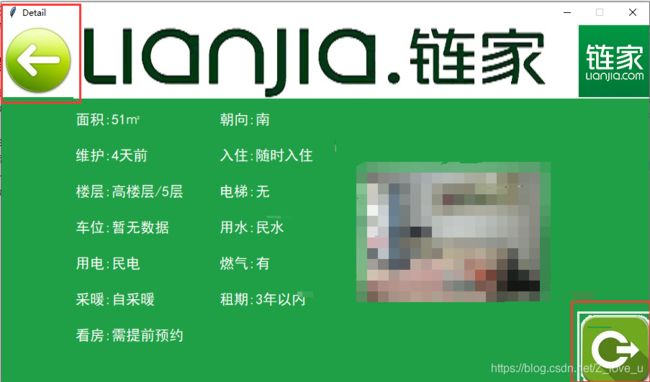
1、布局
三级界面的布局及功能实现依然使用tkinter,图片的加载需要ImageTk的支持
代码如下:
window = tk.Tk()
window.geometry('900x500')
window.resizable(0, 0)
window.title('Detail')

# bg
bg = ImageTk.PhotoImage(file = './images/index2.png')
bgLab = tk.Label(window, image = bg, width = 900, height = 500)
bgLab.pack()


# topImg
topImg = ImageTk.PhotoImage(file = './images/index.jpg')
topLab = tk.Label(window, image = topImg, width = 700, height = 100)
topLab.place(x = 100, y = 0)

# right
right = ImageTk.PhotoImage(file = './images/index1_right.png')
rightLab = tk.Label(window, image = right, width = 100, height = 100)
rightLab.place(x = 800, y = 0)

# back
back = ImageTk.PhotoImage(file = './images/back1.jpg')
backBtn = tk.Button(window, image = back , bd = 0, width = 100, height = 100,
					command = back_to_second, bg = 'white')
backBtn.place(x = 0, y = 0)

# exit
exit = ImageTk.PhotoImage(file = './images/exit.jpg')
exitBtn = tk.Button(window, image = exit , width = 100, height = 100,
					command = shut_down)
exitBtn.place(x = 800, y = 400)
返回按钮和退出按钮的触发需要额外添加command,分别触发返回二级界面函数和关闭函数
def back_to_second():

	window.destroy()
	os.system('python index1.py')

def shut_down():

	window.destroy()
2、详细信息爬取
分析前段代码,找到对应的标签,详细去查找
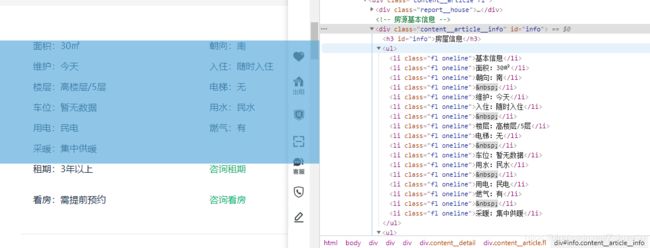
我们发现,整个房屋的基本信息是在class值为content__article__info的div标签当中,具体详细信息是在class值为fl oneline的li标签中,拿到详细信息之后,一个房源存入一个字典,多个房源存入列表当中,方便存储管理
# 获取每一个链接下的租房信息
def get_house_info(res):

	global house_list, area, direction, weihu, ruzhu, floor, dianti, chewei, water, elec, ranqi, cainuan, zuqi, kanfang

	# 返回每一个链接的soup对象
	page_res = get_soup(res)

	# 获取单独房屋情况
	# 价格
	money = page_res.find('div', class_='content__aside--title')  # find是获取单条信息
	danwei = page_res.find('div', class_ = 'content__aside--title')

	# 房屋信息
	house_info = page_res.find_all('div', class_ = 'content__article__info')
	house_title = page_res.find('p', class_ = 'content__title')

	# 基本信息
	base_info = page_res.find_all('li', class_ = 'fl oneline')  # 以列表存储
	area = base_info[1].text[3:]  # 面积
	direction = base_info[2].text[3:]  # 朝向
	weihu = base_info[4].text[3:]  # 维护
	ruzhu = base_info[5].text[3:]  # 入住
	floor = base_info[7].text[3:]  # 楼层
	dianti = base_info[8].text[3:]  # 有无电梯
	chewei = base_info[10].text[3:]  # 有无车位
	water = base_info[11].text[3:]  # 用水
	elec = base_info[13].text[3:]  # 用电
	ranqi = base_info[14].text[3:]  # 燃气
	cainuan = base_info[16].text[3:] # 采暖
	zuqi = base_info[18].text[3:]  # 租期
	kanfang = base_info[21].text[3:]  # 看房
	global info
	info = {

			"房屋标题":house_title.text,
			"房屋链接":res,
			"价格":money.find('span').text+danwei.text[5:8],
			"面积":area,
			"朝向":direction,
			"维护":weihu,
			"入住":ruzhu,
			"楼层":floor,
			"电梯":dianti,
			"车位":chewei,
			"用水":water,
			"用电":elec,
			"燃气":ranqi,
			"采暖":cainuan,
			"租期":zuqi,
			"看房":kanfang
	}
	house_list.append(info)
	draw_house_info(info)
	return house_list
3、绘制信息
信息的绘制就比较简单了,用Label直接画上去即可,由于信息的条目比较多,所以调用的方法会多一些
def draw_house_info(info):

	area_text = tk.Label(window, text = '面积:'+info['面积'], bg = '#1fa046', fg = '#FFFFFF', font = ('SimHei', 15))
	area_text.place(x = 100, y = 120)

	direction_text = tk.Label(window, text='朝向:'+info['朝向'], bg='#1fa046', fg='#FFFFFF', font=('SimHei', 15))
	direction_text.place(x=300, y=120)

	weihu_text = tk.Label(window, text='维护:'+info['维护'], bg='#1fa046', fg='#FFFFFF', font=('SimHei', 15))
	weihu_text.place(x=100, y=170)

	ruzhu_text = tk.Label(window, text='入住:'+info['入住'], bg='#1fa046', fg='#FFFFFF', font=('SimHei', 15))
	ruzhu_text.place(x=300, y=170)

	floor_text = tk.Label(window, text='楼层:'+info['楼层'], bg='#1fa046', fg='#FFFFFF', font=('SimHei', 15))
	floor_text.place(x=100, y=220)

	dianti_text = tk.Label(window, text='电梯:'+info['电梯'], bg='#1fa046', fg='#FFFFFF', font=('SimHei', 15))
	dianti_text.place(x=300, y=220)

	chewei_text = tk.Label(window, text='车位:'+info['车位'], bg='#1fa046', fg='#FFFFFF', font=('SimHei', 15))
	chewei_text.place(x=100, y=270)

	water_text = tk.Label(window, text='用水:'+info['用水'], bg='#1fa046', fg='#FFFFFF', font=('SimHei', 15))
	water_text.place(x=300, y=270)

	elec_text = tk.Label(window, text='用电:'+info['用电'], bg='#1fa046', fg='#FFFFFF', font=('SimHei', 15))
	elec_text.place(x=100, y=320)

	ranqi_text = tk.Label(window, text='燃气:'+info['燃气'], bg='#1fa046', fg='#FFFFFF', font=('SimHei', 15))
	ranqi_text.place(x=300, y=320)

	cainuan_text = tk.Label(window, text='采暖:'+info['采暖'], bg='#1fa046', fg='#FFFFFF', font=('SimHei', 15))
	cainuan_text.place(x=100, y=370)

	zuqi_text = tk.Label(window, text='租期:'+info['租期'], bg='#1fa046', fg='#FFFFFF', font=('SimHei', 15))
	zuqi_text.place(x=300, y=370)

	kanfang_text = tk.Label(window, text='看房:'+info['看房'], bg='#1fa046', fg='#FFFFFF', font=('SimHei', 15))
	kanfang_text.place(x=100, y=420)
4、绘制图片
图片的绘制尤其要注意,路径和二级界面当中爬取图片的路径要完全一致,确保可以找到对应房源的图片
def draw_house_img(house_choice):

	img = ImageTk.PhotoImage(file='./images/'+str(house_choice)+str(house_Ii)+'.png')
	imgLab = tk.Label(window, image=img)
	imgLab.config(image = img)
	imgLab.image = img
	imgLab.place(x = 500, y = 200)
四、说明
该工具只是一个框架,如果想实现更多功能可以在此基础扩展,在爬取的过程当中也要注意反爬的操作,可以多准备一些代理,准备一些ip, 而且要遵循Robots.txt去文明抓取
