分布式基础篇
1)简介
项目介绍
该项目分为三篇进行开发:
分布式基础篇(全栈开发篇)
谷粒商城的后台管理系统,后端技术栈:SpringBoot,带上Mybatis那一套,SpringCloud,docker,作为后端的基础环境,结合前端vue+ElementUI,使用逆向工程的方式快速开发出一个后台管理系统,通过分布式基础篇,能够快速打通全栈开发能力。
分布式高级篇(微服务架构篇)
通过实现一整套的商城业务逻辑,比如商品服务、购物车、订单、结算、库存、秒杀…通过实现这么一套业务,来打通整个在微服务架构开发期间的技术栈以及一些重点难点,使用SpringBoot和SpringCloud作为最基础的配套,以及搭配SpringCloudAlibaba的Nacos注册中心配置中心,Sentinel流量保护,Seata分布式事务…在架构篇不仅可以学到分布式的高级技术,以及微服务的周边所有配套方案都能一站式打通。
涉及到的重点难点:
网关,远程调用,链路追踪,缓存,Session同步,全文检索,异步编排,线程池,压力测试,性能调优,redis分布式锁…
高可用集群篇(架构师提升篇)
开发完此篇,将会进一步提升架构师能力。搭建k8s集群,一主两从的方式,会使用kubershere这个一站式的平台,快速将整个商城应用部署到k8s集群里面,打通整个DevOps技术栈,包括完成的可视化的CICD(持续集成,持续部署)基于企业真实流水线编写的一个具有参数化构建,手工确认模式的一个流水线。最终实现整个应该的持续集成持续部署。包括一些集群技术都会涉及,比如mysql的集群,redis的classter,rabbitMQ的镜像队列…
项目背景
1)、电商模式
市场上有5种常见的电商模式B2B、B2C、C2B、C2C、O2O;
1、B2B模式
指的是商家与商家建立的商业关系,如阿里巴巴
2、B2C模式
就是我们经常看到的供应商直接把商品卖给用户,即“商对客”模式,也就是通常说的商业零售,直接面向消费者销售产品和服务,如:苏宁易购、京东、天猫、小米商城
3、C2B模式
就是消费者对企业,先由消费者需求产生后有企业生产,即先有消费者提出需求,后有生产企业按照需求组织生产
4、C2C模式
客户直接把东西放到网上去卖,比如:淘宝,咸鱼,拼多多
5、O2O模式
即Online To Offline,线上消费,线下服务,也就是将线下商务的机会与互联网结合在了一起,让互联网称为线下交易的前台,线上快速支付,线下优质服务。如:饿了么。美团,淘票票,京东到家
2)、谷粒商城
是一个B2C模式的电商平台,模拟销售自营商品给客户。
项目技术&特色
- 前后端分离开发,并开发基于vue的后台管理系统
- SpringCloud全新解决方案
- 应用监控、限流、网关、熔断降级等分布式方案全方位涉及
- 渗透讲解分布式事务、分布式锁等分布式系统的难点
- 分析高并发场景的编码方式,线程池,异步编排等使用
- 压力测试与性能优化
- 各种集群技术的区别以及使用
- CI/CD使用
- …
项目前置要求
- 学习项目的前置知识
- 熟悉SpringBoot以及常见的整合方案
- 了解SpringCloud
- 熟悉git,maven
- 熟悉linux,redis,docker基本操作
- 了解html,css,js,vue
- 熟练使用idea开发项目
项目整体效果演示
https://www.bilibili.com/video/BV1np4y1C7Yf?p=2
分布式微服务基础概念
什么是微服务
微服务架构风格,就像是把一个单独的应用程序开发为一套小服务,每个小服务运行在自
己的进程中,并使用轻量级机制通信,通常是HTTP API。这些服务围绕业务能力来构建,
并通过完全自动化部署机制来独立部署。这些服务使用不同的编程语言书写,以及不同数据
存储技术,并保持最低限度的集中式管理。
微服务:拒绝大型单体应用,基础业务边界进行服务微化和拆分,各个服务器独立部署运行
概念理解(集群&分布式&节点)
分布式中的每一个节点,都可以做集群,而集群并不一定就是分布式
- 集群:是物理形态,一堆机器合起来,就叫集群
- 分布式:是工作方式,分布式系统是若干独立计算机的集合,这些计算机对于用户来说就像单个相关系统。
- 节点:集群中的一个服务器
远程调用
分布式系统中,各个服务可能处于不同主机,但是服务器之间有不可避免的调用,我们也称为远程调用
负载均衡
(不要让任何一台服务器太忙,也一会让他太闲)可以负载均衡调用每一个服务器,提升网站的健壮性
常见的负裁均衡算法:
- **轮询:**为第一个请求选择健康池中的第一个后端服务器,然后按顺序往后依次选择,直到最后一个,然后循环。
- **最小连接:**优先选择连接数最少,也就是压力最小的后端服务器,在会话较长的情况下可以考虑采取这种方式。
- **散列:**根据请求源的IP 的散列(hash) 来选择要转发的服务器。这种方式可以一定程度上保证特定用户能连接到相同的服务器。如果你的应用需要处理状态而要求用户能连接到和之前相同的服务器,可以采取这种方式。
服务的注册/发现&注册中心
为了解诀不知道所需服务当前在哪几台服务器有,哪些正常的,哪些服务已经下线,可以引入注册中心;
如果某些服务下线,为了避免调用不可用的已经下线。解诀这个问题可以引入注册中心;
配置中心
每一个服务最终都有大量的配置,并且每个服务都可能部署在多台机器.上。我们经常需要变更配置,我们可以让每个服务在配置中心获取自己的配置。配置中心用来集中管理微服务的配置信息
服务熔断&服务降级
在微服务架构中,微服务之间通过网络进行通信,存在相互依赖,当其中一个服务不可用时,
有可能会造成雪崩效应。要防止这样的情况,必须要有容错机制来保护服务。
服各熔断
设置服务的超时,当被调用的服务经常失败到达某个阈值,我们可以开启断路保护机制,后来的请求不再去调用这个服务。本地直接返回默认的数据
服务降级
在运维期间,当系统处于高峰期,系统资源紧张,我们可以让非核心业务降级运行。降级:某些服务不处理,或者简单处理[抛异常、返回NULL、调用Mock数据、调用Fallback处理逻辑]。
API网关
在微服务架构中,API Gateway作为整体架构的重要组件,它抽象]微服务中都需要的公共功能,同时提供了客户端负载均衡,服务自动熔断,灰度发布,统- -认证,限流流控,日志统计等丰富的功能,帮助我们解诀很多API 管理难题。
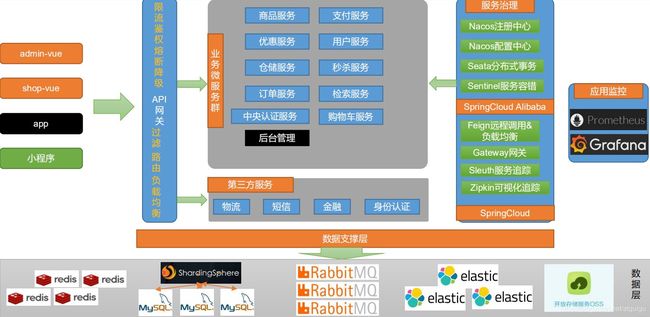
微服务架构图

微服务划分图
2)环境
使用vagrant快速创建Linux虚拟机
安装vagrant
https://www.vagrantup.com/downloads
安装Centos7
$ vagrant init centos/7
A `Vagrantfile` has been placed in this directory. You are now
ready to `vagrant up` your first virtual environment! Please read
the comments in the Vagrantfile as well as documentation on
`vagrantup.com` for more information on using Vagrant.
执行完上面的命令后,会在用户的家目录下生成Vagrantfile文件。
$ vagrant up
Bringing machine 'default' up with 'virtualbox' provider...
==> default: Box 'centos/7' could not be found. Attempting to find and install...
    default: Box Provider: virtualbox
    default: Box Version: >= 0
==> default: Loading metadata for box 'centos/7'
    default: URL: https://vagrantcloud.com/centos/7
==> default: Adding box 'centos/7' (v1905.1) for provider: virtualbox
    default: Downloading: https://vagrantcloud.com/centos/boxes/7/versions/1905.1/providers/virtualbox.box
    default: Download redirected to host: cloud.centos.org
    default: Progress: 0% (Rate: 6717/s, Estimated time remaining: 7:33:42)
下载镜像过程比较漫长,也可以采用先用下载工具下载到本地后,然后使用“ vagrant box add ”添加,再“vagrant up”即可
#将下载的镜像添加到virtualBox中
$ vagrant box add centos/7 E:\迅雷下载\CentOS-7-x86_64-Vagrant-1905_01.VirtualBox.box
==> box: Box file was not detected as metadata. Adding it directly...
==> box: Adding box 'centos/7' (v0) for provider:
    box: Unpacking necessary files from: file:///E:/%D1%B8%C0%D7%CF%C2%D4%D8/CentOS-7-x86_64-Vagrant-1905_01.VirtualBox.box
    box:
==> box: Successfully added box 'centos/7' (v0) for 'virtualbox'!

#启动
$ vagrant up
Bringing machine 'default' up with 'virtualbox' provider...
==> default: Importing base box 'centos/7'...
==> default: Matching MAC address for NAT networking...
==> default: Setting the name of the VM: Administrator_default_1588497928070_24634
==> default: Clearing any previously set network interfaces...
==> default: Preparing network interfaces based on configuration...
    default: Adapter 1: nat
    default: Adapter 2: hostonly
==> default: Forwarding ports...
    default: 22 (guest) => 2222 (host) (adapter 1)
==> default: Booting VM...
==> default: Waiting for machine to boot. This may take a few minutes...
    default: SSH address: 127.0.0.1:2222
    default: SSH username: vagrant
    default: SSH auth method: private key
    default:
    default: Vagrant insecure key detected. Vagrant will automatically replace
    default: this with a newly generated keypair for better security.
    default:
    default: Inserting generated public key within guest...
    default: Removing insecure key from the guest if it's present...
    default: Key inserted! Disconnecting and reconnecting using new SSH key...
==> default: Machine booted and ready!
==> default: Checking for guest additions in VM...
    default: No guest additions were detected on the base box for this VM! Guest
    default: additions are required for forwarded ports, shared folders, host only
    default: networking, and more. If SSH fails on this machine, please install
    default: the guest additions and repackage the box to continue.
    default:
    default: This is not an error message; everything may continue to work properly,
    default: in which case you may ignore this message.
==> default: Configuring and enabling network interfaces...
==> default: Rsyncing folder: /cygdrive/c/Users/Administrator/ => /vagrant
vagrant ssh 开启SSH,并登陆到centos7
$ vagrant ssh
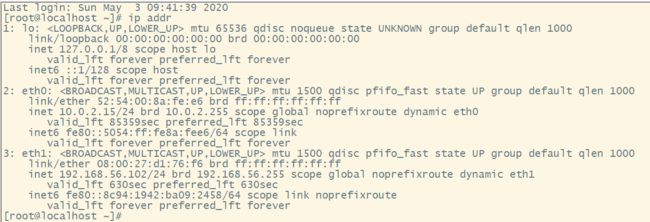
[vagrant@localhost ~]$ ip addr
1: lo: <LOOPBACK,UP,LOWER_UP> mtu 65536 qdisc noqueue state UNKNOWN group default qlen 1000
link/loopback 00:00:00:00:00:00 brd 00:00:00:00:00:00
inet 127.0.0.1/8 scope host lo
valid_lft forever preferred_lft forever
inet6 ::1/128 scope host
valid_lft forever preferred_lft forever
2: eth0: <BROADCAST,MULTICAST,UP,LOWER_UP> mtu 1500 qdisc pfifo_fast state UP group default qlen 1000
link/ether 52:54:00:8a:fe:e6 brd ff:ff:ff:ff:ff:ff
inet 10.0.2.15/24 brd 10.0.2.255 scope global noprefixroute dynamic eth0
valid_lft 86091sec preferred_lft 86091sec
inet6 fe80::5054:ff:fe8a:fee6/64 scope link
valid_lft forever preferred_lft forever
3: eth1: <BROADCAST,MULTICAST,UP,LOWER_UP> mtu 1500 qdisc pfifo_fast state UP group default qlen 1000
link/ether 08:00:27:d1:76:f6 brd ff:ff:ff:ff:ff:ff
inet 192.168.56.102/24 brd 192.168.56.255 scope global noprefixroute dynamic eth1
valid_lft 892sec preferred_lft 892sec
inet6 fe80::8c94:1942:ba09:2458/64 scope link noprefixroute
valid_lft forever preferred_lft forever
[vagrant@localhost ~]$
C:\Users\Administrator>ipconfig
Windows IP 配置
以太网适配器 VirtualBox Host-Only Network:
连接特定的 DNS 后缀 . . . . . . . :
本地链接 IPv6 地址. . . . . . . . : fe80::a00c:1ffa:a39a:c8c2%16
IPv4 地址 . . . . . . . . . . . . : 192.168.56.1
子网掩码 . . . . . . . . . . . . : 255.255.255.0
默认网关. . . . . . . . . . . . . :
虚拟机网络设置
配置网络信息,打开"Vagrantfile"文件:
config.vm.network "private_network", ip: "自己的ip(需要和母机在同一网段下,互相能ping通)"
修改完成后,重启启动vagrant
vagrant reload
检查宿主机和virtualBox之间的通信是否正常
[vagrant@localhost ~]$ ping 192.168.43.43                                                                                                         PING 192.168.43.43 (192.168.43.43) 56(84) bytes of data.
64 bytes from 192.168.43.43: icmp_seq=1 ttl=127 time=0.533 ms
64 bytes from 192.168.43.43: icmp_seq=2 ttl=127 time=0.659 ms

--- 192.168.43.43 ping statistics ---
2 packets transmitted, 2 received, 0% packet loss, time 999ms
rtt min/avg/max/mdev = 0.533/0.596/0.659/0.063 ms
[vagrant@localhost ~]$
[vagrant@localhost ~]$
[vagrant@localhost ~]$ ping www.baidu.com
PING www.a.shifen.com (112.80.248.76) 56(84) bytes of data.
64 bytes from 112.80.248.76 (112.80.248.76): icmp_seq=1 ttl=53 time=56.1 ms
64 bytes from 112.80.248.76 (112.80.248.76): icmp_seq=2 ttl=53 time=58.5 ms
64 bytes from 112.80.248.76 (112.80.248.76): icmp_seq=3 ttl=53 time=53.4 ms
开启远程登陆,修改“/etc/ssh/sshd_config”
PermitRootLogin yes
PasswordAuthentication yes
然后重启SSHD
systemctl restart sshd
使用Xshell或SecureCRT进行远程连接。
linux安装docker
官方安装文档
https://docs.docker.com/engine/install/centos/
#卸载系统之前的docker
sudo yum remove docker \
                  docker-client \
                  docker-client-latest \
                  docker-common \
                  docker-latest \
                  docker-latest-logrotate \
                  docker-logrotate \
                  docker-engine


sudo yum install -y yum-utils

# 配置镜像
sudo yum-config-manager \
    --add-repo \
    https://download.docker.com/linux/centos/docker-ce.repo

sudo yum install docker-ce docker-ce-cli containerd.io

sudo systemctl start docker
# 设置开机自启动
sudo systemctl enable docker
配置docker阿里云镜像加速
由于docker默认拉取镜像是访问国外dockerHub网站,拉镜像下来特别特别慢,所以我们要给docker配置一个阿里云的镜像加速器,这样通过阿里云访问dockerHub就非常快了。
首先进入我们自己的阿里云这个页面:

依次执行命令即可。
docker安装mysql
用docker安装上mysql,去docker仓库里搜索mysql
sudo docker pull mysql:5.7

# --name指定容器名字 -v目录挂载 -p指定端口映射  -e设置mysql参数 -d后台运行
sudo docker run -p 3306:3306 --name mysql \
-v /mydata/mysql/log:/var/log/mysql \
-v /mydata/mysql/data:/var/lib/mysql \
-v /mydata/mysql/conf:/etc/mysql \
-e MYSQL_ROOT_PASSWORD=root \
-d mysql:5.7

su root 密码为vagrant,这样就可以不写sudo了

[root@localhost vagrant]# docker ps
CONTAINER ID        IMAGE               COMMAND                  CREATED             STATUS              PORTS                               NAMES
6a685a33103f        mysql:5.7           "docker-entrypoint.s…"   32 seconds ago      Up 30 seconds       0.0.0.0:3306->3306/tcp, 33060/tcp   mysql

#配置mysql字符编码
vi /mydata/mysql/conf/my.conf

[client]
default-character-set=utf8
[mysql]
default-character-set=utf8
[mysqld]
init_connect='SET collation_connection = utf8_unicode_ci'
init_connect='SET NAMES utf8'
character-set-server=utf8
collation-server=utf8_unicode_ci
skip-character-set-client-handshake
skip-name-resolve

docker restart mysql
docker安装redis
如果直接挂载的话docker会以为挂载的是一个目录,所以我们先创建一个文件然后再挂载。
# 在虚拟机中
mkdir -p /mydata/redis/conf
touch /mydata/redis/conf/redis.conf

docker pull redis

docker run -p 6379:6379 --name redis \
-v /mydata/redis/data:/data \
-v /mydata/redis/conf/redis.conf:/etc/redis/redis.conf \
-d redis redis-server /etc/redis/redis.conf

# 直接进去redis客户端。
docker exec -it redis redis-cli
默认是不持久化的。在配置文件中输入appendonly yes,就可以aof持久化了。修改完docker restart redis,docker -it redis redis-cli
vim /mydata/redis/conf/redis.conf
# 插入下面内容
appendonly yes
保存

docker restart redis
开发工具&环境安装
配置maven阿里云加速
        <mirror>
            <id>alimavenid>
            <name>aliyun mavenname>
            <url>http://maven.aliyun.com/nexus/content/groups/public/url>
            <mirrorOf>centralmirrorOf>
        mirror>
配置使用jdk1.8编译项目
<profile>
    <id>jdk1.8id>
    <activation>
        <activeByDefault>trueactiveByDefault>
        <jdk>1.8jdk>
    activation>
    <properties>
        <maven.compiler.source>1.8maven.compiler.source>
        <maven.compiler.target>1.8maven.compiler.target>
        <maven.compiler.compilerVersion>1.8maven.compiler.compilerVersion>
    properties>
profile>
使用idea整合我们刚配置好的maven。

给idea安装插件
lombak、mybatisx
下载vscode
code.visualstudio.com
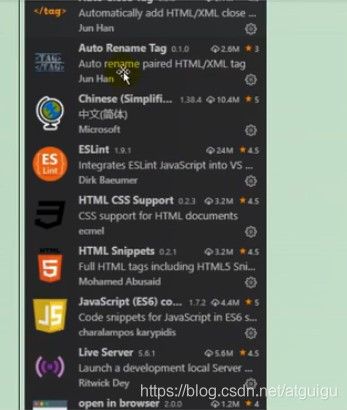
安装vdcode插件
配置git-ssh
下载git客户端:
https://git-scm.com/
右键桌面Git GUI/bash Here。
# 配置用户名
git config --global user.name "username"  //(名字,随意写)

# 配置邮箱
git config --global user.email "[email protected]" // 注册账号时使用的邮箱

# 配置ssh免密登录
ssh-keygen -t rsa -C "[email protected]"
三次回车后生成了密钥
cat ~/.ssh/id_rsa.pub

也可以查看密钥
浏览器登录码云后,个人头像上点设置、然后点ssh公钥、随便填个标题,然后赋值
ssh-rsa AAAAB3NzaC1yc2EAAAADAQABAAABAQC6MWhGXSKdRxr1mGPZysDrcwABMTrxc8Va2IWZyIMMRHH9Qn/wy3PN2I9144UUqg65W0CDE/thxbOdn78MygFFsIG4j0wdT9sdjmSfzQikLHFsJ02yr58V6J2zwXcW9AhIlaGr+XIlGKDUy5mXb4OF+6UMXM6HKF7rY9FYh9wL6bun9f1jV4Ydlxftb/xtV8oQXXNJbI6OoqkogPKBYcNdWzMbjJdmbq2bSQugGaPVnHEqAD74Qgkw1G7SIDTXnY55gBlFPVzjLWUu74OWFCx4pFHH6LRZOCLlMaJ9haTwT2DB/sFzOG/Js+cEExx/arJ2rvvdmTMwlv/T+6xhrMS3 [email protected]

# 测试
ssh -T [email protected]
测试成功,这样以后代码提交到码云就不用再输入账号密码了。
项目结构创建&提交到码云
在码云新建仓库,仓库名gulimall,选择语言java,在.gitignore选中maven,许可证选Apache-2.0,开发模型选生成/开发模型,开发时在dev分支,发布时在master分支,创建。
在IDEA中New–Project from version control–git–复制刚才项目的地址,如https://gitee.com/hanferm/gulimall.git
然后New Module–Spring Initializer–com.atguigu.gulimall , Artifact填 gulimall-product。Next—选择web,springcloud routin里选中openFeign。
依次创建出以下服务
- 商品服务product
- 存储服务ware
- 订单服务order
- 优惠券服务coupon
- 用户服务member
共同点:
- 导入web和openFeign
- group:com.atguigu.gulimall
- Artifact:gulimall-XXX
- 每一个服务,包名com.atguigu.gulimall.XXX{product/order/ware/coupon/member}
- 模块名:gulimall-XXX
然后右下角显示了springboot的service选项,选择他
从某个项目粘贴个pom.xml粘贴到项目目录,修改他
<project xmlns="http://maven.apache.org/POM/4.0.0" xmlns:xsi="http://www.w3.org/2001/XMLSchema-instance"
	xsi:schemaLocation="http://maven.apache.org/POM/4.0.0 https://maven.apache.org/xsd/maven-4.0.0.xsd">
	<modelVersion>4.0.0modelVersion>

	<groupId>com.atguigu.gulimallgroupId>
	<artifactId>gulimallartifactId>
	<version>0.0.1-SNAPSHOTversion>
	<name>gulimallname>
	<description>聚合服务description>

	<packaging>pompackaging>

	<modules>
		<module>gulimall-couponmodule>
		<module>gulimall-membermodule>
		<module>gulimall-ordermodule>
		<module>gulimall-productmodule>
		<module>gulimall-waremodule>

	modules>


project>
在maven窗口刷新,并点击+号,找到刚才的pom.xml添加进来,发现多了个root。这样比如运行root的clean命令,其他项目也一起clean了。
修改总项目的.gitignore,把小项目里的垃圾文件在提交的时候忽略掉,比如HTLP.md。。。
在version control/local Changes,点击刷新看Unversioned Files,可以看到变化。
全选最后剩下21个文件,选择右键、Add to VCS。
在IDEA中安装插件:gitee,重启IDEA。
在D额fault changelist右键点击commit,去掉右面的勾选Perform code analysis、CHECK TODO,然后点击COMMIT,有个下拉列表,点击commit and push才会提交到云端。此时就可以在浏览器中看到了。
数据库初始化
因为已经有人贡献sql文件了,所以我们不理会下面引用部分的内容了
安装powerDesigner软件。http://forspeed.onlinedown.net/down/powerdesigner1029.zip
其他软件:
https://www.lanzous.com/b015ag33e密码:2wre
所有的数据库数据再复杂也不建立外键,因为在电商系统里,数据量大,做外键关联很耗性能。
name是给我们看的,code才是数据库里真正的信息。
选择primary和identity作为主键。然后点preview就可以看到生成这张表的语句。
点击菜单栏database–generate database—点击确定
找到评论区的sql文件,打开sqlyog软件,链接192.168.56.10,账号密码root。
注意重启虚拟机和docker后里面的容器就关了。
sudo docker ps
sudo docker ps -a
# 这两个命令的差别就是后者会显示  【已创建但没有启动的容器】

# 我们接下来设置我们要用的容器每次都是自动启动
sudo docker update redis --restart=always
sudo docker update mysql --restart=always
# 如果不配置上面的内容的话,我们也可以选择手动启动
sudo docker start mysql
sudo docker start redis
# 如果要进入已启动的容器
sudo docker exec -it mysql /bin/bash
然后接着去sqlyog直接我们的操作,在左侧root上右键建立数据库:字符集选utf8mb4,他能兼容utf8且能解决一些乱码的问题。分别建立了下面数据库
gulimall-oms
gulimall-pms
gulimall-sms
gulimall-ums
gulimall-wms
然后打开对应的sql在对应的数据库中执行。依次执行。(注意sql文件里没有建库语句)
3)快速开发
人人开源搭建后台管理系统
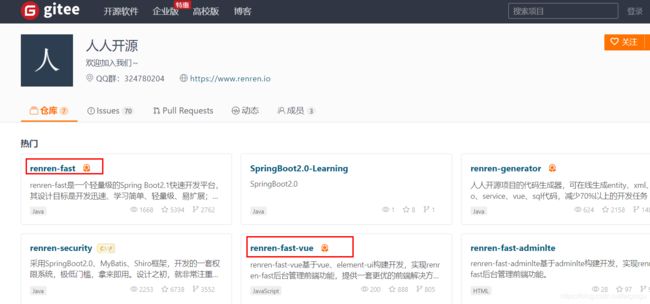
克隆到本地:
git clone https://gitee.com/renrenio/renren-fast-vue.git

git clone https://gitee.com/renrenio/renren-fast.git
将拷贝下来的“renren-fast”删除“.git”后,拷贝到“gulimall”工程根目录下,然后将它作为gulimall的一个module
创建“gulimall_admin”的数据库,然后执行“renren-fast/db/mysql.sql”中的SQl脚本
修改“application-dev.yml”文件,默认为dev环境,修改连接mysql的url和用户名密码
spring:
    datasource:
        type: com.alibaba.druid.pool.DruidDataSource
        druid:
            driver-class-name: com.mysql.cj.jdbc.Driver
            url: jdbc:mysql://192.168.137.14:3306/gulimall_admin?useUnicode=true&characterEncoding=UTF-8&serverTimezone=Asia/Shanghai
            username: root
            password: root
启动“gulimall_admin”,然后访问“http://localhost:8080/renren-fast/”

安装node.js,并且安装仓库
npm config set registry http://registry.npm.taobao.org/
PS D:\tmp\renren-fast-vue> npm config set registry http://registry.npm.taobao.org/
PS D:\tmp\renren-fast-vue> npm install
npm WARN [email protected] requires a peer of ajv@>=4.10.0 but none is installed. You must install peer dependencies yourself.
npm WARN [email protected] requires a peer of node-sass@^4.0.0 but none is installed. You must install peer dependencies yourself.
npm WARN optional SKIPPING OPTIONAL DEPENDENCY: [email protected] (node_modules\fsevents):
npm WARN notsup SKIPPING OPTIONAL DEPENDENCY: Unsupported platform for [email protected]: wanted {
     "os":"darwin","arch":"any"} (current: {
     "os":"win32","arch":"x64"})

up to date in 17.227s
PS D:\tmp\renren-fast-vue>
PS D:\tmp\renren-fast-vue> npm run dev

> [email protected] dev D:\tmp\renren-fast-vue
> webpack-dev-server --inline --progress --config build/webpack.dev.conf.js

 10% building modules 5/10 modules 5 active ...-0!D:\tmp\renren-fast-vue\src\main.js(node:19864) Warning: Accessing non-existent property 'cat' of module exports inside circular dependency
(Use `node --trace-warnings ...` to show where the warning was created)
(node:19864) Warning: Accessing non-existent property 'cd' of module exports inside circular dependency
(node:19864) Warning: Accessing non-existent property 'chmod' of module exports inside circular dependency
(node:19864) Warning: Accessing non-existent property 'cp' of module exports inside circular dependency
(node:19864) Warning: Accessing non-existent property 'dirs' of module exports inside circular dependency
(node:19864) Warning: Accessing non-existent property 'pushd' of module exports inside circular dependency
(node:19864) Warning: Accessing non-existent property 'popd' of module exports inside circular dependency
(node:19864) Warning: Accessing non-existent property 'echo' of module exports inside circular dependency
(node:19864) Warning: Accessing non-existent property 'tempdir' of module exports inside circular dependency
(node:19864) Warning: Accessing non-existent property 'pwd' of module exports inside circular dependency
常见问题1:“Module build failed: Error: Cannot find module 'node-sass”
运行过程中,出现“Module build failed: Error: Cannot find module 'node-sass’报错问题”,解决方法
用npm install -g cnpm --registry=https://registry.npm.taobao.org ,从淘宝镜像那下载,然后cnpm下载成功。
最后输入cnpm install node-sass --save。npm run dev终于能跑起来了!!!
————————————————
版权声明:本文为CSDN博主「夕阳下美了剪影」的原创文章,遵循CC 4.0 BY-SA版权协议,转载请附上原文出处链接及本声明。
原文链接:https://blog.csdn.net/qq_38401285/article/details/86483278
常见问题2:cnpm - 解决 " cnpm : 无法加载文件 C:\Users\93457\AppData\Roaming\npm\cnpm.ps1,因为在此系统上禁止运行脚本。有关详细信息 。。。 "
https://www.cnblogs.com/500m/p/11634969.html
所有问题的根源都在“node_modules”,npm install之前,应该将这个文件夹删除,然后再进行安装和运行。
再次运行npm run dev恢复正常:

逆向工程搭建&使用
clone
https://gitee.com/renrenio/renren-generator.git
然后将该项目放置到“gulimall”的跟路径下,然后添加该Module,并且提交到github上
修改配置
renren-generator/src/main/resources/generator.properties
#代码生成器,配置信息

mainPath=com.bigdata
#包名
package=com.bigdata.gulimall
moduleName=product
#作者
author=cosmoswong
#Email
[email protected]
#表前缀(类名不会包含表前缀)
tablePrefix=pms_
运行“renren-generator”
访问:http://localhost:80/
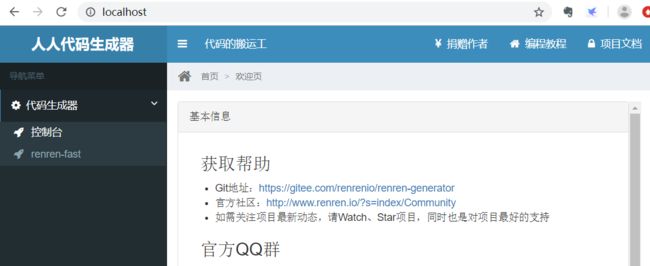
点击“renren-fast”,能够看到它将“renren-fast”的所有表都列举了出来:
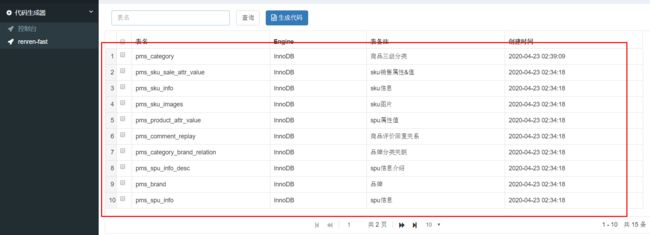
选择所有的表,然后点击“生成代码”,将下载的“renren.zip”,解压后取出main文件夹,放置到“gulimall-product”项目的main目录中。
配置&测试微服务基本CRUD
https://www.bilibili.com/video/BV1np4y1C7Yf?p=18
逆向生成所有微服务基本CRUD代码
下面的几个module,也采用同样的方式来操作。
但是针对于“undo_log”,存在一个问题
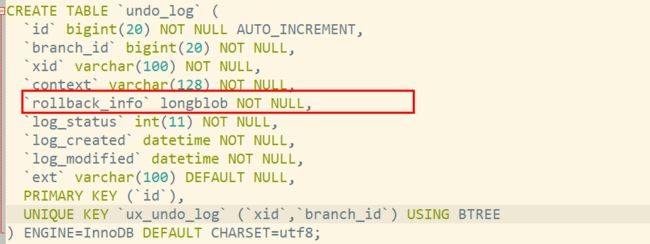
它的数据类型是“longblob”类型,逆向工程后,对应的数据类型未知:

这个问题该要怎么解决?
4)分布式组件
SpringCloud Alibaba简介
概述
2018年10月31日,SpringCloudAlibaba 正式入驻 SpringCloud 官方孵化器,并在 Maven 中央库发布第一个版本。
Spring Cloud for Alibaba 0.2.0 released
The Spring Cloud Alibaba project, consisting of Alibaba’s open-source components and several Alibaba Cloud products, aims to implement and expose well known Spring Framework patterns and abstractions to bring the benefits of Spring Boot and Spring Cloud to Java developers using Alibaba products.
Spring Cloud for Alibaba,它是由一些阿里巴巴的开源组件和云产品组成的。这个项目的目的是为了让大家所熟知的 Spring 框架,其优秀的设计模式和抽象理念,以给使用阿里巴巴产品的 Java 开发者带来使用 Spring Boot 和 Spring Cloud 的更多便利。
Spring Cloud Alibaba 致力于提供微服务开发的一站式解决方案。该项目包含开发分布式应用微服务的必需组件,方便开发者通过 Spring Cloud 编程模型轻松使用这些组件来开发分布式应用服务。
依托 Spring Cloud Alibaba,您只需要添加一些注解和少量配置,就可以将 Spring Cloud 应用接入阿里微服务解决方案,通过阿里中间件来迅速搭建分布式应用系统。
主要功能
- 服务限流降级:默认支持 Servlet、Feign、RestTemplate、Dubbo 和 RocketMQ 限流降级功能的接入,可以在运行时通过控制台实时修改限流降级规则,还支持查看限流降级 Metrics 监控。
- 服务注册与发现:适配 SpringCloud 服务注册与发现标准,默认集成了 Ribbon的支持。
- 分布式配置管理:支持分布式系统中的外部化配置,配置更改时自动刷新。
- 消息驱动能力:基于 SpringCloudStream 为微服务应用构建消息驱动能力。
- 阿里云对象存储:阿里云提供的海量、安全、低成本、高可靠的云存储服务。支持在任何应用、任何时间、任何地点存储和访问任意类型的数据。
- 分布式任务调度:提供秒级、精准、高可靠、高可用的定时(基于 Cron 表达式)任务调度服务。同时提供分布式的任务执行模型,如网格任务。网格任务支持海量子任务均匀分配到所有 Worker(schedulerx-client)上执行。
组件
- Sentinel:面向分布式服务架构的轻量级流量控制产品,主要以流量为切入点,从流量控制、熔断降级、系统负载保护等多个维度来帮助您保护服务的稳定性。
- Nacos:阿里巴巴推出来的一个新开源项目,这是一个更易于构建云原生应用的动态服务发现、配置管理和服务管理平台。
- RocketMQ:分布式消息系统,基于高可用分布式集群技术,提供低延时的、高可靠的消息发布与订阅服务。
- Alibaba Cloud ACM:一款在分布式架构环境中对应用配置进行集中管理和推送的应用配置中心产品。
- Alibaba Cloud OSS: 阿里云对象存储服务(Object Storage Service,简称 OSS),是阿里云提供的海量、安全、低成本、高可靠的云存储服务。您可以在任何应用、任何时间、任何地点存储和访问任意类型的数据。
- Alibaba Cloud SchedulerX: 阿里中间件团队开发的一款分布式任务调度产品,提供秒级、精准、高可靠、高可用的定时(基于 Cron 表达式)任务调度服务。
SpringCloud Alibaba-Nacos注册中心
要注意nacos集群所在的server,一定要关闭防火墙,否则容易出现各种问题。
搭建nacos集群,然后分别启动各个微服务,将它们注册到Nacos中。
  application:
    name: gulimall-coupon
  cloud:
    nacos:
      discovery:
        server-addr: 192.168.137.14
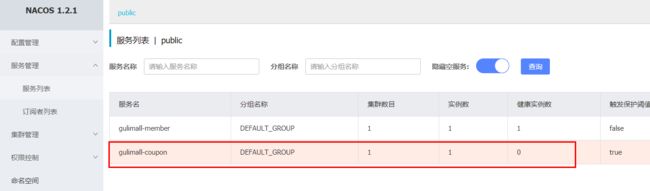
查看注册情况:

SpringCloud-OpenFeign测试远程调用
1)、引入open-feign
        <dependency>
            <groupId>org.springframework.cloudgroupId>
            <artifactId>spring-cloud-starter-openfeignartifactId>
        dependency>
2)、编写一个接口,告诉SpringCLoud这个接口需要调用远程服务
修改“com.bigdata.gulimall.coupon.controller.CouponController”,添加以下controller方法:
    @RequestMapping("/member/list")
    public R memberCoupons(){

        CouponEntity couponEntity = new CouponEntity();
        couponEntity.setCouponName("discount 20%");
        return R.ok().put("coupons",Arrays.asList(couponEntity));
    }
新建“com.bigdata.gulimall.member.feign.CouponFeignService”接口
@FeignClient("gulimall_coupon")
public interface CouponFeignService {

    @RequestMapping("/coupon/coupon/member/list")
    public R memberCoupons();
}
修改“com.bigdata.gulimall.member.GulimallMemberApplication”类,添加上"@EnableFeignClients":
@SpringBootApplication
@EnableDiscoveryClient
@EnableFeignClients(basePackages = "com.bigdata.gulimall.member.feign")
public class GulimallMemberApplication {


    public static void main(String[] args) {

        SpringApplication.run(GulimallMemberApplication.class, args);
    }
}
声明接口的每一个方法都是调用哪个远程服务的那个请求
3)、开启远程调用功能
com.bigdata.gulimall.member.controller.MemberController
    @RequestMapping("/coupons")
    public R test(){

        MemberEntity memberEntity=new MemberEntity();
        memberEntity.setNickname("zhangsan");
        R memberCoupons = couponFeignService.memberCoupons();

        return memberCoupons.put("member",memberEntity).put("coupons",memberCoupons.get("coupons"));
    }
(4)、访问http://localhost:8000/member/member/coupons

停止“gulimall-coupon”服务,能够看到注册中心显示该服务的健康值为0:
再次访问:http://localhost:8000/member/member/coupons
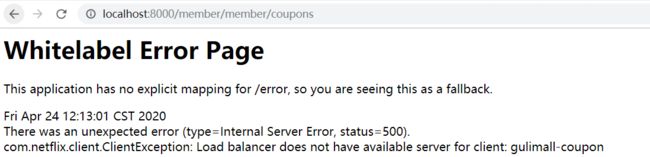
启动“gulimall-coupon”服务,再次访问,又恢复了正常。
SpringCloud Alibaba-nacos配置中心-简单示例
1)修改“gulimall-coupon”模块
添加pom依赖:
<dependency>
    <groupId>com.alibaba.cloudgroupId>
    <artifactId>spring-cloud-starter-alibaba-nacos-configartifactId>
dependency>
创建bootstrap.properties文件,该配置文件会优先于“application.yml”加载。
spring.application.name=gulimall-coupon
spring.cloud.nacos.config.server-addr=192.168.137.14:8848
2)传统方式
为了详细说明config的使用方法,先来看原始的方式
创建“application.properties”配置文件,添加如下配置内容:
coupon.user.name="zhangsan"
coupon.user.age=30
修改“com.bigdata.gulimall.coupon.controller.CouponController”文件,添加如下内容:
    @Value("${coupon.user.name}")
    private String name;
    @Value("${coupon.user.age}")
    private Integer age;

    @RequestMapping("/test")
    public R getConfigInfo(){

       return R.ok().put("name",name).put("age",age);
    }
启动“gulimall-coupon”服务:
访问:http://localhost:7000/coupon/coupon/test>

这样做存在的一个问题,如果频繁的修改application.properties,在需要频繁重新打包部署。下面我们将采用Nacos的配置中心来解决这个问题。
3)nacos config
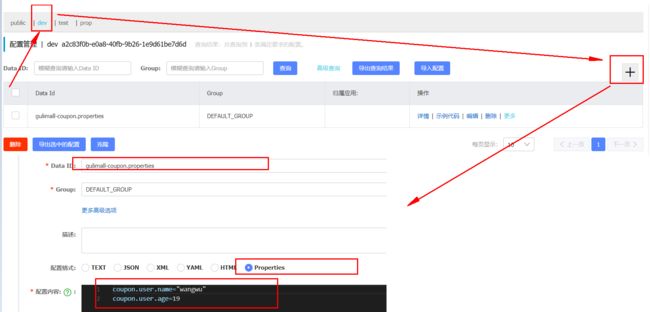
1、在Nacos注册中心中,点击“配置列表”,添加配置规则:
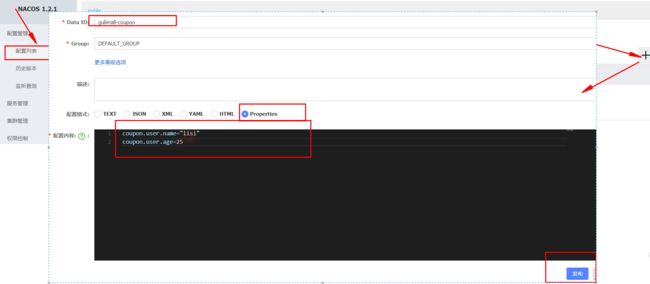
DataID:gulimall-coupon
配置格式:properties
文件的命名规则为:s p r i n g . a p p l i c a t i o n . n a m e − {spring.application.name}-sprin**g.application.nam**e−{spring.profiles.active}.${spring.cloud.nacos.config.file-extension}
${spring.application.name}:为微服务名
${spring.profiles.active}:指明是哪种环境下的配置,如dev、test或info
${spring.cloud.nacos.config.file-extension}:配置文件的扩展名,可以为properties、yml等
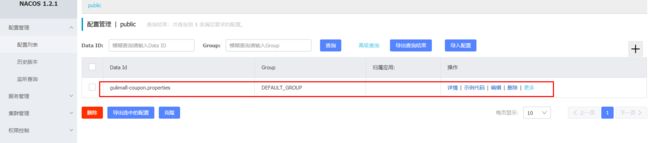
2、查看配置:
3、修改“com.bigdata.gulimall.coupon.controller.CouponController”类,添加“@RefreshScope”注解
@RestController
@RequestMapping("coupon/coupon")
@RefreshScope
public class CouponController {
这样都会动态的从配置中心读取配置.
4、访问:http://localhost:7000/coupon/coupon/test
[外链图片转存失败,源站可能有防盗链机制,建议将图片保存下来直接上传(img-sVYEnJMB-1595834441066)(https://fermhan.oss-cn-qingdao.aliyuncs.com/guli/1587717485283.png)]
能够看到读取到了nacos 中的最新的配置信息,并且在指明了相同的配置信息时,配置中心中设置的值优先于本地配置。
SpringCloud Alibaba-nacos配置中心-命名空间与配置分组
Namespace方案
通过命名空间实现环境区分
下面是配置实例:
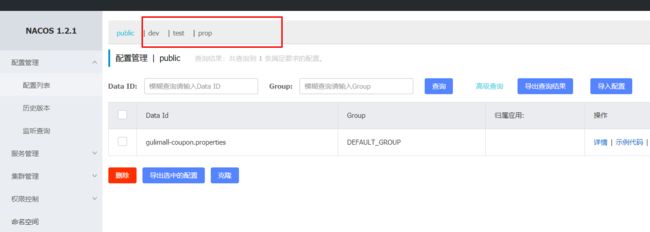
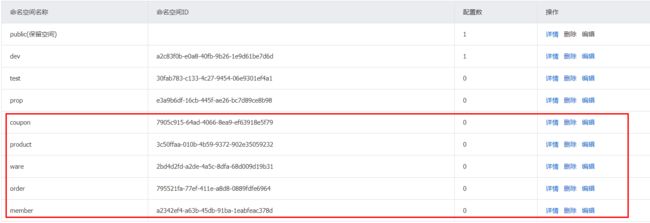
1、创建命名空间:
“命名空间”—>“创建命名空间”:

创建三个命名空间,分别为dev,test和prop
2、回到配置列表中,能够看到所创建的三个命名空间
下面我们需要在dev命名空间下,创建“gulimall-coupon.properties”配置规则:
3、访问:http://localhost:7000/coupon/coupon/test

并没有使用我们在dev命名空间下所配置的规则,而是使用的是public命名空间下所配置的规则,这是怎么回事呢?
查看“gulimall-coupon”服务的启动日志:
2020-04-24 16:37:24.158  WARN 32792 --- [           main] c.a.c.n.c.NacosPropertySourceBuilder     : Ignore the empty nacos configuration and get it based on dataId[gulimall-coupon] & group[DEFAULT_GROUP]
2020-04-24 16:37:24.163  INFO 32792 --- [           main] c.a.nacos.client.config.utils.JVMUtil    : isMultiInstance:false
2020-04-24 16:37:24.169  INFO 32792 --- [           main] b.c.PropertySourceBootstrapConfiguration : Located property source: [BootstrapPropertySource {name='bootstrapProperties-gulimall-coupon.properties,DEFAULT_GROUP'}, BootstrapPropertySource {name='bootstrapProperties-gulimall-coupon,DEFAULT_GROUP'}]
"gulimall-coupon.properties",默认就是public命名空间中的内容中所配置的规则。
4、指定命名空间
如果想要使得我们自定义的命名空间生效,需要在“bootstrap.properties”文件中,指定使用哪个命名空间:
spring.cloud.nacos.config.namespace=a2c83f0b-e0a8-40fb-9b26-1e9d61be7d6d
这个命名空间ID来源于我们在第一步所创建的命名空间
5、重启“gulimall-coupon”,再次访问:http://localhost:7000/coupon/coupon/test

但是这种命名空间的粒度还是不够细化,对此我们可以为项目的每个微服务module创建一个命名空间。
6、为所有微服务创建命名空间
7、回到配置列表选项卡,克隆pulic的配置规则到coupon命名空间下
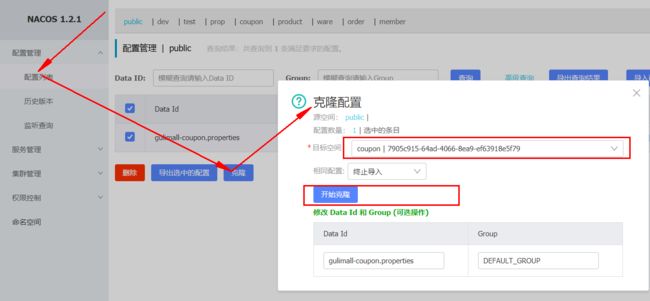
切换到coupon命名空间下,查看所克隆的规则:

8、修改“gulimall-coupon”下的bootstrap.properties文件,添加如下配置信息
spring.cloud.nacos.config.namespace=7905c915-64ad-4066-8ea9-ef63918e5f79
这里指明的是,读取时使用coupon命名空间下的配置。
9、重启“gulimall-coupon”,访问:http://localhost:7000/coupon/coupon/test
DataID方案
通过指定spring.profile.active和配置文件的DataID,来使不同环境下读取不同的配置,读取配置时,使用的是默认命名空间public,默认分组(default_group)下的DataID。
默认情况,Namespace=public,Group=DEFAULT GROUP,默认Cluster是DEFAULT
Group方案
通过Group实现环境区分
实例:通过使用不同的组,来读取不同的配置,还是以上面的gulimall-coupon微服务为例
1、新建“gulimall-coupon.properties”,将它置于“tmp”组下
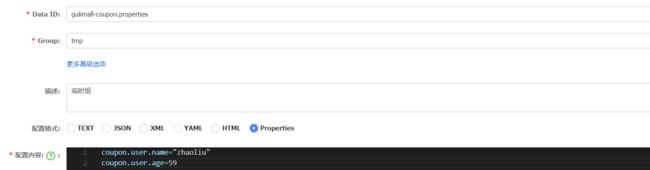
2、修改“bootstrap.properties”配置,添加如下的配置
spring.cloud.nacos.config.group=tmp
3、重启“gulimall-coupon”,访问:http://localhost:7000/coupon/coupon/test

SpringCloud Alibaba-nacos配置中心-加载多配置集
当微服务数量很庞大时,将所有配置都书写到一个配置文件中,显然不是太合适。对此我们可以将配置按照功能的不同,拆分为不同的配置文件。
如下面的配置文件:
server:
  port: 7000

spring:
  datasource:
    #MySQL配置
    driverClassName: com.mysql.cj.jdbc.Driver
    url: jdbc:mysql://192.168.137.14:3306/gulimall_sms?useUnicode=true&characterEncoding=UTF-8&useSSL=false
    username: root
    password: root

  application:
    name: gulimall-coupon
  cloud:
    nacos:
      discovery:
        server-addr: 192.168.137.14:8848


mybatis-plus:
  global-config:
    db-config:
      id-type: auto
  mapper-locations: classpath:/mapper/**/*.xml
我们可以将,
数据源有关的配置写到一个配置文件中:
spring:
  datasource:
    #MySQL配置
    driverClassName: com.mysql.cj.jdbc.Driver
    url: jdbc:mysql://192.168.137.14:3306/gulimall_sms?useUnicode=true&characterEncoding=UTF-8&useSSL=false
    username: root
    password: root
和框架有关的写到另外一个配置文件中:
mybatis-plus:
  global-config:
    db-config:
      id-type: auto
  mapper-locations: classpath:/mapper/**/*.xml
也可以将上面的这些配置交给nacos来进行管理。
实例:将“gulimall-coupon”的“application.yml”文件拆分为多个配置,并放置到nacos配置中心
1、创建“datasource.yml”,用于存储和数据源有关的配置
spring:
  datasource:
    #MySQL配置
    driverClassName: com.mysql.cj.jdbc.Driver
    url: jdbc:mysql://192.168.137.14:3306/gulimall_sms?useUnicode=true&characterEncoding=UTF-8&useSSL=false
    username: root
    password: root
在coupon命名空间中,创建“datasource.yml”配置

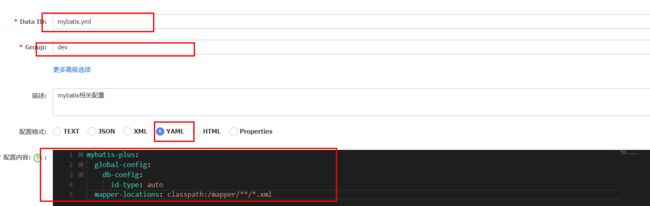
2、将和mybatis相关的配置,放置到“mybatis.yml”中
mybatis-plus:
  global-config:
    db-config:
      id-type: auto
  mapper-locations: classpath:/mapper/**/*.xml
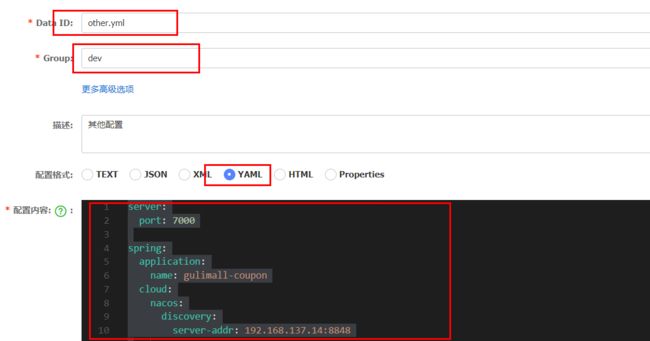
3、创建“other.yml”配置,保存其他的配置信息
server:
  port: 7000

spring:
  application:
    name: gulimall-coupon
  cloud:
    nacos:
      discovery:
        server-addr: 192.168.137.14:8848
现在“mybatis.yml”、“datasource.yml”和“other.yml”共同构成了微服务的配置。
4、修改“gulimall-coupon”的“bootstrap.properties”文件,加载“mybatis.yml”、“datasource.yml”和“other.yml”配置
spring.cloud.nacos.config.extension-configs[0].data-id=mybatis.yml
spring.cloud.nacos.config.extension-configs[0].group=dev
spring.cloud.nacos.config.extension-configs[0].refresh=true

spring.cloud.nacos.config.extension-configs[1].data-id=datasource.yml
spring.cloud.nacos.config.extension-configs[1].group=dev
spring.cloud.nacos.config.extension-configs[1].refresh=true


spring.cloud.nacos.config.extension-configs[2].data-id=other.yml
spring.cloud.nacos.config.extension-configs[2].group=dev
spring.cloud.nacos.config.extension-configs[2].refresh=true
"spring.cloud.nacos.config.ext-config"已经被废弃,建议使用“spring.cloud.nacos.config.extension-configs”
5、注释“application.yml”文件中的所有配置
6、重启“gulimall-coupon”服务,然后访问:http://localhost:7000/coupon/coupon/test

7、访问:http://localhost:7000/coupon/coupon/list,查看是否能够正常的访问数据库

小结:
1)、微服务任何配置信息,任何配置文件都可以放在配置中心;
2)、只需要在bootstrap.properties中,说明加载配置中心的哪些配置文件即可;
3)、@Value, @ConfigurationProperties。都可以用来获取配置中心中所配置的信息;
4)、配置中心有的优先使用配置中心中的,没有则使用本地的配置。
SpringCloud-Gateway核心概念&原理
https://www.bilibili.com/video/BV1np4y1C7Yf?p=26
SpringCloud-Gateway-创建&测试API网关
1、注册“gulimall-gateway”到Nacos
1)创建“gulimall-gateway”
SpringCloud gateway
2)添加“gulimall-common”依赖和“spring-cloud-starter-gateway”依赖
        <dependency>
            <groupId>com.bigdata.gulimallgroupId>
            <artifactId>gulimall-commonartifactId>
            <version>1.0-SNAPSHOTversion>
        dependency>
        <dependency>
            <groupId>org.springframework.cloudgroupId>
            <artifactId>spring-cloud-starter-gatewayartifactId>
        dependency>
3)“com.bigdata.gulimall.gulimallgateway.GulimallGatewayApplication”类上加上“@EnableDiscoveryClient”注解
4)在Nacos中创建“gateway”命名空间,同时在该命名空间中创建“gulimall-gateway.yml”
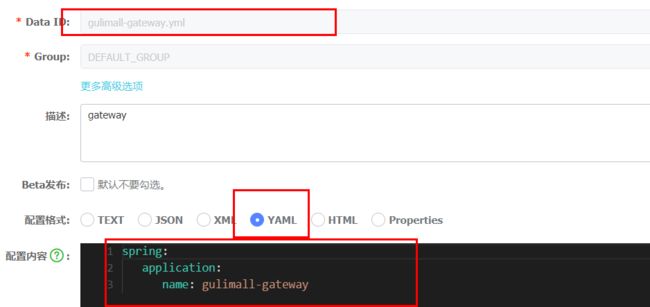
5)创建“bootstrap.properties”文件,添加如下配置,指明配置中心地址和所属命名空间
spring.application.name=gulimall-gateway
spring.cloud.nacos.config.server-addr=192.168.137.14:8848
spring.cloud.nacos.config.namespace=1c82552e-1af0-4ced-9a48-26f19c2d315f
6)创建“application.properties”文件,指定服务名和注册中心地址
spring.application.name=gulimall-gateway
spring.cloud.nacos.discovery.server-addr=192.168.137.14:8848
server.port=88
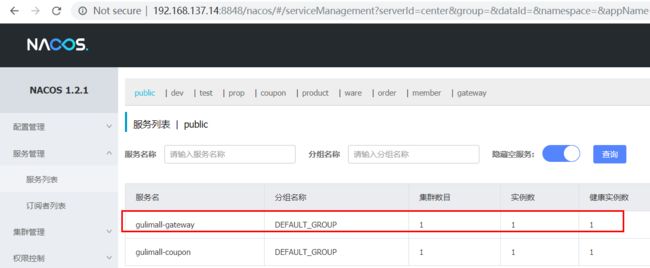
7)启动“gulimall-gateway”
启动报错:
Description:

Failed to configure a DataSource: 'url' attribute is not specified and no embedded datasource could be configured.

Reason: Failed to determine a suitable driver class
解决方法:在“com.bigdata.gulimall.gulimallgateway.GulimallGatewayApplication”中排除和数据源相关的配置
@SpringBootApplication(exclude = {
     DataSourceAutoConfiguration.class})
重新启动
访问:http://192.168.137.14:8848/nacos/#,查看到该服务已经注册到了Nacos中
2、案例
现在想要实现针对于“http://localhost:88/hello?url=baidu”,转发到“https://www.baidu.com”,针对于“http://localhost:88/hello?url=qq”的请求,转发到“https://www.qq.com/”
1)创建“application.yml”
spring:
  cloud:
    gateway:
      routes:
        - id: baidu_route
          uri: https://www.baidu.com
          predicates:
            - Query=url, baidu
        - id: qq_route
          uri: https://www.qq.com/
          predicates:
            - Query=url, qq
2)启动“gulimall-gateway”
3)测试
访问:http://localhost:88/hello?url=baidu
访问:http://localhost:88/hello?url=qq
5)前端基础
技术栈简介
1)VsCode使用
微软旗下的一款轻量级高性能的前段开发工具。
2)ES6
什么是es6?
ECMAScript 6.0(以下简称 ES6)是 JavaScript 语言的下一代标准,已经在 2015 年 6 月正式发布了。
目标:是使得 JavaScript 语言可以用来编写复杂的大型应用程序,成为企业级开发语言。
ECMAScript 和 JavaScript 的关系是:
前者是后者的规格,后者是前者的一种实现
ES6 与 ECMAScript 2015 的关系
2011 年,ECMAScript 5.1 版发布后,就开始制定 6.0 版了。因此,ES6 这个词的原意,就是指 JavaScript 语言的下一个版本。
ES6 的第一个版本,就这样在 2015 年 6 月发布了,正式名称就是《ECMAScript 2015 标准》(简称 ES2015)。2016 年 6 月,小幅修订的《ECMAScript 2016 标准》(简称 ES2016)如期发布,这个版本可以看作是 ES6.1 版,因为两者的差异非常小(只新增了数组实例的includes方法和指数运算符),基本上是同一个标准。根据计划,2017 年 6 月发布 ES2017 标准。
ES6 既是一个历史名词,也是一个泛指,含义是 5.1 版以后的 JavaScript 的下一代标准,涵盖了 ES2015、ES2016、ES2017 等等,而 ES2015 则是正式名称,特指该年发布的正式版本的语言标准。
3)Node.js
前端开发,少不了 node.js,Node.js是一个基于ChromeV8引擎的JavaScript运行环境
http://nodejs.cn/api/
我们关注与node.js的npm功能就行;
NPM 是随同 NodeJS—起安装的包管理工具,JavaScript-NPM,Java-Maven;
-
、官网下载安装node.js,幷使用node-v检査版本
-
、配置npm使用淘宝镜像
npm config set registry http://registry.npm.taobao.org/
4)Vue
Vue.js是一套构建用户界面的渐进式框架。与其他重量级框架不同的是,Vue 采用自底向上增量开发的设计。Vue 的核心库只关注视图层,并且非常容易学习,非常容易与其它库或已有项目整合。另一方面,Vue 完全有能力驱动采用单文件组件和Vue生态系统支持的库开发的复杂单页应用。
Vue.js 的目标是通过尽可能简单的 API 实现响应的数据绑定和组合的视图组件 。
Vue.js 自身不是一个全能框架——它只聚焦于视图层。因此它非常容易学习,非常容易与其它库或已有项目整合。另一方面,在与相关工具和支持库一起使用时 ,Vue.js 也能完美地驱动复杂的单页应用。
优点
在有HTML CSS JavaScript的基础上,快速上手。
简单小巧的核心,渐进式技术栈,足以应付任何规模的应用。
20kb min+gzip 运行大小、超快虚拟 DOM 、最省心的优化。
| 目录/文件 | 说明 |
|---|---|
| build | 项目构建(webpack)相关代码 |
| config | 配置目录,包括端口号等。我们初学可以使用默认的。 |
| node_modules | npm 加载的项目依赖模块 |
| src | 包含了几个目录及文件:assets: 放置一些图片,如logo等。components: 目录里面放了一个组件文件,可以不用。App.vue: 项目入口文件,我们也可以直接将组件写这里,而不使用 components 目录。main.js: 项目的核心文件。 |
| static | 静态资源目录,如图片、字体等。 |
| test | 初始测试目录,可删除 |
| .xxxx文件 | 这些是一些配置文件,包括语法配置,git配置等。 |
| index.html | 首页入口文件,你可以添加一些 meta 信息或统计代码啥的。 |
| package.json | 项目配置文件。 |
| README.md | 项目的说明文档,markdown 格式 |
5)Babel
babel是一个javaScript编译器,我们可以使用es的最新语法编程,而不用担心浏览器兼容问题,它会自动转换为浏览器兼容的代码。
6)Webpack
自动化项目构建工具
[外链图片转存失败,源站可能有防盗链机制,建议将图片保存下来直接上传(img-xuRsntqW-1603345710001)(C:%5CUsers%5CRuic%5CDesktop%5C%E5%B1%8F%E5%B9%95%E6%88%AA%E5%9B%BE%202020-10-13%20101751.jpg)]
ES6-let&const
示例
<html lang="en">
<head>
    <meta charset="UTF-8">
    <meta name="viewport" content="width=device-width, initial-scale=1.0">
    <meta http-equiv="X-UA-Compatible" content="ie=edge">
    <title>Documenttitle>
head>
<body>


    <script>
       // var 声明的变量往往会越域
       // let 声明的变量有严格局部作用域
//         {

//             var a = 1;
//             let b = 2;
//         }
//         console.log(a);  // 1
//         console.log(b);  // ReferenceError: b is not defined

    // var 可以声明多次
            // let 只能声明一次
//         var m = 1
//         var m = 2
//         let n = 3
// //         let n = 4
//         console.log(m)  // 2
//         console.log(n)  // Identifier 'n' has already been declared

        // var 会变量提升
        // let 不存在变量提升
//         console.log(x);  // undefined
//         var x = 10;
//         console.log(y);   //ReferenceError: y is not defined
//         let y = 20;

        // let
        // 1. const声明之后不允许改变
                // 2. 一但声明必须初始化,否则会报错
        const a = 1;
        a = 3; //Uncaught TypeError: Assignment to constant variable.

    script>

body>
html>
小结
- var在{}之外也起作用
- let在{}不起作用
- var多次声明同一变量不会报错,let多次声明会报错,只能声明一次。
- var 会变量提升(打印和定义可以顺序反)。let 不存在变量提升(顺序不能反)
- let的const声明之后不允许改变
ES6-解构&字符串
示例
解构表达式
<html lang="en">
<head>
    <meta charset="UTF-8">
    <meta name="viewport" content="width=device-width, initial-scale=1.0">
    <meta http-equiv="X-UA-Compatible" content="ie=edge">
    <title>Documenttitle>
head>
<body>

    <script>
        //数组解构
        // let arr = [1,2,3];
        // // let a = arr[0];
        // // let b = arr[1];
        // // let c = arr[2];

        // let [a,b,c] = arr;
        // console.log(a,b,c)

        const person = {

            name: "jack",
            age: 21,
            language: ['java', 'js', 'css']
        }
        //         const name = person.name;
        //         const age = person.age;
        //         const language = person.language;

        //对象解构
        const {
       name: abc, age, language } = person;
        console.log(abc, age, language)

        //4、字符串扩展
        let str = "hello.vue";
        console.log(str.startsWith("hello"));//true
        console.log(str.endsWith(".vue"));//true
        console.log(str.includes("e"));//true
        console.log(str.includes("hello"));//true

        //字符串模板
        let ss = `
                    hello world
                `;
        console.log(ss);

        //  // 2、字符串插入变量和表达式。变量名写在 ${} 中,${} 中可以放入 JavaScript 表达式。

        function fun() {

            return "这是一个函数"
        }

        let info = `我是${
        abc},今年${
        age + 10}了, 我想说: ${
        fun()}`;

       console.log(info);

    script>
body>
html>
小结
- 支持
let arr = [1,2,3]; let [a,b,c] = arr;这种语法 - 支持对象解析:
const { name: abc, age, language } = person;冒号代表改名 - 字符串函数
- 支持一个字符串为多行
- 占位符功能 ${}
ES6-箭头函数
Document
<html lang="en">

<head>
    <meta charset="UTF-8">
    <meta name="viewport" content="width=device-width, initial-scale=1.0">
    <meta http-equiv="X-UA-Compatible" content="ie=edge">
    <title>Documenttitle>
head>
<body>

    <script>
        //在ES6以前,我们无法给一个函数参数设置默认值,只能采用变通写法:
        function add(a, b) {

            // 判断b是否为空,为空就给默认值1
            b = b || 1;
            return a + b;
        }
        // 传一个参数
        console.log(add(10));


        //现在可以这么写:直接给参数写上默认值,没传就会自动使用默认值
        function add2(a, b = 1) {

            return a + b;
        }
        console.log(add2(20));


        //2)、不定参数
        function fun(...values) {

            console.log(values.length)
        }
        fun(1, 2)      //2
        fun(1, 2, 3, 4)  //4

        //3)、箭头函数
        //以前声明一个方法
        // var print = function (obj) {

        //     console.log(obj);
        // }
        var print = obj => console.log(obj);
        print("hello");

        var sum = function (a, b) {

            c = a + b;
            return a + c;
        }

        var sum2 = (a, b) => a + b;
        console.log(sum2(11, 12));

        var sum3 = (a, b) => {

            c = a + b;
            return a + c;
        }
        console.log(sum3(10, 20))


        const person = {

            name: "jack",
            age: 21,
            language: ['java', 'js', 'css']
        }

        function hello(person) {

            console.log("hello," + person.name)
        }

        //箭头函数+解构
        var hello2 = ({
      name}) => console.log("hello," +name);
        hello2(person);

    script>
body>
html>
小结
- 原来想要函数默认值得这么写
b = b || 1;现在可以直接写了function add2(a, b = 1) { - 函数不定参数
function fun(...values) { - 支持箭头函数(lambda表达式),还支持使用{}结构传入对象的成员
ES6-对象优化
<html lang="en">
<head>
    <meta charset="UTF-8">
    <meta name="viewport" content="width=device-width, initial-scale=1.0">
    <meta http-equiv="X-UA-Compatible" content="ie=edge">
    <title>Documenttitle>
head>
<body>
    <script>
        const person = {

            name: "jack",
            age: 21,
            language: ['java', 'js', 'css']
        }

        console.log(Object.keys(person));//["name", "age", "language"]
        console.log(Object.values(person));//["jack", 21, Array(3)]
        console.log(Object.entries(person));//[Array(2), Array(2), Array(2)]

        const target = {
       a: 1 };
        const source1 = {
       b: 2 };
        const source2 = {
       c: 3 };

        //{a:1,b:2,c:3}
        Object.assign(target, source1, source2);

        console.log(target);//["name", "age", "language"]

        //2)、声明对象简写
        const age = 23
        const name = "张三"
        const person1 = {
       age: age, name: name }

        const person2 = {
       age, name }//声明对象简写
        console.log(person2);

        //3)、对象的函数属性简写
        let person3 = {

            name: "jack",
            // 以前:
            eat: function (food) {

                console.log(this.name + "在吃" + food);
            },
            //箭头函数this不能使用,对象.属性
            eat2: food => console.log(person3.name + "在吃" + food),
            eat3(food) {

                console.log(this.name + "在吃" + food);
            }
        }

        person3.eat("香蕉");
        person3.eat2("苹果")
        person3.eat3("橘子");

        //4)、对象拓展运算符

        // 1、拷贝对象(深拷贝)
        let p1 = {
       name: "Amy", age: 15 }
        let someone = {
       ...p1 }
        console.log(someone)  //{name: "Amy", age: 15}

        // 2、合并对象
        let age1 = {
       age: 15 }
        let name1 = {
       name: "Amy" }
        let p2 = {
      name:"zhangsan"}
        p2 = {
       ...age1, ...name1 }
        console.log(p2)
    script>
body>

html>
小结
- 可以获取map的键值对等
Object.keys()、values、entries - Object.assgn(target,source1,source2) 合并
- const person2 = { age, name }//声明对象简写
- …代表取出该对象所有属性拷贝到当前对象。let someone = { …p1 }
E6-map和reduce
<html lang="en">
<head>
    <meta charset="UTF-8">
    <meta name="viewport" content="width=device-width, initial-scale=1.0">
    <meta http-equiv="X-UA-Compatible" content="ie=edge">
    <title>Documenttitle>
head>
<body>

    <script>
        //数组中新增了map和reduce方法。
        //map():接收一个函数,将原数组中的所有元素用这个函数处理后放入新数组返回。
         let arr = ['1', '20', '-5', '3'];

        //  arr = arr.map((item)=>{

        //     return item*2
        //  });
         arr = arr.map(item=> item*2);


         console.log(arr);
        //reduce() 为数组中的每一个元素依次执行回调函数,不包括数组中被删除或从未被赋值的元素,
        //[2, 40, -10, 6]
        //arr.reduce(callback,[initialValue])
        /**
         1、previousValue (上一次调用回调返回的值,或者是提供的初始值(initialValue))
    2、currentValue (数组中当前被处理的元素)
    3、index (当前元素在数组中的索引)
    4、array (调用 reduce 的数组)*/
        let result = arr.reduce((a,b)=>{

            console.log("上一次处理后:"+a);
            console.log("当前正在处理:"+b);
            return a + b;
        },100);
        console.log(result)


    script>
body>
html>
小结
-
map处理,arr = arr.map(item=> item*2);
-
reduce。arr.reduce((原来的值,处理后的值即return的值)=>{
ES6-promise异步编排
<html lang="en">
<head>
    <meta charset="UTF-8">
    <meta name="viewport" content="width=device-width, initial-scale=1.0">
    <meta http-equiv="X-UA-Compatible" content="ie=edge">
    <title>Documenttitle>
    <script src="https://cdn.bootcss.com/jquery/3.4.1/jquery.min.js">script>
head>
<body>
    <script>
        //1、查出当前用户信息
        //2、按照当前用户的id查出他的课程
        //3、按照当前课程id查出分数
        // $.ajax({

        //     url: "mock/user.json",
        //     success(data) {

        //         console.log("查询用户:", data);
        //         $.ajax({

        //             url: `mock/user_corse_${data.id}.json`,
        //             success(data) {

        //                 console.log("查询到课程:", data);
        //                 $.ajax({

        //                     url: `mock/corse_score_${data.id}.json`,
        //                     success(data) {

        //                         console.log("查询到分数:", data);
        //                     },
        //                     error(error) {

        //                         console.log("出现异常了:" + error);
        //                     }
        //                 });
        //             },
        //             error(error) {

        //                 console.log("出现异常了:" + error);
        //             }
        //         });
        //     },
        //     error(error) {

        //         console.log("出现异常了:" + error);
        //     }
        // });


        //1、Promise可以封装异步操作
        // let p = new Promise((resolve, reject) => { //传入成功解析,失败拒绝
        //     //1、异步操作
        //     $.ajax({

        //         url: "mock/user.json",
        //         success: function (data) {

        //             console.log("查询用户成功:", data)
        //             resolve(data);
        //         },
        //         error: function (err) {

        //             reject(err);
        //         }
        //     });
        // });

        // p.then((obj) => { //成功以后做什么
        //     return new Promise((resolve, reject) => {

        //         $.ajax({

        //             url: `mock/user_corse_${obj.id}.json`,
        //             success: function (data) {

        //                 console.log("查询用户课程成功:", data)
        //                 resolve(data);
        //             },
        //             error: function (err) {

        //                 reject(err)
        //             }
        //         });
        //     })
        // }).then((data) => { //成功以后干什么
        //     console.log("上一步的结果", data)
        //     $.ajax({

        //         url: `mock/corse_score_${data.id}.json`,
        //         success: function (data) {

        //             console.log("查询课程得分成功:", data)
        //         },
        //         error: function (err) {

        //         }
        //     });
        // })

        function get(url, data) {
       //自己定义一个方法整合一下
            return new Promise((resolve, reject) => {

                $.ajax({

                    url: url,
                    data: data,
                    success: function (data) {

                        resolve(data);
                    },
                    error: function (err) {

                        reject(err)
                    }
                })
            });
        }

        get("mock/user.json")
            .then((data) => {

                console.log("用户查询成功~~~:", data)
                return get(`mock/user_corse_${
        data.id}.json`);
            })
            .then((data) => {

                console.log("课程查询成功~~~:", data)
                return get(`mock/corse_score_${
        data.id}.json`);
            })
            .then((data)=>{

                console.log("课程成绩查询成功~~~:", data)
            })
            .catch((err)=>{
       //失败的话catch
                console.log("出现异常",err)
            });

    script>
body>

html>
corse_score_10.json 得分
{

    "id": 100,
    "score": 90
}
user.json 用户
{

    "id": 1,
    "name": "zhangsan",
    "password": "123456"
}
user_corse_1.json 课程
{

    "id": 10,
    "name": "chinese"
}
小结
以前嵌套ajax的时候很繁琐。
- 把Ajax封装到Promise中,赋值给let p
- 在Ajax中成功使用resolve(data),失败使用reject(err)
- p.then().catch()
ES6-模块化
模块化就是把代码进行拆分,方便重复利用。类似于java中的导包,而JS换了个概念,是导模块。
模块功能主要有两个命令构成 export 和import
- export用于规定模块的对外接口
- import用于导入其他模块提供的功能
user.js
var name = "jack"
var age = 21
function add(a,b){

    return a + b;
}

export {
     name,age,add}
hello.js
// export const util = {

//     sum(a, b) {

//         return a + b;
//     }
// }

export default {

    sum(a, b) {

        return a + b;
    }
}
// export {util}

//`export`不仅可以导出对象,一切JS变量都可以导出。比如:基本类型变量、函数、数组、对象。
main.js
import abc from "./hello.js"
import {
     name,add} from "./user.js"

abc.sum(1,2);
console.log(name);
add(1,3);
vue-介绍&helloword
MVVM思想
- M:module 包括数据和一些基本操作
- V:view 视图,页面渲染结果
- VM:View-module,模型与视图间的双向操作(无需开发人员干涉)
视图和数据通过VM绑定起来,模型里有变化会自动地通过Directives填写到视图中,视图表单中添加了内容也会自动地通过DOM Listeners保存到模型中。
教程:https://cn.vuejs.org/v2/guide/
安装:
- 直接下载并用