Java框架知识点梳理(含springboot、Mybatis)
文章目录
- 前言
- 正文
-
- 1.Spring的启动流程
- 2.Spring IOC如何实现 (DefaultListAbleBeanFactory)
- 3.Spring AoP如何实现,有什么作用
- 4.Spring事务传播机制有哪几种
- 5.Spring Bean的注入方式
- 6.Bean的生命周期和作用范围
- 7.BeanFactory、FactoryBean 和 ApplicationContext 的区别?
- 8.Spring如何解决循环依赖
- 9.Spring如何实现懒加载
- 10.Springboot启动流程(自动配置原理)
- 10.Spring和Springboot的区别
- 11.SpringBoot的SPI机制是如何实现的
-
- 【实例】自定义starter
- 12.SpringMVC的工作流程
- 13.SpringCloud的各种组件
- 14. Mybatis 的优缺点?
- 15. Mybatis 的 XML 文件有哪些标签属性?
- 16. Mybatis 缓存
- 17. Mybatis 原理
- 18. Mybatis #{} 和 ${} 的区别?
前言
用了springboot很久,也看过源码,但是一直没有机会专门总结一下spring和Mybatis的很多关键技术点和工作流程等,借秋招之际,准备好好复盘一下,姑妄试之。
正文
1.Spring的启动流程
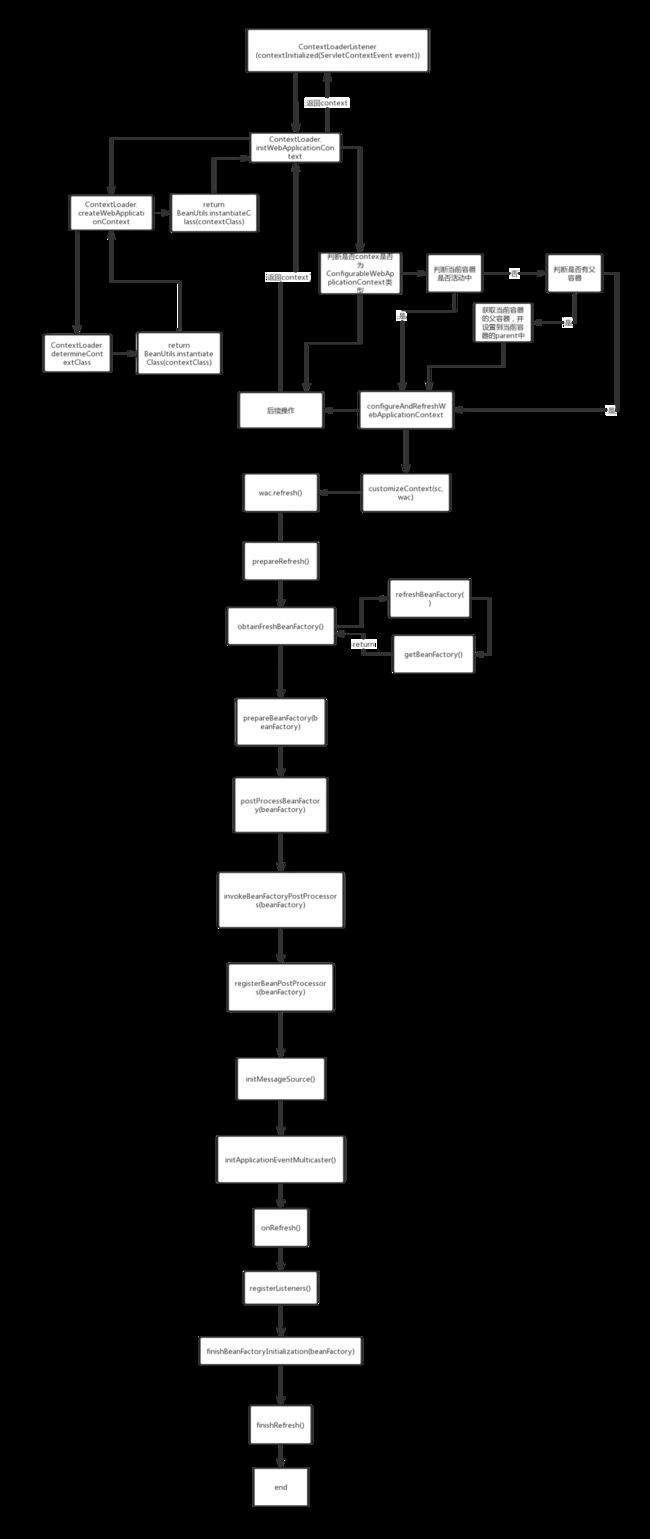
Spring的启动过程实际上就是IOC容器初始化以及载入Bean的过程。Spring是通过web.xml文件中配置的ContextLoaderListener监听器来进行容器初始化的。web.xml中配置各种监听、过滤器,servlet等,一般web.xml文件配置如下:
<listener>
     <listener-class>org.springframework.web.context.ContextLoaderListener
     </listener-class>
</listener>
<context-param>
    <param-name>contextConfigLocation</param-name>
    <param-value>classpath:applicationContext.xml</param-value>
</context-param>
对于IOC容器初始化,可以分为以下三步(留个印象):
- step1:创建一个WebApplicationContext
- step2:配置并且刷新Bean(refresh方法)
- step3:将容器初始化到servlet上下文中
第一步中,ContextLoaderListener监听器(上下文加载监听器,spring容器的启动就从这里开始)继承了ContextLoader,并且重写了ServletContextListener中的contextInitialized和contextDestroyed方法。在contextInitialized方法中,通过调用父类(ContextLoader)的initWebApplicationContext方法进行容器创建:
简单来说,ContextLoaderListener是一个实现了ServletContextListener接口的监听器,在启动项目时会触发它的contextInitialized方法(该方法主要完成ApplicationContext对象的创建),在关闭项目时会触发contextDestroyed方法(该方法会执行ApplicationContext清理操作)。
@Override
public void contextInitialized(ServletContextEvent event) {

    initWebApplicationContext(event.getServletContext());
}
关于initWebApplicationContext的源码:
public WebApplicationContext initWebApplicationContext(ServletContext servletContext) {

    //1:判断当前容器是否存在,如果存在则报容器已经存在的异常信息
    if (servletContext.getAttribute(WebApplicationContext.ROOT_WEB_APPLICATION_CONTEXT_ATTRIBUTE) != null) {

      throw new IllegalStateException(
          "Cannot initialize context because there is already a root application context present - " +
          "check whether you have multiple ContextLoader* definitions in your web.xml!");
    }
    Log logger = LogFactory.getLog(ContextLoader.class);
    //下面这个日志就是我们经常在启动Spring项目时看到的日志信息:
    //Initializing Spring root WebApplicationContext
    //Root WebApplicationContext: initialization started
    servletContext.log("Initializing Spring root WebApplicationContext");
    if (logger.isInfoEnabled()) {

      logger.info("Root WebApplicationContext: initialization started");
    }
    long startTime = System.currentTimeMillis();

    try {

      // Store context in local instance variable, to guarantee that
      // it is available on ServletContext shutdown.
      //如果当前容器为null,则创建一个容器,并将servletContext上下文作为参数传递进去,
      if (this.context == null) {

      	//**第一步,创建一个webapplicationcontext**
        this.context = createWebApplicationContext(servletContext);
      }
       //判断当前容器是否为可配置的,只有是Configurable的容器,才能进行后续的配置
      if (this.context instanceof ConfigurableWebApplicationContext) {

        ConfigurableWebApplicationContext cwac = (ConfigurableWebApplicationContext) this.context;
        if (!cwac.isActive()) {

          // The context has not yet been refreshed -> provide services such as
          // setting the parent context, setting the application context id, etc
          if (cwac.getParent() == null) {

            // The context instance was injected without an explicit parent ->
            // determine parent for root web application context, if any.
            ApplicationContext parent = loadParentContext(servletContext);
            cwac.setParent(parent);
          }
           //**三步走中的第二步:配置并且刷新当前容器**
          configureAndRefreshWebApplicationContext(cwac, servletContext);
        }
      }
       //将配置并且刷新过的容器存入servlet上下文中,并以WebApplicationContext的类名作为key值

    servletContext.setAttribute(WebApplicationContext.ROOT_WEB_APPLICATION_CONTEXT_ATTRIBUTE, this.context);

      ClassLoader ccl = Thread.currentThread().getContextClassLoader();
      if (ccl == ContextLoader.class.getClassLoader()) {

        currentContext = this.context;
      }
      else if (ccl != null) {

        currentContextPerThread.put(ccl, this.context);
      }

      if (logger.isDebugEnabled()) {

        logger.debug("Published root WebApplicationContext as ServletContext attribute with name [" +
            WebApplicationContext.ROOT_WEB_APPLICATION_CONTEXT_ATTRIBUTE + "]");
      }
      if (logger.isInfoEnabled()) {

        long elapsedTime = System.currentTimeMillis() - startTime;
        logger.info("Root WebApplicationContext: initialization completed in " + elapsedTime + " ms");
      }
       //返回创建好的容器
      return this.context;
    }
    catch (RuntimeException ex) {

      logger.error("Context initialization failed", ex);

//第三步,放入servlet context中
servletContext.setAttribute(WebApplicationContext.ROOT_WEB_APPLICATION_CONTEXT_ATTRIBUTE, ex);
      throw ex;
    }
    catch (Error err) {

      logger.error("Context initialization failed", err);

	// Binds an object to a given attribute name in this servlet context.
      servletContext.setAttribute(WebApplicationContext.ROOT_WEB_APPLICATION_CONTEXT_ATTRIBUTE, err);
      throw err;
    }
  }
总结:
- 创建 WebApplicationContext;
- 加载对应的Spring文件创建里面的Bean实例;
- 将WebApplicationContext放入 ServletContext(Java Web的全局变量)中。【看到这里,一定有和多人和我一样疑惑servletContext的定义,或者概念模糊了,看这里:传送门】
第一步,关于createWebApplicationContext()方法的源码:
protected WebApplicationContext createWebApplicationContext(ServletContext sc) {

    //首先来确定context是由什么类定义的,并且判断当前容器是否为可配置的
    Class<?> contextClass = determineContextClass(sc);
    if (!ConfigurableWebApplicationContext.class.isAssignableFrom(contextClass)) {

      throw new ApplicationContextException("Custom context class [" + contextClass.getName() +
          "] is not of type [" + ConfigurableWebApplicationContext.class.getName() + "]");
    }
    //创建可配置的上下文容器
    return (ConfigurableWebApplicationContext) BeanUtils.instantiateClass(contextClass);
  }
关于这其中determineContextClass()方法的源码:
protected Class<?> determineContextClass(ServletContext servletContext) {

    //首先从web.xml中查看用户是否自己定义了context
    String contextClassName = servletContext.getInitParameter(CONTEXT_CLASS_PARAM);
    //如果有,则通过反射创建实例
    if (contextClassName != null) {

      try {

        return ClassUtils.forName(contextClassName, ClassUtils.getDefaultClassLoader());
      }
      catch (ClassNotFoundException ex) {

        throw new ApplicationContextException(
            "Failed to load custom context class [" + contextClassName + "]", ex);
      }
    }
    /*如果没有,则去defaultStrategies里面取【defaultStrategies是Propertites类的对象,在ContextLoader中的静态代码块中初始化的;具体可看下面】;默认容器是XmlWebApplicationContext*/
  else {

   contextClassName = defaultStrategies.getProperty(WebApplicationContext.class.getName());
      try {

        return ClassUtils.forName(contextClassName, ContextLoader.class.getClassLoader());
      }
      catch (ClassNotFoundException ex) {

        throw new ApplicationContextException(
            "Failed to load default context class [" + contextClassName + "]", ex);
      }
    }
  }
这个方法的主要工作就是,获取初始化参数contextClass,如果我们在web.xml中配置了该参数,则使用ClassUtils.forName(contextClassName, ClassUtils.getDefaultClassLoader()),即前面提到的上下文对象。如果没有在web.xml中配置该参数,则会进入else处理逻辑,加载默认的配置项,defaultStrategies的初始化代码为:
static {

        // Load default strategy implementations from properties file.
        // This is currently strictly internal and not meant to be customized
        // by application developers.
        try {

            ClassPathResource resource = new ClassPathResource(DEFAULT_STRATEGIES_PATH, ContextLoader.class);
            defaultStrategies = PropertiesLoaderUtils.loadProperties(resource);
        }
        catch (IOException ex) {

            throw new IllegalStateException("Could not load 'ContextLoader.properties': " + ex.getMessage());
        }
    }
读取spring默认的上下文类,全文搜索一下这个DEFAULT_STRATEGIES_PATH文件:
org.springframework.web.context.WebApplicationContext= \\
org.springframework.web.context.support.XmlWebApplicationContext
默认的WebApplicationContextd的类型为XmlWebApplicationContext。determineContextClass方法返回后就可以利用反射来加载这个applicationContext上下文对象并且返回。
之后返回createApplicationContext方法继续执行逻辑,首先判断指定的webApplicationContext是否是ConfigurableWebApplicationContext类型,如果不是则抛出异常终止容器启动,如果是则实例化该webApplicationContext对象,这里我们就是创建XmlWebApplicationContext对象,并返回到initWebApplicationContext方法中。到此整个spring容器的初始化就完成了,也就是容器启动完成了。至此,上述第一步即完成。
2.Spring IOC如何实现 (DefaultListAbleBeanFactory)
第二步,加载对应的Spring文件创建里面的Bean实例(接前问)
主要的方法就是configureAndRefreshWebApplicationContext()方法,参数是上一步确定的xmlWebApplicationContext:
protected void configureAndRefreshWebApplicationContext(ConfigurableWebApplicationContext wac, ServletContext sc) {

        if (ObjectUtils.identityToString(wac).equals(wac.getId())) {

            // The application context id is still set to its original default value
            // -> assign a more useful id based on available information
            String idParam = sc.getInitParameter(CONTEXT_ID_PARAM);
            if (idParam != null) {

                wac.setId(idParam);
            }
            else {

                // Generate default id...
                wac.setId(ConfigurableWebApplicationContext.APPLICATION_CONTEXT_ID_PREFIX +
                        ObjectUtils.getDisplayString(sc.getContextPath()));
            }
        }

        wac.setServletContext(sc);
        String configLocationParam = sc.getInitParameter(CONFIG_LOCATION_PARAM);
        if (configLocationParam != null) {

            wac.setConfigLocation(configLocationParam);
        }

        // The wac environment's #initPropertySources will be called in any case when the context
        // is refreshed; do it eagerly here to ensure servlet property sources are in place for
        // use in any post-processing or initialization that occurs below prior to #refresh
        ConfigurableEnvironment env = wac.getEnvironment();
        if (env instanceof ConfigurableWebEnvironment) {

            ((ConfigurableWebEnvironment) env).initPropertySources(sc, null);
        }

        customizeContext(sc, wac);
        wac.refresh();
    }
customizeContext(sc, wac)初始化定制的容器,在此就不做深入,重点看一下wac.refresh()方法,它就是spring的各种bean创建的入口了。
以AbstractApplicationContext的refresh()为例,该方法的主要内容如下 :
【beanFactory与applicationContext】
@Override
    public void refresh() throws BeansException, IllegalStateException {

        synchronized (this.startupShutdownMonitor) {

            // Prepare this context for refreshing.
            //刷新前预处理工作:
            //1-设置启动的时间戳:
			//2-设置容器为未关闭状态
			//3-设置容器为活动状态
			//4-在上下文环境中初始化任何占位符属性源 initPropertySources() 给子类留空,可以在子类自定义个性化的属性设置
			//5-在环境变量中验证必须的属性  用属性解析器resolver校验属性合法等
			//6-初始化上下文事件容器(本质是一个LinkedHashSet)保存容器中早期events,等派发器ok就可以派发出去
            prepareRefresh();

            // Tell the subclass to refresh the internal bean factory.
            //获取bean工厂:
	            //1.refreshBeanFactory(),刷新beanFactory,该方法的具体实现在
	            //AbstractRefreshableApplicationContext中,如果已经存在了
	            //beanFactory,先销毁所有的单例bean,然后关闭beanFactory,接着就开始创
	            //建beanFactory,

            	//1.2.refreshBeanFactory(),在GenericApplicationContext类中创建一个
            	//bean factory对象DefaultListAbleBeanFactory,并设置序列化ID

				//2.getBeanFactory():返回刚创建好的BeanFactory。

				//3.定制beanFacotory属性(allowBeanDefinitionOverriding和
				//allowCircularReferences),之后这开始加载bean定义-
				//loadBeanDefinitions(beanFactory),加载bean定义这里就变得比较灵活
				//了,不同的webApplocationContext都有自己的实现方式
            ConfigurableListableBeanFactory beanFactory = obtainFreshBeanFactory();

			//以上创建了一个DefaultListAbleBeanFactory
			*******************************************

            // Prepare the bean factory for use in this context.
            //设置刚创建好的beanfactory
            	//1.设置beanfactory的类加载器、支持表达式解析器
            	//2.添加部分的beanPostProcessor,比如
            	//applicationContextAwareProcessor
            	//3.设置忽略的自动装配的接口,比如EnvironmentAware等
            	//注册可以解析的自动装配,可以在任何组件中自动注入:BeanFactory、
            	//ApplicationContext等
            	//4.添加ApplicationListenerDetector功能的BeanPostProcessor
            	//5.注册一些能用的组件:判断是否包含environment、systemProperties、
            	//systemEnvironment(map),如果存在则进行单例注册
            prepareBeanFactory(beanFactory);

            try {

                // Allows post-processing of the bean factory in context subclasses.beanfactory准备完成后进行的后置处理工作
                	//1.GenericApplicationContext子类可以重写这个方法beanfactory准备好后做进一步设置
                postProcessBeanFactory(beanFactory);

                // Invoke factory processors registered as beans in the context.
                //调用上下文中注册为bean的工厂处理器。执行beanfactoryPostProcessor:在BeanFactory标准初始化之后执行。
                //两个接口:BeanFactoryPostProcessor和
                //BeanDefinitionRegistryPostProcessor(两者中的方法会依次实现)
                //1)先获取所有的BeanDefinitionRegistryPostProcessor并按照优先级执行
                //(实现了PriorityOrdered接口,再是Ordered接口,最后是无实现接口)的
                //PostProcessBeanDefinitionRegistry方法(执行过的processor方法会放入ProcessedBeans中)
                //2)再执行BeanFactoryPostProcessor的postProcessBeanFactory方法
                invokeBeanFactoryPostProcessors(beanFactory);

                // Register bean processors that **intercept bean creation**.注册bean的后置处理器
                //1.按照优先级实例化和调用所有已注册(保存不执行)的BeanPostProcessor
                //(BeanPostProcessor、InstantiationAwareBeanPostProcessor、
                //MergedBeanDefinitionPostProcessor...都像前面一样有优先级,注册就是添加到beanfactory中)
				//如果给出显式顺序,则按顺序执行
				//必须在应用程序bean的任何实例化之前调用
				//其中的详细流程包含以下几步:
				//获取所有类型为BeanPostProcessor的bean的name的数组
				//添加BeanPostProcessorChecker子类的后置处理器
				//分离实现了PriorityOrdered、Ordered和其他接口的BeanPostProcessors
				//注册实现了PriorityOrdered的BeanPostProcessors
				//注册实现了Ordered的BeanPostProcessors
				//注册常规的BeanPostProcessors
				//最后重新排序,然后重新注册所有的BeanPostProcessors
				//将检测内部bean的后处理器重新注册为ApplicationListeners(监听),并将其移动到处理器链的末尾
                registerBeanPostProcessors(beanFactory);

                // Initialize message source for this context.
                //初始化MessageSource组件,主要为做国际化功能;消息绑定,消息解析做准备
                //1)获取beanfactory
                //2)看里面有没有id和类型为messagesource的组件,有则赋值给MessageSource,
                //无则用默认的DelegatingMessagSource,能按照区域获取配置中的值
                //3)把创建好的MessageSource注册在容器中,以后获取国际化配置文件的时候,可
                //以自动注入MessageSource组件
                initMessageSource();

                //Initialize event multicaster for this context.初始化事件派发器
                //首先会查看当前beanFactory中是否包含了名为
                //applicationEventMulticaster的bean,如果有则通过名称beanFactory中获
                //取这个bean,赋给当前容器的applicationEventMulticaster对象,无则创建
                //一个SimpleApplicationEventMulticaster,并添加到beanfactory中,可以自动注入
                initApplicationEventMulticaster();

                // Initialize other special beans in specific context subclasses.
                //留给子类重写,在容器中可以自定义逻辑
                onRefresh();

                // Check for listener beans and register them.注册进容器
                //从容器中拿到所有的ApplicationListener
                //将每个监听器添加到事件派发器中
                //派发之前步骤产生的事件earlyApplicationEvents
                registerListeners();

                // Instantiate all remaining (non-lazy-init) singletons.初始化所有剩下的单实例bean。
                //**整个容器最核心的部分**
                //1. 获取容器中所有bean,依次进行初始化创建对象
                //2.获取bean的定义信息:RootBeanDefinition
                //3.只作用于单实例、懒加载、并且不是抽象的bean
                	//1)判断是否为factory bean(是否实现FactoryBean接口)
                	//2)如果不是,用getBean(beanName)创建对象
                		//调用doGetBean
                		//调用getSingleton(),先获取缓存中的单实例bean(之前被创建过的,存在一个map里)
               		//3)缓存中获取不到,就开始bean的创建流程
               		//4)标记当前bean已经被创建
               		//5)获取bean的定义信息
               		//6)获取当前bean依赖的其他bean(depends-on),利用getBean()创建,先创建依赖bean
               		//7)启动单实例bean的创建流程
               			//1)createBean()
               			//2)resolveBeforeInstantiation():给个机会(返回代理对象)执行
               			//InstantiationAwareBeanPostProcessor的postProcessBeforeInstatiation方法,有返回值则继续执行postProcessAfterInstatiation方法
               			//3)如果上式没有返回代理对象 调用4
               			//4)调用doGetBean创建bean
               				//1)创建Bean实例:createBeanInstance()方法
               					//1)利用工厂方法或者对象的构造器创建出Bean实例
               				//2)applyMergedBeanDefinitionPostProcessors
               					//依次调用MergedBeanDefinitionPostProcessor的PostProcessMergedBeanDefinition方法
             		   	   //3)populateBean():bean属性赋值
             		   	   		//1)赋值之前,拿到并执行InstantiationAwareBeanPostProcessor的postProcessAfterInstatiation方法
             		   	   		//2)拿到并执行InstantiationAwareBeanPostProcessor的postProcessPropertyValues方法
             		   	   		===========赋值之前===================

             		   	   		//3)应用bean属性值,为属性利用setter方法进行赋值:applyPropertyValues()
            		   	   //4)【Bean初始化】initializeBean
            		   	   		//1)invokeAwareMethods():执行xxxAware接口的方法
            		   	   		//2)【执行后置处理器初始化之前的方法】applyBeanPostProcessorsBeforeInstantiation(),调用postProcessBeforeInstantiation方法。
            		   	   		//3)【执行初始化方法】invokeInitMethods:
            		   	   			1)判断是否为InitializingBean接口的实现,是则执行接口规定的初始化方法。
            		   	   			2)有自定义初始化方法则执行之
           		   	   			//4)【执行后置处理器初始化之后的方法】applyBeanPostProcessorsAfterInstantiation(),调用postProcessAfterInstatiation方法。
          		   	   	 //5)【注册bean的销毁方法】RegisterDisposable()方法
         		   	  //5)**将创建的bean添加到缓存中SingletonObjects(map实现),而这些
         		   	  ***************************************
         		   	  //缓存实际就是IOC容器,是很多的map**
         		   	  ******************************
      		   	 //所有的bean都利用getBean创建好之后:检查所有的Bean是否是SmartInitializeingsingleton接口的,如果是则执行afterSingletonsInstantiated方法。
                finishBeanFactoryInitialization(beanFactory);

                // Last step: publish corresponding event.完成BeanFactory的初始化创建工作
                //初始化生命周期相关的后置处理器LifeCycleProcessor,可以自定义子类,重写方法,完成拦截。
                //默认从容器中找,没有则用default的。
                //加入到容器中
                //onrefresh()
                //发布容器refresh完成事件publishEvent
                finishRefresh();
            }

            catch (BeansException ex) {

                if (logger.isWarnEnabled()) {

                    logger.warn("Exception encountered during context initialization - " +
                            "cancelling refresh attempt: " + ex);
                }

                // Destroy already created singletons to avoid dangling resources.
                destroyBeans();

                // Reset 'active' flag.
                cancelRefresh(ex);

                // Propagate exception to caller.
                throw ex;
            }

            finally {

                // Reset common introspection caches in Spring's core, since we
                // might not ever need metadata for singleton beans anymore...
                resetCommonCaches();
            }
        }
    }
核心:
1.spring容器启动的时候,首先保存所有注册进来的Bean定义信息BeanDefinition
a.XML注册bean
b.注解注册Bean @Service @Component @Bean
2.spring容器会再合适的时机创建bean:
a.用到这个Bean的时候,利用getBean创建这个Bean,创建好以后保存在容器中
b.统一创建剩下的所有Bean的时候:finishBeanFactoryInitialization()方法
3.后置处理器
每一个bean创建完成后,都会使用各种后置处理器进行处理,来增强bean的功能。比如:
AutoWiredAnnotationBeanPostProcessor:处理自动注入
AnnotationAwareAspectJAutoProxyCreator:AOP功能(代理对象)
4.事件驱动模型
ApplicationListener:事件监听
ApplicationEventMulticaster:事件派发器【拓展】
再次总结:
- 首先,对于一个web应用,其部署在web容器中,web容器提供其一个全局的上下文环境,这个上下文就是ServletContext,其为后面的spring IoC容器提供宿主环境;
- 其 次,在web.xml中会提供有contextLoaderListener。在web容器启动时,会触发容器初始化事件,此时 contextLoaderListener会监听到这个事件,其contextInitialized方法会被调用,在这个方法中,spring会初始化一个启动上下文,这个上下文被称为根上下文,即WebApplicationContext,这是一个接口类,确切的说,其实际的实现类是 XmlWebApplicationContext。这个就是spring的IoC容器,其对应的Bean定义的配置由web.xml中的context-param标签指定。
- 在这个IoC容器初始化完毕后,spring以WebApplicationContext.ROOTWEBAPPLICATIONCONTEXTATTRIBUTE为属性Key,将其存储到ServletContext中,便于获取;
补充:- 之后,contextLoaderListener监听器初始化完毕后,开始初始化web.xml中配置的Servlet,这里是DispatcherServlet,这个servlet实际上是一个标准的前端控制器,用以转发、匹配、处理每个servlet请求。DispatcherServlet上下文在初始化的时候会建立自己的IoC上下文,用以持有spring mvc相关的bean。【Servlet(Server Applet),全称Java Servlet。是用Java编写的服务器端程序。其主要功能在于交互式地浏览和修改数据,生成动态Web内容。】
- 在建立DispatcherServlet自己的IoC上下文时,会利用WebApplicationContext.ROOTWEBAPPLICATIONCONTEXTATTRIBUTE 先从ServletContext中获取之前的根上下文(即WebApplicationContext)作为自己上下文的parent上下文。
- 有了这个 parent上下文之后,再初始化自己持有的上下文。这个DispatcherServlet初始化自己上下文的工作在其initStrategies方法中可以看到,大概的工作就是初始化处理器映射、视图解析等。这个servlet自己持有的上下文默认实现类也是 mlWebApplicationContext。初始化完毕后,spring以与servlet的名字相关(此处不是简单的以servlet名为 Key,而是通过一些转换,具体可自行查看源码)的属性为属性Key,也将其存到ServletContext中,以便后续使用。这样每个servlet 就持有自己的上下文,即拥有自己独立的bean空间,同时各个servlet共享相同的bean,即根上下文(第2步中初始化的上下文)定义的那些 bean。【拓展】
最后,附上完整流程图
3.Spring AoP如何实现,有什么作用
没想到你还能坚持到这里?缘分!
那么在送你一份大礼,spring第二块难啃的骨头——AOP,没有基础的先去看这篇文章,虽然有些地方不是非常严谨但是通俗易懂,可以作为入门理解,后面细节可以慢慢理解透彻。
面向切面编程是指在程序运行期间动态将某段代码切入到指定方法的指定位置运行的编程方式。
以下所有内容都将围绕上述定义进行讲解!
AOP的实现技术有多种,一般分为动态织入和静态织入,动态织入的方式是在运行时动态将要增强的代码织入到目标类中,这样往往是通过动态代理技术完成的,如Java JDK的动态代理(Proxy,底层通过反射实现)或者CGLIB的动态代理(底层通过继承实现),Spring AOP采用的就是基于运行时增强的代理技术,这点后面会分析,这里主要重点分析一下静态织入,ApectJ采用的就是静态织入的方式。ApectJ主要采用的是编译期织入,在这个期间使用AspectJ的acj编译器(类似javac)把aspect类编译成class字节码后,在java目标类编译时织入,即先编译aspect类再编译目标类。
以下内容是基于AspectJ源码的解析。
使用:
- 将业务类和切面类都加入到容器中,@Aspect
- 在切面类的每个通知方法上标注通知注释,告诉此方法何时何位置执行@Before @After @AfterReturing @AfterThrowing @Around
- 开启基于注解的aop模式,@EnableAspectJAutoProxy
具体的使用例子可以参考这个--------》例子
AOP原理:
1)@EnableAspectJAutoProxy注解就是给容器中导入了一个AspectJAutoProxyRegistrar,利用它在容器中自定义注册bean:AnnotationAwareAspectJAutoProxyCreator
2)AnnotationAwareAspectJAutoProxyCreator多层实现了SmartInstantiationAwareBeanPostProcessor(bean初始化前后执行方法)和BeanFactoryAware接口(可传入bean factory)【工作量一变三】
流程:
1)传入配置类,创建IOC容器
2)注册配置类,调用refresh()刷新容器
3)registerBeanPostProcessors()注册bean的后置处理器用来拦截bean的生成
- 先获取容器中已经定义了的但还没创建对象的后置处理器(比如autowiredAnnotationProcessor)
- 给容器中加入其他的beanpostprocessor
- 优先注册实现了priorityOrder接口的beanpostProcessor。。。再依序
- 注册beanPostProcessor,实际就是创建它并加入容器(流程为创建bean,bean赋值,在初始化bean)
- 在初始化bean前后执行beanPostProcessor的postProcessBeforeInitialization和postProcessAfterInitialization方法。
至此创建和注册了AnnotationAwareAspectJAutoProxyCreator组件
之后,因为AnnotationAwareAspectJAutoProxyCreator实现了SmartInstantiationAwareBeanPostProcessor接口,所以它会在bean创建之前就尝试拦截(postprocessbefore/afterInstantiation),尝试返回一个代理对象,而其他的beanpostProcessor是在bean对象创建完成之后,初始化前后才调用其对应的前后(postprocessbefore/afterInitialization)方法。
1.在每一个bean创建之前,调用postProcessBeforeInstantiation方法
a.判断当前bean是否在advisedBean(需要增强的beans)中
b.判断是否为基础类的、PointCut、Advice、Aspect的Bean
c.判断是否需要跳过
2.在每一个bean创建之后,调用postProcessAfterInstantiation方法
a.获取bean的所有能在bean中使用的增强器(即通知方法),并排序
b.这些可用的增强器(eligibleAdvisors)换了个名字,拦截器(Interceptor)!
c.并且这些需要增强的bean也换了个名字,advisedBean!
d.创建当前advisedBean的代理对象:把所有的增强器放入proxyFactory -》创建动态代理对象(jdk原生 需要业务类实现接口;cglib 可以利用父子继承)
3.最终,给容器中返回使用了cglib增强后的组件(比如对象业务类 calculator)的代理对象。
最最后,使用的就是增强后的代理对象了,如何指向目标方法的呢?
-
进入CglibAopProxy的intercept()方法
-
根据ProxyFactory(回忆下,之前步骤保存过啥?)获取拦截器链chain
- intercepterList
- 遍历所有增强器,用AdvisorAdaptor将其转为interceptor()
-
如果没有拦截器链,直接执行目标方法
-
如果有,则用以上信息创建一个CglibMethodInvocation对象(返回一个拦截器链),调用其proceed方法。
-
拦截器的触发过程:(非常巧妙,务必看源码)
- 只有在没有拦截器或者拦截器索引等于拦截器数组长度减一时,执行目标方法。
- 链式获取每一个拦截器,并执行其invoke方法,每一个拦截器都等待下一个拦截器执行目标方法结束以后才执行目标方法。
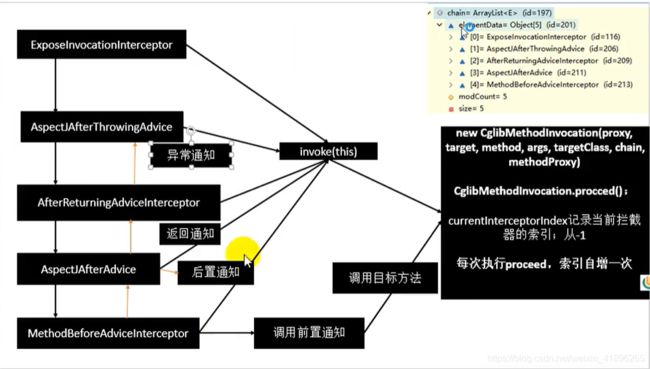
(截图来自于雷神的视频,受益良多,感恩。)
Spring AOP 使用了与 AspectJ 5 一样的注解,但仍然没有使用 AspectJ 的ajc编译器,底层依是动态代理技术的实现。
以上内容有一说一排版不咋地,但是却是AOP的精妙所在,本部分没有结合源码,建议大家先收藏再去看看源码部分,回头再看这里,你会豁然开朗。
推荐文章---->【拓展1】【拓展2】
拓展:
一. BeanPostProcessor—》bean的后置处理器—》bean创建对象初始化前后拦截工作
二. BeanFactoryPostProcessor----》beanFactory的后置处理器—》beanFactory标准初始化后,所有的beanDefinition已经保存进beanfactory但还未创建。这是我们可以利用BeanFactoryPostProcessor方法定制和修改BeanFactory。
流程:
- ioc容器创建对象。
- refresh()中的invokeBeanFactoryPostProcessors(beanFactory),执行BeanFactoryPostProcessor。过程是,先在beanFactory中找到所有BeanFactoryPostProcessors并依次执行,之后才是bean的初始化工作。
三、BeanDefinitionRegistryPostProcessor extends BeanFactoryPostProcessor—>postProcessBeanDefinitionRegistry方法—》在所有bean定义信息将被加载,但还未实例化时执行,所以是先于BeanFactoryPostProcessor执行的。这样我们可以额外添加自定义postprocessor并自定义bean定义信息。
流程:


- 创建ioc容器
- 先从容器中获取所有BeanDefinitionRegistryPostProcessor并依次执行postProcessBeanDefinitionRegistry方法
- 之后再执行postProcessBeanFactory
四、ApplicationListener—》监听容器中发布的事件,事件驱动模型开发,需要实现ApplicationListener接口,重写方法onApplicationEvent(ApplcaitionEvent event)
比如:
步骤:
- 写一个监听器监听某个事件(ApplicationEvent子类)
- 把监听器加入容器中
- 容器中有相关时间发布,则触发方法
- (可以用ApplicatinContext.publishEvent发布事件)
原理:- 创建容器对象 refresh()
- finishRefresh方法中,publishEvent()—》getApplicationEventMulticaster(),遍历容器中所有的Listener----》有异步执行的用executor执行—》没有的invokeListener(Listener,event)----》回调Listener的onApplicationEvent(event)方法(可以自定义需要listen哪些event)
3.无论是用ac发还是自己发布事件,都是以上流程
4.其他关于多播器(ApplicationEventMulticaster())初始化和先后顺序,以及监听器注册等,请看第一问详解。注意也可以用@EventListener注解(原理是利用EventListenerMethodProcessor解析注解,它实现了SmartInitialzingSingleton接口,初始化bean之后,执行它的AfterSingletonInstantiated()方法),之后全部创建结束后发布完成事件。

4.Spring事务传播机制有哪几种
(前面是引子,后面会回答问题)
Spring并不直接管理事务,而是提供了多种事务管理器,他们将事务管理的职责委托给Hibernate或者JTA等持久化机制所提供的相关平台框架的事务来实现。所以Spring事务管理的一个优点就是为不同的事务API提供一致的编程模型,如JTA、JDBC、Hibernate、JPA。
spring提供的统一接口如下:
Public interface PlatformTransactionManager()...{

    // 由TransactionDefinition得到TransactionStatus对象
    TransactionStatus getTransaction(TransactionDefinition definition) throws TransactionException;
    // 提交
    Void commit(TransactionStatus status) throws TransactionException;
    // 回滚
    Void rollback(TransactionStatus status) throws TransactionException;
    }
spring事务管理可以表示如下:

事务管理器接口PlatformTransactionManager通过getTransaction(TransactionDefinition definition)方法来得到事务,这个方法里面的参数是TransactionDefinition类,这个类就定义了一些基本的事务属性。TransactionDefinition接口内容如下:
public interface TransactionDefinition {

    int getPropagationBehavior(); // 返回事务的传播行为,本题问
    int getIsolationLevel(); // 返回事务的隔离级别,事务管理器根据它来控制另外一个事务可以看到本事务内的哪些数据
    int getTimeout();  // 返回事务必须在多少秒内完成
    boolean isReadOnly(); // 事务是否只读,事务管理器能够根据这个返回值进行优化,确保事务是只读的
}
1)事务的第一个方面是传播行为(propagation behavior)。当事务方法被另一个事务方法调用时,必须指定事务应该如何传播。例如:方法可能继续在现有事务中运行,也可能开启一个新事务,并在自己的事务中运行。Spring定义了七种传播行为:【拓展】
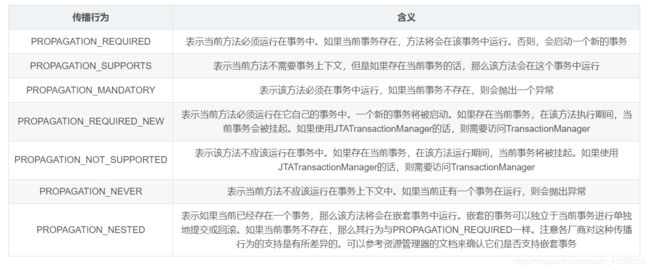
【拓展】
2)隔离级别定义了一个事务可能受其他并发事务影响的程度。
编程式和声明式事务的区别:
Spring提供了对编程式事务和声明式事务的支持,编程式事务允许用户在代码中精确定义事务的边界,而声明式事务(基于AOP)有助于用户将操作与事务规则进行解耦。
简单地说,编程式事务侵入到了业务代码里面,但是提供了更加详细的事务管理;而声明式事务由于基于AOP,所以既能起到事务管理的作用,又可以不影响业务代码的具体实现。
事务管理的原理:

核心就是再执行拦截器链时,如果发生异常就直接回滚。

5.Spring Bean的注入方式
注册:@Bean @Configuration @ComponentScan @Import @Component
注入:@Resource和@Autowired:
@Resource默认是使用byName进行装配,@Autowired默认使用byType进行装配。
@Component 把当前类对象存入 Spring 容器中,相当于在 xml 中配置一个 bean 标签。value 属性指定 bean 的 id,默认使用当前类的首字母小写的类名。
@Controller,@Service,@Repository 三个注解都是 @Component 的衍生注解,作用及属性都是一模一样的。只是提供了更加明确语义,@Controller 用于表现层,@Service用于业务层,@Repository用于持久层。如果注解中有且只有一个 value 属性要赋值时可以省略 value。
如果想将第三方的类变成组件又没有源代码,也就没办法使用 @Component 进行自动配置,这种时候就要使用 @Bean 注解。被 @Bean 注解的方法返回值是一个对象,将会实例化,配置和初始化一个新对象并返回,这个对象由 Spring 的 IoC 容器管理。name 属性用于给当前 @Bean 注解方法创建的对象指定一个名称,即 bean 的 id。当使用注解配置方法时,如果方法有参数,Spring 会去容器查找是否有可用 bean对象,查找方式和 @Autowired 一样。
6.Bean的生命周期和作用范围
生命周期:
在 IoC 容器的初始化过程中会对 Bean 定义完成资源定位,加载读取配置并解析,最后将解析的 Bean 信息放在一个 HashMap 集合中。当 IoC 容器初始化完成后,会进行对 Bean 实例的创建和依赖注入过程,注入对象依赖的各种属性值,在初始化时可以指定自定义的初始化方法。经过这一系列初始化操作后 Bean 达到可用状态,接下来就可以使用 Bean 了,当使用完成后会调用 destroy 方法进行销毁,此时也可以指定自定义的销毁方法,最终 Bean 被销毁且从容器中移除。
XML 方式通过配置 bean 标签中的 init-Method 和 destory-Method 指定自定义初始化和销毁方法。
注解方式通过 @PreConstruct 和 @PostConstruct 注解指定自定义初始化和销毁方法。
作用范围:
过 scope 属性指定 bean 的作用范围,包括:
① singleton:单例模式,是默认作用域,不管收到多少 Bean 请求每个容器中只有一个唯一的 Bean 实例。
② prototype:原型模式,和 singleton 相反,每次 Bean 请求都会创建一个新的实例。
③ request:每次 HTTP 请求都会创建一个新的 Bean 并把它放到 request 域中,在请求完成后 Bean 会失效并被垃圾收集器回收。
④ session:和 request 类似,确保每个 session 中有一个 Bean 实例,session 过期后 bean 会随之失效。
⑤ global session:当应用部署在 Portlet 容器时,如果想让所有 Portlet 共用全局存储变量,那么该变量需要存储在 global session 中。
7.BeanFactory、FactoryBean 和 ApplicationContext 的区别?
BeanFactory 是一个 Bean 工厂,使用简单工厂模式,是 Spring IoC 容器顶级接口,BeanFactory定义了IOC容器的最基本形式,并提供了IOC容器应遵守的的最基本的接口,也就是Spring IOC所遵守的最底层和最基本的编程规范。
Spring容器给出了很多种实现,如 DefaultListableBeanFactory。作用是管理 Bean,包括实例化、定位、配置对象及建立这些对象间的依赖。BeanFactory 实例化后并不会自动实例化 Bean,只有当 Bean 被使用时才实例化与装配依赖关系,属于延迟加载,适合多例模式。
FactoryBean 是一个工厂 Bean,,能生产或者修饰对象生成的工厂Bean,可以通过实现该接口,提供一个工厂方法来自定义实例化 Bean 的逻辑。FactoryBean 接口由 BeanFactory 中配置的对象实现,这些对象本身就是用于创建对象的工厂,如果一个 Bean 实现了这个接口,那么它就是创建对象的工厂 Bean,而不是 Bean 实例本身。当配置文件中的class属性配置的实现类是FactoryBean时,通过getBean()方法返回的不是FactoryBean本身,而是FactoryBean#getObject()方法所返回的对象,相当于FactoryBean#getObject()代理了getBean()方法。当调用getBean(“car”)时,Spring通过反射机制发现CarFactoryBean实现了FactoryBean的接口,这时Spring容器就调用接口方法CarFactoryBean#getObject()方法返回。【拓展】
ApplicationConext 是 BeanFactory 的子接口,扩展了 BeanFactory 的功能,继承BeanFactory接口,它是Spring的一更高级的容器,提供了更多的有用的功能:【拓展】
-
国际化(MessageSource)
-
访问资源,如URL和文件(ResourceLoader)
-
载入多个(有继承关系)上下文 ,使得每一个上下文都专注于一个特定的层次,比如应用的web层
-
消息发送、响应机制(ApplicationEventPublisher)
-
AOP(拦截器)
容器会在初始化时对配置的 Bean 进行预实例化,Bean 的依赖注入在容器初始化时就已经完成,属于立即加载,适合单例模式,一般推荐使用。
8.Spring如何解决循环依赖
spring单例对象的初始化大略分为三步:
- createBeanInstance:实例化,其实也就是调用对象的构造方法实例化对象
- populateBean:填充属性,这一步主要是对bean的依赖属性进行填充
- initializeBean:调用spring xml中的init 方法。
从上面讲述的单例bean初始化步骤我们可以知道,循环依赖主要发生在第一、第二步。也就是构造器循环依赖和field循环依赖。第一种直接抛出BeanCurrentlylnCreationException异常,第二种使用三级缓存。
/** Cache of singleton objects: bean name –> bean instance 一级缓存*/
private final Map singletonObjects = new ConcurrentHashMap(256);
/** Cache of early singleton objects: bean name –> bean instance 二级缓存*/
private final Map earlySingletonObjects = new HashMap(16);
/** Cache of singleton factories: bean name –> ObjectFactory 三级缓存*/
private final Map> singletonFactories = new HashMap>(16);
- singletonFactories : 进入实例化阶段的单例对象工厂的cache (三级缓存)
- earlySingletonObjects :完成实例化但是尚未初始化的,提前加入的单例对象的Cache (二级缓存)
- singletonObjects:完成初始化的单例对象的cache(一级缓存)
核心是以下AbstractBeanFactory里的doCreateBean()方法:
protected void addSingletonFactory(String beanName, ObjectFactory<?> singletonFactory) {

    Assert.notNull(singletonFactory, "Singleton factory must not be null");
    synchronized (this.singletonObjects) {

        if (!this.singletonObjects.containsKey(beanName)) {

        //在createBeanInstance之后,populateBean()之前,也就是说单例对象此时已经被创建
        //出来(调用了构造器)。这个对象已经被生产出来了,此时将这个对象提前曝光出来,让大家使用。
            this.singletonFactories.put(beanName, singletonFactory);
            this.earlySingletonObjects.remove(beanName);
            this.registeredSingletons.add(beanName);
        }
    }
}
总结:
对于“A的某个field或者setter依赖了B的实例对象,同时B的某个field或者setter依赖了A的实例对象”这种循环依赖的情况。A首先完成了初始化的第一步,并且将自己提前曝光到singletonFactories中,此时进行初始化的第二步,发现自己依赖对象B,此时就尝试去get(B),发现B还没有被create,所以走create流程,B在初始化第一步的时候发现自己依赖了对象A,于是尝试get(A),尝试一级缓存singletonObjects(肯定没有,因为A还没初始化完全),尝试二级缓存earlySingletonObjects(也没有),尝试三级缓存singletonFactories,由于A通过ObjectFactory将自己提前曝光了,所以B能够通过ObjectFactory.getObject拿到A对象(虽然A还没有初始化完全,但是总比没有好呀),B拿到A对象后顺利完成了初始化阶段1、2、3,完全初始化之后将自己放入到一级缓存singletonObjects中。此时返回A中,A此时能拿到B的对象顺利完成自己的初始化阶段2、3,最终A也完成了初始化,进去了一级缓存singletonObjects中,而且更加幸运的是,由于B拿到了A的对象引用,所以B现在hold住的A对象完成了初始化。【拓展】
9.Spring如何实现懒加载
针对单实例bean,Spring提供了懒加载机制。所谓的懒加载机制就是可以规定指定的bean不在启动时立即创建,而是在后续第一次用到时才创建,从而减轻在启动过程中对时间和内存的消耗。
注解@Lazy 或者 配置文件default-lazy-init=“true”
这部分原理第一问都可以找到,贴出该部分代码一目了然(前提是你吃透了IOC)。
看下面finishBeanFactoryInitialization(beanFactory)中的初始化non-lazy-init bean的函数 preInstantiateSingletons():
public void preInstantiateSingletons() throws BeansException {

   // 所有beanDefinition集合
   List<String> beanNames = new ArrayList<String>(this.beanDefinitionNames);
   // 触发所有非懒加载单例bean的初始化
   for (String beanName : beanNames) {

       // 获取bean 定义
      RootBeanDefinition bd = getMergedLocalBeanDefinition(beanName);
      // 判断是否是懒加载单例bean,如果是单例的并且不是懒加载的则在Spring 容器
      if (!bd.isAbstract() && bd.isSingleton() && !bd.isLazyInit()) {

          // 判断是否是FactoryBean
         if (isFactoryBean(beanName)) {

                final FactoryBean<?> factory = (FactoryBean<?>) getBean(FACTORY_BEAN_PREFIX + beanName);
                boolean isEagerInit;
                if (System.getSecurityManager() != null && factory instanceof SmartFactoryBean) {

                   isEagerInit = AccessController.doPrivileged(new PrivilegedAction<Boolean>() {

                      @Override
                      public Boolean run() {

                         return ((SmartFactoryBean<?>) factory).isEagerInit();
                      }
                   }, getAccessControlContext());
                }
         }else {

             // 如果是普通bean则进行初始化依赖注入,此 getBean(beanName)接下来触发的逻辑跟
             // context.getBean("beanName") 所触发的逻辑是一样的
            getBean(beanName);
         }
      }
   }
}
10.Springboot启动流程(自动配置原理)
(以下截图均来自于雷丰阳老师的教学视频)
先来个总体流程,扫一眼,留个印象(无非以下两个步骤):


- 启动类入口
@SpringBootApplication
public class Application {

    public static void main(String[] args) {

        SpringApplication.run(Application.class, args);
        ****************  ****
    }
}
- @SpringBootApplication注解
@Target(ElementType.TYPE) // 注解的适用范围,其中TYPE用于描述类、接口(包括包注解类型)或enum声明
@Retention(RetentionPolicy.RUNTIME) // 注解的生命周期,保留到class文件中(三个生命周期)
@Documented // 表明这个注解应该被javadoc记录
@Inherited // 子类可以继承该注解
@SpringBootConfiguration // 继承了Configuration,表示当前是注解类
@EnableAutoConfiguration // 开启springboot的注解功能,springboot的四大神器之一,其借助@import的帮助
@ComponentScan(excludeFilters = {
      // 扫描路径设置(具体使用待确认)
@Filter(type = FilterType.CUSTOM, classes = TypeExcludeFilter.class),
@Filter(type = FilterType.CUSTOM, classes = AutoConfigurationExcludeFilter.class) })
public @interface SpringBootApplication {

...
}
几个重要的事件回调机制:
配置在META-INF/spring.factories
ApplicationContextInitializer
SpringApplicationRunListener
只需要放在ioc容器中:
ApplicationRunner
CommandLineRunner
启动流程:
1、创建SpringApplication对象
核心在执行此类的initialize(sources方法,实际是new了一个SpringApplication类,并配置其相关属性。
initialize(sources);
private void initialize(Object[] sources) {

    //保存主配置类,sources来自于主配置类的参数
    if (sources != null && sources.length > 0) {

        this.sources.addAll(Arrays.asList(sources));
    }
    //判断当前是否一个web应用
    this.webEnvironment = deduceWebEnvironment();

    //**从类路径下找到META-INF/spring.factories配置的所有ApplicationContextInitializer;然后保存起来**
    setInitializers((Collection) getSpringFactoriesInstances(
        ApplicationContextInitializer.class));
    //从类路径下找到META-INF/spring.factories配置的所有ApplicationListener
    setListeners((Collection) getSpringFactoriesInstances(ApplicationListener.class));
    //从多个配置类中找到有main方法的主配置类,确定一个主配置类
    this.mainApplicationClass = deduceMainApplicationClass();
}


以上主要工作就是在类路径下找到META-INF/spring.factories配置的所有ApplicationContextInitializer和ApplicationListener,并保存。
2、运行run方法
执行配置好的类的SpringApplication中的run方法:
public ConfigurableApplicationContext run(String... args) {

   StopWatch stopWatch = new StopWatch();
   stopWatch.start();
   ConfigurableApplicationContext context = null;
   FailureAnalyzers analyzers = null;
   configureHeadlessProperty();

   //*获取SpringApplicationRunListeners;从类路径下META-INF/spring.factories获取************
   SpringApplicationRunListeners listeners = getRunListeners(args);
    //回调所有的获取SpringApplicationRunListener.starting()方法
   listeners.starting();
   try {

       //封装命令行参数
      ApplicationArguments applicationArguments = new DefaultApplicationArguments(
            args);
      //准备环境
      ConfigurableEnvironment environment = prepareEnvironment(listeners,
            applicationArguments);
       		//创建环境完成后回调SpringApplicationRunListener.environmentPrepared();表示环境准备完成
       //打印图标
      Banner printedBanner = printBanner(environment);

       //创建ApplicationContext;决定反射创建web的ioc还是普通的ioc
       *********************************************
      context = createApplicationContext();

      analyzers = new FailureAnalyzers(context);

       //准备上下文环境;将environment保存到ioc中;而且applyInitializers();
       //applyInitializers():回调之前保存的所有的ApplicationContextInitializer的initialize方法
         *******************
       //回调所有的SpringApplicationRunListener的contextPrepared();
      prepareContext(context, environment, listeners, applicationArguments,
            printedBanner);
       //prepareContext运行完成以后回调所有的SpringApplicationRunListener的contextLoaded();

       //刷新容器;ioc容器初始化(如果是web应用还会创建嵌入式的Tomcat);Spring注解版
       **********************
       //扫描,创建,加载所有组件的地方;(配置类,组件,自动配置)
      refreshContext(context);
       //从ioc容器中获取所有的ApplicationRunner和CommandLineRunner进行回调
       //ApplicationRunner先回调,CommandLineRunner再回调
      afterRefresh(context, applicationArguments);

       //所有的SpringApplicationRunListener回调finished方法
      listeners.finished(context, null);
      stopWatch.stop();
      if (this.logStartupInfo) {

         new StartupInfoLogger(this.mainApplicationClass)
               .logStarted(getApplicationLog(), stopWatch);
      }
       //整个SpringBoot应用启动完成以后返回启动的ioc容器;
                                   *****************
      return context;
   }
   catch (Throwable ex) {

      handleRunFailure(context, listeners, analyzers, ex);
      throw new IllegalStateException(ex);
   }
}
BeanFactory 和ApplicationContext的区别
BeanFactory和ApplicationContext都是接口,并且ApplicationContext间接继承了BeanFactory。
BeanFactory是Spring中最底层的接口,提供了最简单的容器的功能,只提供了实例化对象和获取对象的功能,而ApplicationContext是Spring的一个更高级的容器,提供了更多的有用的功能。
ApplicationContext提供的额外的功能:获取Bean的详细信息(如定义、类型)、国际化的功能、统一加载资源的功能、强大的事件机制、对Web应用的支持等等。
加载方式的区别:BeanFactory采用的是延迟加载的形式来注入Bean;ApplicationContext则相反的,它是在Ioc启动时就一次性创建所有的Bean,好处是可以马上发现Spring配置文件中的错误,坏处是造成浪费。【拓展1】【拓展2】
3、事件监听机制
配置在META-INF/spring.factories
ApplicationContextInitializer
public class HelloApplicationContextInitializer implements ApplicationContextInitializer<ConfigurableApplicationContext> {

    @Override
    public void initialize(ConfigurableApplicationContext applicationContext) {

        System.out.println("ApplicationContextInitializer...initialize..."+applicationContext);
    }
}
SpringApplicationRunListener
public class HelloSpringApplicationRunListener implements SpringApplicationRunListener {


    //必须有的构造器
    public HelloSpringApplicationRunListener(SpringApplication application, String[] args){


    }

    @Override
    public void starting() {

        System.out.println("SpringApplicationRunListener...starting...");
    }

    @Override
    public void environmentPrepared(ConfigurableEnvironment environment) {

        Object o = environment.getSystemProperties().get("os.name");
        System.out.println("SpringApplicationRunListener...environmentPrepared.."+o);
    }

    @Override
    public void contextPrepared(ConfigurableApplicationContext context) {

        System.out.println("SpringApplicationRunListener...contextPrepared...");
    }

    @Override
    public void contextLoaded(ConfigurableApplicationContext context) {

        System.out.println("SpringApplicationRunListener...contextLoaded...");
    }

    @Override
    public void finished(ConfigurableApplicationContext context, Throwable exception) {

        System.out.println("SpringApplicationRunListener...finished...");
    }
}
配置(META-INF/spring.factories)
org.springframework.context.ApplicationContextInitializer=\
com.atguigu.springboot.listener.HelloApplicationContextInitializer

org.springframework.boot.SpringApplicationRunListener=\
com.atguigu.springboot.listener.HelloSpringApplicationRunListener
只需要放在ioc容器中
ApplicationRunner
@Component
public class HelloApplicationRunner implements ApplicationRunner {

    @Override
    public void run(ApplicationArguments args) throws Exception {

        System.out.println("ApplicationRunner...run....");
    }
}
CommandLineRunner
@Component
public class HelloCommandLineRunner implements CommandLineRunner {

    @Override
    public void run(String... args) throws Exception {

        System.out.println("CommandLineRunner...run..."+ Arrays.asList(args));
    }
}
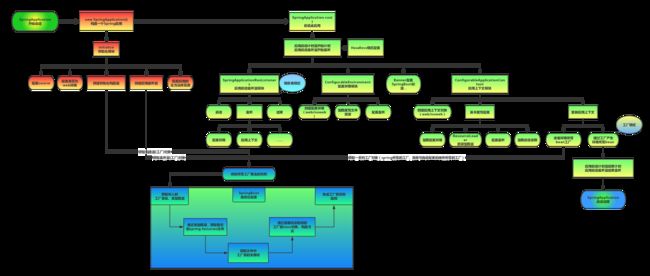
自动配置原理:
将主配置类(@SpringBootApplication标注的类)的所在包及下面所有子包里面的所有组件扫描到Spring容器;
@Import(EnableAutoConfigurationImportSelector.class);
给容器中导入组件?
EnableAutoConfigurationImportSelector:导入哪些组件的选择器;
将所有需要导入的组件以全类名的方式返回;这些组件就会被添加到容器中;
会给容器中导入非常多的自动配置类(xxxAutoConfiguration);就是给容器中导入这个场景需要的所有组件,并配置好这些组件;
有了自动配置类,免去了我们手动编写配置注入功能组件等的工作;
SpringFactoriesLoader.loadFactoryNames(EnableAutoConfiguration.class,classLoader);
Spring Boot在启动的时候从类路径下的META-INF/spring.factories中获取EnableAutoConfiguration指定的值,将这些值作为自动配置类导入到容器中,自动配置类就生效,帮我们进行自动配置工作;以前我们需要自己配置的东西,自动配置类都帮我们完成了;


10.Spring和Springboot的区别
Spring Boot、Spring MVC 和 Spring 区别:
Spring 框架整个家族家族,共同的基础是Spring 的ioc和 aop,ioc 提供了依赖注入的容器, aop解决了面向切面编程,然后在此两者的基础上实现了其他延伸产品的高级功能。
Spring MVC提供了一种轻度耦合的方式来开发web应用;它是Spring的一个模块,是一个web框架;通过DispatcherServlet, ModelAndView 和 View Resolver,开发web应用变得很容易;解决的问题领域是网站应用程序或者服务开发——URL路由、Session、模板引擎、静态Web资源等等。
Spring Boot实现了auto-configuration自动配置(另外三大神器actuator监控,cli命令行接口,starter依赖),降低了项目搭建的复杂度。它主要是为了解决使用Spring框架需要进行大量的配置太麻烦的问题,所以它并不是用来替代Spring的解决方案,而是和Spring框架紧密结合用于提升Spring开发者体验的工具;同时它集成了大量常用的第三方库配置(例如Jackson, JDBC, Mongo, Redis, Mail等等),Spring Boot应用中这些第三方库几乎可以零配置的开箱即用。
11.SpringBoot的SPI机制是如何实现的
SPI的全称是Service Provider Interface, 即"服务提供商接口"。一个接口可以有很多种实现. 例如搜索,可以是搜索系统的硬盘,也可以是搜索数据库。系统的设计者为了降低耦合,并不想在硬编码里面写死具体的搜索方式,而是希望由服务提供者来选择使用哪种搜索方式, 这个时候就可以选择使用SPI机制。
普通SPI机制使用流程:
SPI机制已经定义好了加载服务的流程框架, 你只需要按照约定, 在META-INF/services目录下面, 以接口的全限定名称为名创建一个文件夹(com.north.spilat.service.Search), 文件夹下再放具体的实现类的全限定名称(com.north.spilat.service.impl.DatabaseSearch), 系统就能根据这些文件,加载不同的实现类。
 package com.north.spilat.main;
 import com.north.spilat.service.Search;
 import java.util.Iterator;
 import java.util.ServiceLoader;
 public class Main {

     public static void main(String[] args) {

         System.out.println("Hello World!");
         ServiceLoader<Search> s = ServiceLoader.load(Search.class);
                                   ******************//指定位置加载实体类
         Iterator<Search> searchList = s.iterator();
         while (searchList.hasNext()) {

             Search curSearch = searchList.next();
             curSearch.search("test");
         }
     }
 }
JDK的SPI逻辑:服务提供商按照约定,将具体的实现类名称放到/META-INF/services/xxx下, ServiceLoader就可以根据服务提供者的意愿, 加载不同的实现了, 避免硬编码写死逻辑, 从而达到解耦的目的。
SpringBoot的SPI机制
spring框架里面一定是有一个类似于ServiceLoader的类, 专门从META-INF/spring.factories里面的配置,加载特定接口的实现。
    /**
    * 参数type就是要加载的接口的class
    */
    private <T> Collection<? extends T>
    getSpringFactoriesInstances(Class<T> type) {

        // 直接调用重载方法getSpringFactoriesInstances
		return getSpringFactoriesInstances(type, new Class<?>[] {
     });
	}

	private <T> Collection<? extends T>
	        getSpringFactoriesInstances(Class<T> type,
			Class<?>[] parameterTypes,
			Object... args) {

		// 获取当前线程的classLoader
		ClassLoader classLoader = Thread.currentThread().getContextClassLoader();
		// Use names and ensure unique to protect against duplicates
		// 翻译一下原文注释就是用names来去重
		// 注意这里, 我们寻找的"ServiceLoader"终于出现了
		// 就是SpringFactoriesLoader
		Set<String> names = new LinkedHashSet<String>(
				SpringFactoriesLoader.loadFactoryNames(type, classLoader));
				**********************//就是你啦!你穿上马甲我照样认得你,ServiceLoader!
		// 是用java反射来实例化
		List<T> instances = createSpringFactoriesInstances(type, parameterTypes,
				classLoader, args, names);
		// 根据@Order注解来排一下序
		AnnotationAwareOrderComparator.sort(instances);
		// 返回这个接口的所有实现实例
		return instances;
	}
以上过程可以描述为:
- FACTORIES_RESOURCE_LOCATION 正是指向我们上面所说的META-INF/spring.factories
- loadFactories, 从META-INF/spring.factories查找指定的接口实现类并实例化, 其中查找是通过调用loadFactoryNames
- loadFactoryNames从指定的位置查找特定接口的实现类的全限定名称
- instantiateFactory 实例化
starter也可以认为是一种SPI机制,引入同一接口的不同实现类可以实现不同的逻辑。【拓展】
【实例】自定义starter
starter()利用了SPI机制:
1、这个场景需要使用到的依赖是什么?
2、如何编写自动配置
@Configuration  //指定这个类是一个配置类
@ConditionalOnXXX  //在指定条件成立的情况下自动配置类生效
@AutoConfigureAfter  //指定自动配置类的顺序
@Bean  //给容器中添加组件

@ConfigurationProperties结合相关xxxProperties类来绑定相关的配置
@EnableConfigurationProperties //让xxxProperties生效加入到容器中

自动配置类要能加载
将需要启动就加载的自动配置类,配置在META-INF/spring.factories
org.springframework.boot.autoconfigure.EnableAutoConfiguration=\
org.springframework.boot.autoconfigure.admin.SpringApplicationAdminJmxAutoConfiguration,\
org.springframework.boot.autoconfigure.aop.AopAutoConfiguration,\
3、模式:
启动器只用来做依赖导入;
专门来写一个自动配置模块;
启动器依赖自动配置;别人只需要引入启动器(starter)
mybatis-spring-boot-starter;自定义启动器名-spring-boot-starter
步骤:
1)、启动器模块
<project xmlns="http://maven.apache.org/POM/4.0.0"
         xmlns:xsi="http://www.w3.org/2001/XMLSchema-instance"
         xsi:schemaLocation="http://maven.apache.org/POM/4.0.0 http://maven.apache.org/xsd/maven-4.0.0.xsd">
    <modelVersion>4.0.0modelVersion>

    <groupId>com.atguigu.startergroupId>
    <artifactId>atguigu-spring-boot-starterartifactId>
    <version>1.0-SNAPSHOTversion>


    <dependencies>


        <dependency>
            <groupId>com.atguigu.startergroupId>
            <artifactId>atguigu-spring-boot-starter-autoconfigurerartifactId>
            <version>0.0.1-SNAPSHOTversion>
        dependency>
    dependencies>

project>
2)、自动配置模块
<project xmlns="http://maven.apache.org/POM/4.0.0" xmlns:xsi="http://www.w3.org/2001/XMLSchema-instance"
   xsi:schemaLocation="http://maven.apache.org/POM/4.0.0 http://maven.apache.org/xsd/maven-4.0.0.xsd">
   <modelVersion>4.0.0modelVersion>

   <groupId>com.atguigu.startergroupId>
   <artifactId>atguigu-spring-boot-starter-autoconfigurerartifactId>
   <version>0.0.1-SNAPSHOTversion>
   <packaging>jarpackaging>

   <name>atguigu-spring-boot-starter-autoconfigurername>
   <description>Demo project for Spring Bootdescription>

   <parent>
      <groupId>org.springframework.bootgroupId>
      <artifactId>spring-boot-starter-parentartifactId>
      <version>1.5.10.RELEASEversion>
      <relativePath/>
   parent>

   <properties>
      <project.build.sourceEncoding>UTF-8project.build.sourceEncoding>
      <project.reporting.outputEncoding>UTF-8project.reporting.outputEncoding>
      <java.version>1.8java.version>
   properties>

   <dependencies>


      <dependency>
         <groupId>org.springframework.bootgroupId>
         <artifactId>spring-boot-starterartifactId>
      dependency>

   dependencies>


project>
package com.atguigu.starter;

import org.springframework.boot.context.properties.ConfigurationProperties;

@ConfigurationProperties(prefix = "atguigu.hello")
public class HelloProperties {


    private String prefix;
    private String suffix;

    public String getPrefix() {

        return prefix;
    }

    public void setPrefix(String prefix) {

        this.prefix = prefix;
    }

    public String getSuffix() {

        return suffix;
    }

    public void setSuffix(String suffix) {

        this.suffix = suffix;
    }
}
package com.atguigu.starter;

public class HelloService {


    HelloProperties helloProperties;

    public HelloProperties getHelloProperties() {

        return helloProperties;
    }

    public void setHelloProperties(HelloProperties helloProperties) {

        this.helloProperties = helloProperties;
    }

    public String sayHellAtguigu(String name){

        return helloProperties.getPrefix()+"-" +name + helloProperties.getSuffix();
    }
}
package com.atguigu.starter;

import org.springframework.beans.factory.annotation.Autowired;
import org.springframework.boot.autoconfigure.condition.ConditionalOnWebApplication;
import org.springframework.boot.context.properties.EnableConfigurationProperties;
import org.springframework.context.annotation.Bean;
import org.springframework.context.annotation.Configuration;

@Configuration
@ConditionalOnWebApplication //web应用才生效
@EnableConfigurationProperties(HelloProperties.class)
public class HelloServiceAutoConfiguration {


    @Autowired
    HelloProperties helloProperties;

    @Bean
    public HelloService helloService(){

    	//把自动配置类全类名写入类路径的META-INFO/spring.factories文件中,在启动时就可以返回
    	//一个设置了自定义property的对象
        HelloService service = new HelloService();
        //与helloProperties绑定了
        service.setHelloProperties(helloProperties);
        return service;
    }
}
12.SpringMVC的工作流程
SpringMVC处理请求的流程:
1、用户发送请求至前端控制器DispatcherServlet
2、DispatcherServlet收到请求调用HandlerMapping处理器映射器。
3、处理器映射器根据请求url找到具体的处理器,生成处理器对象Handler及处理器拦截器(如果有则生成)一并返回给DispatcherServlet。
4、DispatcherServlet通过HandlerAdapter(让Handler实现更加灵活)处理器适配器调用处理器
5、执行处理器(Controller,也叫后端控制器)。
6、Controller执行完成返回ModelAndView(连接业务逻辑层和展示层的桥梁,持有一个ModelMap对象和一个View对象)。
7、HandlerAdapter将controller执行结果ModelAndView返回给DispatcherServlet
8、DispatcherServlet将ModelAndView传给ViewReslover视图解析器
9、ViewReslover解析后返回具体View
10、DispatcherServlet对View进行渲染视图(将ModelMap模型数据填充至视图中)。
11、DispatcherServlet响应用户【拓展】
13.SpringCloud的各种组件
SpringCloudAlibaba:
微服务环境搭建
Nacos Discovery–服务治理
Sentinel–服务容错
Gateway–服务网关
Sleuth–链路追踪
Rocketmq–消息驱动
SMS–短信服务
Nacos Config–服务配置
Seata-分布式事务
14. Mybatis 的优缺点?
是ORM(Object Relational Mapping)的一种实现框架,都是对JDBC的一种封装。
优点
相比 JDBC 减少了大量代码量,减少冗余代码。
使用灵活,SQL 语句写在 XML 里,从程序代码中彻底分离,降低了耦合度,便于管理。
提供 XML 标签,支持编写动态 SQL 语句。
提供映射标签,支持对象与数据库的 ORM 字段映射关系。
缺点
SQL 语句编写工作量较大,尤其是字段和关联表多时。
SQL 语句依赖于数据库,导致数据库移植性差,不能随意更换数据库
15. Mybatis 的 XML 文件有哪些标签属性?
select、insert、update、delete 标签分别对应查询、添加、更新、删除操作。
parameterType 属性表示参数的数据类型,包括基本数据类型和对应的包装类型、String 和 Java Bean 类型,当有多个参数时可以使用 #{argn} 的形式表示第 n 个参数。除了基本数据类型都要以全限定类名的形式指定参数类型。
resultType 表示返回的结果类型,包括基本数据类型和对应的包装类型、String 和 Java Bean 类型。还可以使用把返回结果封装为复杂类型的 resultMap 。
16. Mybatis 缓存
整体示意:
一、一级缓存

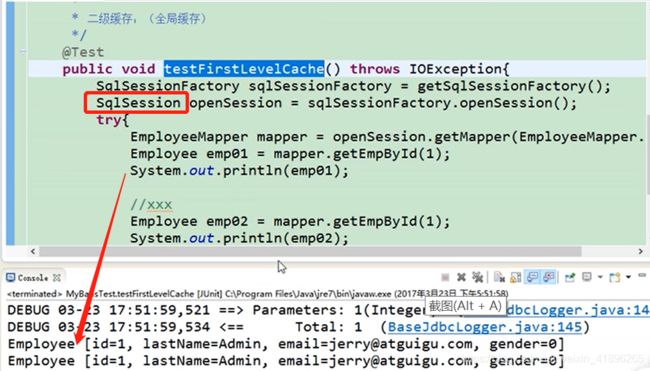
一级缓存是 SqlSession 级别,默认开启且不能关闭。
操作数据库时需要创建 SqlSession 对象,对象中有一个 HashMap 存储缓存数据,不同 SqlSession 之间缓存数据区域互不影响。
一级缓存的作用域是 SqlSession 范围的,在同一个 SqlSession 中执行两次相同的 SQL 语句时,第一次执行完毕会将结果保存在缓存中,第二次查询直接从缓存中获取。
如果 SqlSession 执行了 DML 操作(insert、update、delete),Mybatis 必须将缓存清空保证数据有效性。
一级缓存的测试如下:
一级缓存的失效情况:
1)使用不同的sqlsession

查询结果:

2)查询条件不同
3)两次查询之间使用了增删改
4)手动清空了一级缓存

二、二级缓存
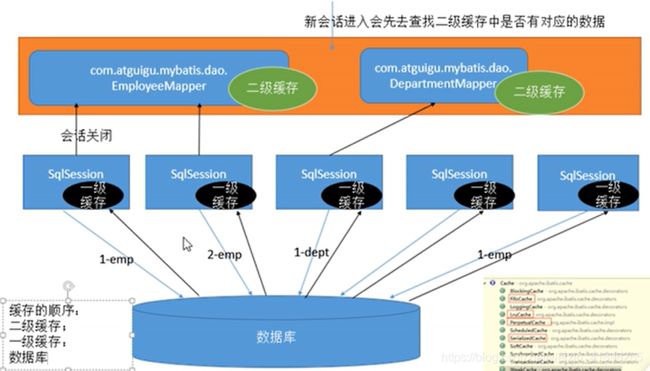
MyBatis使用了二级缓存,并且你的Mapper和select语句也配置使用了二级缓存,那么在执行select查询的时候,MyBatis会先从二级缓存中取输入,其次才是一级缓存,即MyBatis查询数据的顺序是:二级缓存 —> 一级缓存 —> 数据库。
作为一个作用范围更广的缓存,它肯定是在SqlSession 的外层,否则不可能被多个SqlSession 共享。而一级缓存是在SqlSession 内部的,所以第一个问题,肯定是工作在一级缓存之前,也就是只有取不到二级缓存的情况下才到一个会话中去取一级缓存。第二个问题,二级缓存放在哪个对象中维护呢? 要跨会话共享的话,SqlSession 本身和它里面的BaseExecutor 已经满足不了需求了,那我们应该在BaseExecutor 之外创建一个对象。
实际上MyBatis 用了一个装饰器的类来维护,就是CachingExecutor。如果启用了二级缓存,MyBatis 在创建Executor 对象的时候会对Executor 进行装饰。CachingExecutor 对于查询请求,会判断二级缓存是否有缓存结果,如果有就直接返回,如果没有委派交给真正的查询器Executor 实现类,比如SimpleExecutor 来执行查询,再走到一级缓存的流程。最后会把结果缓存起来,并且返回给用户。
关于二级缓存的测试:

注意:只有在session关闭的时候,清空一级缓存之后,将数据移入二级缓存。
总结:

17. Mybatis 原理
一、配置原理


重要组件:

二、工作流程
1.测试用例

2.概述

18. Mybatis #{} 和 ${} 的区别?
使用 ${} 相当于使用字符串拼接,存在 SQL 注入的风险。
使用 #{} 相当于使用占位符,可以防止 SQL 注入,不支持使用占位符的地方就只能使用 ${} ,典型情况就是动态参数。
使用#的即输入参数在SQL中拼接的部分,传入参数后,打印出执行的SQL语句,会看到SQL是这样的:
select id, username, password, role from user where username=? and password=?
不管输入什么参数,打印出的SQL都是这样的。这是因为MyBatis启用了预编译功能,在SQL执行前,会先将上面的SQL发送给数据库进行编译;执行时,直接使用编译好的SQL,替换占位符“?”就可以了。因为SQL注入只能对编译过程起作用,所以这样的方式就很好地避免了SQL注入的问题。
底层实现原理:MyBatis是如何做到SQL预编译的呢?其实在框架底层,是JDBC中的PreparedStatement类在起作用,PreparedStatement对象包含了编译好的SQL语句。这种“准备好”的方式不仅能提高安全性,而且在多次执行同一个SQL时,能够提高效率。原因是SQL已编译好,再次执行时无需再编译。
关于Mybatis的问题引自这里。