Vue前端框架的学习——02—(属性绑定Class和Style、使用JavaScript表达式、条件判断、v-show和v-if、触发视图更新)
1、属性绑定Class和Style
在绑定class或者style的时候,可以通过以下方式来实现。
绑定Class
通过数组的方式来实现
<!DOCTYPE html>
<html lang="en">
<head>
    <meta charset="UTF-8">
    <meta name="viewport" content="width=device-width, initial-scale=1.0">
    <title>Vue模板语法</title>

    <style>
        .title{

            font-size: 90px;
            color:red;
        }

        .main-title{

            font-weight: 800;
        }

    </style>

</head>
<body>
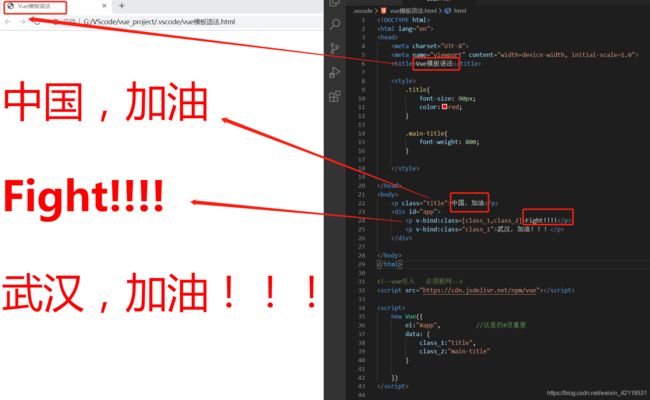
    <p class="title">中国,加油</p>
    <div id="app">
        <p v-bind:class=[class_1,class_2]>Fight!!!!</p>
        <p v-bind:class="class_1">武汉,加油!!!</p>
    </div>

</body>
</html>

<!--vue引入   必须联网-->
<script src="https://cdn.jsdelivr.net/npm/vue"></script>

<script>
    new Vue({

        el:"#app",          //这里的#很重要
        data: {

            class_1:"title",
            class_2:"main-title"
        }

    })
</script>
<!DOCTYPE html>
<html lang="en">
<head>
    <meta charset="UTF-8">
    <meta name="viewport" content="width=device-width, initial-scale=1.0">
    <title>Vue模板语法</title>

    <style>
        .title{

            font-size: 90px;
            color:red;
        }

        .main-title{

            font-weight: 800;
        }

    </style>

</head>
<body>
    <p class="title">中国,加油</p>
    <div id="app">
        <p v-bind:class=[class_1,class_2]>Fight!!!!</p>
        <p v-bind:class="class_1">武汉,加油!!!</p>
        <p v-bind:class="{'title':class1,'main-title':class2}">hello world</p>
        <p v-bind:class="[class_1,class_2]">你好!!!</p>
    </div>
</body>
</html>

<!--vue引入   必须联网-->
<script src="https://cdn.jsdelivr.net/npm/vue"></script>

<script>
    new Vue({

        el:"#app",          //这里的#很重要
        data: {

            class_1:"title",
            class_2:"main-title",
            class1:true,
            class2:true
        }
    })
</script>
绑定Style
用对象的方式
<!DOCTYPE html>
<html lang="en">
<head>
    <meta charset="UTF-8">
    <meta name="viewport" content="width=device-width, initial-scale=1.0">
    <title>Vue模板语法</title>

    <style>
        .title{

            font-size: 90px;
            color:red;
        }
        .main-title{

            font-weight: 800;
        }
    </style>
</head>
<body>
    <p class="title">中国,加油</p>
    <div id="app">
        <p v-bind:style="{'background-color':background}">1 2 3 4 5 6 7</p>
        <p v-bind:style="{backgroundColor:background}">7 6 5 4 3 2 1</p>            //驼峰命名法
        <p :style="pstyle">python</p>
    </div>
</body>
</html>

<!--vue引入   必须联网-->
<script src="https://cdn.jsdelivr.net/npm/vue"></script>

<script>
    new Vue({

        el:"#app",
        data: {

            background:'yellow',         //不加引号视作变量
            pstyle:{

                // 'background-color':'red',
                'background-color':'rgb(255,255,50)',    //效果与上面相同
                // backgroundColor:'red',                 //驼峰命名法
                'font-size':"30px",
            }
        }
    })
</script>
但是样式如果有横线,则都需要变成驼峰命名的方式
用数组的方式
<!DOCTYPE html>
<html lang="en">
<head>
    <meta charset="UTF-8">
    <meta name="viewport" content="width=device-width, initial-scale=1.0">
    <title>Vue模板语法</title>

    <style>
        .title{

            font-size: 90px;
            color:red;
        }
        .main-title{

            font-weight: 800;
        }
    </style>
</head>
<body>
    <p class="title">中国,加油</p>
    <div id="app">
        <p :style="pstyle">python</p>
        <p v-bind:style="[pclass1,pclass2]">首页</p>
    </div>
</body>
</html>

<!--vue引入   必须联网-->
<script src="https://cdn.jsdelivr.net/npm/vue"></script>

<script>
    new Vue({

        el:"#app",          //这里的#很重要
        data: {

            pstyle:{

                // 'background-color':'red',
                'background-color':'rgb(255,255,50)',    //效果与上面相同
                // backgroundColor:'red',                 //驼峰命名法
                'font-size':"20px",
            },
            pclass1:{

                'background-color':'rgb(255,255,50)',
                'font-size':"50px",
            },
            pclass2:{

                'background-color':'rgb(255,255,50)',
                fontSize:"50px",
            },
        }
    })
</script>
2、使用JavaScript表达式
在使用了v-bind的html属性,或者使用了{ {}}的文本。我们还可以执行一个JavaScript表达式:三元表达式。
<!DOCTYPE html>
<html lang="en">
<head>
    <meta charset="UTF-8">
    <meta name="viewport" content="width=device-width, initial-scale=1.0">
    <title>Vue模板语法</title>

    <style>
        .title{

            font-size: 90px;
            color:red;
        }
        .main-title{

            font-weight: 800;
        }
    </style>
</head>
<body>
    <p class="title">中国,加油</p>
    <div id="app">
        <p >{
     {
     username.split(" ").reverse().join(" ")}}</p>
        <!-- 字符串    先用空格分割,再反排, 再重新去除空格,连接成字符串 -->

        <p v-bind:style="{color:color?'red':'blue'}">{
     {
     username.split(" ").reverse().join(" ")}}</p>
        <!-- 三元运算符,判断color的true或者false,然后选择true是red ,false是blue -->
        <!-- 表达式?表达式1:表达式2            三元运算符的语句模板-->
    </div>
</body>
</html>

<!--vue引入   必须联网-->
<script src="https://cdn.jsdelivr.net/npm/vue"></script>

<script>
    new Vue({

        el:"#app",          //这里的#很重要
        data: {

            pclass1:{

                'background-color':'rgb(255,255,50)',
                'font-size':"50px",
            },
            pclass2:{

                'background-color':'rgb(255,255,50)',
                fontSize:"50px",
            },

            username:'hello world',

            color:true,    //判断是否为True或者False
        }
    })
</script>
注意,只能是JavaScript表达式,不能是语句,比如var a=1;a=2;这样的是js语句,不是表达式了。
3、条件判断
在模板中,可以根据条件进行渲染。条件用到的是v-if、v-else-if以及v-else来组合实现的
有时候我们想要在一个条件中加载多个html元素,那么我们可以通过template元素上实现
<!DOCTYPE html>
<html lang="en">
<head>
    <meta charset="UTF-8">
    <meta name="viewport" content="width=device-width, initial-scale=1.0">
    <title>Document</title>
</head>
<body>
    <!-- <div class="app"></div>          输入div.app 按住tab,会补全为class="app"-->
    <!-- <div id="app"></div>             输入div#app 按住tab,会补全为id="app"-->
    <!-- div*3  按住tab,会补全三个div标签     -->
    <div id="app">
        <p v-if="weather== 'sunny' ">出门</p>
        <p v-else-if="weather=='rain' ">在家</p>
        <p v-else>吃饭</p>

        <template v-if="age < 18">
            <p>上网</p>
            <p>逃课</p>
        </template>
        <template v-else-if="age >= 18 && age < 25">
            <p>上班</p>
            <p>赚钱</p>
        </template>
        <template v-else="age > 30">
            <p>结婚</p>
            <p>生娃</p>
        </template>

    </div>

</body>
</html>

<!--vue引入   必须联网-->
<script src="https://cdn.jsdelivr.net/npm/vue"></script>

<script>
    new Vue({

        el:"#app",          //这里的#很重要
        data: {

           weather:123,
           age:18,
        },
    })
</script>
另外,在模板中,Vue会尽量重用已有的元素,而不是重新渲染,这样可以变得更加高效。如果你允许用户在不同的登录方式之间切换。
<!DOCTYPE html>
<html lang="en">
<head>
    <meta charset="UTF-8">
    <meta name="viewport" content="width=device-width, initial-scale=1.0">
    <title>Document</title>
</head>
<body>
    <div id="app">
        <template v-if = "loginType=='username'">
            <label for="">用户名:</label>
            <input type="text" placeholder="用户名1">
        </template>
        <template v-else-if = "loginType=='email'">
            <label for="">邮箱:</label>
            <input type="text" placeholder="email">
        </template>
        <template v-else = "loginType=='number'">
            <label for="">手机号:</label>
            <input type="text" placeholder="号码">
        </template>

        <button v-on:click="changeloginType()">切换登陆方式</button>
    </div>
</body>
</html>

<!--vue引入   必须联网-->
<script src="https://cdn.jsdelivr.net/npm/vue"></script>

<script>
    new Vue({

        el:"#app",          //这里的#很重要
        data: {

            loginType:"username",
            changeloginType:function(){

                this.loginType= this.loginType=="username"?"email":"username"//三元运算,为了切换输入
            }
        },
    })
</script>
这个里面会有一个问题,就是如果我在username的输入框中输入完信息,切换到邮箱中,之前的信息还是保留下来,这样肯定不符合需求的,如果我们想要让html元素每次切换的时候都重新渲染一遍,可以在需要重新渲染的元素上加上唯一的key属性,其中key属性推荐使用整形,字符串类型。
<!DOCTYPE html>
<html lang="en">
<head>
    <meta charset="UTF-8">
    <meta name="viewport" content="width=device-width, initial-scale=1.0">
    <title>Document</title>
</head>
<body>
    <div id="app">
        <template v-if = "loginType=='username'">
            <label for="">用户名:</label>
            <!-- <input type="text" placeholder="用户名1" key="username"> -->
            <-- key属性唯一就可以,其中key属性推荐使用整形,字符串类型 -->
            <input type="text" placeholder="用户名1" key=123>
        </template>
        <template v-else-if = "loginType=='email'" key="email">
            <label for="">邮箱:</label>
            <input type="text" placeholder="email">
        </template>

        <button v-on:click="changeloginType()">切换登陆方式</button>
    </div>
</body>
</html>

<!--vue引入   必须联网-->
<script src="https://cdn.jsdelivr.net/npm/vue"></script>

<script>
    new Vue({

        el:"#app",          //这里的#很重要
        data: {

            loginType:"username",
            changeloginType:function(){

                this.loginType= this.loginType=="username"?"email":"username"//三元运算,为了切换输入
            }
        },
    })
</script>
注意,元素仍然会被高效地复用,因为它们没有添加key属性.
4、v-show和v-if
v-if是“真正”的条件渲染,因为它会确保在切换过程中条件块内的事件监听器和子组件适当地被销毁和重建。 v-if也是惰性的:如果在初始渲染时条件为假,则什么也不做——直到条件第一次变为真时,才会开始渲染条件块。 相比之下,v-show就简单得多——不管初始条件是什么,元素总是会被渲染,并且只是简单地基于CSS进行切换。 一般来说, v-if有更高的切换开销,而v-show有更高的初始渲染开销。因此,如果需要非常频繁地切换,则使用v-show较好;如果在运行时条件很少改变,则使用v-if较好。
循环
在模板中可以用v-for指令来循环数组,对象等
循环数组
<!DOCTYPE html>
<html lang="en">
<head>
    <meta charset="UTF-8">
    <meta name="viewport" content="width=device-width, initial-scale=1.0">
    <title>Document</title>
</head>
<body>
    <div id="app">
        <table>
                <tr>
                    <th>序号</th>
                    <th>标题</th>
                    <th>作者</th>
                </tr>
                <!-- <tr v-for="(index,book) in books"> -->
                    <!-- <td>{
     {
     book+1}}</td> -->
                    <!-- <td>{
     {
     index.title}}</td> -->
                    <!-- <td>{
     {
     index.author}}</td> -->

                    <!-- book,index 第一个位置数据,第二个位置  索引,与名称无关 -->
                <tr v-for="(book,index) in books">
                    <td>{
     {
     index+1}}</td>
                    <td>{
     {
     book.title}}</td>
                    <td>{
     {
     book.author}}</td>
                </tr>
        </table>
    </div>
</body>
</html>

<!--vue引入   必须联网-->
<script src="https://cdn.jsdelivr.net/npm/vue"></script>

<script>
    new Vue({

        el:"#app",
        data: {

            books:[
                {

                    'title':"python",
                    "author":'123',
                },
                {

                    'title':"java",
                    "author":'321',
                },
                {

                    'title':"C++",
                    "author":'000',
                },
            ],
        }
    })
</script>
循环对象
循环对象跟循环数组是一样的。并且都可以在循环的时候使用接收多个参数
<!DOCTYPE html>
<html lang="en">
<head>
    <meta charset="UTF-8">
    <meta name="viewport" content="width=device-width, initial-scale=1.0">
    <title>Document</title>
</head>
<body>
    <div id="app">
        <div v-for="(value,key) in person">
            {
     {
     key}}:{
     {
     value}}
        </div>

    </div>
</body>
</html>

<!--vue引入   必须联网-->
<script src="https://cdn.jsdelivr.net/npm/vue"></script>

<script>
    new Vue({

        el:"#app",
        data: {

            person:{

                //key       value
                'username':700,
                "age":18,
                'sex':0,
            }
        }
    })
</script>
保持状态
循环出来的元素,如果没有使用key元素来唯一标识,如果后期的数据发生了更改,默认是会重用的,并且元素的顺序不会跟着数据的顺序更改而更改
<!DOCTYPE html>
<html lang="en">
<head>
    <meta charset="UTF-8">
    <meta name="viewport" content="width=device-width, initial-scale=1.0">
    <title>Document</title>
</head>
<body>
    <div id="app">
        <!-- 使用key元素来唯一标识,如果后期的数据发生了更改,数据可以跟随更新 -->
        <div v-for="book in books" v-bind:key="book">
            <label>{
     {
     book}}</label>
            <input type="text" v-bind:placeholder='book'>
        </div>
        <button @click="changebooks()">更换图书</button>
    </div>
</body>
</html>

<!--vue引入   必须联网-->
<script src="https://cdn.jsdelivr.net/npm/vue"></script>

<script>
    new Vue({

        el:"#app",
        data:{

            books:['python','c','java','html']
        },
        methods:{

            changebooks:function(){

                this.books.sort(function(a,b){
                 //sort  是个排序方法   (a,b)参数是指当返回True,ab顺序不变,否则顺序改变
                    return Math.random()*10 - 5          //math.random  随机产生0-1的值,这样可以产生正负值
                })
            }
        }
    })
</script>
5、触发视图更新
Vue对一些方法进行了包装和变异,以后数组通过这些方法进行数组更新,会出发视图的更新。
1、push():添加元素的方法。
this.books.push(“123”)
2、pop():删除数组最后一个元素。
this.books.pop()
3、shift():删除数组的第一个元素。
this.books.shift()
4、unshift(item):在数组的开头位置添加一个元素。
this.books.unshift(“123”)
<!DOCTYPE html>
<html lang="en">
<head>
    <meta charset="UTF-8">
    <meta name="viewport" content="width=device-width, initial-scale=1.0">
    <title>Document</title>
</head>
<body>

    <div id="app">
        <div v-for="book in books">
            <label>{
     {
     book}}</label>
        </div>

        <button @click="updatelist()">更换数据</button>
    </div>

</body>
</html>

<!--vue引入   必须联网-->
<script src="https://cdn.jsdelivr.net/npm/vue"></script>

<script>
    new Vue({

        el:"#app",
        data:{

            books:['python','c','java','html']
        },
        methods:{

            changebooks:function(){

                this.books.sort(function(a,b){
                 //sort  是个排序方法   (a,b)参数是指当返回True,ab顺序不变,否则顺序改变
                    return Math.random()*10 - 5          //math.random  随机产生0-1的值,这样可以产生正负值
                })
            },

            updatelist:function(){

                //直接赋值
                // this.books=['123']
                // this.person.username="xxxx"

                // 将此元素放在最后
                //this.books.push('mysql')

                //删除最后一个元素
                this.books.pop()

            }
        }
    })
</script>
5、splice(index,howmany,item1,…,itemX):向数组中添加或者删除或者替换元素。
// 向books第0个位置添加元素
this.books.splice(0,0,“123”)
// 下标从0开始,删除2个元素
this.books.splice(0,2)
// 下标从0开始,替换2个元素
this.books.splice(0,2,‘xxx’,‘ppp’)
this.books.splice(0,0,'213')
this.books.splice(0,2)
this.books.splice(0,2,'213','xxx')
6、sort(function):排序。
this.books.sort(function(x,y){

     // 取两个随机数排序
     a = Math.random();
     b = Math.random();
     return a-b;
 });
7、reverse():将数组元素进行反转。
this.books.reverse();
