项目实践 - SQLite数据库的使用
文章目录
- 前言
- 一 读取相册
-
- 1.1 读相册
-
- 1.1.1 实践学习反馈
-
- 1.1.1.1 (不完全理解)隐式启动
- 1.1.1.2 (未理解)intent.setType
- 1.1.2 (未理解)取出图片
-
- 1.1.3 总结
- 二 使用SQLite
-
- 2.1 实体类?
- 2.2 简单的使用SQLite数据库
前言
说实话,相当的有点尴尬,其实我只想做前端的来着。算了,毕竟是个项目,然后我写如何架构的时候写的是,非标准的MVC架构。我笑死了,MVC架构已经是不能再简单了吧,非标准的MVC架构不就是在说,“那个,我没想要做什么架构,我看着来的”的那种感觉吗hhhh
今天视频面试了海澜集团,emm怎么说呢,没问任何技术问题我是相当的没底,然后我说,是不是不招android前端啊,哈哈哈哈,我也是很直白了。
之前情绪不断崩溃,前天买了铃木敏夫的《吉卜力的风》,其实是个采访集,一直在想什么叫“才能”呢?什么样才能发现自己的才能呢?想了一下,没有答案,“想做个魔法师,愚笨也好,拙劣也好,只要是个魔法师就好了。”就是这样的心情吧。我想做出更好看的前端效果,别总是一个控件,一个正正方方的按钮,感觉好不近人情,同样的硬件条件,游戏已经能做得这么流畅了,看看纪念碑谷,为什么除了娱乐之外的辅助日常生活的APP就要这么僵硬呢?我不喜欢玩游戏,比起来,一个有纪念碑谷一样美妙界面和交互方式的,比如用来帮助我处理待办事项的APP不是很棒吗?我觉得这样的艺术性才是它的潜力。
现在来写一写SQLite,存储图像我找了一下相关资料,决定使用cd卡上的URL来存,所以首先学习一下怎么读取Android内存,然后再学习怎么使用SQLite。
一 读取相册
参考资料:《第一行代码》8.3节
1.1 读相册
第一步是设置权限
<uses-permission android:name="android.permission.WRITE_EXTERNAL_STORAGE" />
第二步是选取相册图片,暂做后续处理
要做到这一步其实很简单,只要这三行代码就可以了
        Intent intent = new Intent("android.intent.action.GET_CONTENT");
        intent.setType("image/*");
        startActivityForResult(intent, CHOOSE_PHOTO);
1.1.1 实践学习反馈
1.1.1.1 (不完全理解)隐式启动
Intent intent = new Intent("android.intent.action.GET_CONTENT");
//或者:
//Intent intent = new Intent(Intent.ACTION_GET_CONTENT);
它是什么意思?
在《第一行代码》2.3.2-使用隐式Intent中,有提到。
怎么样使用隐式Intent呢?
首先,我们平常的启动方式是显示Intent启动程序,而在AndroidManifest.xml中声明Activity也很简单
<activity android:name=".OpenAlbumActivity">activity>
但是如果要使用隐式Intent就不能这么简单的使用了,需要配置
        <activity android:name=".ShareTransition">
            <intent-filter>
                <action android:name="android.intent.action.ALL_APPS" />
                <category android:name="android.intent.category.DEFAULT" />
            intent-filter>
        activity>
其中android.intent.action.XXX选项。所以可见,android库中,框定了一系列的行为,其中之一就是android.intent.action.GET_CONTENT
在文章Android开发之Intent.Action中,说到
Intent.ACTION_GET_CONTENT
String: android.intent.action.GET_CONTENT
允许用户选择特殊种类的数据,并返回(特殊种类的数据:照一张相片或录一段音)
Input: Type
Output:URI
int requestCode = 1001;
Intent intent = new Intent(Intent.ACTION_GET_CONTENT); // "android.intent.action.GET_CONTENT"
intent.setType("image/*"); // 查看类型,如果是其他类型,比如视频则替换成 video/*,或 */*
Intent wrapperIntent = Intent.createChooser(intent, null);
startActivityForResult(wrapperIntent, requestCode);
所以它其实有一个系统提供的我们看不见的Activity处理这些事情吗?这个看不见的Activity在哪里呢?暂且到此为止。
1.1.1.2 (未理解)intent.setType
所有人都知道结论,让我们选择图像。但是为什么是这样呢?整个android系统到底是怎么设计的呢?
1.1.2 (未理解)取出图片
    Bitmap bm = BitmapFactory.decodeFile(path);
    imgView.setImageBitmap(bm);
这两句代码是简单易懂的,也就是通过地址获取Bitmap,通过Bitmap设置ImageView
Uri uri = data.getData();
这句代码在onActivityResult中也是易懂的,就是获取uri
但是不能理解的是《第一行代码》8.3.2节中说:
Android系统从4.4开始,选取相册中的图片就不返回它的真实Uri了,而是一个封装过的Uri,因此如果是4.4版本以上的手机就需要对这个Uri进行解析
我就不懂了,为啥要这样,网上大家都说怎么怎么解析,但是为啥要封装呢?emm 总而言之,我先用,毕竟是完成项目嘛。
获取真实path的代码如下
        Uri uri = data.getData();
        String imagePath = getTruePath(uri);
        Bitmap bitmap = BitmapFactory.decodeFile(imagePath);
        imageView.setImageBitmap(bitmap);


    private String getTruePath(Uri uri) {

        if (DocumentsContract.isDocumentUri(this, uri)) {

            // 如果是document类型的Uri,则通过document id处理
            String docId = DocumentsContract.getDocumentId(uri);
            if("com.android.providers.media.documents".equals(uri.getAuthority())) {

                String id = docId.split(":")[1]; // 解析出数字格式的id
                String selection = MediaStore.Images.Media._ID + "=" + id;
                return getImagePath(MediaStore.Images.Media.EXTERNAL_CONTENT_URI, selection);
            } else if ("com.android.providers.downloads.documents".equals(uri.getAuthority())) {

                Uri contentUri = ContentUris.withAppendedId(Uri.parse("content://downloads/public_downloads"), Long.valueOf(docId));
                return getImagePath(contentUri, null);
            }
        } else if ("content".equalsIgnoreCase(uri.getScheme())) {

            // 如果是content类型的Uri,则使用普通方式处理
            return getImagePath(uri, null);
        } else if ("file".equalsIgnoreCase(uri.getScheme())) {

            // 如果是file类型的Uri,直接获取图片路径即可
            return uri.getPath();
        }

        return null;
    }

    //内容提供器,取得图片。
    private String getImagePath(Uri uri, String selection) {

        String path = null;
        // 通过Uri和selection来获取真实的图片路径
        Cursor cursor = getContentResolver().query(uri, null, selection, null, null);
        if (cursor != null) {

            if (cursor.moveToFirst()) {

                path = cursor.getString(cursor.getColumnIndex(MediaStore.Images.Media.DATA));
            }
            cursor.close();
        }
        return path;
    }
1.1.3 总结
学了相册存储之后,我们在SQLite中,只需要做的事情就是把用getTruePath获得的path,存到数据库中即可。
二 使用SQLite
本来之前用Room来操作过SQLite的,我先纠结一下是不是继续用Room。
2.1 实体类?
这是我第一个问题,可能是我项目写得太少的关系吧。
Q:比如数据库中要存user表,user表中有ID,但是项目中用的user类中其实没有ID。如果user类中设置ID,每次创建user都要传入ID,user表中所谓的主键自增行为又如何发生呢?
参考:
Android SQLite - Primary Key - Inserting into table
food-sqlite-demo这个Demo像是无法正确插入数据?
解决方案:
- 在创建表的时候声明主键以及主键自增行为:
Id INTEGER PRIMARY KEY AUTOINCREMENT,...
Id是主键名字,INTEGER是类型,PRIMARY KEY声明主键,AUTOINCREMENT自增行为
在food-sqlite-demo项目中,创建数据库的方式:
        sqLiteHelper.queryData
        ("CREATE TABLE IF NOT EXISTS FOOD(Id INTEGER PRIMARY KEY AUTOINCREMENT, name VARCHAR, price VARCHAR, image BLOB)");
或者在Android SQLite - Primary Key - Inserting into table中说:
// Creating Tables
@Override
public void onCreate(SQLiteDatabase db) {

    String CREATE_JOURNEY_TABLE = "CREATE TABLE " + TABLE_JOURNEY + "("
            + KEY_P + " INTEGER PRIMARY KEY AUTOINCREMENT DEFAULT 1 ," + KEY_ID + " TEXT," + KEY_DIST + " TEXT,"
            + KEY_MPG + " TEXT," + KEY_COST + " TEXT )";
    db.execSQL(CREATE_JOURNEY_TABLE);
}
- 在insert操作的时候,赋值的实体类不要设置id属性
//SQLiteHelper中
    public void insertData(String name, String price, byte[] image){

        SQLiteDatabase database = getWritableDatabase();
        String sql = "INSERT INTO FOOD VALUES (NULL, ?, ?, ?)";

        SQLiteStatement statement = database.compileStatement(sql);
        statement.clearBindings();

        statement.bindString(1, name);
        statement.bindString(2, price);
        statement.bindBlob(3, image);

        statement.executeInsert();
    }
- 在从数据库中取出数据构建实体类的时候,可以取出id
        Cursor cursor = MainActivity.sqLiteHelper.getData("SELECT * FROM FOOD");
        list.clear();
        while (cursor.moveToNext()) {

            int id = cursor.getInt(0);
            String name = cursor.getString(1);
            String price = cursor.getString(2);
            byte[] image = cursor.getBlob(3);

            list.add(new Food(name, price, image, id));
        }
        adapter.notifyDataSetChanged();
2.2 简单的使用SQLite数据库
不使用Room的方式了,反正就是怎么简单怎么来。
参考:
Android SQLite - Primary Key - Inserting into table
Android :SQLlite数据库 使用手册
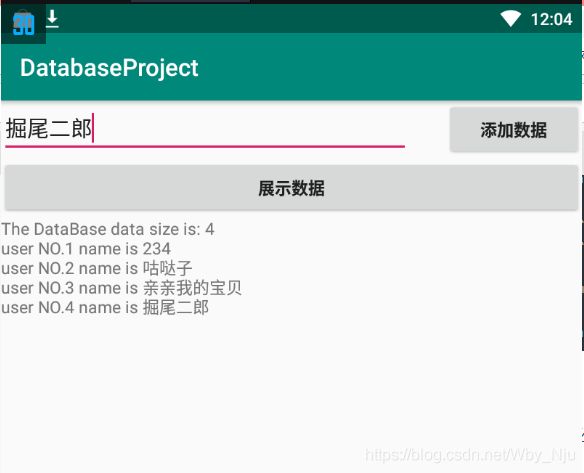
效果:

完成三个类,实体类,Helper类,调用Helper类的Acitivity
实体类User
public class User {

    int id;
    String name;

    public int getId() {
      return id; }

    public void setId(int id) {
      this.id = id; }

    public String getName() {
      return name; }

    public void setName(String name) {
      this.name = name; }
}
DataBaseHelper类
首先是继承SQLiteOpenHelper 必须要实现的构造函数
DataBaseHelper(Context context, String name, SQLiteDatabase.CursorFactory factory, int version)
其实除了context需要Activity传入外,其他的都可以在Helper中自己写,factory写null。比如在Android SQLite - Primary Key - Inserting into table中是这么写的
DATABASE_NAME和DATABASE_VERSION都是static final形的变量
    public DatabaseHandler(Context context) {

        super(context, DATABASE_NAME, null, DATABASE_VERSION);
    }
我的实现:
public class DataBaseHelper extends SQLiteOpenHelper {


    //数据库版本号
    private static Integer Version = 1;

    private static final String TABLE_NAME = "user";
    private static final String ID = "id";
    private static final String NAME = "name";

    public DataBaseHelper(Context context, String name, SQLiteDatabase.CursorFactory factory, int version) {

        super(context, name, factory, version);
    }
    //参数说明
    //context:上下文对象
    //name:数据库名称
    //param:factory
    //version:当前数据库的版本,值必须是整数并且是递增的状态
    public DataBaseHelper(Context context,String name,int version)
    {

        this(context,name,null,version);
    }

    public DataBaseHelper(Context context,String name)
    {

        this(context, name, Version);
    }

    @Override
    public void onCreate(SQLiteDatabase db) {

        System.out.println("创建数据库和表");
        String sql = "CREATE TABLE " + TABLE_NAME + "("
                + ID + " INTEGER PRIMARY KEY AUTOINCREMENT DEFAULT 1 ," + NAME + " TEXT)";
        db.execSQL(sql);
    }

    @Override
    public void onUpgrade(SQLiteDatabase db, int oldVersion, int newVersion) {

        System.out.println("更新数据库版本为:"+newVersion);
    }

    public void addUserData(User user) {

        SQLiteDatabase db = this.getWritableDatabase();
        ContentValues values = new ContentValues();
        values.put(NAME, user.getName());
        db.insert(TABLE_NAME, null, values);
    }

    public ArrayList<User> getAll() {

        ArrayList<User> users = new ArrayList<>();
        String selectQuery = "SELECT  * FROM " + TABLE_NAME;
        SQLiteDatabase db = this.getReadableDatabase();

        Cursor cursor = db.rawQuery(selectQuery, null);
        if (cursor.moveToFirst()) {

            do {

                User user = new User();
                user.setId(Integer.parseInt(cursor.getString(0)));
                user.setName(String.valueOf(cursor.getString(1)));
                // Adding contact to list
                users.add(user);
            } while (cursor.moveToNext());
        }
        return users;
    }
}
Activity类
基本上就是个调用,我把按钮点击事件的代码贴出来
        button_input.setOnClickListener(v->insertDB(helper));
        button_show.setOnClickListener(v -> showAll(helper));

    private void showAll(DataBaseHelper helper) {

        ArrayList<User> users = helper.getAll();
        String output = "The DataBase data size is: " + users.size() + "\n";
        for (User user : users) {

            output = output + "user NO." + user.getId() + " name is " + user.getName() + "\n";
        }
        textView_show.setText(output);
    }
    private void insertDB(DataBaseHelper helper) {

        User user = new User();
        user.setName(String.valueOf(editText_input.getText()));
        helper.addUserData(user);
    }