Android中运行Tensorflow程序2-编写自己的程序
官方给出的demo中运行已经打包好的模型,没有解释怎样从零开始构建自己的模型。参考网站https://omid.al/posts/2017-02-20-Tutorial-Build-Your-First-Tensorflow-Android-App.html,自己做了一些尝试。
准备我们自己的TF模型
首先,我们创建一个简单的模型,把它的计算图保存为一个序列化的GraphDef文件。训练之后,把模型的变量值保存到checkpoint文件中。最后,我们需要把这两个文件变成一个优化了的独立的文件,这个文件是我们在Android App中所需要的所有文件。
创建和保存模型
主要目的是演示过程,所以模型十分简单:一个采用ReLU的单层网络。代码如下:
# Create a simple TF Graph
# By Omid Alemi - Jan 2017
# Works with TF r1.0

import tensorflow as tf

I = tf.placeholder(tf.float32, shape=[None,3], name='I') # input
W = tf.Variable(tf.zeros(shape=[3,2]), dtype=tf.float32, name='W') # weights
b = tf.Variable(tf.zeros(shape=[2]), dtype=tf.float32, name='b') # biases
O = tf.nn.relu(tf.matmul(I, W) + b, name='O') # activation / output

saver = tf.train.Saver()
init_op = tf.global_variables_initializer()

with tf.Session() as sess:
  sess.run(init_op)

  # save the graph
  tf.train.write_graph(sess.graph_def, '.', 'tfdroid.pbtxt')

  # normally you would do some training here
  # but fornow we will just assign something to W
  sess.run(tf.assign(W, [[1, 2],[4,5],[7,8]]))
  sess.run(tf.assign(b, [1,1]))

  #save a checkpoint file, which will store the above assignment
  saver.save(sess, 'tfdroid.ckpt')
运行上面的代码会把模型的计算图保存在tfdroid.pbtxt文件中,同时把模型变量的checkpoint保存在tfdroid.ckpt中。
冻结图
接下来需要把checkpoint中的变量转化为const Ops,同时把他们和GraphDef proto结合成为一个单独的文件。使用这个更方便我们在app中载入模型。为此,Tensorflow在tensorflow.python.tools中提供了freeze_graph这个工具。
冻结图之后,我们就可以对模型文件进行优化:移除那些只在训练过程中才用得上的部分,保留做预测需要的部分。根据文档,这个过程包括以下内容:
1. 删除只有在训练过程中才用得到的操作,比如保存checkpoint。
2. 剪枝掉那些永远都用不到的图。
3. 删除debug操作,比如数据检查。
4. 把batch normalization操作变成预先计算权值。
5. Fusing common operations into unified versions。
冻结图和优化的代码如下:
# Preparing a TF model for usage in Android
# By Omid Alemi - Jan 2017
# Works with TF r1.0

import sys
import tensorflow as tf
from tensorflow.python.tools import freeze_graph
from tensorflow.python.tools import optimize_for_inference_lib


MODEL_NAME = 'tfdroid'

# Freeze the graph

input_graph_path = MODEL_NAME+'.pbtxt'
checkpoint_path = './'+MODEL_NAME+'.ckpt'
input_saver_def_path = ""
input_binary = False
output_node_names = "O"
restore_op_name = "save/restore_all"
filename_tensor_name = "save/Const:0"
output_frozen_graph_name = 'frozen_'+MODEL_NAME+'.pb'
output_optimized_graph_name = 'optimized_'+MODEL_NAME+'.pb'
clear_devices = True


freeze_graph.freeze_graph(input_graph_path, input_saver_def_path,
                          input_binary, checkpoint_path, output_node_names,
                          restore_op_name, filename_tensor_name,
                          output_frozen_graph_name, clear_devices, "")


# Optimize for inference

input_graph_def = tf.GraphDef()
with tf.gfile.Open(output_frozen_graph_name, "r") as f:
    data = f.read()
    input_graph_def.ParseFromString(data)

output_graph_def = optimize_for_inference_lib.optimize_for_inference(
        input_graph_def,
        ["I"], # an array of the input node(s)
        ["O"], # an array of output nodes
        tf.float32.as_datatype_enum)

# Save the optimized graph

f = tf.gfile.FastGFile(output_optimized_graph_name, "w")
f.write(output_graph_def.SerializeToString())

# tf.train.write_graph(output_graph_def, './', output_optimized_graph_name) 运行上述代码之后,我们可以得到frozen_tfdroid.pb和optimized_tfdroid.pb两个文件。如果运行过程中提示utf8decode错误,请尝试用python2.7运行。
freeze_graph.freeze_graph参数解析
有以下几个参数:
1. input_graph:必须,要输入的计算图的路径
2. input_saver:必须,不太懂,给它赋值为''(空字符串)
3. input_binary:必须,输入的是二进制数据或者是文件
4. input_checkpoint:必须,checkpoint文件的位置
5. output_node_names:必须,字符串,内容是输出节点的名字,多个节点名字之间用,隔开
6. restore_op_name:从模型中恢复变量的名字,默认设置为'save/restore_all'
7. filename_tensor_name:已弃用,默认设置为save/Const:0
8. output_graph:必选,保存输出文件
9. clear_devices:设置为True
10. initializer_nodes:必须,不理解
11. variable_names_blacklist:不理解
optimize_for_inference_lib.optimize_for_inference函数的参数解析
input_graph_def:包括训的模型的一个GraphDefinput_node_names:一个列表,列表的元素是字符串,一个字符串是一个输入节点的nameoutput_node_names:一个列表,列表的元素是字符串,一个字符串是一个输出节点的nameplaceholder_type_enum:一个AttrValue enum(只有一个输入)或者它的列表(如果有多个输入),指明输入数据的格式。
接下来,我们构建自己的Android App。
创建Android App
创建一个新的App
使用Android Studio创建只有一个空activity的project。
获取TF Libraries
当然可以从源码开始编译TF Libraries(参考网站 compile the Tensorflow libraries from scratch),但是使用 nightly android builds提供的编译好的接口会更方便一些。从网站下载。
在project中使用TF Libraries
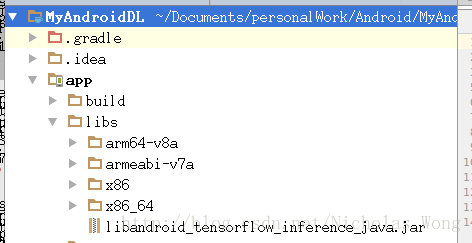
下载编译好的接口之后,解压缩,把libandroid_tensorflow_inference_java.jar和libtensorflow_inference.so中所有的文件夹都拷贝到project的app/libs/里面,在Android Studio中可以看到如下结构

然后修改app/build.gradle,增加如下内容,使系统知道这些libraries在什么位置。
    sourceSets {
        main {
            jniLibs.srcDirs = ['libs']
        }
}修改后的app/build.gradle内容如下:
apply plugin: 'com.android.application'

android {
    compileSdkVersion 26
    buildToolsVersion "26.0.1"
    defaultConfig {
        applicationId "com.example.dong.myandroiddl"
        minSdkVersion 15
        targetSdkVersion 26
        versionCode 1
        versionName "1.0"
        testInstrumentationRunner "android.support.test.runner.AndroidJUnitRunner"
    }
    buildTypes {
        release {
            minifyEnabled false
            proguardFiles getDefaultProguardFile('proguard-android.txt'), 'proguard-rules.pro'
        }
    }

    sourceSets {
        main {
            jniLibs.srcDirs = ['libs']
        }
    }
}

dependencies {
    compile fileTree(dir: 'libs', include: ['*.jar'])
    androidTestCompile('com.android.support.test.espresso:espresso-core:2.2.2', {
        exclude group: 'com.android.support', module: 'support-annotations'
    })
    compile 'com.android.support:appcompat-v7:26.+'
    compile 'com.android.support.constraint:constraint-layout:1.0.2'
    testCompile 'junit:junit:4.12'
}
拷贝TF Model
在app/src/main/中创建assets/文件夹,把optimized_tfdroid.pb文件拷贝进来。
导入TF Inference Interfaces
在MainActivity.java中导入ensorFlowInferenceInterface包。
import org.tensorflow.contrib.android.TensorFlowInferenceInterface;导入tensorflow_inference库。
    static {
        System.loadLibrary("tensorflow_inference");
    }
然后设置一些辅助变量。
private static final String MODEL_FILE = "file:///android_asset/optimized_tfdroid.pb";
private static final String INPUT_NODE = "I";
private static final String OUTPUT_NODE = "O";

private static final int[] INPUT_SIZE = {
1,3};创建TensorFlowInferenceInterface接口的对象
private TensorFlowInferenceInterface inferenceInterface;在onCreate()函数中初始化接口和加载模型文件:
inferenceInterface = new TensorFlowInferenceInterface();
inferenceInterface.initializeTensorFlow(getAssets(), MODEL_FILE);
开始预测
首先,给INPUT_NODE赋值。
float[] inputFloats = {num1, num2, num3};
inferenceInterface.fillNodeFloat(INPUT_NODE, INPUT_SIZE, inputFloats);然后,调用runInference()方法来计算OUTPUT_NODE。
inferenceInterface.runInference(new String[] {OUTPUT_NODE});计算完成之后,从OUTPUT_NODE中获取值。
float[] resu = {
    0, 0};
inferenceInterface.readNodeFloat(OUTPUT_NODE, resu);
项目代码可以从github上下载。