Pytorch 入门学习笔记+深度学习代码示例
Pytorch 入门学习笔记+深度学习代码示例
- 1.0 Pytorch是什么
- 2.0 Pytorch 的安装
-
- 2.1 Pytorch 的安装方式
- 2.2 Pytorch 的安装结果
- 3.0 Pytorch 入门编程
-
- 3.1 Pytorch 中Tensors的使用
- 3.2 Pytorch 中tensor与numpy的转换以及将tensor转入CUDA
- 3.3 Pytorch 的自动分类
- 4.0 Pytorch 示例卷积神经网络代码
-
- 4.1 卷积神经网络的构建
- 4.1 LOSS 函数的构建
- 5.0 Pytorch 的网络训练实操
1.0 Pytorch是什么
Pytorch是一种基于Python的科学计算软件包,面向两组受众:
1.替代NumPy以使用GPU的功能
2.提供最大灵活性和速度的深度学习研究平台
2.0 Pytorch 的安装
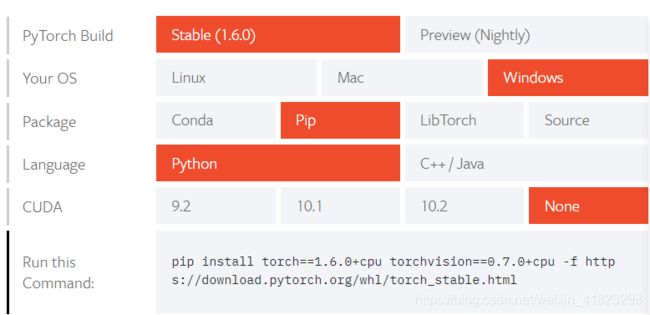
2.1 Pytorch 的安装方式
首先电脑需要装有Anoconda或者MINIconda
1.推荐使用Pytorch清华镜像相对下载速度很快,一定要根据链接教程通过修改用户目录下的 .condarc 文件。Windows 用户无法直接创建名为 .condarc 的文件,可先执行 conda config --set show_channel_urls yes 生成该文件之后再修改。
2.Pytorch官网下载根据自己的机型选择下载方式(下载速度非常慢)

2.2 Pytorch 的安装结果
安装完成之后可以在conda中使用:
(base)<users>python
>>import torch
>>torch .__versin__
3.0 Pytorch 入门编程
3.1 Pytorch 中Tensors的使用
Tensors与NumPy的ndarray相似,此外,Tensor也可以在GPU上使用以加速计算。
>>from __future__ import print_function
>>import torch
3.1.1 首先是tensor的创建:
x = torch.zeros(5, 3, dtype=torch.long)
print(x)
运行可以得到
tensor([[0, 0, 0],
        [0, 0, 0],
        [0, 0, 0],
        [0, 0, 0],
        [0, 0, 0]])
3.1.2如果想知道一个tensor的size:
print(x.size())
输出结果:
torch.Size([5, 3])
我们可以看到这是一个5*3的矩阵.
3.1.3简单的tensor的运算:
创建一个空的tensor并用以保留两个tensor相加的结果输出
result = torch.empty(5, 3)
torch.add(x, y, out=result)
3.2 Pytorch 中tensor与numpy的转换以及将tensor转入CUDA
3.2.1将numpy数组转换为torch 中的tensor:
可以通过 torch.from_numpy() 来实现数据的转换:
import numpy as np
a = np.ones(5)
b = torch.from_numpy(a)
np.add(a, 1, out=a)
print(a)
print(b)
输出结果:
[2. 2. 2. 2. 2.]
tensor([2., 2., 2., 2., 2.], dtype=torch.float64)
3.2.2将numpy数组转换为torch 中的tensor:
可以通过 .to 来实现数据的转换,从而将tensor转入任何设备中(一般进行网络训练都会转入cuda进行加速):
# let us run this cell only if CUDA is available
# We will use ``torch.device`` objects to move tensors in and out of GPU
if torch.cuda.is_available():
    device = torch.device("cuda")          #  CUDA
    y = torch.ones_like(x, device=device)  # directly create a tensor on GPU
    x = x.to(device)                       # or just use strings ``.to("cuda")``
    z = x + y
    print(z)
    print(z.to("cpu", torch.double))       # ``.to`` can also change dtype together!
输出结果:
tensor([0.0043], device='cuda:0')
tensor([0.0043], dtype=torch.float64)
3.3 Pytorch 的自动分类
PyTorch中所有神经网络的核心是autograd软件包。 让我们先简要地介绍一下,然后再训练第一个神经网络。
autograd软件包为Tensor上的所有操作提供自动区分。 这是一个按运行定义的框架,这意味着backprop是由代码的运行方式定义的,并且每次迭代都可以不同。
让我们用一些示例更简单地说明这一点。
3.3.1 Tensors:
Torch.Tensor是程序包的中心类。如果将其属性.requires_grad设置为True,它将开始跟踪对其的所有操作。完成计算后,可以调用.backward()并自动计算所有渐变。该张量的梯度将累积到.grad属性中。要停止Tensor跟踪历史记录,可以调用.detach()将其与计算历史记录分离,并防止跟踪将来的计算。
为了防止跟踪历史记录(和使用内存),还可以使用torch.no_grad():包装代码块。这在评估模型时特别有用,因为模型可能具有可训练的参数,且require_grad = True,但我们不需要梯度。
还有另外一类对自动实施非常重要的类- Function。
Tensor和函数相互连接并建立一个非循环图,该图对完整的计算历史进行编码。每个张量都有一个.grad_fn属性,该属性引用创建了张量的函数(用户创建的张量除外-它们的grad_fn为None)。
如果要计算导数,可以在Tensor上调用.backward()。如果tensor是标量(即,它包含一个元素数据),则无需为后面的()内指定任何参数,但是,如果Tensor具有更多元素,则需要指定一个渐变形状的 tensor作为梯度参数。
3.3.2 pytorch自动分类的具体应用(Tensors):
创建一个tensor并设置require_grad = True来跟踪它的计算:
x = torch.ones(2, 2, requires_grad=True)
print(x)
输出结果:
tensor([[1., 1.],
        [1., 1.]], requires_grad=True)
此时对tensor进行一次运算:
y = x + 2
print(y)
输出结果:
tensor([[3., 3.],
        [3., 3.]], grad_fn=)
y是作为一个结果而被创建的,因此具有grad_fn:
print(y.grad_fn)
输出结果:
现在对y进行更多的操作:
z = y * y * 3
out = z.mean()

print(z, out)
输出结果:
tensor([[27., 27.],
        [27., 27.]], grad_fn=) tensor(27., grad_fn=)
.requires_grad_()会更改现有Tensor的require_grad。 如果未给出输入,则默认为False:
a = torch.randn(2, 2)
a = ((a * 3) / (a - 1))
print(a.requires_grad)
a.requires_grad_(True)
print(a.requires_grad)
b = (a * a).sum()
print(b.grad_fn)
输出结果:
False
True
3.3.3 pytorch自动分类的具体应用(Gradients):
现在开始反向传播。 因为out只包含单个标量,所以out.backward()等同于out.backward(torch.tensor(1.))
打印渐变d(out)/dx
out.backward()
print(x.grad)
输出结果:
tensor([[4.5000, 4.5000],
        [4.5000, 4.5000]])
现在,让我们看一个雅可比向量的示例:
x = torch.randn(3, requires_grad=True)

y = x * 2
while y.data.norm() < 1000:
    y = y * 2

print(y)
输出结果:
tensor([ 921.4462, -305.1625, -704.4802], grad_fn=)
现在,在这种情况下,y不再是标量. torch.autograd无法直接计算完整的雅可比行列式,但是如果我们只想要雅可比乘积,只需将向量作为参数传递给backward即可:
v = torch.tensor([0.1, 1.0, 0.0001], dtype=torch.float)
y.backward(v)

print(x.grad)
输出结果:
tensor([5.1200e+01, 5.1200e+02, 5.1200e-02])
也可以通过使用torch.no_grad()将代码块包装在.requires_grad = True中,从而停止自动张量跟踪在Tensor上的历史记录:
print(x.requires_grad)
print((x ** 2).requires_grad)

with torch.no_grad():
    print((x ** 2).requires_grad)
输出结果:
True
True
False
或者使用.detach()获得具有相同内容但不需要渐变的新Tensor:
print(x.requires_grad)
y = x.detach()
print(y.requires_grad)
print(x.eq(y).all())
输出结果:
True
False
tensor(True)
4.0 Pytorch 示例卷积神经网络代码
4.1 卷积神经网络的构建
可以使用torch.nn包构建神经网络。
现在我们已经了解了autograd,nn依靠autograd定义模型并对其进行区分。 nn.Module包含图层以及返回输出的方法forward(input)。
现在我们对下面这个数字图像进行分类的卷积神经网络进行分析:

这是一个简单的前馈网络。 它获取输入,将其一层又一层地馈入,然后最终给出输出。
神经网络的典型训练过程如下:
- 定义具有一些可学习参数(或权重)的神经网络
- 遍历输入数据集
- 通过网络处理输入
- 计算损失(输出正确的距离有多远)
- 将渐变传播回网络参数
- 通常使用简单的更新规则来更新网络的权重:
weight = weight - learning_rate * gradient
现在我们来定义这个卷积神经网络:
import torch
import torch.nn as nn
import torch.nn.functional as F


class Net(nn.Module):

    def __init__(self):
        super(Net, self).__init__()
        # 1 input image channel, 6 output channels, 3x3 square convolution
        # kernel
        self.conv1 = nn.Conv2d(1, 6, 3)
        self.conv2 = nn.Conv2d(6, 16, 3)
        # an affine operation: y = Wx + b
        self.fc1 = nn.Linear(16 * 6 * 6, 120)  # 6*6 from image dimension
        self.fc2 = nn.Linear(120, 84)
        self.fc3 = nn.Linear(84, 10)

    def forward(self, x):
        # Max pooling over a (2, 2) window
        x = F.max_pool2d(F.relu(self.conv1(x)), (2, 2))
        # If the size is a square you can only specify a single number
        x = F.max_pool2d(F.relu(self.conv2(x)), 2)
        x = x.view(-1, self.num_flat_features(x))
        x = F.relu(self.fc1(x))
        x = F.relu(self.fc2(x))
        x = self.fc3(x)
        return x

    def num_flat_features(self, x):
        size = x.size()[1:]
        num_features = 1
        for s in size:
            num_features *= s
        return num_features


net = Net()
可以看到,在pytorch中,我们只需要定义forward函数,就可以使用autograd自动定义backward函数(计算梯度)。同样,我们也可以在forward函数中使用任何Tensor操作。
定义完网络之后可以使用net.parameters()返回模型的可学习参数
4.1 LOSS 函数的构建
损失函数采用一对(output, target)输入,并计算一个值,该值估计输出与目标的距离。
nn函数包下有几种不同的损失函数。 一个简单的损失是:nn.MSELoss,它计算输入和目标之间的均方误差。
例如:
output = net(input)
target = torch.randn(10)  # a dummy target, for example
target = target.view(1, -1)  # make it the same shape as output
criterion = nn.MSELoss()

loss = criterion(output, target)
5.0 Pytorch 的网络训练实操
总之,pytorch相对而言非常适用于网络模型的构建训练,后续我会放出对于自己手码的RNN 对于MINST数据集的代码 以及Resnet 对于CIFAR10数据集的代码详情看我后续更的文章。
更新:
Pytorch实现Resnet训练CIFAR10数据集(完整代码,可进一步优化)