SpringBoot项目搭建Swagger2框架day2-2
一、Swagger2介绍
1.1: 前后端分离开发模式中,api文档是最好的沟通方式。
- 2: Swagger 是一个规范和完整的框架,用于生成、描述、调用和可视化 RESTful 风格的 Web 服务。
1.2.1: 及时性 (接口变更后,能够及时准确地通知相关前后端开发人员)
1 2.2: 规范性 (并且保证接口的规范性,如接口的地址,请求方式,参数及响应格式和错误信息)
1.2.3: 一致性 (接口信息一致,不会出现因开发人员拿到的文档版本不一致,而出现分歧)
1.2.4 可测性 (直接在接口文档上进行测试,以方便理解业务)
二、配置Swagger2

1.1、创建common模块
- 2 : 在guli-parent父工程下创建模块common
1.2.1: 配置:
1.2.2: groupId:com.atguigu
1.2.3: artifactId:common

2、在common中引入相关依赖 删 src 改 pom
<?xml version="1.0" encoding="UTF-8"?>
<project xmlns="http://maven.apache.org/POM/4.0.0"
         xmlns:xsi="http://www.w3.org/2001/XMLSchema-instance"
         xsi:schemaLocation="http://maven.apache.org/POM/4.0.0 http://maven.apache.org/xsd/maven-4.0.0.xsd">
    <parent>
        <artifactId>guli_parent</artifactId>
        <groupId>com.atguigu</groupId>
        <version>0.0.1-SNAPSHOT</version>
    </parent>
    <modelVersion>4.0.0</modelVersion>

    <artifactId>common</artifactId>
<!--pom 类型-->
    <packaging>pom</packaging>
    <modules>
        <module>service_base</module>
        <module>common_utils</module>
    </modules>

    <dependencies>
        <dependency>

            <groupId>org.springframework.boot</groupId>
            <artifactId>spring-boot-starter-web</artifactId>
            <scope>provided </scope>
        </dependency>

        <!--mybatis-plus-->
        <dependency>
            <groupId>com.baomidou</groupId>
            <artifactId>mybatis-plus-boot-starter</artifactId>
            <scope>provided </scope>
        </dependency>

        <!--lombok用来简化实体类:需要安装lombok插件-->
        <dependency>
            <groupId>org.projectlombok</groupId>
            <artifactId>lombok</artifactId>
            <scope>provided </scope>
        </dependency>

        <!--swagger-->
        <dependency>
            <groupId>io.springfox</groupId>
            <artifactId>springfox-swagger2</artifactId>
            <scope>provided </scope>
        </dependency>

        <dependency>
            <groupId>io.springfox</groupId>
            <artifactId>springfox-swagger-ui</artifactId>
            <scope>provided </scope>
        </dependency>

        <!-- redis -->
        <dependency>
            <groupId>org.springframework.boot</groupId>
            <artifactId>spring-boot-starter-data-redis</artifactId>
        </dependency>

        <!-- spring2.X集成redis所需common-pool2
        <dependency>
            <groupId>org.apache.commons</groupId>
            <artifactId>commons-pool2</artifactId>
            <version>2.6.0</version>
        </dependency>-->

    </dependencies>

</project>
3、在common下面创建子模块service-base
- 创建包com.atguigu.servicebase.config,创建类SwaggerConfig

package com.atguigu.servicebase;

import com.google.common.base.Predicates;
import org.springframework.context.annotation.Bean;
import org.springframework.context.annotation.Configuration;
import springfox.documentation.builders.ApiInfoBuilder;
import springfox.documentation.builders.PathSelectors;
import springfox.documentation.service.ApiInfo;
import springfox.documentation.service.Contact;
import springfox.documentation.spi.DocumentationType;
import springfox.documentation.spring.web.plugins.Docket;
import springfox.documentation.swagger2.annotations.EnableSwagger2;

/**
 * 类 描 述:TODD
 * 项目名称:guli_parent
 * 类 名 称:SwaggerConfig
 * 创建时间:2020/9/14 6:53 PM
 * 创 建 人:huanghao
 *
 * @version: V2.2
 */
@Configuration //标注配置类
@EnableSwagger2 //注解标注 Swagger2*表示应启用Swagger支持。
public class SwaggerConfig {


    @Bean
    public Docket webApiConfig() {

        return new Docket(DocumentationType.SWAGGER_2)
                .groupName("webApi")
                .apiInfo(webApiInfo())
                .select()
                .paths(Predicates.not(PathSelectors.regex("/admin/.*"))) //not 当你接口中含有 admin 和error 就不在显示
                .paths(Predicates.not(PathSelectors.regex("/error.*")))
                .build();
    }

        private ApiInfo webApiInfo () {

            return new ApiInfoBuilder()
                    .title("网站-课程中心API文档")
                    .description("本文档描述了课程中心微服务接口定义")
                    .version("1.0")
                    .contact(new Contact("Helen", "http://atguigu.com", "[email protected]"))
                    .build();
        }
    }
4、在模块service父工程模块中引入service-base
<!--引入公共模块 service_Swagger-->
       <dependency>
            <groupId>com.atguigu</groupId>
            <artifactId>service_base</artifactId>
            <version>0.0.1-SNAPSHOT</version>
        </dependency>
5、在service-edu启动类上添加注解开启组件扫描,进行测试
package com.atguigu.eduservice;

import org.springframework.boot.SpringApplication;
import org.springframework.boot.autoconfigure.SpringBootApplication;
import org.springframework.context.annotation.ComponentScan;

/**
 * 类 描 述:TODD
 * 项目名称:guli_parent
 * 类 名 称:EduApplication
 * 创建时间:2020/9/14 5:45 PM
 * 创 建 人:huanghao
 *
 * @version: V2.2
 */
@SpringBootApplication
@ComponentScan(basePackages = {
     "com.atguigu"}) //当项目启动时会去组件扫描com.atguigu的所有配置信息如果不添加就会扫描不到
public class EduApplication {


    public static void main(String[] args) {

        SpringApplication.run(EduApplication.class,args);
    }
}
6、API模型
- 1: 可以添加一些自定义设置,例如:定义样例数据
@ApiModelProperty(value = "创建时间", example = "2019-01-01 8:00:00")
@TableField(fill = FieldFill.INSERT)
private Date gmtCreate;

@ApiModelProperty(value = "更新时间", example = "2019-01-01 8:00:00")
@TableField(fill = FieldFill.INSERT_UPDATE)
private Date gmtModified;
- 2.1: 像这样添加显示的数据
7、定义接口说明和参数说明
- 定义在类上:@Api
- 定义在方法上:@ApiOperation
- 定义在参数上:@ApiParam
package com.atguigu.eduservice.controller;


import com.atguigu.eduservice.entity.EduTeacher;
import com.atguigu.eduservice.service.EduTeacherService;
import io.swagger.annotations.Api;
import io.swagger.annotations.ApiOperation;
import io.swagger.annotations.ApiParam;
import org.springframework.beans.factory.annotation.Autowired;
import org.springframework.web.bind.annotation.*;

import java.util.List;

/**
 * <p>
 * 讲师 前端控制器
 * </p>
 *
 * @author testjava
 * @since 2020-09-14
 */
@Api(description = "讲师管理")
@RestController
@RequestMapping("/eduservice/edu-teacher")
public class EduTeacherController {


    //2:service 业务注入实现方法
    @Autowired
    private EduTeacherService teacherService;

    //1: 查询讲师所有数据
    //resu风格写代码
    //访问地址: http:localhost:8001/eduservice/edu-teacher/findAll
    @ApiOperation(value = "查询所有讲师列表")
    @GetMapping("findAll")
    public List<EduTeacher> findAllTeacher(){

        //调用 service 的方法实现查询所有的功能 返回的类型 list 类型
        List<EduTeacher> list = teacherService.list(null);
        //返回该方法值
        return list;
    }

    @ApiOperation(value = "逻辑删除讲师列表")
    //2: 逻辑删除讲师的方法
    @DeleteMapping("{id}")
	//得到数据中的 id 值  返回的类型 Boolean 类型
    public boolean removeTeacher(
            @ApiParam(name = "id",value = "讲师 ID",required = true)
            @PathVariable String id){

        //
        boolean flag = teacherService.removeById(id);
        //返回值
        return flag;
    }
}
三: 统一返回数据格式
- 1:项目中我们会将响应封装成json返回,一般我们会将所有接口的数据格式统一, 使前端(iOS Android, Web)对数据的操作更一致、轻松。
1.2.1: 一般情况下,统一返回数据格式没有固定的格式,只要能描述清楚返回的数据状态以及要返回的具体数据就可以。但是一般会包含状态码、返回消息、数据这几部分内容
1.2.2: 例如,我们的系统要求返回的基本数据格式如下:
- 列表型数据:
{

  "success": true, //key 值
  "code": 20000,	//value 值
  "message": "成功",
  "data": {

    "items": [
      {

        "id": "1",
        "name": "刘德华",
        "intro": "毕业于师范大学数学系,热爱教育事业,执教数学思维6年有余"
      }
    ]
  }
}
- 分页型数据格式
{

  "success": true, //ket 键值对
  "code": 20000,	//value值
  "message": "成功",
  "data": {

    "total": 17, //返回数据
    "rows": [ //返回每页数据的 list 集合
      {

        "id": "1",
        "name": "刘德华",
        "intro": "毕业于师范大学数学系,热爱教育事业,执教数学思维6年有余"
      }
    ]
  }
}
- 没有返回数据 成功数据 做删除返回成功或失败:
{

  "success": true,
  "code": 20000,
  "message": "成功",
  "data": {
     }
}
- 没有返回数据 失败数据:
{

  "success": false,
  "code": 20001,
  "message": "失败",
  "data": {
     }
}
- 像这种类返回的数据结构.直接简化方式定义简单化统一形式:
{

  "success": 布尔, //响应是否成功
  "code": 数字, //响应码
  "message": 字符串, //返回消息
  "data": HashMap //返回数据,放在键值对中
}
四: 创建统一结果返回类
1: 创建统一返回的流程图:

2: 项目的构架:

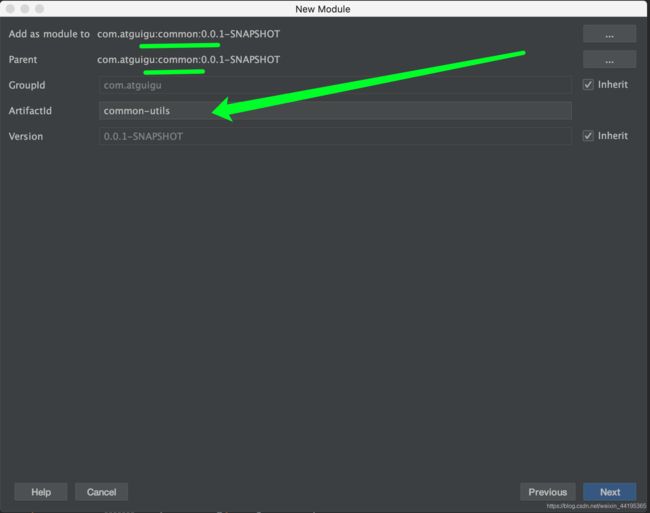
1、在common模块下创建子模块common-utils作为我们公共的模块
3、创建接口定义返回码
- 1 创建包com.atguigu.commonutils,创建接口 ResultCode.java
package com.atguigu.commonutils;

/**
 * 类 描 述:TODD
 * 项目名称:guli_parent
 * 类 名 称:R
 * 创建时间:2020/9/14 11:11 PM
 * 创 建 人:huanghao
 *
 * @version: V2.2
 */

import io.swagger.annotations.ApiModelProperty;
import lombok.Data;
import java.util.HashMap;
import java.util.Map;

/**
 * 统一返回数据格式结果的类
 */
@Data //lombok 注解生成 set 方法get. toSting 有参构造 无参构造
public class R {


    @ApiModelProperty(value = "是否成功")
    private Boolean success;

    @ApiModelProperty(value = "返回状态码")
    private Integer code;

    @ApiModelProperty(value = "返回消息")
    private String message;

    @ApiModelProperty(value = "返回数据")
    private Map<String, Object> data = new HashMap<String, Object>();

    //把构造方法作为私有化
    private R(){
     }

    //成功静态方法
    public static R success(){

        R r = new R();
        r.setSuccess(true);
        r.setCode(ResultCode.SUCCESS);
        r.setMessage("返回成功!");

        //返回的值
        return r;
    }

    //失败的静态方法
    public static R error(){

        R r = new R();
        r.setSuccess(false);
        r.setCode(ResultCode.ERROR);
        r.setMessage("返回失败!");

        //返回的值
        return r;
    }

    /**
     *
     * @param success
     * @return
     */
    public R success(Boolean success){

        this.setSuccess(success);
        return this;
    }

    public R message(String message){

        this.setMessage(message);
        return this;
    }

    public R code(Integer code){

        this.setCode(code);
        return this;
    }

    public R data(String key,Object value){

        this.data.put(key, value);
        return this;
    }

    public R data(Map<String, Object>map){

        this.setData(map);
        return this;
    }
}
五: 测试 Swagger到 service_edu前端控制器编写实现的方法
1、在service pom.xml 模块中添加依赖
<!--映入 common_utils 公共的模块-->
        <dependency>
            <groupId>com.atguigu</groupId>
            <artifactId>common_utils</artifactId>
            <version>0.0.1-SNAPSHOT</version>
        </dependency>
2、编写 Controller 的 Swagger 实现的方法
- 列表
import com.atguigu.commonutils.R;
import java.util.List;

/**
 * <p>
 * 讲师 前端控制器
 * </p>
 *
 * @author testjava
 * @since 2020-09-14
 */
@Api(description = "讲师管理")
@RestController
@RequestMapping("/eduservice/edu-teacher")
public class EduTeacherController {


 	/**
     * ===========================统一返回结果方法==================================
     */

    @ApiOperation(value = "查询所有讲师列表")
    @GetMapping("findAll")
    public R findAllTeacher() {

        //调用 teacherService 的 CRUD 方法实现查询All 所有的讲师列表
        List<EduTeacher> list = teacherService.list(null);
        return R.success().data("items", list);
    }
测试结果: 请求地址: http://localhost:8001/swagger-ui.html


- 删除
	/**
     * ===========================统一返回结果方法==================================
     */
     2: 逻辑删除讲师的方法
    @DeleteMapping("{id}")
    //得到数据中的 id 值  返回的类型 Boolean 类型
    public R removeTeacher(
            @ApiParam(name = "id",value = "讲师 ID",required = true)
            @PathVariable String id){

        //
        boolean flag = teacherService.removeById(id);
        if (flag) {

            return R.success();
        } else {

            return R.error();
        }
    }
}
测试结果:请求地址: http://localhost:8001/swagger-ui.html


六: 分页查询讲师列表

1、MyBatisPlusConfig中配置分页插件
@Configuration //标注为配置类
@MapperScan("com.atguigu.eduservice.mapper") //组件扫描
public class EduConfig {


	 /**
     * 分页查询的插件
     */
    @Bean
    public PaginationInterceptor paginationInterceptor() {

        return new PaginationInterceptor();
    }
2、分页service_edu 的 Controller分页查询方法
- EduTeacherController中添加分页方法
/**
     * ===========================分页查询讲师的方法==================================
     * 分页查询讲师的方法
     * current 代表当前页
     * limit 每页显示的记录数
     */
    @ApiOperation(value = "分页讲师列表")
    @GetMapping("pageTeacher/{current}/{limit}") //get提交
    public R pageListTeacher(
                            @ApiParam(name = "current",value = "当前页码",required = true)
                             @PathVariable long current,
                            @ApiParam(name = "limit",value = "每页记录数",required = true)
                             @PathVariable long limit ){

        //创建 page 对象
        Page<EduTeacher> pageTeacher = new Page<>(current,limit);

        //调用方法实现分页
        //调用方法时候.底层做了封装.把分页所有的数据封装到pageTeacher对象里面
        teacherService.page(pageTeacher,null);

        long total = pageTeacher.getTotal(); //记录总页数
        //getRecords 返回的 list 集合
        List<EduTeacher> records = pageTeacher.getRecords(); //数据list 集合

		//第二中种方法
//        //创建 map 集合用 map 集合的方式存到集合中使用
//        Map map = new HashMap();
//        map.put("total",total);
//        map.put("rows",records);
//
//        //返回的值
//        return R.success().data(map);

        //返回的每页总数
        //返回每页的 list 的数据
        return R.success().data("total",total).data("rows:", records);
    }
}
测试结果:


七: 条件查询
- 1根据讲师名称name,讲师头衔level、讲师入驻时间gmt_create(时间段)查询 gmt_modified结束时间.
1.2.1: 创建com.guli.entity.vo包,创建TeacherQuery.java封装查询对象.
package com.atguigu.eduservice.entity.vo;

import io.swagger.annotations.ApiModel;
import io.swagger.annotations.ApiModelProperty;
import lombok.Data ;
/**
 * 用于封装查询对象的值数据
 */
@Data //注解生成 get 和 set 方法
@ApiModel(value = "Teacher查询对象", description = "讲师查询对象封装")
public class TeacherQuery {


    @ApiModelProperty(value = "教师名称,模糊查询")
    private String name;

    @ApiModelProperty(value = "头衔级别1高级讲师 2首席讲师")
    private Integer level;

    @ApiModelProperty(value = "查询开始时间", example = "2019-01-01 10:10:10")
    private String begin;//注意,这里使用的是String类型,前端传过来的数据无需进行类型转换

    @ApiModelProperty(value = "查询结束时间", example = "2019-12-01 10:10:10")
    private String end;
}
2: 第二种方法直接去控制器层直接写业务调度逻辑代码:Controller
 	/**
     * ===========================条件查询带分页的方法==================================
     *
     *  RequestBody : 使用 json传递数据.把json数据封装到对应的对象里面  TeacherQuery对象
     *  ResponseBody: 返回数据.一般都返回json数据
     */
    @ApiOperation(value = "条件查询对象封装")
    @PostMapping("pageTeacherCondition/{current}/{limit}")
    public R pageTeacherCondition(
                                 @ApiParam(name = "current",value = "当前页数",required = true)
                                 @PathVariable long current,
                                 @ApiParam(name = "limit",value = "每页记录数",required = true)
                                 @PathVariable long limit,
                                 //传入封装数据的对象.用对象形式得到该条件
                                 //@RequestBody(required = false) 返回 json 数据里面传值required=false 表示这里面值  可以为 null没有
                                 @ApiParam(name = "teacherQuery", value = "查询封装对象", required = false)
                                 @RequestBody(required = false) TeacherQuery teacherQuery){

        //1: 创建 page 对象 传入查询的参数 当前页 记录数
        Page<EduTeacher> pageTeacher = new Page<>(current, limit);

        //3: 构建QueryWapper 条件
        QueryWrapper<EduTeacher> wrapper = new QueryWrapper<>();
        //4: 多种条件组合查询
        //在Mybatis_pius框架 利用动态 sql 语句用判断拼接 sql 语句 把封装 vo 的数据取出
        String name = teacherQuery.getName(); //名称
        Integer level = teacherQuery.getLevel(); //级别
        String begin = teacherQuery.getBegin();//开始时间
        String end = teacherQuery.getEnd(); //结束时间
        //判断条件是否为空.如果不为空拼接条件

        /**
         * StringUtils springframework 的容器 jar
         * isEmpty表示 name值为空或者为空字符串
         */
        //名称
        if(!StringUtils.isEmpty(name)){

            //模糊查询
            //构建它的条件  like 的值 1: 对应数据库字段名称的值 name 2: 具体的值name最终存入的值
            wrapper.like("name",name);
        }

        //级别
        if(!StringUtils.isEmpty(level)){

            wrapper.eq("level",level);
        }

        //开始时间  <=
        if(!StringUtils.isEmpty(begin)){

            wrapper.ge("gmt_create",begin);
        }

        //结束时间 wrapper 的框架查询方式  >=
        if(!StringUtils.isEmpty(end)){

            wrapper.le("gmt_modified",end);
        }

        //2: 调用方法实现条件分页的
        teacherService.page(pageTeacher,wrapper);

        long total = pageTeacher.getTotal(); //记录总页数
        List<EduTeacher> records = pageTeacher.getRecords(); //数据 list 集合
        return R.success().data("total:",total).data("rows:", records);
    }
}
条件查询测试结果:


