Retrofit+Okhttp实现注册登录+后端代码超详细步骤
前言
这几天想学习网络相关的东西,那么就从最简单的开始吧,但是在网上搜了一下,百度还是谷歌都没有完整的教程,要不只有移动端代码,要不只有后端代码,不想使用别人的api,那就自己做一个,所以我在完成之后想把这些记录下来,中间的坑遇到了不少,在这做一个简简单单的总结。从搭建环境开始一步一步来。代码比较粗糙,不过基本功能没问题。本文章用到的框架不会的可以提前学起来了。
环境介绍
移动端:
 1. AndroidStudio 4.1.1
 2. 编程语言:kotlin
 3. 架构:mvp
 4. 框架库:retrofit2+okhttp3(这里没用rxjava是因为有kotlin)
后端:
1.JDK 8
2.IntelliJ IDEA 2020
3.Tomcat 8
4.MySQL 5.7.29
5.Navicat Premium 15
6.springboot+mybatis
搭建环境
安卓端的环境搭建不会的可以看我的其他文章,这里不再多说。
对于一个没有接触过后端的,首先是要学会搭建环境!这里主要是后端的环境搭建:可以参考这篇文章,写的很详细,绝对够用:
手把手教你搭建开发环境之Java开发
知识储备
既然我们用retrofit和okhttp,那么我们总得知道怎么使用吧,这里推荐个不错的文章:
你应该知道的HTTP基础知识
你真的会用Retrofit2吗?Retrofit2完全教程
后端的不会的可以直接看b站的视频:
我们本篇文章的主要目的不是学习后端
SpringBoot系列–SSM1: 注册登录
后端环境搭建好之后,基本上跟着视频来一步一步的做出来就没问题了。如果有问题可以去看源码对比一下,不过小关哥的第三个视频跳的稍微有点快,对于后端没碰过的我,是真的菜,这里我遇到了几个坑,下面会给大家提出来避免入坑。最后也会放上完整代码的链接!
Android端
1.添加依赖
implementation 'com.squareup.retrofit2:retrofit:2.9.0'
implementation 'com.squareup.retrofit2:converter-gson:2.9.0'
implementation 'com.squareup.okhttp3:okhttp:4.9.0'
implementation 'com.squareup.okhttp3:logging-interceptor:4.9.0'
2.布局
activity_login.xml(部分资源查看源码)
<RelativeLayout xmlns:android="http://schemas.android.com/apk/res/android"
    xmlns:tools="http://schemas.android.com/tools"
    android:layout_width="match_parent"
    android:layout_height="match_parent"
    android:gravity="center_horizontal"
    android:paddingBottom="@dimen/activity_vertical_margin"
    android:paddingLeft="@dimen/activity_horizontal_margin"
    android:paddingRight="@dimen/activity_horizontal_margin"
    android:paddingTop="@dimen/activity_vertical_margin">

    <com.google.android.material.textfield.TextInputLayout
        android:id="@+id/username_layout"
        android:layout_width="match_parent"
        android:layout_height="wrap_content">

        <EditText
            android:id="@+id/username"
            android:layout_width="match_parent"
            android:layout_height="wrap_content"
            android:hint="@string/login_username"
            android:maxLines="1"/>

    com.google.android.material.textfield.TextInputLayout>

    <com.google.android.material.textfield.TextInputLayout
        android:id="@+id/password_layout"
        android:layout_width="match_parent"
        android:layout_height="wrap_content"
        android:layout_below="@id/username_layout">

        <EditText
            android:id="@+id/password"
            android:layout_width="match_parent"
            android:layout_height="wrap_content"
            android:hint="@string/login_password"
            android:imeActionLabel="@string/action_sign_in_short"
            android:imeOptions="actionUnspecified"
            android:inputType="textPassword"
            android:maxLines="1"/>

    com.google.android.material.textfield.TextInputLayout>

    <com.google.android.material.textfield.TextInputLayout
        android:id="@+id/email_layout"
        android:layout_width="match_parent"
        android:layout_height="wrap_content"
        android:layout_below="@id/password_layout">

        <EditText
            android:id="@+id/email"
            android:layout_width="match_parent"
            android:layout_height="wrap_content"
            android:hint="@string/prompt_email"
            android:inputType="textEmailAddress"
            android:maxLines="1"/>

    com.google.android.material.textfield.TextInputLayout>

    <LinearLayout
        android:layout_width="match_parent"
        android:layout_height="wrap_content"
        android:layout_below="@id/email_layout"
        android:layout_marginTop="16dp"
        android:orientation="horizontal">

        <Button
            android:id="@+id/register"
            style="?android:textAppearanceSmall"
            android:layout_width="0dp"
            android:layout_height="wrap_content"
            android:layout_weight="1"
            android:text="@string/login_register"
            android:textStyle="bold"/>

        <Button
            android:id="@+id/login"
            style="?android:textAppearanceSmall"
            android:layout_width="0dp"
            android:layout_height="wrap_content"
            android:layout_weight="1"
            android:text="@string/login_login"
            android:textStyle="bold"/>

    LinearLayout>

RelativeLayout>
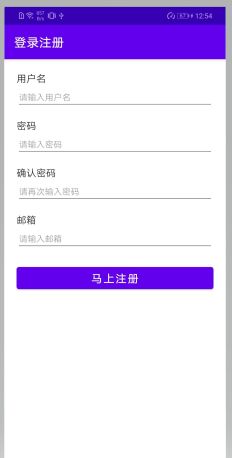
activity_register.xml
<LinearLayout xmlns:android="http://schemas.android.com/apk/res/android"
    android:orientation="vertical" android:layout_width="match_parent"
    android:layout_height="match_parent"
    android:padding="20dp">
    <TextView
        android:layout_width="match_parent"
        android:layout_height="wrap_content"
        android:text="@string/login_username"
        android:textSize="16sp"
        android:textColor="#2b2b2b"/>

    <EditText
        android:id="@+id/input_name"
        android:layout_width="match_parent"
        android:layout_height="wrap_content"
        android:maxLength="18"
        android:maxLines="1"
        android:hint="请输入用户名"
        android:textSize="14sp"
        android:inputType="text"/>

    <TextView
        android:layout_width="match_parent"
        android:layout_height="wrap_content"
        android:layout_marginTop="15dp"
        android:text="@string/login_password"
        android:textSize="16sp"
        android:textColor="#2b2b2b"/>

    <EditText
        android:id="@+id/input_pwd"
        android:layout_width="match_parent"
        android:layout_height="wrap_content"
        android:inputType="text|textPassword"
        android:maxLength="18"
        android:hint="请输入密码"
        android:textSize="14sp"
        android:maxLines="1"/>

    <TextView
        android:layout_width="match_parent"
        android:layout_height="wrap_content"
        android:layout_marginTop="15dp"
        android:text="@string/confirm_pwd"
        android:textSize="16sp"
        android:textColor="#2b2b2b"/>

    <EditText
        android:id="@+id/input_confirm_pwd"
        android:layout_width="match_parent"
        android:layout_height="wrap_content"
        android:inputType="text|textPassword"
        android:maxLength="18"
        android:hint="请再次输入密码"
        android:textSize="14sp"
        android:maxLines="1"/>

    <TextView
        android:layout_width="match_parent"
        android:layout_height="wrap_content"
        android:layout_marginTop="15dp"
        android:text="@string/email"
        android:textSize="16sp"
        android:textColor="#2b2b2b"/>

    <EditText
        android:id="@+id/input_email"
        android:layout_width="match_parent"
        android:layout_height="wrap_content"
        android:inputType="text"
        android:maxLength="18"
        android:hint="请输入邮箱"
        android:textSize="14sp"
        android:maxLines="1"/>

    <Button
        android:id="@+id/btn_register"
        android:layout_width="match_parent"
        android:layout_height="wrap_content"
        android:layout_marginTop="20dp"
        android:textSize="18sp"
        android:text="@string/register"/>
LinearLayout>
Entity
data class Accounts(val status: String,
                         val msg: String,
                         val result: User):Serializable

data class  User(val id: String, val nickname: String,val password:String,val username:String)
这里的实体我们得和后端同步,首先定义User类,用户id,昵称,用户名和密码
然后再建一个Accounts账户类,包括响应状态码,响应信息,响应数据就是我们的User类。
API
class APIService {


    /**
     * 注册
     */
    interface Register {

        @FormUrlEncoded
        @POST("register")
        fun toRegister(
            @Field("username") username: String,
            @Field("password") password: String
        ): Call<Accounts>
    }

    /**
     * 登录
     */
    interface Login {

        @FormUrlEncoded
        @POST("login")
        fun toLogin(
            @Field("username") username: String,
            @Field("password") password: String
        ):Call<Accounts>
    }
}
这里我们采用post请求方式,返回的数据就是我们定义的Accounts类,其他请求方式不再介绍,具体的使用方法见上面的推荐文章,刚开始不理解注解后面的参数含义,就想自己搭建一个后端来看看怎么链接的,我的 BaseUrl 是:
const val REQUEST_BASE_URL:String = "http://47.111.233.78:8080/api/user/"
这里我没有使用localhost而是使用的ip地址,因为我的服务器在云端上面。(这里是使用的阿里云服务器,可以自己搭建一个云端服务器来使用。中间有些狗血的坑,比如我用mstsc来连接云端连接不上,得弄什么注册表权限,还有就是搭建完之后,一定要在云端的网站配置安全组的常用端口8080。总之比较坎坷,挑选自己的服务器,如果只是测试,可以选个一个月免费,或者是三个月的比较便宜的轻量型服务器。)
好了,我们看一下一个完整的请求连接是什么样的:
http://localhost:8080/api/user/login?username=wyq&password=321
我的baseurl是http://localhost:8080/api/user/
而我们需要在api中进行一些操作,相当于login是一个请求登录的操作,然后传入你的参数用户名和密码
http://localhost:8080/api/user/register?username=wyq&password=321
这就是注册请求操作,这里只是演示一下,以便于理解,post不能使用这种请求操作,get请求才能。
接着retrofit和okhttp会自动拼接这些参数并传给后端,后端接收到这些参数会拆分,根据你的请求参数是login还是register来进行进一步的数据库查询还是插入操作。
retrofitManager.kt
class RetrofitManager {


    private val BASE_URL = "http://47.111.233.78:8080/api/user/"

    companion object{


        fun <T> getService(url:String,service: Class<T>):T{

            //根据你传的service来进行不同的请求
            return createRetrofit(url).create(service)
        }

        private fun createRetrofit(url: String):Retrofit{

            val level: HttpLoggingInterceptor.Level = HttpLoggingInterceptor.Level.BODY
            val loggingInterceptor = HttpLoggingInterceptor(object :HttpLoggingInterceptor.Logger{

                override fun log(message: String) {

                    Log.i("kotlin", "OkHttp: $message")
                }
            })
            loggingInterceptor.level = level

            val okHttpClientBuilder = OkHttpClient.Builder()
            //连接超时
            okHttpClientBuilder.connectTimeout(30, TimeUnit.SECONDS)
            //读取超时
            okHttpClientBuilder.readTimeout(10, TimeUnit.SECONDS)
            //添加拦截器
            okHttpClientBuilder.addInterceptor(loggingInterceptor)
            //创建retrofit对象
            return Retrofit.Builder()
                            .baseUrl(url)
                            .client(okHttpClientBuilder.build())
							//json数据转换
                        	.addConverterFactory(GsonConverterFactory.create())
                            .build()
        }
    }
}
LoginTask.kt
class LoginTask:LoginContract.Task {


    private var callBack: LoginContract.Presenter.OnLoginCallBack? = null


    override fun login(
        username: String?,
        password: String?,
        onLoginCallBack: LoginContract.Presenter.OnLoginCallBack
    ) {

        callBack = onLoginCallBack
        val mLogin = RetrofitManager.getService(Constant.REQUEST_BASE_URL, APIService.Login::class.java)
        if (username!!.isNotEmpty() && password!!.isNotEmpty()){


            val longCall = mLogin.toLogin(username, password)
            longCall.enqueue(object : Callback<Accounts> {


                override fun onFailure(call: Call<Accounts>, t: Throwable) {

                    callBack?.loginFail("登录失败")
                }

                override fun onResponse(call: Call<Accounts>, response: Response<Accounts>) {


                    var result: Accounts? = response.body()
                    if (result != null && "0" == result.status){

                        callBack?.loginSuccess()
                    }else{

                        callBack?.loginFail(result!!.msg)
                    }
                }
            })
        }
    }
}
registerTask.kt
class RegisterTask : RegisterContract.Task {

    private var callback: RegisterContract.Presenter.OnRegisterCallBack? = null

    override fun goRegister(
        name: String,
        pwd: String,
        onRegisterCallBack: RegisterContract.Presenter.OnRegisterCallBack
    ) {

        callback = onRegisterCallBack

        val registerService =
            RetrofitManager.getService(Constant.REQUEST_BASE_URL, APIService.Register::class.java)
        val registerCallBack = registerService.toRegister(name, pwd)
        registerCallBack.enqueue(object : Callback<Accounts> {


            override fun onFailure(call: Call<Accounts>, t: Throwable) {

                callback?.registerFail("注册失败")
            }

            override fun onResponse(call: Call<Accounts>, response: Response<Accounts>) {

                var result: Accounts? = response!!.body()
                if (result != null && "0" == result.status) {

                    callback?.registerSuccess(result)
                } else {

                    callback?.registerFail(result!!.msg)
                }
            }
        })
    }
}
后端:
这里就放主要代码:
@Slf4j
@Api(tags = "用户接口")
@AllArgsConstructor
@RequestMapping(Const.API + "user")
@RestController
public class UserController {


    private final UserService userService;
    private final UserMapper userMapper;


    @ApiOperation("登陆接口,返回用户数据")
    @PostMapping("login")
    public Result<User> login(
            @RequestParam String username,
            @RequestParam String password) {

        return userService.login(username, password);
    }


    @ApiOperation("注册用户接口")
    @PostMapping("register")
    public Result<User> register(@RequestParam String username,
                                 @RequestParam String password, String nickname) {

        return userService.addUser(username, password, nickname);
    }
看到postMapping里面是不是和android里面APIService很相像,是的,这就相当于一个约定,我们在android移动端和后端要约定好接口,才能进行数据请求和响应。
@Slf4j
@AllArgsConstructor
@Service
public class UserService {


    private final UserMapper userMapper;

    public Result<User> login(String username, String password) {

        User user = getUserByUsernameAndPassword(username, password);
        if (user == null) {

            return Result.createByErrorMessage("登陆失败");
        }
        HttpKit.getRequest().getSession().setAttribute("user", user);
        return Result.createBySuccess(user);
    }
    private User getUserByUsernameAndPassword(String username, String password) {

        User record = new User();
        record.setUsername(username);
        record.setPassword(password);
        PageHelper.startPage(1, 1);
        List<User> list = userMapper.select(record);
        return list.size() == 0 ? null : list.get(0);
    }
    public Result<User> addUser(String username, String password, String nickname) {

        User record = new User();
        record.setUsername(username);
        List<User> list = userMapper.select(record);
        if (!CollectionUtils.isEmpty(list)) {

            return Result.createByErrorMessage("用户已经存在,无法添加");
        }
        record.setPassword(password);
        record.setNickname(nickname);
        int resultCount = userMapper.insertSelective(record);
        return resultCount == 0 ? Result.createByErrorMessage("添加失败") : Result.createBySuccess(record);
    }

}
这里的userMapper.select(record); userMapper.insertSelective(record);是一个查询数据库操作,我们只需要把需要查询的对象,或者需要插入的对象传进去就可以了,是不是很方便。当然这里面用到了大量的注解,这些注解就不详细介绍了,想学的可以自行百度。
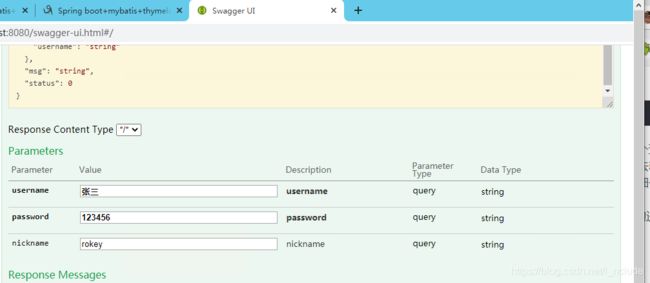
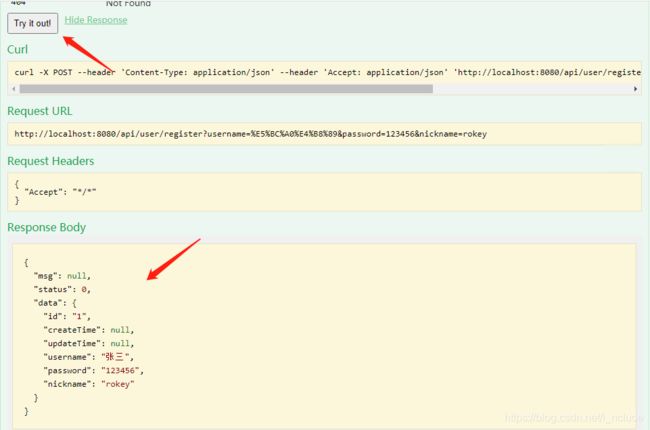
注意一点,这里面用到了swagger框架,这个框架是可以帮助我们很方便的进行网络请求测试:

我们只需要在这里填入数据,就可以看到请求的结果

点击try it out就可以看到下面的结果集
问题总结:
1.搭建好环境代码也完整,本地可访问,其他电脑不可访问,
java.net.UnknownServiceException: CLEARTEXT communication ** not permitted by network security polic
首先android端要在AndroidManifest.xml中加上:android:usesCleartextTraffic="true",Google表示,为保证用户数据和设备的安全,针对下一代 Android 系统(Android P) 的应用程序,将要求默认使用加密连接,这意味着 Android P 将禁止 App 使用所有未加密的连接,因此运行 Android P 系统的安卓设备无论是接收或者发送流量,未来都不能明码传输,需要使用下一代(Transport Layer Security)传输层安全协议,而 Android Nougat 和 Oreo 则不受影响。
<application
        android:name=".common.MyApplication"
        android:allowBackup="true"
        android:icon="@mipmap/ic_launcher"
        android:label="@string/app_name"
        android:roundIcon="@mipmap/ic_launcher_round"
        android:supportsRtl="true"
        android:usesCleartextTraffic="true"
        android:theme="@style/Theme.LoginDemo">
一步一步用腾讯云服务器搭建一个tomcat项目,并用外网通过ip访问项目
2.后端在后期写的时候,由于使用的框架,在navicat建一个数据库后,运行代码会自动建表,这里出现的问题是没有自动建表,解决:

原来我自己敲的代码在profiles这一行前面时没有缩进的,导致自动创建失败,是因为spring的yml文件有着严格的结构层次,如果层次结构不对那么就会出现意想不到的结果,比如这个。
登陆注册安卓端完整代码:
https://github.com/1QQ6/LoginDemo
登陆注册后端完整代码:
https://github.com/guangee/login-server-demo
这里我也把注册登录功能集成到我的另一个开源项目【音乐播放器】了,想要进一步学习的可以看下哦。
链接:https://github.com/1QQ6/TTMusicApp

