SpringBoot实践(四):SpringBoot中的常用注解
传统的Spring使用.xml文件来对bean进行注入或者是配置aop,造成可读性差且不好维护的情况,使用注解可以全方位对实体或者类进行标注,大大地简化了配置写法;
一、@Autowired (自动装配)
spring使用xml文件使用bean和引用时候,zoo实体拥有tiger和monkey类,写法如下:
若使用注解@Autowired来自动装配,就可以消除这种引用,当Spring发现@Autowired注解时,将自动在代码上下文中找到和其匹配(默认是类型匹配)的Bean,并自动注入到相应的地方去。
public class Zoo {
    @Autowired
    private Tiger tiger;
    @Autowired
    private Monkey monkey;
    public String toString(){
        return tiger + "\n" + monkey;
    }
}二、@Qualifier(指定注入Bean的名称)
假设Car类有2个子类,在使用@Autowired来装配的时候可以使用@Qualifier指定想要装配的子类名称;
public class CarFactory {
    @Autowired
    @Qualifier("bmwCar")
    private ICar car;
    public String toString(){
        return car.getCarName();
    }
}
三、 @Service (声明为bean)
类使用@Service注解后就被声明为一个bean,只有成为bean其他的类才可以使用@Autowired将其作为成员变量自动注入,@Scope注解表明这个类是一个单例模式,每次都是一个新的zoo类;
@Service("Zoo")
@Scope("prototype")
public class Zoo {
    @Autowired
    private Tiger tiger;
    @Autowired
    private Monkey monkey;
    public String toString(){
        return tiger + "\n" + monkey;
    }
}
四、@Component (泛指组件,不好归类的时候用这个注解)
@Component注解的类,被Spring进行管理,相当于在xml中配置了一个bean,该注解一般用于即不是表现层又不是业务层更不是持久层的类上面,当工程启动后,该类就已经被实例化;
五、 @Controller(标记为表现层的bean)和 @RestController
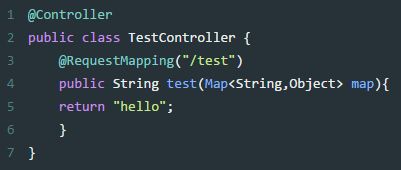
@RestController是Spring4之后加入的注解,等于@Controller中+@ResponseBody,表明这是个能返回json串的表现层接口类,下例中@Controller注释该类将返回hello.html资源,而如果改为@RestController将可以定义rest接口;
六、@RequestMapping(定义请求映射路径)
@RequestMapping可以放在类和方法的上面,定义REST请求的请求路径,/user将是UserController类中方法提供的api请求的根路径;@RequestMapping有8个属性。
value:指定请求的实际地址。
method:指定请求的method类型(GET,POST,PUT,DELETE)等。
consumes:指定处理请求的提交内容类型(Context-Type)。
produces:指定返回的内容类型,还可以设置返回值的字符编码。
params:指定request中必须包含某些参数值,才让该方法处理。
headers:指定request中必须包含某些指定的header值,才让该方法处理请求。
@RestController
@RequestMapping("/user")
@Api("统一认证管理")
@Slf4j
public class UserController {
    @Autowired
    AuthServiceImpl authService;
    @Autowired
    UserServiceImpl userService;
    @Autowired
    private HttpSession session;
    @PostMapping("/login")
    @ApiImplicitParam(name = "req", value = "用户登陆信息", dataType = "LoginReq")
    public R login(@RequestBody @NotNull LoginReq req) throws Exception {
}
七、@RequestParam
用于将请求参数数据映射到处理方法的参数上,也就是当你在页面发起请求有参数传递时候,下例将得到传递的id,并在方法体中对id进行逻辑处理;
八、@ Repository(标注数据访问组件,即DAO组件)
该注解的类一般是持久层,用法比较尴尬,@mapper后不需要在spring配置中设置扫描地址,通过mapper.xml里面的namespace属性对应相关的mapper类,spring将动态的生成Bean后注入到ServiceImpl中。、@repository则需要在Spring中配置扫描包地址,然后生成dao层的bean,之后被注入到ServiceImpl中,下例中可以不写@ Repository注解该mapper也可以被注入spring;
package com.example.testspring.mapper;
import com.example.testspring.model.Students;
import org.apache.ibatis.annotations.Mapper;
import org.springframework.stereotype.Repository;
import java.util.List;
@Repository
@Mapper
public interface StudentMapper {
    List SelectAll();
    Students SelectByID(int id);
}
九、@Configuration(配置类)和@ConfigurationProperties
@Configuration注解把类当做一个配置,也是一个IoC容器,它的某个方法头上如果注册了@Bean就会作为这个Spring容器中的Bean;
Spring源码中大量使用@ConfigurationProperties注解(比如server.port),通过与其他注解配合使用实现Bean的按需配置,该注解有一个prefix属性,通过指定的前缀绑定配置文件中的配置,该注解可以放在类上也可以放在方法上,当作用于方法上时需要有@Bean注解且所属Class需要有@Configuration注解。
下例中使用组合注解得到对于spring.datasource.ds1这个写在application.propertity中的数据源进行定义;
@Configuration
public class DataSourceConfig {
	// 主数据源 ds1数据源
	@Primary
	@Bean(name = "ds1DataSourceProperties")
	@ConfigurationProperties(prefix = "spring.datasource.ds1")
	public DataSourceProperties ds1DataSourceProperties() {
		return new DataSourceProperties();
	}
}
十、@Mapper注解
mybatis3.4.0开始加入了@Mapper注解,目的就是为了不再写mapper映射文件,下例用了mybatisPlus;
@Mapper
public interface UserMapper extends BaseMapper{
    User getByIdLazy(String userId);
    User findById(String userId);
    boolean deleteRoleByUserId(String userId);
    boolean insertRolesBatch(@Param("list") List list);}
十一、@getMapping和@postMapping
@getMapping与@postMapping是组合注解:
@getMapping = @requestMapping(method = RequestMethod.GET)
@postMapping = @requestMapping(method = RequestMethod.POST)

