自定义类加载器以及打破双亲委派
0x01 自定义类加载器
自定义类加载器加载一个类需要:继承ClassLoader,重写findClass,如果不想打破双亲委派模型,那么只需要重写findClass;如果想打破双亲委派模型,那么就重写整个loadClass方法,设定自己的类加载逻辑
1 被加载的类:
import java.io.Serializable;

public class Test360 implements Serializable {

        public static  String admin(){
                return "1111111";
        }

        static String name="test";
}
加载方式,可以将类转为字节数组或者读取编译后的class文件
import java.io.*;
/*
将类转为字节数组;将字节数组还原成类
 */
public class arreytobytes   {
    public static void main(String[] args) throws Exception {
        Test360 test =new Test360();
        System.out.print ( "java class对象转字节数组\n" );
        byte[] bufobject = getBytesFromObject(test);
        for(int i=0 ; i
运行此方法后,得到字节数组:
-84,-19,0,5,115,114,0,17,109,97,105,110,46,100,97,121,49,46,84,101,115,116,51,54,48,98,-48,-103,38,120,38,47,-95,2,0,0,120,1122 自定义的类加载器:
import java.io.Serializable;
import java.lang.reflect.Method;


    public class TestClassLoader extends ClassLoader implements Serializable {

        // Test360类名

        private static String testClassName = "main.day1.Test360";
   private static byte[] testClassBytes = new byte[]{
                -84,-19,0,5,115,114,0,17,109,97,105,110,46,100,97,121,49,46,84,101,115,116,51,54,48,98,-48,-103,38,120,38,47,-95,2,0,0,120,112
        };
        @Override
        public Class findClass(String name) throws ClassNotFoundException {
            Class log=null;
            // 只处理Test360类
            if (name.equals ( testClassName )) {
                // 调用JVM的native方法定义TestHelloWorld类
                return defineClass ( testClassName, testClassBytes, 0, testClassBytes.length );
            }
            return log;


        }

        public static void main(String[] args) {
            // 创建自定义的类加载器
            TestClassLoader loader = new TestClassLoader ();

            try {
                // 使用自定义的类加载器加载TestHelloWorld类
                Class testClass = loader.loadClass ( testClassName );


                Object testInstance = testClass.newInstance ();

                // 反射获取admin方法
                Method method = testInstance.getClass ().getMethod ( "admin" );

                // 反射调用admin方法,等价于 String str = t.hello();
                String str = (String) method.invoke ( testInstance );
                System.out.println ( str );

            } catch (Exception e) {
                e.printStackTrace ();
            }
        }
    }
运行结果:
扩展:什么时候回用到类加载器?
new一个类、反射调用等都会用到,关于反射调用可以参考上篇博客https://blog.csdn.net/qq_38376348/article/details/108236057
看一下new一个类的过程:
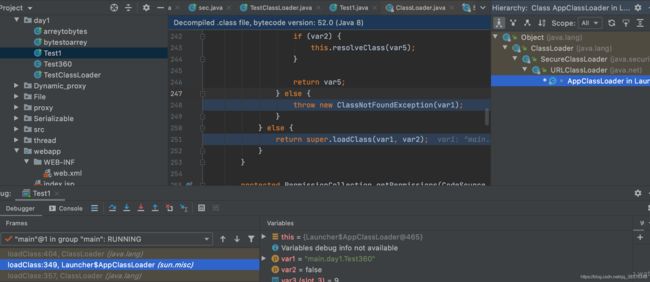
debug:
调用父类的loadClass
很明显C为null,则调用URLClassLoader的findClass
return defineClass(name, res);中,调用了urlclassloader中的defineClass,以字节形式加载class,加载后返回,之后的操作是获取类的方法等后面的部分略过,还涉及到Instrumentation等操作,在整个过程中,URLClassLoader:继承自SecureClassLoader,支持从jar文件和文件夹中获取class,继承于classload,加载时首先去classload里判断是否由bootstrap classload加载过,类的继承关系如下
双亲委派主要体现在ClassLoader的loadclass
ClassLoader:所有类加载器的基类,它是抽象的,定义了类加载最核心的操作。所有继承与classloader的类加载器,都会优先判断是否被父类加载器加载过,防止多次加载
其中classloader的loadclass代码详解:
Class c = findLoadedClass(name); 检测类是否已经被加载如果被加载则最后一行代码直接返回c
如果没有被加载,则执行以下代码
      Class c = findLoadedClass(name);
            if (c == null) {
                long t0 = System.nanoTime();
                try {
                    if (parent != null) {
                        c = parent.loadClass(name, false);
                    } else {
                        c = findBootstrapClassOrNull(name);
                    }
                } catch (ClassNotFoundException e) {
                    // ClassNotFoundException thrown if class not found
                    // from the non-null parent class loader
                }

                if (c == null) {
                    // If still not found, then invoke findClass in order
                    // to find the class.
                    long t1 = System.nanoTime();
                    c = findClass(name);

                    // this is the defining class loader; record the stats
                    sun.misc.PerfCounter.getParentDelegationTime().addTime(t1 - t0);
                    sun.misc.PerfCounter.getFindClassTime().addElapsedTimeFrom(t1);
                    sun.misc.PerfCounter.getFindClasses().increment();
                }
            }
其中c = parent.loadClass(name, false);为调用当亲类的父类加载器 加载,c = findBootstrapClassOrNull(name);为调用BootstrapClass加载器加载,new一个对象时,会走到 c = findClass(name);这一步,findClass为自己定义的类加载器的实现比如new的时候用到的类加载器为:URLClassloader
0x02 破坏双亲委派
在tomcat中,就打破了双亲委派机制,否则多个webapp类依赖容易产生冲突,如果awebapp依赖了spring4 ,bwebapp依赖了spring5,而spring在包路径和命名都有很大的相似,但是功能实现差别却又很大,所以必须进行隔离各自webapp进行单独加载。打破双亲委派机制的有设置Thread.setContextClassLoader() ,热部署OSGI,自定义loadclass类加载逻辑等
在tomcat中的类加载器WebappClassLoader中,每个webapp加载的类仅对当前webapp生效,实现隔离的效果,引用https://www.cnblogs.com/ITPower/p/13217145.html博客中大佬画的一张图
tomcat通过启动多个WebappClassLoader来实现加载包名路径一样的类,看一下WebappClassLoaderBase的loadClass具体实现
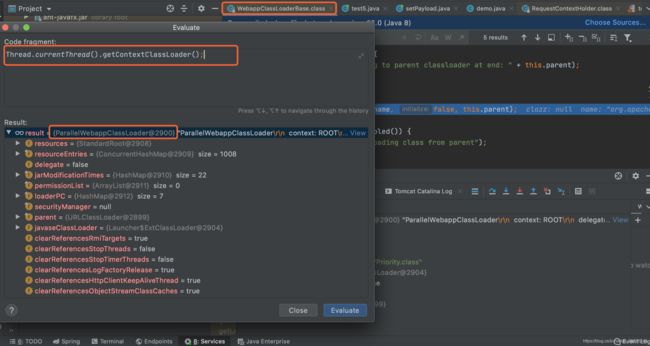
通过调试tomcat可以发现,通过Thread.currentThread().getContextClassLoader(),webapp中使用的类加载器为:
WebappClassLoader
继承关系:
其中loadclass定义了类加载顺序
参考文章:
https://blog.csdn.net/u010883443/article/details/107508114?utm_medium=distribute.pc_aggpage_search_result.none-task-blog-2~all~sobaiduend~default-2-107508114.nonecase&utm_term=tomcat8%E5%A6%82%E4%BD%95%E6%89%93%E7%A0%B4%E5%8F%8C%E4%BA%B2%E5%A7%94%E6%B4%BE
https://blog.csdn.net/xiaobao5214/article/details/81674215
https://www.cnblogs.com/chuonye/p/10827102.html


