安卓笔记
安卓笔记
- 智能手机应用类型
- 按钮
- 菜单
-
- 右上角小菜单
- 上下文菜单
- 文本框
- 拨打电话
- 显示弹窗
-
- 消息弹框
- 界面弹框
- 界面布局
-
- 显示过长的文本
- 实现水平居中
- 实现水平和垂直居中
-
- 使用LinearLayout
- 使用ConstrainLayout
- 模块集中方法
- 实现北南中布局
- 控件隐藏与显示
- ConstraintLayout动画
- 界面的动态替换
- 使用ViewStub动态实例化控件
- CountDown倒计时
- 按钮动画
- 设置按钮集合
- XXOO游戏
- 新建另一个页面
- Activity状态与生命周期
-
- 概念
- 在切换横屏竖屏时候
- 定义静态变量
- 禁止横竖屏旋转
智能手机应用类型
- Mobile Web
本质上是一个传统的Web应用 - Native App
使用Kotlin/Swift开发
使用系统原生的编程语言实现,调用手机硬件和操作系统的所有功能,开发量较大 - Hybrid App
本质上是一个内嵌了WebView的NativeApp
使用JavaScript编写
id 'kotlin-android-extensions'
按钮
val Year = findViewById<TextView>(R.id.editText)
val textView2 = findViewById<TextView>(R.id.textView2)
val btnClick = findViewById<Button>(R.id.button)
//响应按钮
btnClick.setOnClickListener {

	val NowYear = Calendar.getInstance()[Calendar.YEAR]//日期
	val InYear = Year.text.toString().toInt()
	textView2.text = "您的年龄是:" + (NowYear - InYear)
}
btnChangeMyText.setOnClickListener {

	counter++//事件响应函数中的第一个参数,引用按钮对象自己
	(it as Button).text = "我被扁了${
       counter}次! :-("
}
btnLongClick.setOnLongClickListener {

	Toast.makeText(this, "长按了按钮", Toast.LENGTH_SHORT).show()
     true//返回true表示应用程序己经处理了长按事件
}
//设定复选框的状态
myCheckBox.isChecked = false
//响应复选框状态的改变
myCheckBox.setOnCheckedChangeListener {
      buttonView, isChecked ->
//buttonView引用当前的复选框对象
//isChecked表示当前是选中还是取消
	val info = if (isChecked) "勾选" else "取消勾选"
	buttonView.text = "您${
       info}了复选框"
}
//针对单选钮的编程,需要基于它的容器RadioGroup
rgGender.setOnCheckedChangeListener {
      group, checkedId ->
//checkedId表示当前选中的单选钮Id
	tvRadioButton.text = when (checkedId) {

	R.id.rdoFemale -> "美女"
	R.id.rdoMale -> "帅哥"
	else -> "傻瓜"
	}
}
var isFlower = false
btnChangeImage.setOnClickListener {

	if (isFlower) {

		image.setImageResource(R.drawable.forest)
	} else {

	image.setImageResource(R.drawable.flower)
	}
	isFlower = !isFlower
}
//使用ImageAsset
image.setImageResource(R.mipmap.ic_launcher)
rGroup.setOnCheckedChangeListener {
      group, checkedId ->
	when (checkedId) {

		R.id.center -> image.setScaleType(ImageView.ScaleType.FIT_CENTER)
         R.id.fitend -> image.setScaleType(ImageView.ScaleType.FIT_END)
         R.id.fitstart -> image.setScaleType(ImageView.ScaleType.FIT_START)
     }
}//when就是switch
菜单
右上角小菜单
File name: mymenu
Recource type: Menu
Directory name: menu
ShowAsAction:ifRoom有空间则显示,always始终显示,withText同时显示文本
override fun onCreateOptionsMenu(menu: Menu?): Boolean {

	super.onCreateOptionsMenu(menu)
	//设置在任何情况下均显示图标
    setIconEnable(menu!!,true);
    //加载菜单资源
    menuInflater.inflate(R.menu.mymenu,menu)
    return true
}
//Hack手段,使用反射打开“显示菜单项图标”功能
private fun setIconEnable(menu: Menu, enable: Boolean) {

    try {

        val clazz =
            Class.forName("androidx.appcompat.view.menu.MenuBuilder")
        val m: Method = clazz.getDeclaredMethod(
            "setOptionalIconsVisible",
             Boolean::class.javaPrimitiveType
        )
        m.isAccessible = true
        //下面传入参数
        m.invoke(menu, enable)
    } catch (e: Exception) {

        e.printStackTrace()
    }
}
//相应菜单点击事件
override fun onOptionsItemSelected(item: MenuItem): Boolean {

    super.onOptionsItemSelected(item)
    when(item.itemId){

        R.id.mnuAbout->tvInfo.text="About"
        R.id.mnuEdit->tvInfo.text="Edit"
        R.id.mnuExit->finish()
        R.id.mnuNew->tvInfo.text="New"
        R.id.mnuOpen->tvInfo.text="Open"
        R.id.mnuSave->tvInfo.text="Save"
    }
    return true
}
    override fun onCreateOptionsMenu(menu: Menu): Boolean {

        super.onCreateOptionsMenu(menu)
        menuInflater.inflate(R.menu.menu, menu)
        return true
    }

    override fun onOptionsItemSelected(item: MenuItem): Boolean {

        if (item.itemId == R.id.about_item) {

            showInfo()
        }
        return true
    }

    private fun showInfo() {

        val dialogTitle = "关于"
        val dialogMessage = "倒计时计数器 ver 1.0 \n\n开发:金旭亮"
        val builder = AlertDialog.Builder(this)
        builder.setTitle(dialogTitle)
        builder.setMessage(dialogMessage)
        builder.create().show()
    }
上下文菜单
File name:mycontext_menu
Directory name: menu
Recource type: Menu
registerForContextMenu(tvInfo)// 给控件注册上下文菜单

override fun onCreateContextMenu(
    menu: ContextMenu?,
    v: View?,
    menuInfo: ContextMenu.ContextMenuInfo?
) {

    super.onCreateContextMenu(menu, v, menuInfo)
    menuInflater.inflate(R.menu.mycontext_menu,menu)
}

override fun onContextItemSelected(item: MenuItem): Boolean {

   val info= when(item.itemId){

       R.id.main_ctxmenu_deleteCommunicator->
           "选中了:main_ctxmenu_deleteCommunicator"
       R.id.main_ctxmenu_editCommunicator->
           "选中了:main_ctxmenu_editCommunicator"
       else -> "选中了:main_ctxmenu_sendMessage"
    }
    tvInfo.text=info
    return true
}
文本框
EditText
intputType属性:用于限制用户只能输⼊数字等特定的字符
text属性:用于取出用户输⼊的字符串
maxLength属性:用于设置用户能输⼊的最⼤字符数
edtPhone.addTextChangedListener(object : TextWatcher {

    override fun afterTextChanged(s: Editable?) {

    }

    override fun beforeTextChanged(s: CharSequence?, start: Int,
                                   count: Int, after: Int) {

    }

    override fun onTextChanged(s: CharSequence?, start: Int,
                                       before: Int, count: Int) {

        val strLength = s.toString()?.length
        if (strLength == 11) {

            tvInfo.text = "您输入的手机号码是:${
       s}"
        } else {

            tvInfo.text = "还剩余${
       11 - strLength}个数字"
        }
   }
})

btnCall.setOnClickListener {

    callPhone(edtPhone.text.toString())
}
拨打电话
在AndroidManifest.xml中声明权限:
显示弹窗
消息弹框
Toast.makeText(this, "长按了按钮", Toast.LENGTH_SHORT).show()
界面弹框
    private fun showInfo() {

        val dialogTitle = "关于"
        val dialogMessage = "倒计时计数器 ver 1.0 \n\n开发:金旭亮"
        val builder = AlertDialog.Builder(this)
        builder.setTitle(dialogTitle)
        builder.setMessage(dialogMessage)
        builder.create().show()
    }
界面布局
Margin:元素之间的间距
Padding:元素内部具体内容与元素外边界之间的区域
固定值:100sp
warp_content:数值依控件所显示的内容而定
match_parent:与其父空间的数值相匹配(一致)
fill_parent:
dp:
160dpi屏幕上 1dp1像素
480dpi屏幕上 1dp3像素
使用ConstraintLayout
在build.gradle 中添加以下依赖:
implementation 'androidx.constraintlayout:constraintlayout:1.1.3 '
显示过长的文本
将有可能超出屏幕的布局放到scrollView控件中,即可自动给其添加滚动查看功能。
实现水平居中
使用LinearLayout
⼦控件宽度设置为match_parent,然后让其内容居中,以TextView为例,这是通过设置它的textAligment(⽂本对齐⽅式)实现center
⼦控件宽⾼度均设置为wrap_content,可以使用layout_gravity让其“显示位置居中center_horizontal
实现水平和垂直居中
使用LinearLayout
让⼦控件的宽度⾼度占满⽗控件,然后设置gravity和textAlignment让其“内容居中”,center
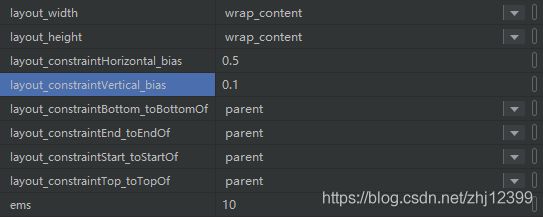
使用ConstrainLayout
android:layout_width="wrap_content"
android:layout_height="wrap_content"
app:layout_constraintBottom_toBottomOf="parent"
app:layout_constraintEnd_toEndOf="parent"
app:layout_constraintStart_toStartOf="parent"
app:layout_constraintTop_toBottomOf="parent"
app:layout_constraintVertical_bias="0.5"
模块集中方法
实现北南中布局
使用LinearLayout
顶部和底部都有控件,中部依据屏幕⼤小自动切换。
中间可用RecyclerView作为示例控件,设置layout_weight实现自动铺满可用空间。
layout_height = “0dp”
layout_weight = “1”
控件隐藏与显示
android:visibility=“gone”:不显示此按件,它不参与布局
android:visibility=“invisible”:不显示此按件,但它参与布局,在界面上会留有位置
android:visibility=“visible”:此控件正常显示
ConstraintLayout动画
    //定义两个约束集,分别对应两个动画状态(即关键帧)
    val constraintSet = ConstraintSet()
    val constraintSet2 = ConstraintSet()
    //定义动画对象
    val transition = ChangeBounds()
    //这个标记用于在两个动画状态之间反复切换
    var flag = true

    override fun onCreate(savedInstanceState: Bundle?) {

        super.onCreate(savedInstanceState)
        setContentView(R.layout.activity_main)

        //分别装载两个布局文件的约束集
        constraintSet.load(this, R.layout.activity_main)
        constraintSet2.load(this, R.layout.activity_main2)
        //设定动画属性
        transition.interpolator = AnticipateOvershootInterpolator(1.0f)
        transition.duration = 1000
        //点击Activity时,启动动画
        rootContainer.setOnClickListener {

            animateToKeyframe()
        }
    }


    fun animateToKeyframe() {

        //开始动画
        TransitionManager.beginDelayedTransition(rootContainer, transition)
        if (flag) {

            constraintSet2.applyTo(rootContainer)
        } else {

            constraintSet.applyTo(rootContainer)
        }
        flag = !flag
    }
界面的动态替换
在Activity中需要时随时调用setContentView(R.layout.布局⽂件ID);即可,动态切换的布局可共享Activity中的成员变量。
使用代码创建控件实例,然后调用ViewGroup的addView⽅法加⼊到控件树中
(1)直接用new关键字实例化
(2)使用LayoutInflator基于XML布局进⾏实例化
在不需要时,可以随时调用ViewGroup.removeView()⽅法从控件树中移除特定的控件。
	    var counter = 0
        btnAdd.setOnClickListener {

            counter++
            //从XML布局文件中加载并实例化一个TextView控件对象
            val textView = layoutInflater.inflate(R.layout.my_textview, null) as TextView
            //设置TextView控件显示的文本
            textView.text = "新控件${
       counter}"
            //给其挂接事件响应
            textView.setOnClickListener {

                Toast.makeText(this, "${
       (it as TextView).text}", Toast.LENGTH_SHORT)
                    .show()
            }
            //追加到控件容器中
            viewContainer.addView(textView)
        }

        btnRemoveAllView.setOnClickListener {

            viewContainer.removeAllViews()
        }
<TextView
    xmlns:android="http://schemas.android.com/apk/res/android"
    android:layout_width="match_parent"
    android:layout_height="wrap_content"
    android:layout_margin="4dp"
    android:text="新控件"
    android:textAlignment="center"
    android:textColor="#ff0000"
    android:textSize="20sp">
TextView>
使用ViewStub动态实例化控件
示例每次运⾏时,都随机地确定到底使用哪个布局。
可以为ViewStub指定⼀个布局,在inflate布局的时候,只有ViewStub会被初始化。然后当viewstub被设置为可见的时候,或者调用了inflate⽅法的时候, ViewStub所指向的布局就会被inflate和实例化,然后ViewStub的布局属性都会传给所指向的布局,这样就可以使用ViewStub来⽅便在运⾏时有选择的显示某⼀个布局。
 fun randomChangeView() {

    val ranValue = Random().nextInt(100)
    if (ranValue > 49) {

        viewstub_textview.inflate()
        val textView = findViewById<TextView>(R.id.viewstub_demo_textview)
        textView.text = "viewstub是一个轻量级的 view," +
                "可以为viewstub指定一个布局," +
                "在inflate布局的时候,只有viewstub会被初始化."
    } else {

        viewstub_iamgeview.inflate()
        val imageView = findViewById<ImageView>(R.id.viewstub_demo_imageview)
        imageView.setImageResource(R.drawable.test)
    }
}
//activity_main.xml中
<LinearLayout
    xmlns:android="http://schemas.android.com/apk/res/android"
    android:orientation="vertical"
    android:layout_width="match_parent"
    android:layout_height="match_parent"
    android:gravity="center_horizontal">
    <ViewStub
        android:id="@+id/viewstub_textview"
        android:layout_width="wrap_content"
        android:layout_height="wrap_content"
        android:layout_marginLeft="5dp"
        android:layout_marginRight="5dp"
        android:layout_marginTop="10dp"
        android:layout="@layout/viewstub_textview_layout"/>
    <ViewStub
        android:id="@+id/viewstub_iamgeview"
        android:layout_width="wrap_content"
        android:layout_height="wrap_content"
        android:layout_marginLeft="5dp"
        android:layout_marginRight="5dp"
        android:layout="@layout/viewstub_imageview_layout"/>
LinearLayout>
//viewstub_imageview_layout.xml中
<LinearLayout
  xmlns:android="http://schemas.android.com/apk/res/android"
  android:orientation="vertical"
  android:layout_width="wrap_content"
  android:layout_height="wrap_content">
    <ImageView
        android:id="@+id/viewstub_demo_imageview"
        android:layout_width="wrap_content"
        android:layout_height="wrap_content"/>
</LinearLayout>
//viewstub_textview_layout.xml中
<LinearLayout
  xmlns:android="http://schemas.android.com/apk/res/android"
  android:orientation="vertical"
  android:layout_width="wrap_content"
  android:layout_height="wrap_content">
    <TextView
        android:id="@+id/viewstub_demo_textview"
        android:layout_width="match_parent"
        android:layout_height="wrap_content"
        android:background="#aa664411"
        android:textSize="16sp"/>
</LinearLayout>
CountDown倒计时
//CountDownTimer是一个抽象基类
private lateinit var countDownTimer: CountDownTimer
private var timeLeft = 60
private var isStart = false

private fun startCountDown() {

        timeLeft = 30
        isStart = true
        countDownTimer = object : CountDownTimer(30000, 1000) {

            override fun onFinish() {

                Toast.makeText(this@MainActivity, "时间到!", Toast.LENGTH_LONG).show()
                btnCountDown.isEnabled = true、、//倒计时结束后才能开始点击
            }

            override fun onTick(millisUntilFinished: Long) {

                timeLeft = millisUntilFinished.toInt() / 1000
                tvInfo.text = "${
       timeLeft}"
            }
        }
        countDownTimer.start()
    }

    private fun cancelCountDown() {

        if (!isStart)
            return
        countDownTimer.cancel()
        btnCountDown.isEnabled = true//点击完取消后就可以点击开始了

    }
按钮动画
btnCountDown.setOnClickListener {

    //装载动画
    val bounceAnimation = AnimationUtils.loadAnimation(
        this,
        R.anim.bounce
    )
    it.startAnimation(bounceAnimation)
}
<set xmlns:android="http://schemas.android.com/apk/res/android"
    android:fillAfter="true"
    android:interpolator="@android:anim/bounce_interpolator"
    >
    <scale
        android:duration="2000"
        android:fromXScale="2.0"
        android:fromYScale="2.0"
        android:pivotX="50%"
        android:pivotY="50%"
        android:toXScale="1.0"
        android:toYScale="1.0" />
set>
设置按钮集合
为每一个按钮都设置上onclick为btnClick这样在按下九宫格的时候就都会有反应
fun btnClick(view: View) {
    val btnSelected = view as Button
    var cellId = 0
    when (btnSelected.id) {
        R.id.btn1 -> cellId = 1
        R.id.btn2 -> cellId = 2
        R.id.btn3 -> cellId = 3
        R.id.btn4 -> cellId = 4
        R.id.btn5 -> cellId = 5
        R.id.btn6 -> cellId = 6
        R.id.btn7 -> cellId = 7
        R.id.btn8 -> cellId = 8
        R.id.btn9 -> cellId = 9
    }
    playGame(cellId, btnSelected)
}
XXOO游戏
package com.example.tictactoy

import android.graphics.Color
import androidx.appcompat.app.AppCompatActivity
import android.os.Bundle
import android.view.View
import android.widget.Button
import android.widget.Toast
import kotlinx.android.synthetic.main.activity_main.*
import java.util.*
import kotlin.collections.ArrayList


class MainActivity : AppCompatActivity() {


    override fun onCreate(savedInstanceState: Bundle?) {

        super.onCreate(savedInstanceState)
        setContentView(R.layout.activity_main)
    }

    fun btnClick(view: View) {

        val btnSelected = view as Button
        var cellId = 0
        when (btnSelected.id) {

            R.id.btn1 -> cellId = 1
            R.id.btn2 -> cellId = 2
            R.id.btn3 -> cellId = 3
            R.id.btn4 -> cellId = 4
            R.id.btn5 -> cellId = 5
            R.id.btn6 -> cellId = 6
            R.id.btn7 -> cellId = 7
            R.id.btn8 -> cellId = 8
            R.id.btn9 -> cellId = 9
        }
        playGame(cellId,btnSelected)
    }

    var player1=ArrayList<Int>()
    var player2=ArrayList<Int>()
    var activePlayer=1

    fun playGame(cellId:Int,btnSelected:Button){

        if(activePlayer==1){

            btnSelected.text="X"
            btnSelected.setBackgroundColor(Color.GREEN)
            player1.add(cellId)
            activePlayer=2
            autoPaly()
        }else{

            btnSelected.text="O"
            btnSelected.setBackgroundColor(Color.YELLOW)
            player2.add(cellId)
            activePlayer=1
        }
        btnSelected.isEnabled=false
        checkWinner()
    }

    fun checkWinner(){

        var winner=-1

        //第一行
        if(player1.contains(1) && player1.contains(2) && player1.contains(3)){

            winner=1
        }

        if(player2.contains(1) && player2.contains(2) && player2.contains(3)){

            winner=2
        }

        //第二行
        if(player1.contains(4) && player1.contains(5) && player1.contains(6)){

            winner=1
        }

        if(player2.contains(4) && player2.contains(5) && player2.contains(6)){

            winner=2
        }

        //第三行
        if(player1.contains(7) && player1.contains(8) && player1.contains(9)){

            winner=1
        }

        if(player2.contains(7) && player2.contains(8) && player2.contains(9)){

            winner=2
        }

        //------------------
        //第一列
        if(player1.contains(1) && player1.contains(4) && player1.contains(7)){

            winner=1
        }

        if(player2.contains(1) && player2.contains(4) && player2.contains(7)){

            winner=2
        }

        //第二列
        if(player1.contains(2) && player1.contains(5) && player1.contains(8)){

            winner=1
        }

        if(player2.contains(2) && player2.contains(5) && player2.contains(8)){

            winner=2
        }

        //第三列
        if(player1.contains(3) && player1.contains(6) && player1.contains(9)){

            winner=1
        }

        if(player2.contains(3) && player2.contains(6) && player2.contains(9)){

            winner=2
        }
        //-----------------------------
        //TODO:添加对于对角线的检查
        //-------------------
        if(winner!= -1){

            Toast.makeText(this,"Player${
       winner} win",Toast.LENGTH_SHORT).show()
        }
    }

    fun autoPaly(){

        val emptyCells=ArrayList<Int>()
        for(cellId in 1..9){

            if(!(player1.contains(cellId) || player2.contains(cellId))){

                emptyCells.add(cellId)
            }
        }
        val ranIndex= Random().nextInt(emptyCells.size)
        val cellId=emptyCells[ranIndex]

        var btnSelected:Button?
        when(cellId){

            1->btnSelected=btn1
            2->btnSelected=btn2
            3->btnSelected=btn3
            4->btnSelected=btn4
            5->btnSelected=btn5
            6->btnSelected=btn6
            7->btnSelected=btn7
            8->btnSelected=btn8
            else->btnSelected=btn9
        }
        playGame(cellId,btnSelected)
    }
}
<TableLayout xmlns:android="http://schemas.android.com/apk/res/android"
    xmlns:app="http://schemas.android.com/apk/res-auto"
    xmlns:tools="http://schemas.android.com/tools"
    android:layout_width="match_parent"
    android:layout_height="match_parent"
    android:gravity="center"
    tools:context=".MainActivity">

    <TableRow
        android:gravity="center"
        android:layout_width="match_parent"
        android:layout_height="match_parent" >

        <Button
            android:onClick="btnClick"
            android:id="@+id/btn1"
            android:layout_width="40pt"
            android:layout_height="40pt" />

        <Button
            android:onClick="btnClick"
            android:id="@+id/btn2"
            android:layout_width="40pt"
            android:layout_height="40pt" />

        <Button
            android:onClick="btnClick"
            android:id="@+id/btn3"
            android:layout_width="40pt"
            android:layout_height="40pt" />
    TableRow>

    <TableRow
        android:gravity="center"
        android:layout_width="match_parent"
        android:layout_height="match_parent" >

        <Button
            android:onClick="btnClick"
            android:id="@+id/btn4"
            android:layout_width="40pt"
            android:layout_height="40pt" />

        <Button
            android:onClick="btnClick"
            android:id="@+id/btn5"
            android:layout_width="40pt"
            android:layout_height="40pt" />

        <Button
            android:onClick="btnClick"
            android:id="@+id/btn6"
            android:layout_width="40pt"
            android:layout_height="40pt" />
    TableRow>

    <TableRow
        android:gravity="center"
        android:layout_width="match_parent"
        android:layout_height="match_parent" >

        <Button
            android:onClick="btnClick"
            android:id="@+id/btn7"
            android:layout_width="40pt"
            android:layout_height="40pt" />

        <Button
            android:onClick="btnClick"
            android:id="@+id/btn8"
            android:layout_width="40pt"
            android:layout_height="40pt" />

        <Button
            android:onClick="btnClick"
            android:id="@+id/btn9"
            android:layout_width="40pt"
            android:layout_height="40pt" />
    TableRow>
TableLayout>
新建另一个页面
setContentView(R.layout.activity_other)
Activity状态与生命周期
概念
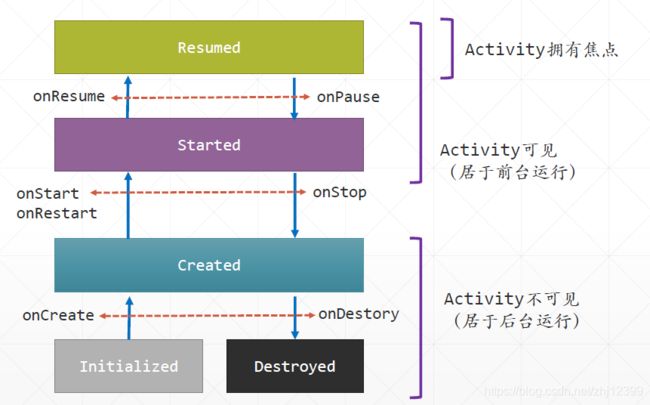
五个状态:Initialized Created Started Resumed Destroyed
生命周期:
- onCreate 初始化Activity内部字段,设定Activity布局
- onRestart Activity进入已启动状态,对用户可见
- onResume Activity已经准备好,可以相应用户输入
- onPause Activity失去焦点并进入“已暂停状态”
- onStop Activity不可见,再次释放用不着的资源
- onDestrory Activity将被操作系统销毁,在此释放所有资源

在切换横屏竖屏时候
之所以用户旋转屏幕时状态会丢失,是因为Android把原先的Activity销毁了
这样做可以使界面布局改变时保存所需要的值
    override fun onCreate(savedInstanceState: Bundle?) {

        super.onCreate(savedInstanceState)
        setContentView(R.layout.activity_main)

        btnClickMe.setOnClickListener {

            counter++
            tvCount.text = "计数值:${
       counter}"
        }
        //恢复实例数据
        if (savedInstanceState != null) {

            counter = savedInstanceState.getInt("counter")
            tvCount.text = "计数值:${
       counter}"
        }
    }

    var counter = 0
    override fun onSaveInstanceState(outState: Bundle) {

        //保存实例数据
        outState.putInt("counter", counter)
        Log.d("MainActivity", "计数值己保存:$counter")
        Toast.makeText(this, "保存", Toast.LENGTH_SHORT).show()
        super.onSaveInstanceState(outState)
    }
定义静态变量
companion object {

    var globalCount: Int = 0
}
禁止横竖屏旋转
# 增添上
<activity android:name=".MainActivity" android:screenOrientation="portrait">