PCIe初始化枚举和资源分配流程分析
本文主要是对PCIe的初始化枚举、资源分配流程进行分析,代码对应的是alikernel-4.19,平台是arm64
1. PCIe architecture
1.1 pcie的拓扑结构
在分析PCIe初始化枚举流程之前,先描述下pcie的拓扑结构。
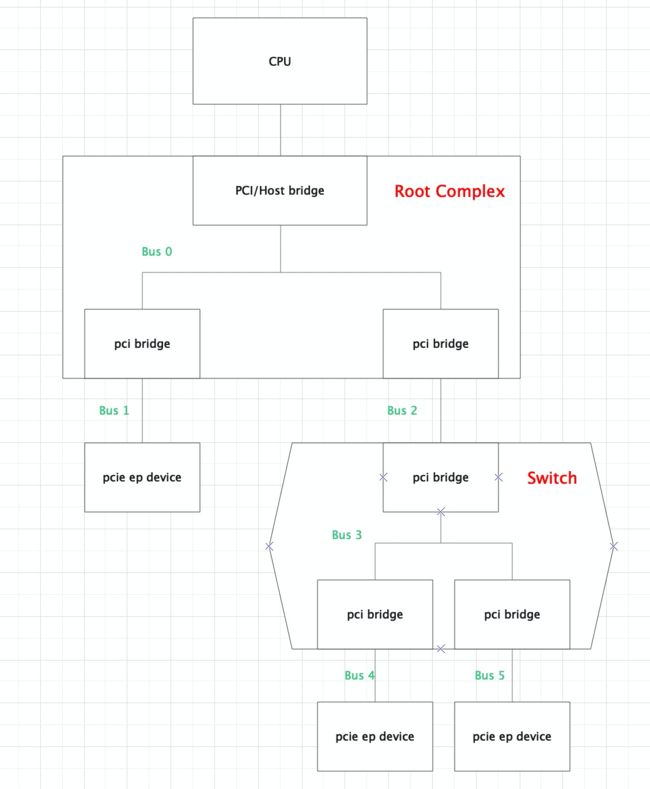
如下图所示:
整个PCIe是一个树形的拓扑:
• Root Complex是树的根,它一般实现了一个主桥设备(host bridge), 一条内部PCIe总线(BUS 0),以及通过若干个PCI bridge扩展出一些root port。host bridge可以完成CPU地址到PCI域地址的转换,pci bridge用于系统的扩展,没有地址转换功能;
• Swich是转接器设备,目的是扩展PCIe总线。switch中有一个upstream port和若干个downstream port, 每一个端口都相当于一个pci bridge
• PCIe ep device是叶子节点设备,比如pcie网卡,显卡,nvme卡等。
每个PCIe设备,包括host bridge、pci bridge和ep设备都有一个4k的配置空间。arm使用ecam的方式访问pcie配置空间。
1.2 PCIe的软件层次
PCIe模块涉及到的代码文件很多,在分析pcie的代码前,先对pcie的涉及到的代码梳理下。
这里以arm64架构为例,pcie代码主要分散在三个目录:
drivers/pci/*
driver/acpi/pci*
arch/arm64/kernel/pci.c
将pcie代码按如下层次划分:
    |-->+ pcie hp service driver  +
    |-->+ pcie aer service driver +
    |-->+ pcie pme service driver +
    |-->+ pcie dpc service driver +
    |
+---------------------+   +----------------+
| pcie port bus driver|   | pcie ep driver |
+---------------------+   +----------------+
+------------------------------------------+
|              pcie core driver            |
+------------------------------------------+
+------------------+   +-------------------+
| arch pcie driver |   | acpi pcie driver  |
+------------------+   +-------------------+
____________________________________________
+------------------------------------------+
|               pcie hardware              |
+------------------------------------------+
arch pcie driver:放一些和架构强相关的pcie的函数实现,对应arch/arm64/kernel/pci.c
acpi pcie driver: apci扫描时所涉及到的pcie代码,包括host bridge的解析初始化,pcie bus的创建,ecam的映射等, 对应drivers/acpi/pci*.c
pcie core driver: pcie的子系统代码,包括pcie的枚举流程,资源分配流程,中断流程等,主要对应drivers/pci/*.c
pcie port bus driver: 是pcie port的四个service代码的整合, 四个service主要指的是pcie dpc/pme/hotplug/aer,对应的是drivers/pci/pcie/*
pcie ep driver:是叶子节点的设备驱动,比如显卡,网卡,nvme等。
Linux内核实现
2.1 pcie初始化流程
pcie的代码文件这么多,初始化涉及的调用也很多,从哪一个开始看呢?
内核通过initcore的level决定模块的启动顺序
cat System.map | grep pci | grep initcall再结合Makefile中object定义的先后顺序
obj-y     += access.o bus.o probe.o remove.o pci.o quirks.o /
             pci-driver.o search.o pci-sysfs.o rom.o setup-res.o
可以看出关键symbol的调用顺序如下:
|-->pcibus_class_init() /* postcore_initcall(pcibus_class_init) */
|
|-->pci_driver_init() /* postcore_initcall(pci_driver_init) */
|
|-->acpi_pci_init() /* arch_initcall(acpi_pci_init) */
|
|-->acpi_init() /* subsys_initcall(acpi_init) */
pcibus_class_init(): 注册pci_bus class,完成后创建了/sys/class/pci_bus目录。
pci_driver_init(): 注册pci_bus_type, 完成后创建了/sys/bus/pci目录。
acpi_pci_init(): 注册acpi_pci_bus, 并设置电源管理相应的操作。
acpi_init(): apci启动所涉及到的初始化流程,PCIe基于acpi的启动流程从该接口进入。
在linux/Documentation/acpi/namespace.txt中定义了acpi解析的流程
     +---------+    +-------+    +--------+    +------------------------+
     |  RSDP   | +->| XSDT  | +->|  FADT  |    |  +-------------------+ |
     +---------+ |  +-------+ |  +--------+  +-|->|       DSDT        | |
     | Pointer | |  | Entry |-+  | ...... |  | |  +-------------------+ |
     +---------+ |  +-------+    | X_DSDT |--+ |  | Definition Blocks | |
     | Pointer |-+  | ..... |    | ...... |    |  +-------------------+ |
     +---------+    +-------+    +--------+    |  +-------------------+ |
                    | Entry |------------------|->|       SSDT        | |
                    +- - - -+                  |  +-------------------| |
                    | Entry | - - - - - - - -+ |  | Definition Blocks | |
                    +- - - -+                | |  +-------------------+ |
                                             | |  +- - - - - - - - - -+ |
                                             +-|->|       SSDT        | |
                                               |  +-------------------+ |
                                               |  | Definition Blocks | |
                                               |  +- - - - - - - - - -+ |
                                               +------------------------+
                                                           |
                                              OSPM Loading |
                                                          \|/
                                                    +----------------+
                                                    | ACPI Namespace |
                                                    +----------------+
ACPI Namespace就是表示系统上所有可枚举的ACPI设备的层次结构。
现在对acpi_init()流程展开,主要找和pci初始化相关的调用:
acpi_init() /* subsys_initcall(acpi_init) */
    +-> mmcfg_late_init()
    +-> acpi_scan_init()
        +-> acpi_pci_root_init()
            +-> acpi_scan_add_handler_with_hotplug(&pci_root_handler, "pci_root");
                +-> .attach = acpi_pci_root_add
        /*
         * register pci_link_handler to list: acpi_scan_handlers_list.
         * this handler has relationship with PCI IRQ.
         */
        +-> acpi_pci_link_init()
        /* we facus on PCI-ACPI, ignore other handlers' init */
        ...
        +-> acpi_bus_scan()
            /* create struct acpi_devices for all device in this system */
            --> acpi_walk_namespace()
            --> acpi_bus_attach()
                --> acpi_scan_attach_handler()
                    --> acpi_scan_match_handler()
                    --> handler->attach /* attach is acpi_pci_root_add */
mmcfg_late_init(), acpi先扫描MCFG表,MCFG表定义了ecam的相关资源。
acpi_pci_root_init(),定义pcie host bridge device的attach函数, ACPI的Definition Block中使用PNP0A03表示一个PCI Host Bridge。
acpi_pci_link_init(), 注册pci_link_handler, 主要和pcie IRQ相关。
acpi_bus_scan(), 会通过acpi_walk_namespace()会遍历system中所有的device,并为这些acpi device创建数据结构,执行对应device的attatch函数。根据ACPI spec定义,pcie host bridge device定义在DSDT表中,acpi在扫描过程中扫描DSDT,如果发现了pcie host bridge, 就会执行device对应的attach函数,调用到acpi_pci_root_add()。
acpi_pci_root_add的函数很长,完整代码就不贴了, 它主要做了几个动作
(1)通过ACPI的_SEG参数, 获取host bridge使用的segment号, segment指的就是pcie domain, 主要目的是为了突破pcie最大256条bus的限制。
(2)通过ACPI的_CRS里的BusRange类型资源取得该Host Bridge的Secondary总线范围,保存在root->secondary这个resource中
(3)通过ACPI的_BNN参数获取host bridge的根总线号。
执行到这里如果没有返回失败,硬件设备上会有如下打印:
pr_info(PREFIX "%s [%s](domain %04x %pR)\n",
        acpi_device_name(device), acpi_device_bid(device),
        root->segment, &root->secondary);
...
ACPI: PCI Root Bridge [PCI0](domain 0000 [bus 00-7f])
(3) pci_acpi_scan_root, pcie枚举流程的入口
2.2 pcie枚举流程
166 struct pci_bus *pci_acpi_scan_root(struct acpi_pci_root *root)
167 {
168         int node = acpi_get_node(root->device->handle);
169         struct acpi_pci_generic_root_info *ri;
170         struct pci_bus *bus, *child;
171         struct acpi_pci_root_ops *root_ops;
172
173         ri = kzalloc_node(sizeof(*ri), GFP_KERNEL, node);
174         if (!ri)
175                 return NULL;
176
177         root_ops = kzalloc_node(sizeof(*root_ops), GFP_KERNEL, node);
178         if (!root_ops) {
179                 kfree(ri);
180                 return NULL;
181         }
182
183         ri->cfg = pci_acpi_setup_ecam_mapping(root);    -------(1)
184         if (!ri->cfg) {
185                 kfree(ri);
186                 kfree(root_ops);
187                 return NULL;
188         }
189
190         root_ops->release_info = pci_acpi_generic_release_info;
191         root_ops->prepare_resources = pci_acpi_root_prepare_resources;
192         root_ops->pci_ops = &ri->cfg->ops->pci_ops;     ----- (2)
193         bus = acpi_pci_root_create(root, root_ops, &ri->common, ri->cfg);  ---- (3)
194         if (!bus)
195                 return NULL;
196
            ....
202
203         return bus;
204 }
(1) pci_acpi_setup_ecam_mapping(), 建立ecam映射。 arm64上访问pcie的配置空间都是通过ecam机制进行访问,将ecam的空间进行映射,这样cpu就可以通过访问内存访问到相应设备的配置空间。
118 static struct pci_config_window *
119 pci_acpi_setup_ecam_mapping(struct acpi_pci_root *root)
120 {
121         struct device *dev = &root->device->dev;
122         struct resource *bus_res = &root->secondary;
123         u16 seg = root->segment;
124         struct pci_ecam_ops *ecam_ops;
125         struct resource cfgres;
126         struct acpi_device *adev;
127         struct pci_config_window *cfg;
128         int ret;
129
130         ret = pci_mcfg_lookup(root, &cfgres, &ecam_ops);
131         if (ret) {
132                 dev_err(dev, "%04x:%pR ECAM region not found\n", seg, bus_res);
133                 return NULL;
134         }
135
136         adev = acpi_resource_consumer(&cfgres);
137         if (adev)
138                 dev_info(dev, "ECAM area %pR reserved by %s\n", &cfgres,
139                          dev_name(&adev->dev));
140         else
141                 dev_warn(dev, FW_BUG "ECAM area %pR not reserved in ACPI namespace\n",
142                          &cfgres);
143
144         cfg = pci_ecam_create(dev, &cfgres, bus_res, ecam_ops);
145         if (IS_ERR(cfg)) {
146                 dev_err(dev, "%04x:%pR error %ld mapping ECAM\n", seg, bus_res,
147                         PTR_ERR(cfg));
148                 return NULL;
149         }
150
151         return cfg;
152 }
130行:pci_mcfg_lookup(), 通过该接口可以获取ecam的资源以及访问配置空间的操作ecam_ops.
ecam_ops默认是pci_generic_ecam_ops, 定义在drivers/pci/ecam.c中,但也可以由厂商自定义,厂商自定义的ecam_ops实现在drivers/pci/controller/目录下, 比如hisi_pcie_ops和ali_pcie_ops,厂商会依据实际的硬件对ecam进行限制。
107 struct pci_ecam_ops ali_pcie_ops = {
108         .bus_shift    = 20,
109         .init         =  ali_pcie_init,
110         .pci_ops      = {
111                 .map_bus    = ali_pcie_map_bus,
112                 .read       = ali_pcie_rd_conf,
113                 .write      = ali_pcie_wr_conf,
114         }
115 };
144行: pci_ecam_create(), 对ecam的地址进行ioremap,如果定义了ecam_ops->init,还会执行到相应的初始化函数中
(2) 设置root_ops的pci_ops, 这里的pci_ops就是对应上面说的ecam_ops->pci_ops, 即配置空间的访问接口
(3) bus = acpi_pci_root_create(root, root_ops, &ri->common, ri->cfg);
struct pci_bus *acpi_pci_root_create(struct acpi_pci_root *root,
878                                      struct acpi_pci_root_ops *ops,
879                                      struct acpi_pci_root_info *info,
880                                      void *sysdata)
881 {
882         int ret, busnum = root->secondary.start;
883         struct acpi_device *device = root->device;
884         int node = acpi_get_node(device->handle);
885         struct pci_bus *bus;
886         struct pci_host_bridge *host_bridge;
887
            ...
906         bus = pci_create_root_bus(NULL, busnum, ops->pci_ops,
907                                   sysdata, &info->resources);
908         if (!bus)
909                 goto out_release_info;
910
911         host_bridge = to_pci_host_bridge(bus->bridge);
            ...
923         pci_scan_child_bus(bus);
924         pci_set_host_bridge_release(host_bridge, acpi_pci_root_release_info,
925                                     info);
926         if (node != NUMA_NO_NODE)
927                 dev_printk(KERN_DEBUG, &bus->dev, "on NUMA node %d\n", node);
928         return bus;
929
930 out_release_info:
931         __acpi_pci_root_release_info(info);
932         return NULL;
933 }
906行: pci_create_root_bus()用来创建该{segment: busnr}下的根总线。传递的参数: NULL是host bridge设备的parent节点; busnum是总线号; ops->pci_ops对应的是ecam->pci_ops,即配置空间的操作接口; sysdata私有数据,对应的是pcie_create_ecam()所返回的pci_cfg_window, 包括ecam的地址范围,映射地址等; info->resource是一个resource_list, 用来保存总线号,I/O空间,mem空间等信息。
2914 struct pci_bus *pci_create_root_bus(struct device *parent, int bus,
2915                 struct pci_ops *ops, void *sysdata, struct list_head *resources)
2916 {
2917         int error;
2918         struct pci_host_bridge *bridge;
2919
2920         bridge = pci_alloc_host_bridge(0);
2921         if (!bridge)
2922                 return NULL;
2923
2924         bridge->dev.parent = parent;
2925
2926         list_splice_init(resources, &bridge->windows);
2927         bridge->sysdata = sysdata;
2928         bridge->busnr = bus;
2929         bridge->ops = ops;
2930
2931         error = pci_register_host_bridge(bridge);
2932         if (error < 0)
2933                 goto err_out;
2934
2935         return bridge->bus;
2936
2937 err_out:
2938         kfree(bridge);
2939         return NULL;
2940 }
2920行: 分配struct pci_host_bridge, 一个pci_host_bridge对应一个pci host bridge设备。
2924行:设置该bridge的parent为NULL, 说明host bridge device是最上层设备。
2931行: pci_register_host_bridge()。 注册host bridge device。 该函数比较长,就不贴具体实现了,主要是为host bridge数据结构注册对应的设备,创建了一个根总线pci_bus, 也为该pci_bus数据结构注册一个设备并填充初始化的数据。
         dev_set_name(&bridge->dev, "pci%04x:%02x", pci_domain_nr(bus),
                      bridge->busnr);
         err = device_register(&bridge->dev);
         dev_set_name(&bus->dev, "%04x:%02x", pci_domain_nr(bus), bus->number);
         err = device_register(&bus->dev);
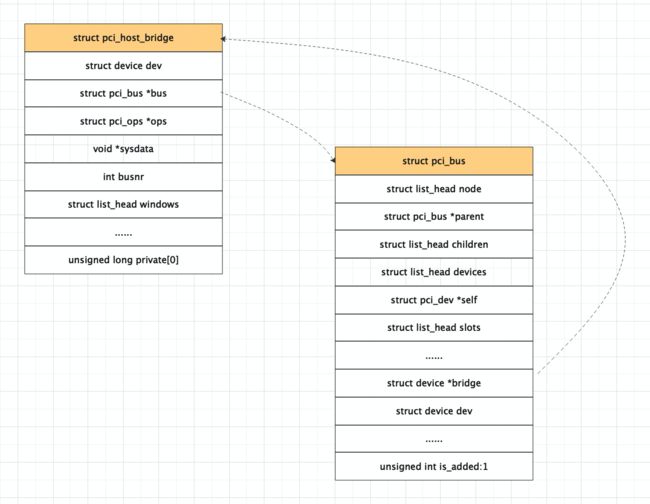
2935行:返回root_bus, 即pci_host_bridge的bus成员。
到该函数结束我们已经有了一个root_bus device, 一个host bridge device, 也知道了他们的关系:
回到上面acpi_pci_root_create()函数中,看923行 pci_scan_child_bus(), 现在开始遍历host bridge主桥下的所有pci设备
函数也比较长,列一些关键的函数调用:
pci_scan_child_bus()
    +-> pci_scan_child_bus_extend()
        +-> for dev range(0, 256)
               pci_scan_slot()
                    +-> pci_scan_single_device()
                        +-> pci_scan_device()
                            +-> pci_bus_read_dev_vendor_id()
                            +-> pci_alloc_dev()
                            +-> pci_setup_device()
                        +-> pci_add_device()
        +-> for each pci bridge
            +-> pci_scan_bridge_extend()
pci_scan_slot(): 一条pcie总线最多32个设备,每个设备最多8个function, 所以这里pci_scan_child_bus枚举了所有的pcie function, 调用了pci_scan_slot 256次, pci_scan_slot调用pci_scan_single_device()配置当前总线下的所有pci设备。
pci_scan_single_device(): 进一步调用pci_scan_device()和pci_add_device()。 pci_scan_device先去通过配置空间访问接口读取设备的vendor id, 如果60s没读到,说明没有找到该设备。 如果找到该设备,则通过pci_alloc_dev创建pci_dev数据结构,并对pci的配置空间进行一些配置。pci_add_device,软件将pci dev添加到设备list中。
pci_setup_device(): 获取pci设备信息,中断号,BAR地址和大小(使用pci_read_bases, 就是往BAR地址写1来计算的),并保存到pci_dev->resources中。
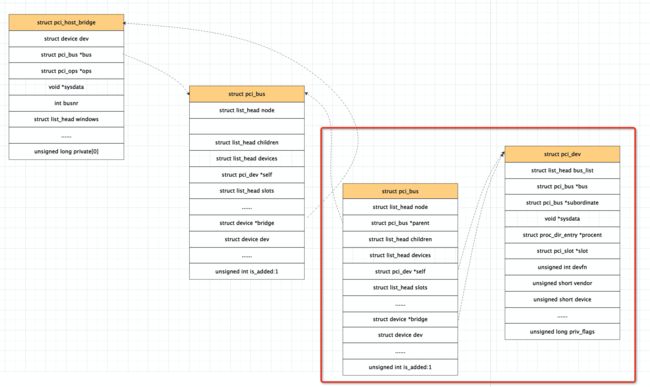
现在我们已经扫描完了host bridge下的bus和dev, 现在开始扫描bridge, 一个bridge也对应一个pci_dev。比如switch中的每一个port对应一个pci bridge。
pci_scan_bridge_extend()就是用于扫描pci桥和pci桥下的所有设备, 这个函数会被调用2次,第一次是处理BIOS已经配置好的pci桥, 这个是为了兼容各个架构所做的妥协。通过2次调用pci_scan_bridge_extend函数,完成所有的pci桥的处理。
1061 static int pci_scan_bridge_extend(struct pci_bus *bus, struct pci_dev *dev,
1062                                   int max, unsigned int available_buses,
1063                                   int pass)
1064 {
1065         struct pci_bus *child;
             ......
1078         pci_read_config_dword(dev, PCI_PRIMARY_BUS, &buses);
1079         primary = buses & 0xFF;
1080         secondary = (buses >> 8) & 0xFF;
1081         subordinate = (buses >> 16) & 0xFF;
1082
1083         pci_dbg(dev, "scanning [bus %02x-%02x] behind bridge, pass %d\n",
1084                 secondary, subordinate, pass);
1085
             ......
1110         if ((secondary || subordinate) && !pcibios_assign_all_busses() &&
1111             !is_cardbus && !broken) {
                    .......
1145         } else {
1146
1151                 if (!pass) {
1152                         if (pcibios_assign_all_busses() || broken || is_cardbus)
1153
1162                                 pci_write_config_dword(dev, PCI_PRIMARY_BUS,
1163                                                        buses & ~0xffffff);
1164                         goto out;
1165                 }
1166
1167                 /* Clear errors */
1168                 pci_write_config_word(dev, PCI_STATUS, 0xffff);
1169
1175                 child = pci_find_bus(pci_domain_nr(bus), max+1);
1176                 if (!child) {
1177                         child = pci_add_new_bus(bus, dev, max+1);
1178                         if (!child)
1179                                 goto out;
1180                         pci_bus_insert_busn_res(child, max+1,
1181                                                 bus->busn_res.end);
1182                 }
1183                 max++;
1184                 if (available_buses)
1185                         available_buses--;
1186
1187                 buses = (buses & 0xff000000)
1188                       | ((unsigned int)(child->primary)     <<  0)
1189                       | ((unsigned int)(child->busn_res.start)   <<  8)
1190                       | ((unsigned int)(child->busn_res.end) << 16);
1191
                    ......
1200
1201                 /* We need to blast all three values with a single write */
1202                 pci_write_config_dword(dev, PCI_PRIMARY_BUS, buses);
1203
1204                 if (!is_cardbus) {
1205                         child->bridge_ctl = bctl;
1206                         max = pci_scan_child_bus_extend(child, available_buses);
1207                 } else {
                            .......
1239                 }
1240
1241                 /* Set subordinate bus number to its real value */
1242                 pci_bus_update_busn_res_end(child, max);
1243                 pci_write_config_byte(dev, PCI_SUBORDINATE_BUS, max);
1244         }
1245         .......
1268         return max;
1269 }
1078行:一开始读取pci bridge的主bus号,是因为有的体系结构可能已经在BIOS中对这些做过配置。如果需要在kernel中进行scan bridge,就不会进1110行的那个if 分支。
1151行: 第一次pci_scan_bridge的pass参数为0,在这里直接返回。
1187行:生成新的BUS号,准备写入pci配置空间。
1202行: 将该pci bridge的primary bus, secondary bus, subordinate bus写入配置空间。
1206行: 这里又递归调用了pci_scan_child_bus, 扫描该子总线下所有设备。
1242行: 比较关键, 每次递归结束把实际的subordinate bus写入pci桥的配置空间。subordinate bus表示该pci桥下最大的总线号。
最后,在PCIe总线树枚举完成后,返回PCIe总线树中的最后一个pci总线号,PCIe的枚举流程至此结束。
总的来说,枚举流程分为3步:
- 发现主桥设备和根总线;
- 发现主桥设备下的所有pci设备
- 如果主桥下面的设备是pci bridge, 那么再次遍历这个pci bridge桥下的所有pci设备,并以此递归,直到将当前的pci总线树遍历完毕,并且返回host bridge的subordinate总线号。
2.3 pcie的资源分配
pcie枚举完成后,pci总线号已经分配,pcie ecam的映射、 pcie设备信息、BAR的个数及大小等也已经ready, 但此时并没有给各个pci device的BAR, pci bridge的mem, I/O, prefetch mem的base/limit寄存器分配资源。
这时就需要走到pcie的资源分配流程,整个资源分配的过程就是从系统的总资源里给每个pci device的bar分配资源,给每个pci桥的base, limit的寄存器分配资源。
pcie的资源分配流程整体比较复杂,主要介绍下总体的流程,对关键的函数再做展开。
pcie资源分配的入口在pci_acpi_scan_root()->pci_bus_assign_resources()
在调用pci_bus_assign_resources()之前,先调用pci_bus_size_bridges()
pci_bus_size_bridges(): 用深度优先递归确定各级pci桥上base/limit的大小,会记录在pci_dev->resource[PCI_BRIDGE_RESOURCES]中。
再进行资源分配pci_bus_assign_resources():
1376 void __pci_bus_assign_resources(const struct pci_bus *bus,
1377                                 struct list_head *realloc_head,
1378                                 struct list_head *fail_head)
1379 {
1380         struct pci_bus *b;
1381         struct pci_dev *dev;
1382
1383         pbus_assign_resources_sorted(bus, realloc_head, fail_head);
1384
1385         list_for_each_entry(dev, &bus->devices, bus_list) {
1386                 pdev_assign_fixed_resources(dev);
1387
1388                 b = dev->subordinate;
1389                 if (!b)
1390                         continue;
1391
1392                 __pci_bus_assign_resources(b, realloc_head, fail_head);
1393
1394                 switch (dev->class >> 8) {
1395                 case PCI_CLASS_BRIDGE_PCI:
1396                         if (!pci_is_enabled(dev))
1397                                 pci_setup_bridge(b);
1398                         break;
1399
1400                 case PCI_CLASS_BRIDGE_CARDBUS:
1401                         pci_setup_cardbus(b);
1402                         break;
1403
1404                 default:
1405                         pci_info(dev, "not setting up bridge for bus %04x:%02x\n",
1406                                  pci_domain_nr(b), b->number);
1407                         break;
1408                 }
1409         }
1410 }
1383行: pbus_assign_resources_sorted, 这个函数先对当前总线下设备请求的资源进行排序
+-> pbus_assign_resources_sorted()
    +-> list_for_each_entry(dev, &bus->devices, bus_list)
            __dev_sort_resources(dev, &head);
+-> __assign_resources_sorted(&head, realloc_head, fail_head);
    +-> assign_requested_resources_sorted(head, fail_head);
        +-> list_for_each_entry(dev_res, head, list)
            pci_assign_resource(dev_res->dev, idx)
                +-> pci_bus_alloc_resource()
                    +-> allocate_resource()
                        +-> find_resource()
                        +-> request_resource()
            +->pci_update_resource()
__dev_sort_resources将pci设备使用的资源进行对齐和排序,然后加入到head流程中。
__assign_resources_sorted中先调用find_resource()获取上游pci bridge的所管理的空间资源范围。 再调用request_resource()为当前pci设备分配pcie地址空间,最后调用pci_update_resource()将初始化pcie bar寄存器,将更新的资源区间写到寄存器。
1392行: 和枚举流程一样,这里也是用深度优先遍历的方法,依次分配各个pcie ep设备的bar资源。
1397行: pci_setup_bridge(),某个总线下所有设备BAR空间分配之后,将初始化该总线桥的配置空间中的memory base寄存器(该总线子树下所有设备使用的PCI总线域地址空间的基地址)和memory limit寄存器(总线子树使用的总地址空间的大小)。
总而言之,pcie的资源枚举过程可以概况如下:
- 获取上游pci 桥设备所管理的系统资源范围
- 使用DFS对所有的pci ep device进行bar资源的分配
- 使用DFS对当前pci桥设备的base和limit的值,并对这些寄存器进行更新。
至此,pci树中所有pci设备的BAR寄存器,以及pci桥的base、limit寄存器都已经初始化完毕。
参考资料
PCI Express体系结构导读